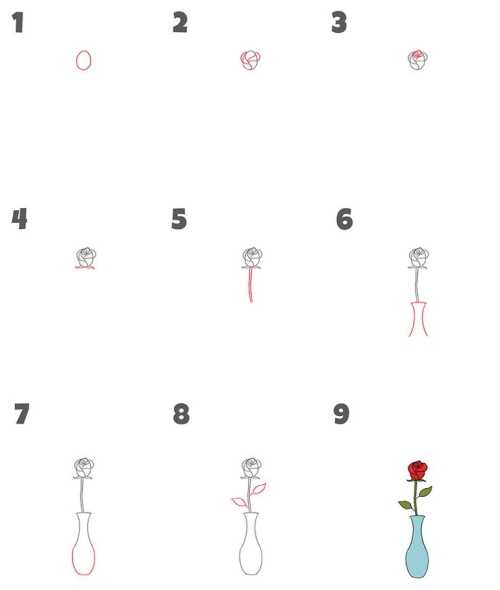
A vase is used to decorate an interior. It can be made of different materials: glass, ceramics, metal. Vases come in a variety of shapes and sizes, from tall and narrow to low and wide.
Its main function is to serve as a vessel for flowers or other decorative elements. The vase is one of the most popular objects for drawing due to its simple shape and variety of materials.
Necessary materials and tools
Pencil drawing is an art that requires attention to detail and careful elaboration of each line. Choosing the right materials and tools will help the artist create works full of life and energy, revealing his creative potential.
| Tools and materials | Brief description |
| Paper | It can be of different types: from regular office paper to special art paper. Paper can have different density and texture, which allows the artist to create various effects and textures. |
| Pencils | They can be hard (H), soft (B) or medium soft (HB). Hard pencils are used to create clear lines and contours, soft ones are used for shading and adding volume, and medium soft ones are used to combine the first 2 functions. Pencils also differ in the material of the lead, for example, graphite or charcoal. |
| Erasers and pens | An eraser is a tool used to erase pencil lines. They come in a variety of shapes and sizes, from simple rectangular to triangular and round. Kneaded erasers are special erasers that are designed to lighten and soften lines, as well as add tones and shades. They have a softer texture and can be used as a stand-alone tool to create soft transitions and voluminous shadows. |
| Stencils | These are sheets with cutouts or holes of various shapes used to create repeating patterns or elements. They can help artists quickly and easily create many similar shapes or lines without having to draw them by hand. Stencils come in a variety of sizes and shapes, from circles and squares to more complex shapes. |
| Rulers, compasses | These are tools that are used to measure and draw straight lines, angles, and circles. Rulers can be simple measuring tools or special rulers for artists, with various divisions and marks for ease of work. Compasses, in turn, allow you to create circles and arcs of a certain size. |
| Sharpeners | These are devices designed for sharpening pencils. They can have different shapes and mechanisms, from simple mechanical sharpeners to electric ones with various attachments. |
Master classes
Artists pay attention not only to the shape and color, but also to the surface texture and materials from which the vases are made. This diversity of shapes and materials gives artists the opportunity to experiment and express their vision of the world through the image of a vase.
Drawing a vase can be a complex process that requires attention to detail and an understanding of composition principles. One of the important aspects when depicting it is the choice of angle and perspective. This affects the perception of form and proportions in the drawing.
To achieve maximum expressiveness, it is also important to consider lighting and shadow. The play of light and shadow allows you to give the drawing volume and realism, making it more lively and interesting for the viewer. In addition, when drawing a vase, you need to pay attention to details.
Even small elements, such as patterns or ornaments on the surface, can significantly affect the overall impression of the drawing. The ability to convey the nuances and features of the vase makes the drawing more accurate and reliable.
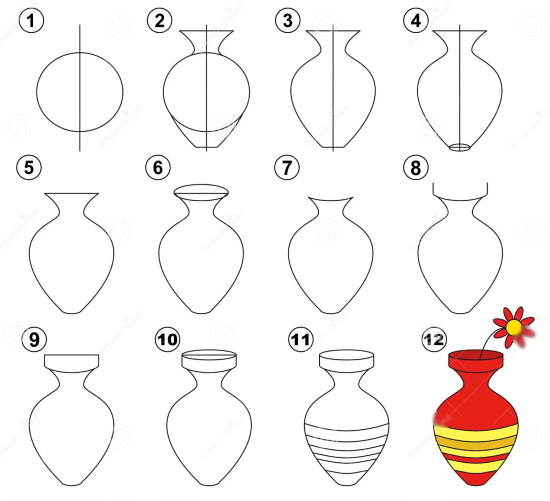
Basic volumetric drawing
The vase in the picture can be created according to this master class, which presents general steps and tips.
They do not require practice or experience, so it is recommended to experiment with different techniques and methods to find the most suitable method:
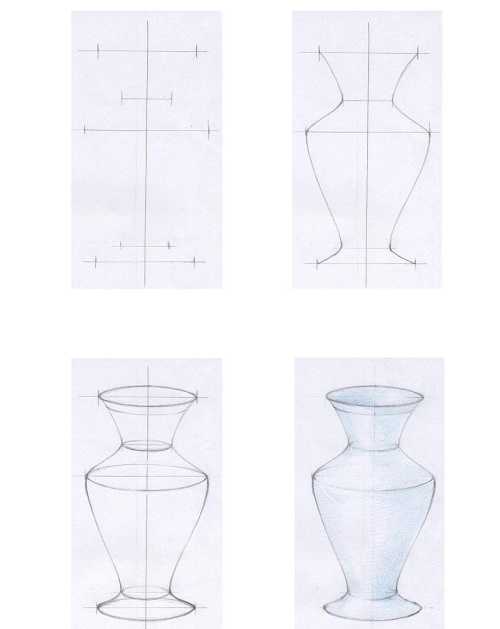
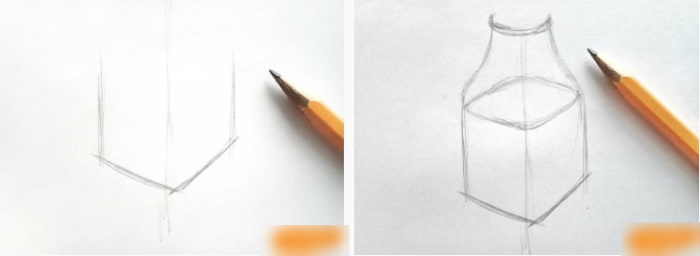
- Divide the sheet in half with a vertical line. This will be the basis for creating the vase. This step is very important for creating the right balance between the elements of the drawing. It allows the artist to focus on each element separately.
- Draw 5 horizontal lines to define the curves of the vase. The lines should be at different levels relative to the base of the vase and of different lengths. Use a soft pencil or pen to draw the base. This will allow you to correct mistakes and add details later.
- Mark the horizontal bend sizes with dashes. They will help you navigate the proportions when creating the outline of the vase.
- Connect the dashes with smooth curved lines. The lines should be beautiful so that the vase looks aesthetically pleasing.
- Add volume to the vase with semicircles. This step will make the vase more realistic and voluminous. The semicircles should be located at the right levels relative to the curve of the lines.
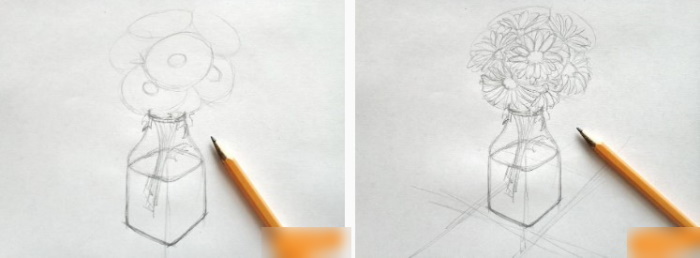
- Erase unnecessary lines. Pay attention to the curvature of the contours, the drawing should be neat.


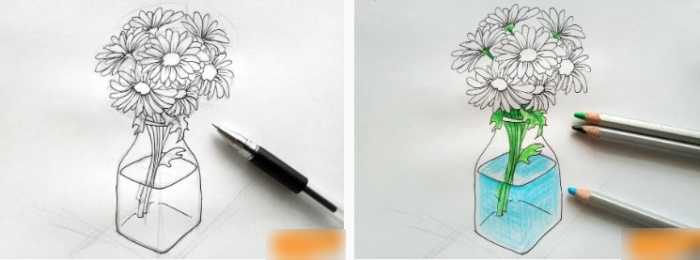
- Outline the vase. The outline should be clear and neat. This will help emphasize the shape of the vase and its details.
- Add shadows and volumetric effects to make the vase look more realistic. Use different hatching directions and vary the intensity of the shadow to create the effect of depth and volume. Observe the gradual transition from light to shadow, avoid sharp contrasts.
In places where the light does not reach, use the darkest shadow. In places with the most intense lighting, use light tones. Examine the vase from different sides and at different angles to make sure that the shadows match the shape and give it volume.
Consider perspective and the location of light sources.
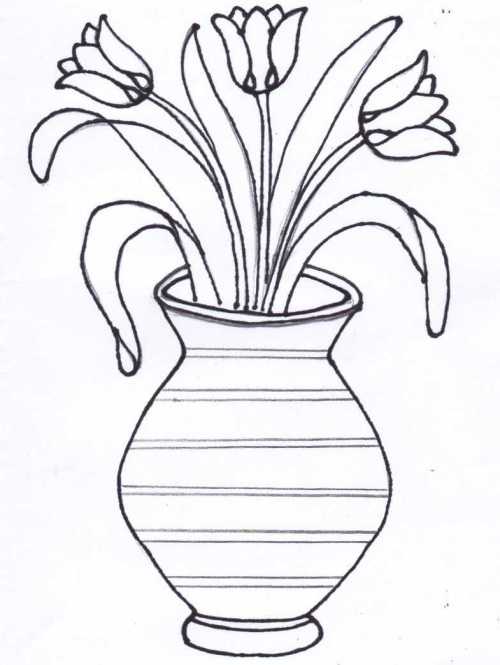
Volumetric with tulips
Using this master class, you can draw a schematic volumetric composition that includes a vase and several half-open tulips:
- Divide the paper into 2 equal parts with a vertical line. This will help organize the space for the image and make the drawing process easier.
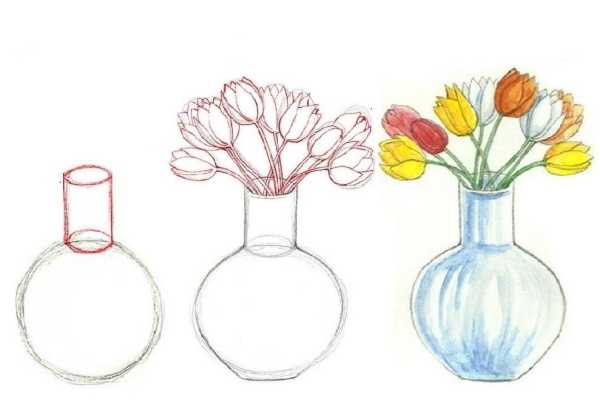
- Draw a circle at the bottom of the left half of the sheet. It will serve as the base for the vase. It is important to make the circle large enough so that it looks harmonious. The circle defines its shape. Its size determines the overall impression of the image.
- Draw an elongated rectangle on top of the circle. It will represent the neck of the vase, located at the top of the circle. Give the rectangle the necessary proportions. The shape of the neck should be proportional to the shape of the vase and not differ too much in size from it.
- Add volume using semicircles around the base. These semicircles should smoothly connect to the neck of the vase. Make sure they are symmetrical.
- Draw several straight lines from the base of the vase upwards. Add curves at the ends, creating volumetric stems of tulips. The stems should be of different lengths to create a sense of depth. Use different line thicknesses to create the effect of shadows and volume.
- Add tulip flowers. Start with the buds at the tops of the stems. Add petals, creating the effect of half-opened flowers. Flowers should be arranged symmetrically relative to each other.
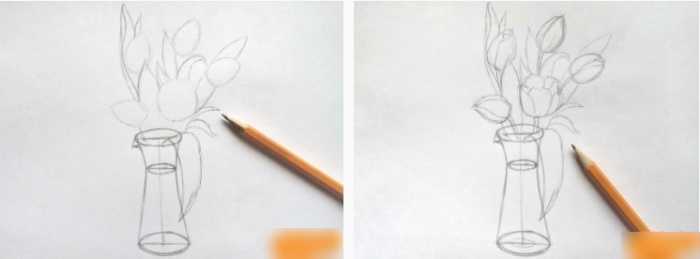
- Remove all unnecessary or inaccurate lines.
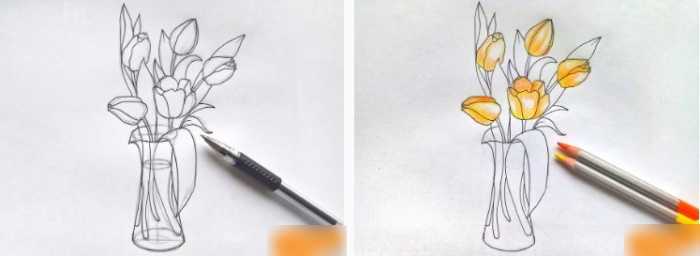
- Emphasize the contours of the composition to enhance the contrast between the elements and the background. Outline the lines of the vase and flowers.
- Use strokes and shadows to create a sense of volume and depth. Shade the surface of the vase and tulips to emphasize their relief.
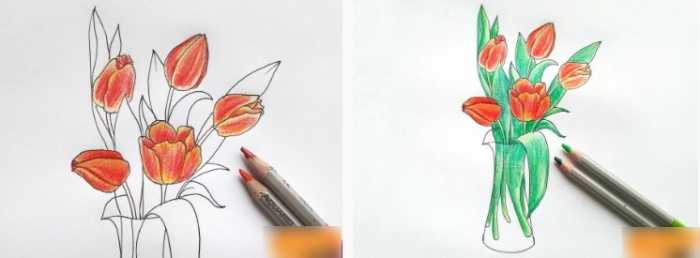
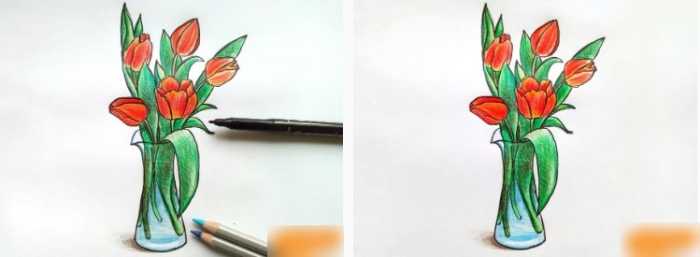
- Choose colors for tulips and color them with colored pencils. Keep shades and color transitions realistic. Pay attention to the shades of petals and leaves. Evaluate the work and make adjustments if necessary.
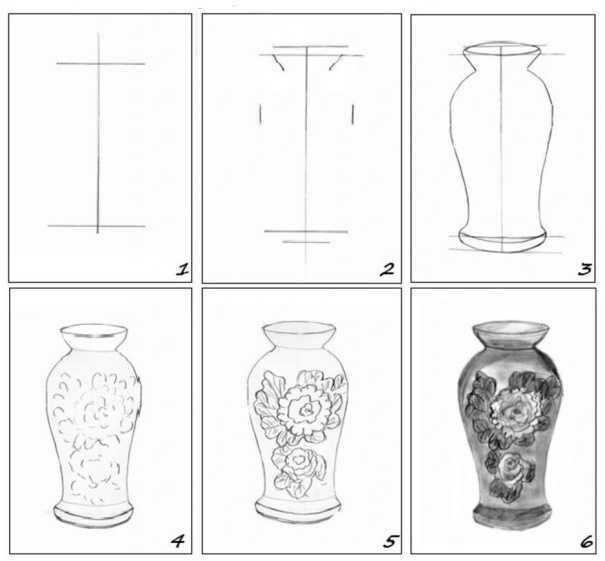
Volumetric with roses
The vase in the picture can be included in a beautiful composition with roses. The step-by-step master class will help to depict it most realistically.
By following simple tips, you can create a realistic and attractive drawing:
- Divide the sheet into 2 equal parts using a vertical line drawn down the center of the sheet. This will help create the basis for the image of the vase and roses.
- On the top half of the sheet, draw 5 horizontal lines that will determine the shape of the vase. They should be located at different distances from each other and have different thicknesses depending on what kind of curves you want to get.
For smoother curves, it is recommended to use thin lines.
- Mark their intersections with thin vertical lines. This will allow you to more accurately determine the angles of the vase bends and make the further drawing process easier.
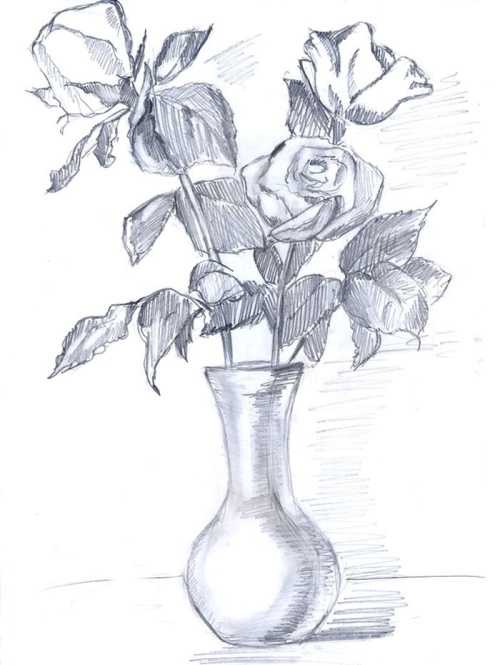
- Using smooth curved lines, connect vertical lines with horizontal ones to create volumetric curves for the vase shape. The curves should smoothly flow into each other, creating a harmonious shape.
- Semicircles will help make the vase more voluminous and realistic. They can be drawn at the top and bottom of the vase to add depth and completeness.
- The stems of the roses can be drawn with thin curved lines coming out of the vase. They should be of different lengths, creating the effect of volume and adding dynamism to the drawing.
- Rose flowers can be drawn inside curved stems, using smooth lines to create petals. They can be partially opened, showing the inside of the flower, which adds realism to the image.
- Rose leaves can be placed on the stems, giving them volume and realism. They should be slightly tilted and slightly different in size, creating the impression of living plants.
- The thorns on the rose stems can be drawn with small sharp dots or strokes along the stem. They add detail and realism to the drawing.
- Remove unnecessary lines and contours that are no longer needed to create the final look of the rose vase. Pay attention to detail and make sure that the lines do not interfere with the perception of the composition.
- Outline the final outline of the vase, stems, and flowers. Outlining creates clear boundaries around an object and can be used to highlight details and give definition to a form. It also serves to enhance the visual effect of volume.
- Using pencils, add shadows and highlights to the vase and roses to create a three-dimensional effect. Consider the contrast of light and shadow to give the drawing depth.
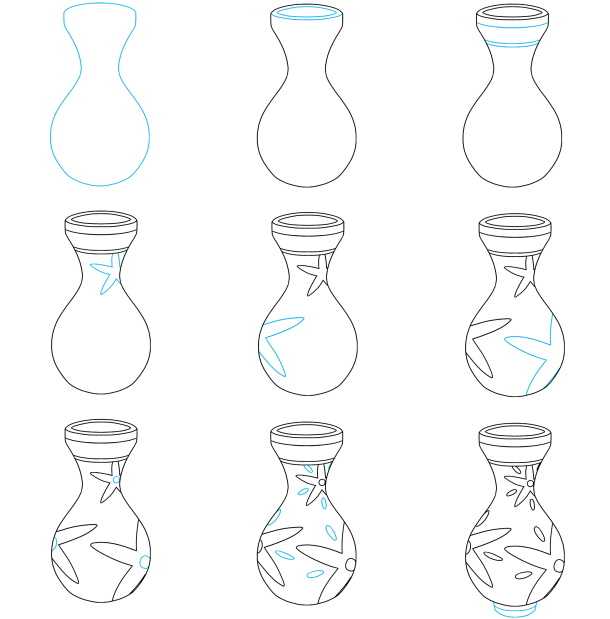
Striped with tulips (simplified version)
The vase in the picture can be created schematically.
An artist can master the basic skills of her depiction with tulips if he follows a clear plan and practices with the help of a step-by-step master class:
- Divide the sheet in half with a vertical line. This will help create a base for the vase and provide balance to the composition. Use a ruler or triangle to ensure the line is straight.
- Draw 5 horizontal lines to define the curves of the vase. The lines should be spaced at different distances from each other. The more curves you plan, the more complex the shape of the vase will be.
- Mark the horizontal bend sizes with dashes. They will serve as a guide for creating the bends.
- Connect the dashes with smooth curved lines. When drawing lines, do not press too hard on the pencil so that you can erase the excess later.
- Use semicircles to add volume to the vase. Make the curves more pronounced.
- Draw the stems of the flowers slightly below the level of the vase, slightly shifting them to the sides from the central vertical line. They should be thin and graceful.
- Detail the drawing, making the flowers half-open. Do not make the petals too large. The tulips should look realistic, but not take up most of the drawing.
- Using light strokes, draw small oval leaves on the stems of the flowers.
- Use an eraser to remove unnecessary lines and make the drawing more neat.
- Trace the drawing with a pencil or pen to make it clearer. Make sure the outline is evenly distributed over the entire surface. Do not press too hard on the pencil to be able to make corrections later.
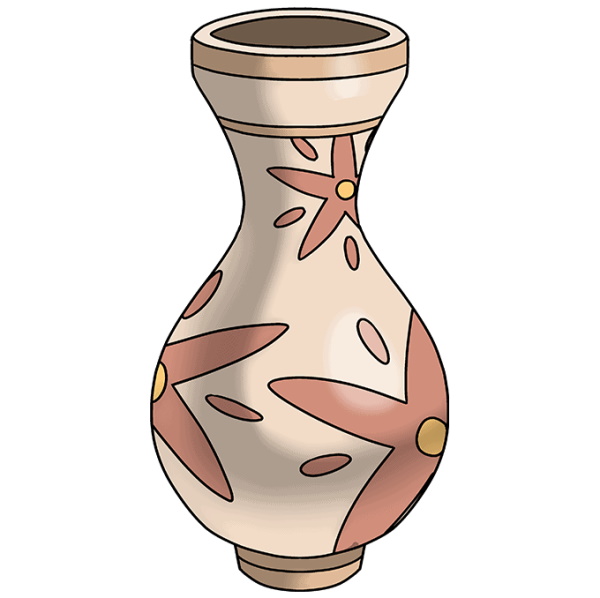
- The drawing can be colored.
Volumetric with flowers on a vase
The following steps will help you draw a vase decorated with flowers in a style close to academic, step by step.
When working on each element, it is necessary to remember about composition, balance and harmony so that the drawing turns out aesthetically pleasing and attractive:
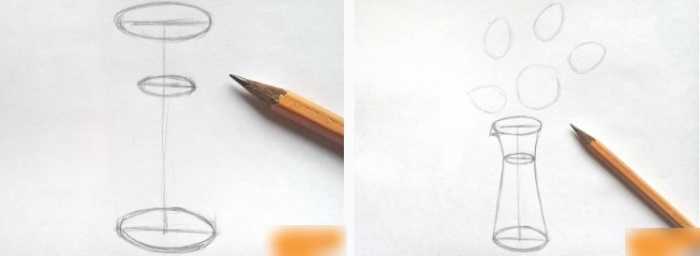
- The vertical line dividing the sheet of paper in half will serve as the axis of symmetry for the vase. Draw 2 horizontal lines defining the top and bottom of the vase.
- Draw 2 more horizontal lines that define the curves of the vase and mark their horizontal dimensions. These lines will help create the basis for the shape of the vase.
- Smooth curved lines connecting the dashes will give the vase shape smooth curves. Add semicircles to add volume effect - this will make it more realistic.
- Erase extra lines. Outline the general outline of the drawing on the vase.
- Draw flowers on the vase, as well as stems and leaves. Erase extra lines and outline the contour.
- Shade the vase to give it volume and realism. Add shadows to highlight the relief of the vase and flowers. They should correspond to the light source in the drawing. Work on the unevenness, strokes, and small details to give it realism.
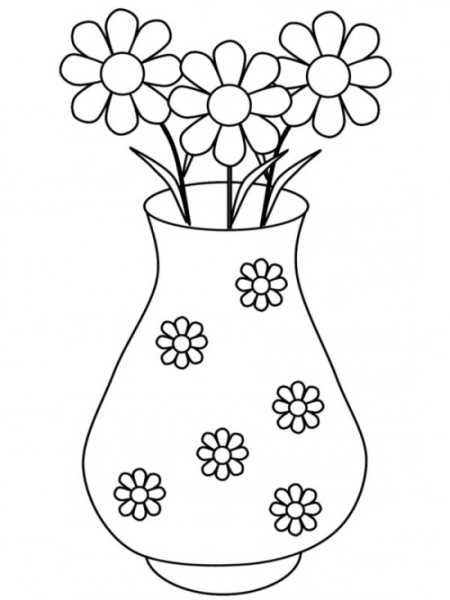
With daisies for the youngest artists
The vase in the picture can be depicted by beginning artists or preschool children. If you follow the step-by-step master class, you will get a picture with daisies.
Changes and additions are allowed to express individuality:
- Divide the sheet in half with a vertical line. This will become the base for the vase.
- Draw 4 horizontal lines that define the curves of the vase. They should be located at different levels relative to the dividing line.
- Mark the horizontal bend sizes with dashes. Pay attention to the fact that they should be proportional to each other and correspond to the vase sizes.
 |  |
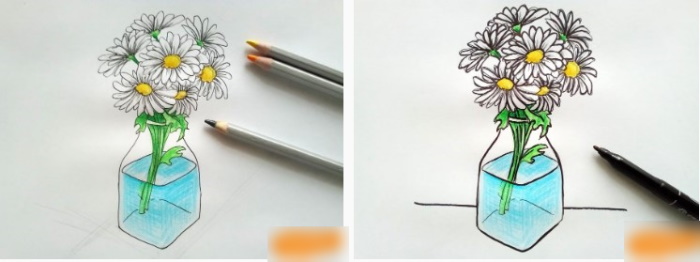
- Connect the dashes with smooth curved lines. These lines will help to give volume to the vase. The lines are continuous, this will give the drawing a natural look.
- Draw a curved line from the top horizontal line to the point where it intersects with the vertical line. This will help give the vase a finished look.
- The stems of the daisies should start from the base of the vase and be of different lengths to create a sense of volume and depth in the drawing. When drawing the stems, use simple lines and avoid complex details.
- Draw circles of different sizes at the top of the chamomile stem. Add small dots inside the circles to imitate the flower petals.
- Remove any unnecessary or erroneous lines using a soft eraser.
- Draw clearer lines around all elements of the drawing to make it more expressive.
- You can color the drawing. Use light pastel shades for the background and rich colors for the vase, daisies and stems.
Tips for Beginners
Drawing a vase requires following certain rules, but also gives the artist room for self-expression and experimentation.
| Stages | Comments and recommendations |
| Definition of composition | Decide how the vase will be placed on the sheet: in the center or diagonally, vertically or horizontally. Determine the proportions and scale of the vase so that it fits harmoniously into the space of the sheet. |
| Creating a contour | Start with a schematic sketch of the basic shapes of the vase. Use soft pencils to draw lines, watch the smoothness of the transitions between elements. Consider that the vase may have different wall thicknesses, so do not make the lines too thick or thin. |
| Working out the details | This stage involves working on small details, such as the neck, handle or pattern on the surface of the vase. Work with soft pencils, gradually strengthening the lines. Make sure that all the elements are connected to each other and form a harmonious composition. |
| Adding shadow and volume | The vase should look voluminous and realistic. To do this, use pencils of different hardness. Soft pencils will help create light areas, and hard ones - shadows. Consider that the light falls from above, so the shadows will be directed downwards and to the sides. Gradually add volume, strengthening the shadows in dark areas. |
| Completing the drawing | Make sure the drawing looks complete and finished. Assess the composition, check the proportions and balance of light and shadow. If necessary, add strokes to emphasize the shape and texture of the vase. |
Drawing different versions of a vase is a fun process that allows you to express your creativity and imagination. You can experiment with different techniques and styles to find a unique approach to drawing it with pencils.
Video about drawing
Vase - drawing: