Protozoa geometric shapes in pencil – the initial stage of drawing any object. This is evidenced by computer modeling. As computer three-dimensional objects include many figures, the image is divided into forms.
Features of constructing geometric figures
Drawing geometric figures with a pencil has the following stages:
| No. | Stage | Description |
| 1 | Model Analysis | It is necessary to imagine the figure as a framework of points and lines. Drawing invisible lines is the main methodological technique that helps to draw complex models. |
| 2 | Outlining lines and vertices | To do this, you need to make light sliding movements with the pencil, without pressing too hard. |
| 3 | Designation of visible ribs | The lines that are visible to the viewer should be drawn in detail. For example, if a ball or a cone is depicted, the edges of the shape should be drawn in detail. |
| 4 | Hatching | It can be used to display the location of shadows. |
Hatching
Hatching is an important element in the depiction of three-dimensional objects. With its help, the artist conveys shadow.
The rules that a beginning creator should remember are the following:
- The hatching is done only according to the shape of the object. Sometimes it is possible to combine hatching, which helps to strengthen the shadow.
- Filling with strokes should start with shadow areas. If it is a cube, then strokes should fill one of its faces, and the edges of the cube will become the border of the chiaroscuro. In the case of a sphere, cylinder and cone, the borders are not clear, but more blurred.
- It is better to give preference to vertical hatching. You should start from the near part and then move further - into the depth of the drawing, while reducing the pressure of the pencil. This makes the stroke lighter and it becomes noticeable how the surface gradually recedes into the distance.
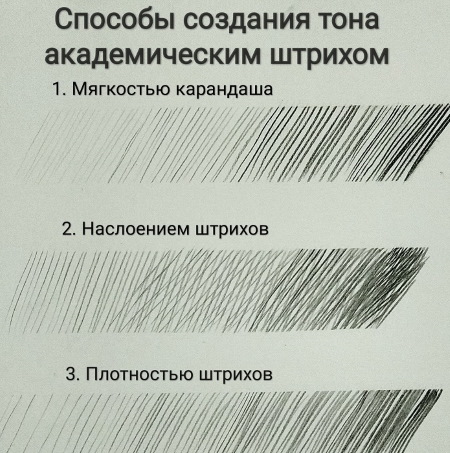
- The illuminated area should be shaded starting from the outside.
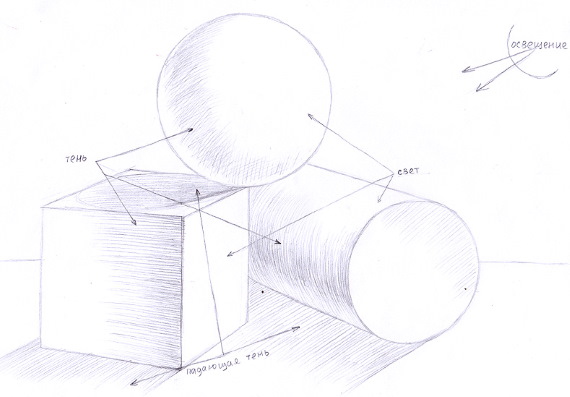
Light and shadow
Any shadow is formed if there is a light source. The artist must determine in advance where exactly this source is located and from which side the rays fall on the object. If difficulties with chiaroscuro arise when drawing, you should practice on a simple version.
You can use one of two techniques - hatching or shading. Before work, it is recommended to turn on the light, which will be directed at the object. It is also important that there are no other, brighter light sources in the room.
A beginning artist should remember that there are the following areas in a drawing:
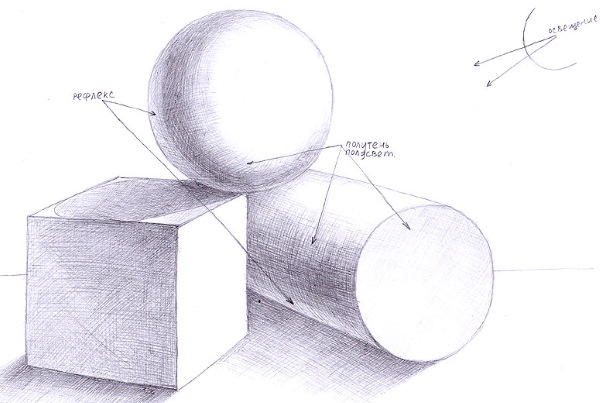
| Plot | Description |
| Glare | The part of the drawing that reflects the light of a lamp or a ray of sunlight. |
| Light | Areas illuminated by rays at right angles. |
| Penumbra | Areas located between light and shadow. They are also called intermediate. |
| Shadow | These are not illuminated areas. |
| Reflex | This is the illuminated area that is obtained from nearby objects. The brightness of the incident light plays a huge role: the brighter it is, the more saturated the shadow will be. |
| Falling shadow | A shadow from a figure onto what is around it. For example, onto a horizontal surface where the figure is located or a wall near it. |

It is important to be able to find the boundary between light and shadow. Its shape depends on the image being drawn.For example, on a sphere this boundary is one, and on a cube - another. The problem of finding the boundary is that it is usually blurred. Rarely it is clear: the brighter the light, the clearer the boundary.
For example:
- if you look at a ball under bright direct rays, you can notice that the border of light and shadow has a bend and looks like an oval;
- in the case of a cylinder, the boundary will turn into a straight line;
- On a cube, this boundary runs straight along the edge.
In fine art, a technique called chiaroscuro is used. It is based on the opposition of illuminated and shaded areas. Under artificial lighting, an environment is created where the light becomes too bright and the shadow is very dark, which adds saturation and sharpness.
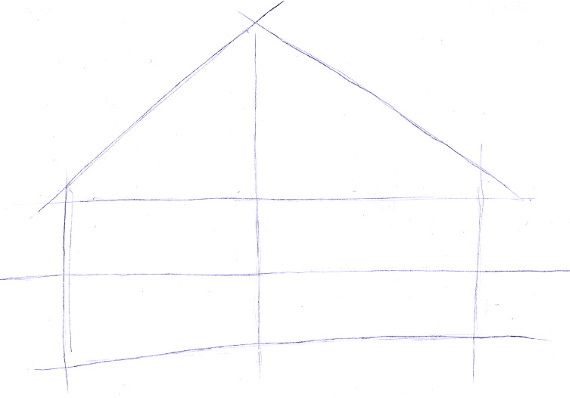
Drawing in Perspective: Cube
When drawing geometric figures with a pencil, you should start with a cube.
Usually a white plaster model is used, on which the light and shadow are clearly visible. It is better to buy a model or make it yourself; it is not recommended to use a photograph.
For the image you need:
- Mark the location of the figure. Place it slightly above the center of the sheet, and it should be moved toward the shadow area. This contributes to the balance of the composition.
- Draw the first vertical line. This will be the edge of the cube closest to the viewer. The notches should limit the height of the cube.
- Draw the base of the figure. You need to start with the visible lines, accurately determining their angles of inclination.
- Draw lines located at the top. Before this, you need to remember the principles of linear perspective. One of them states: the apparent size of figures becomes smaller as they move away. The horizon line is located at eye level, but when the position of the head changes, this line can rise or fall.
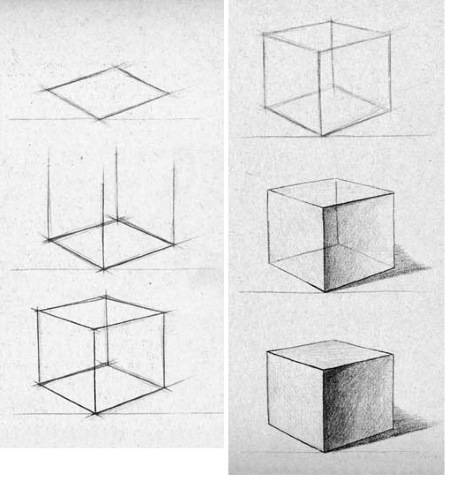
- Determine how the lateral edges of the figure have been reduced.
- Draw the distant lines, not forgetting the lines that are not visible.
- After completing and checking the construction, select the nearest lines. The closer they are, the darker they should be made.
- Carry out shading. First fill the shadow areas with a stroke, and then move on to the illuminated surface. The near corner should be left unshaded, and the far part should be filled with a light stroke.
- Emphasize the volume of the shape by adding tonal accents.
Drawing geometric bodies of revolution
Geometric bodies of revolution begin to be drawn only after mastering the image of a cube. Initially, figures are depicted separately, then they try still life.
To successfully draw complex shapes, start with the image of simple ones. Models can be purchased in a store or made by yourself. For this, cardboard or thick paper is used.
Figures cannot be replaced with photographs: copying three-dimensional figures from a flat surface is meaningless and of no use.
Cone
The word "cone" is of Greek origin. It is translated as "pine cone". The figure was given this name because it resembles a cone or a cap.
In mathematical terms, this figure is a symmetrical body that is formed as a result of the union of rays originating from a single point (the top of the cone) and passing through a flat surface.
The base is a circle. If you place the cone model with its base on a horizontal surface and look at it from the side, it will appear as a triangle.
However, depending on the angle at which the figure is viewed, its lower part can turn into a semicircle, so when depicting a cone, the angle of view should be taken into account. It is also important from which side the light falls on the figure for subsequent shading.
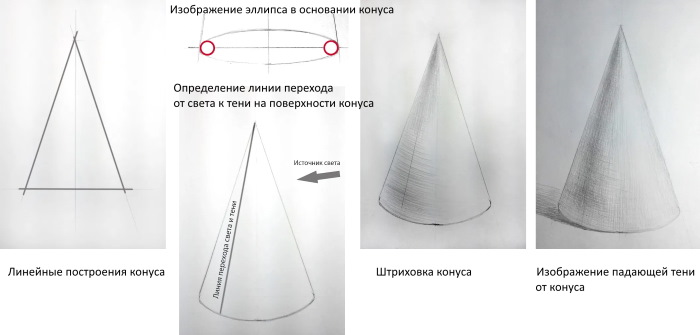
To draw a three-dimensional geometric figure of a cone with a pencil, you should do the following:
- Mark the place and size of the figure, which should not be too small or, on the contrary, too large. The cone is located above the middle of the sheet: its upper part is optically lighter, due to the larger free space.
- Mark the top of the figure and draw a horizontal line. It will act as the axis of the base.
- Mark the width of the base with notches.
- Draw a vertical line through the center of the figure.
- Connect the vertices to the base.
- Visually make the outer lines more distant from the viewer by making them lighter.
- Construct an ellipse: to convey volume, the near part of the oval should be darker.
- Continue working on volume. To do this, find the border of shadow and light at the top of the figure and passing to the base. The upper part of the line should be clear, and its distant edge should be lighter.
- Carry out shading, moving vertically from the top and bringing it to the base. To better convey the form, introduce shading horizontally as well.
- Mark the contrast of light and shadow by making the upper part lighter. From the horizontal surface on which the figure is installed, highlight the shadow part.
Cylinder
The cylinder has 2 bases - at the bottom and at the top. Both of them are circular in shape and absolutely equal in size. The cylinder's generator is a vertical line located perpendicular to the base.

Drawing geometric figures with a pencil in the form of a cylinder is performed in the following order:
- On the sheet, mark the location of the object and use light shading to reveal the volume of the form. Do not press too hard on the pencil, especially when drawing auxiliary lines. It is better to keep the use of the eraser to a minimum.
- Determine the height and width of the figure.
- Draw an axis. It should divide the figure in half.
- Check that the top ellipse is slightly smaller. When looking at the model, it is easy to notice that the top base is less developed.
- Proceed to work with chiaroscuro. Its border is drawn vertically from one base to another. Given the smoothness of the shape change, make the border blurry. The stroke should be vertical. The areas that are removed darken in the light and become light in the shadow. The upper ellipse falls into the penumbra area if the light source is from the side.
- Refine the shape. To do this, use horizontal shading. Since the upper part is close to the light, it should be a little lighter.
Ball
The sphere is considered the simplest figure, and it is not without reason that all planets and stars acquire this shape under the influence of natural forces. However, depicting a sphere is not an easy task.
The first difficulties may arise with drawing a circle, then you have to deal with serious problems that appear when shading.
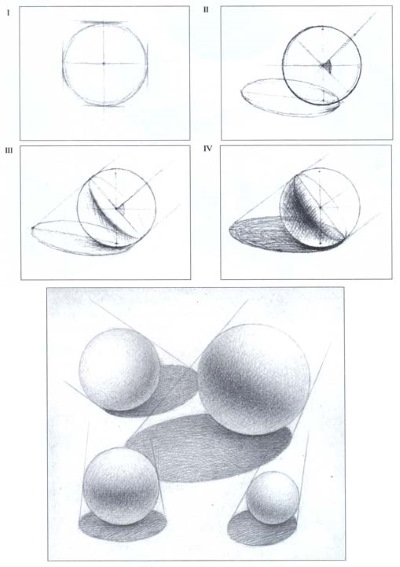
Before work, it is recommended to illuminate the ball model with soft light. In this case, there will be no sharp shadows, which will significantly simplify the task.
The sequence for drawing a ball is as follows:
- Draw a circle that will become the basis of the figure. Draw a straight line in the center of the paper, and put a point in the center of this line. Draw another line through it, perpendicular to the 1st. When drawing these lines, do not press hard on the pencil.
The extreme points of the lines must be connected to form a circle. - Apply shadows. You need to determine where the light comes from and put a dot in the most illuminated part. The width of the shadow should be marked with hatching.
- Draw a diameter through the center of the figure perpendicular to the rays of light.
- Based on the diameter, draw an ellipse. It marks the boundaries of light and shadow.
- The surface of the figure is divided into several areas depending on the degree of illumination. The lightest area is a highlight, it can be left unpainted. Around it is a light spot, and then gradually move on to the shadow. The shadow should be depicted with arched strokes.
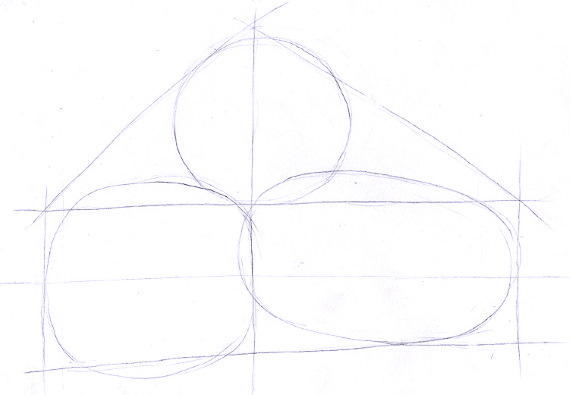

To draw still lifes from geometric shapes you need:
- Prepare 3-4 figures with different characteristics. For example, it could be a cube, a sphere and a cylinder.
- Place the figures and prepare the drape of the fabric on which they stand.
- Set up calm, diffused lighting.
- Choose an angle for copying. It is better if it is frontal.
- Decide on the location of the drawing and get to work.
For a beginner artist, drawing geometric shapes with a pencil is like learning the alphabet for someone studying a language. This training will help later when creating complex shapes and compositions on paper.
Video about drawing geometric shapes
Drawing geometric shapes with pencil: