The first thing that begins knitting any product is forming a typesetting edgeA neatly executed cross-shaped cast-on edge has two advantages. It not only serves as a decoration for knitted clothing or accessories, but is also functional.
Many clothing items need to be elastic to be comfortable to wear. This elasticity is provided by an elastic band consisting of front and back loops.
This article will reveal all the secrets of cross stitch technology.
The table below provides a comparative description of the two most popular methods of creating a typesetting row:
| Type of inlaid edge | Advantages | Flaws |
| Classical | One of the lightest. Universal, suitable for knitting any items of children's, women's and men's wardrobe. Moderately stretchable for elastic and fabrics knitted with satin stitch or with a pattern. | Loses elasticity when frequently stretched (in hats, mittens and gloves, socks, snoods, bibs, cuffs). Not decorative. Twisted in stockinette stitch. |
| Cross-shaped | Decorative.
Can be made in several versions. Does not curl the edge of the front or back stitch. Highly elastic. | More difficult to perform.
Requires additional threading of the ends. More suitable for children's and women's products. |
Using a cross stitch set
The cross-shaped set of loops with knitting needles for elastic, satin stitch or patterns is also known to many knitters as the Bulgarian start. The edges of knitted items, decorated in this way, look especially elegant if the rest of the fabric is made with a monotonous front satin stitch, even without other decorative patterns, embroidery and other decor.
There is no need for beginner knitters to use complex patterns in order to decorate a simple-design item.
A flat garter stitch, knowledge of several rules for forming increases and decreases, as well as the ability to close loops - and a simple knitted item, without intricate lace and patterns, but decorated along the edges with a neat border, acquires a completely different, more sophisticated look.
The art of knitting consists of a thousand subtleties, and one of them – a beautiful cast-on edge – will be discussed below.
The dense, cross-shaped cast-on edge looks especially good on items knitted from thin yarn, including mohair "webs", which remain at the peak of fashion to this day. Such a thickened edge on translucent sweaters creates the impression of a contour framing the sleeves, neck and bottom of the item.
The cross-shaped cast-on edge will further decorate the product if this method is slightly complicated by knitting the next row with yarn overs, alternating them with two loops knitted together. Yarn overs in combination with the Bulgarian start will give the edge of the product the appearance of a delicate miniature border. This design looks especially good on things for small children.
Due to its decorativeness, this design of products is used mainly for women's and children's items. On men's products, the cross-shaped set looks good with 2*2 and 1*1 elastic.
The main property of the Bulgarian zachin method is the high elasticity of the edge. The edge of single-layer cuffs, necklines, the bottom of shoulder garments, the edges of hats and snoods, knitted in this way, retains high elasticity. Horizontal broaches for creating a beautiful edge of elastic bands of this type are most suitable.
Single drawstrings are hardly noticeable, although they make the edge clearer and more even. This is how you can start knitting men's items. Drawstrings from the end of the thread folded in half give the edge the appearance of a roll or thick border. This method is perfect for making children's and women's items, for men's items it is too decorative.
A cross-shaped set of loops with knitting needles for elastic, purl or front surface, and also in combination with patterns is used when knitting many things.
This is how they can be designed:
- headbands, hats, single and double layer;
- mittens, gloves, as well as single- and double-layer mittens;
- bibs, snoods and scarves;
- shoulder items – tops, vests, sweaters, dresses.
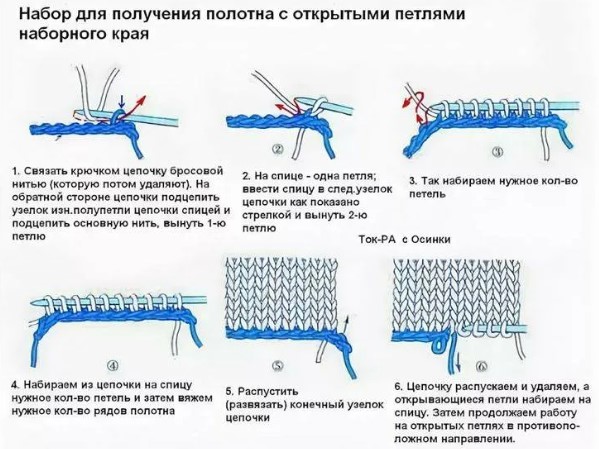
Description of the cross stitch set
The Bulgarian start method is a bit more complicated than the classic one, which is familiar to many knitters. First, you need to understand the structure of such an edge.
The loop that ends up on the needle when casting on consists of a thread that envelops the needle and the braids underneath it. These drawstrings are made single or double. When starting knitting, the end of the thread must be left free. If the drawstrings are made from one thread, then the calculation of the length of its free end and the formation of the first loop is performed in the same way as in the initial stage of knitting.
The free end of the working thread can be double or triple. The length of such a piece of thread folded in half (in three) is the width of the part multiplied by 3 (or 4). That is, when knitting a 20 cm wide shelf, it is necessary to measure 20 cm * 3 = 60 cm from the end of the skein twice for knitting with double drawstrings and fold the measured section in half.
A loop is formed at the bend. The first cast-on loop (single) is caught with the knitting needle on the side opposite the bend of the thread (at the point where its end is located).
If the width of the part is large, then you need to leave the end of the thread free with a length of two widths and add about 30 cm to this value. For example, for a shelf with a width of 50 cm, leave the end of the thread free with a length of 2 * 50 cm + 30 cm = 130 cm.
The first loop can be formed differently - simply by tying a knot with your fingers from a single thread, leaving the end of the second thread free, which will hang freely.
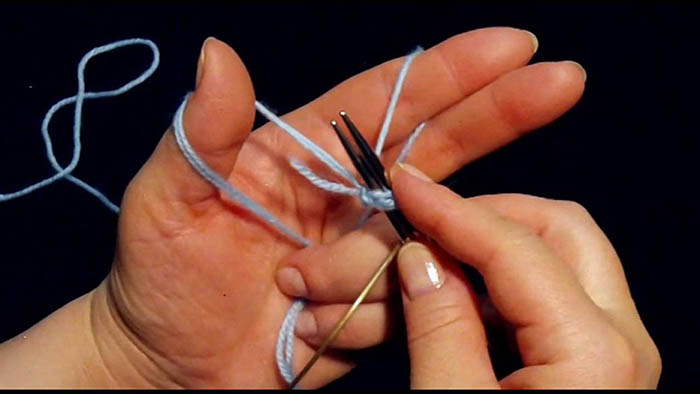
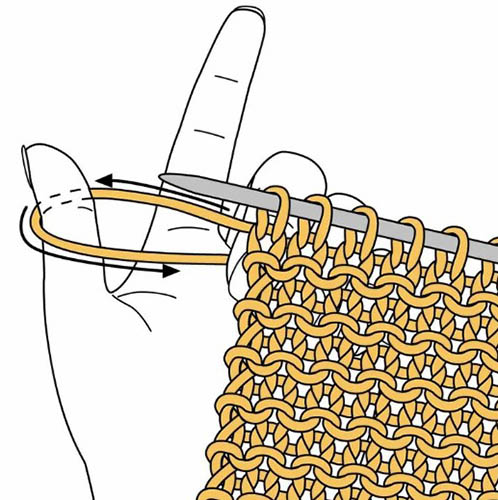
The thread is thrown onto the straightened fingers of the left hand (thumb and index). The starting point of the set, where the first loop will be caught, is between the fingers. The only difference from the classic method is that the thread can be thrown onto the thumb in several folds.
The single thread going to the skein is located on the right side of the index finger, the end of the thread or the thread with a loop of the bend at the end is on the left side of the thumb. Both threads - the working one from the ball and the one that will form the broaches - are pressed to the center of the palm with the other three fingers.
To make the edge as elastic as possible, you need to cast on the stitches more freely than with the classic method. That is, leaving a gap between adjacent stitches the width of the thickness of 1 stitch.
Casting on two needles or on a working and additional needle one full size or number smaller also helps to maintain elasticity when knitting tightly. When casting on too tightly, the elasticity of the edge is lost.
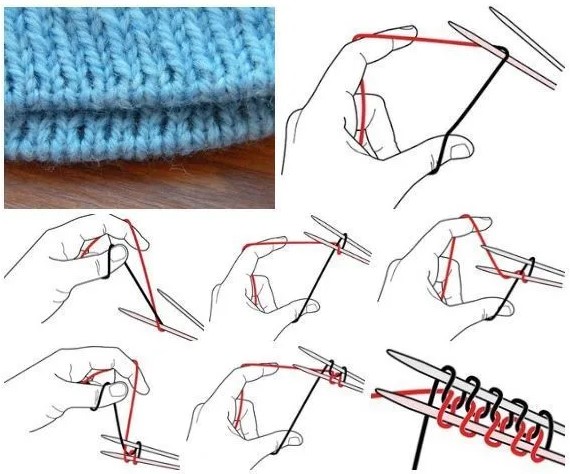
Like any other cast-on method, the Bulgarian cast-on begins with the formation of the first stitch. It can be made on the needles, as in the classic cast-on row, or as a sliding stitch with the fingers, and then put on the needle.
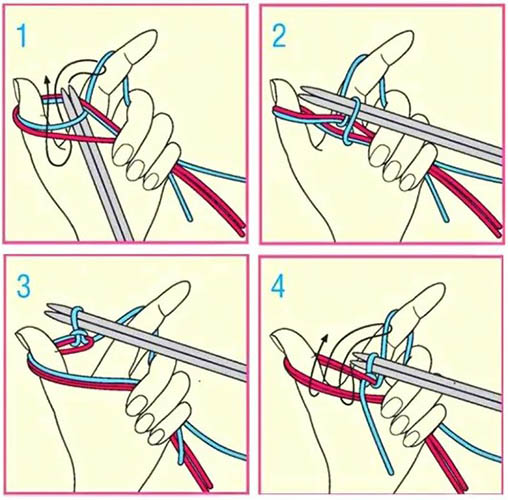
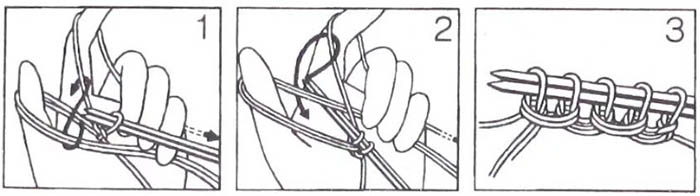
Then alternate two movements:
- The second loop is formed in the same way as with a regular set. — the needle with the first loop cast on is inserted under the thread to the left of the thumb, passes over the thread to the right of it, grabs the thread to the left of the index finger and pulls it through the resulting loop around the thumb. That is, after grabbing the thread, the needle moves in the opposite direction to the initial position. At the end of the needle movement, the thumb tightens the loop, moving under the thread of the free end and moving from the bottom up. Thus, the thread, grasping the thumb, ends up thrown over in the right position in order to correctly make the next movement.
- The next loop is formed differently – the knitting needle is inserted from above into the loop around the thumb, passes under the thread to the right of it, grabs the thread to the left of the index finger and is brought out in the opposite direction. The resulting loop must be tightened with the thumb as in the classic set – placing it behind the thread of the free end and moving from top to bottom.
You can tighten the loop using the usual technique for the classic version, but then you will have to throw the thread around your thumb, swapping the sides of the loop. This takes a little more time.
Having done the set several times according to the algorithm described above, you can bring the process to automatism, and it will not be inferior in time to the classic version of starting knitting.
This set of loops is called cross-shaped because of the alternation of the loop walls (left - right) around the thumb, under which the working needle is inserted. For an elastic band knitted from single or paired purl and face loops, a drawstring covering two adjacent loops serves as a very successful design.
If you use a double-stranded thread when casting on, then after the new loop on the needle is formed, the double-stranded end of the thread should be tightened as carefully as possible, without rushing or tugging it. Then the horizontal pull under the needle, covering two loops, will be very neat.
Both threads in this drawstring will be evenly stretched, and therefore equal in thickness. And at the same time, it is advisable to ensure that the two threads do not twist when tightening, slightly straightening them. This little secret will allow you to achieve an exceptionally neat edge.
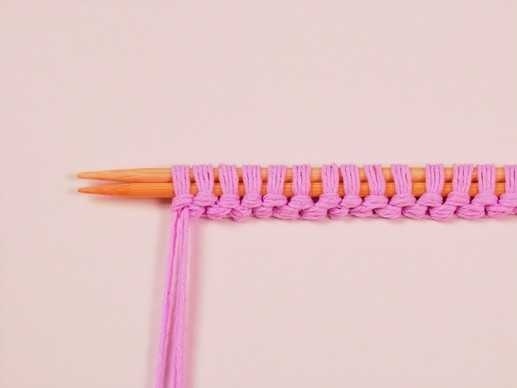
It is worth spending a little more time than usual when casting on - and it will become an additional decoration of the knitted item. A flawless edge, both cast on and final, immediately attracts attention and is an indicator of high quality work.
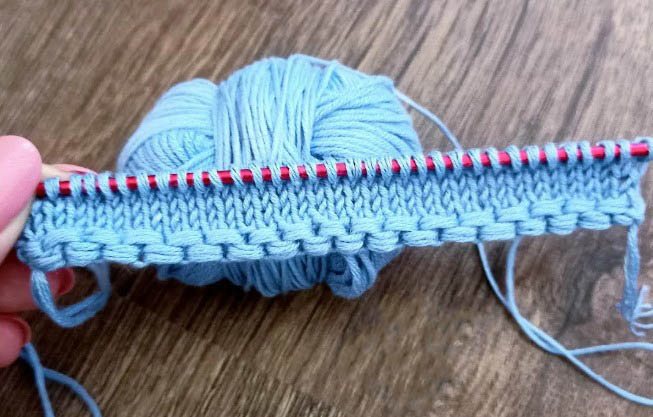
The cross-shaped set of loops with knitting needles for ribbing can be turned to the front with either side. The appearance of the edge will be different, since in front of the knitting needle long broaches are formed, covering two adjacent loops, and behind the knitting needle - short broaches around each loop.
If you start knitting the front side immediately after casting on, the edge (the side with the drawstrings that form behind the needle during casting on) will be less pronounced, but if you knit the second row of the set-up purl stitch, the front edge (the drawstrings that form during casting on in front of the needles) will take on the appearance of a more voluminous roll.
Many knitters do not like to tuck in the ends of the threads. If a small or structurally simple knitted product does not require much time, then pockets, strips, frills knitted from the armhole of the sleeve, and from the neck - hoods and collars leave a lot of untucked threads. With the Bulgarian tuck in, even more work is added.
When casting on crosswise, there are 3 ends left on a double thread. One - as in a classic cast-on row, and two from the loop remaining at the end of the row, which will need to be cut in order to tuck it invisibly under the walls of the loops and the drawstring.
For perfectionists who want to make the back of the product as “clean” as possible from excess threads and thickenings after threading, we can recommend one method.
It will take more time to cast on stitches, but will speed up the final stage of knitting.
- In order to get rid of the double thread loop remaining at the end of the cast-on row, which forms the broaches, you need to find its exact length. This can be done by simply casting on the loops on the knitting needle several times and reducing the section of the doubled thread by the length of its end that remains free. The last loop of the cast-on row will be the loop at the end of the doubled thread. It may be slightly larger than the others, but due to the elasticity of such an edge, the difference will be leveled out either immediately after wet-heat treatment, or you can simply stretch the edge a little several times.
- To make it easier to cast on the last stitches, when the double thread becomes too short and cannot be held with the fingers, an additional thread is attached to it by pulling it through the loop. After putting the last stitch of the cast-on row on the knitting needle, the temporary thread is removed.
Double thread set
It is very convenient to use the Bulgarian start method for knitting double-layer items. Headwear, snoods, scarves and mittens with the help of a cross-shaped set of loops will not only be decorated with a decorative border, but also when knitting such accessories with a double thread in the Bulgarian start, the loops of the initial row of the inner layer are immediately formed.
The difference when knitting with a double thread is that on the needle not only the drawstrings will consist of two threads, but also the loops cast on to the needle. That is, when casting on, the drawstrings covering 4 threads are visible in front of the needle.
For this, not only the section intended for the drawstrings (located to the left of the hand when casting on) must be double, but also the section of thread that goes to the ball (to the right of the hand). After the cast-on row, the loops are divided, removing every second one onto a waste thread.
Then they begin knitting the front side in the chosen way, and then the back side, having first returned the loops from the temporary thread to the knitting needles.
How to make for elastic (1*1 or 2*2)
Casting on stitches on knitting needles for 1*1 or 2*2 elastic is done in the manner described above.
You just need to take into account the pattern repeat.
- The number of stitches in a cast-on row must be a multiple of 2 for an elastic band in which 1 front and 1 back stitch alternate.
- For a 2 x 2 elastic, the number of stitches cast on must be divisible by 4.
This rule applies to both rotary and circular knitting. You can choose which side will be the front side - although the ribbing looks the same from the front and back, the cross-shaped edge of the front side is more embossed.
For knitting the stocking stitch
The cast-on method for the stockinette stitch does not have any differences. The edge loops are cast on in the manner described above. The stockinette stitch, which does not have a rapport (more precisely, the rapport of this pattern is 1 front loop), can be knitted from a cast-on row with any number of loops.
The Bulgarian start for the stockinette stitch is convenient for several reasons:
- the edges of such a thing do not curl,
- in contrast to the monotonous knitting of the fabric, its edges look expressive,
- the edges of the parts retain elasticity.
You can diversify the design of the stockinette stitch by using a Bulgarian starter with yarn of a contrasting color or a different texture from the main thread.
There are many ways to add variety to a knitted item using the garter stitch:
- single, double or triple pulls,
- using the front side of the cross-shaped set or its back side,
- replacement of the installation purl row, following the cast-on row, next to the yarn overs.
By approaching the process creatively and remembering that seemingly inconspicuous details like a cast-on edge can become the highlight of a knitting project, you can create a thing that will elicit compliments from others and a desire to repeat the design even among experienced craftsmen.
Bulgarian start in circular knitting
When knitting in the round, the stitches are cast on to the needles in the same way as for turning knitting.
Closing into a circle can be done in different ways:
- As with the classic set - pull the last loop of the row (on the left needle) through the first (on the right) and return it to the left needle. For this method, when calculating the loops, you need to add another one to close the knitting in a circle.
- Pull the last loop of the row (on the left needle) through the first two loops (on the right) and return the loop to its place.
Tips and tricks
Several tips from this section will help you make the highest quality cross-shaped set of loops with knitting needles for elastic band framing the edge of the product or its parts.
To get a perfect (or close to perfect) cast-on edge, experienced knitters recommend:
- Use high-quality yarn, especially bobbin yarn consisting of several threads. This will make the cast-on edge more beautiful, even if the loops were not cast on quite evenly. After a properly performed wet-heat treatment, the loops themselves will straighten out a little. A particularly good effect is given by yarn that “opens up” after washing, like cashmere or blends containing cashmere. Light fluff will “hide” minor flaws.
- To make a knitted item look harmonious, along with the cast-on cross-shaped edge, you can use a closure that imitates it. This advice does not apply to hats and mittens, gloves with closed fingers, but will be useful when knitting mittens, snoods and bibs, various shoulder items - summer, winter and off-season.
- Fluffy yarn or bobbin yarn in several folds do not require careful monitoring of the behavior of the thread when tightening the loops of the cast-on row. The fluff will hide the unevenness, and with three or more folds of the working thread, especially thin, there is no point in monitoring their mutual arrangement.
The crosswise method for the set row is quite easy to master. The above tips on using such an edge and the subtleties of knitting with the Bulgarian start will certainly help to create a beautiful and comfortable to wear thing. Even edge loops and a well-stretched elastic band are an indicator of the high quality of knitted things.
It is worth learning and consolidating in practice the techniques described above - and the quality of finished works knitted for yourself, as a gift or for sale will noticeably improve.
Video about knitting