Beautiful drawings, designed to teach children basic fine art skills, should consist of simple geometric shapes (circle, square, triangle, etc.) and straight lines. One such example is the sun, which can be depicted in many ways, depending on the age of the young artist, as well as his abilities.
Using a pencil
It is recommended to draw the sun (a drawing for children can be either colored or black and white) with colored pencils like this:
| Sun drawing option for kids | Recommended workflow algorithm |
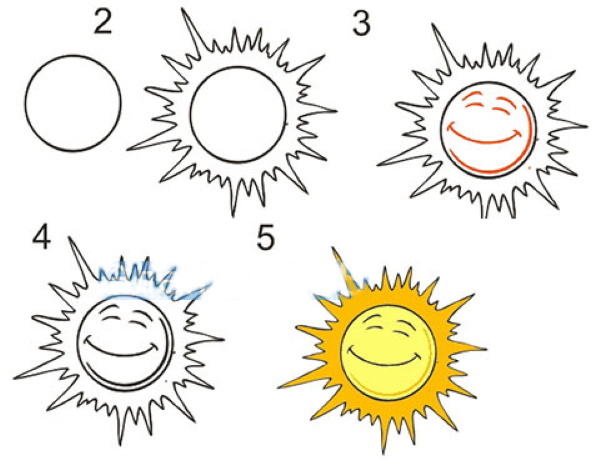
| 1. In the middle of the working plane you need to draw an even circle. 2. Stepping back 2-3 cm from the main outline, draw another circle that exactly follows the curves of the border of the inner circle. 3. Correct the outer contour, transforming it into a wavy line with sharp bends. 4. Inside the smaller circle, draw 2 small semicircles curved upwards (eyebrows) at the top. 5. Step back 1 cm from the eyebrows, and then draw 2 more semicircles with an upward bend at the same level (eyes). 6. Stepping back 4-5 cm from the eye level, draw a long semicircle curved downwards (mouth). At the extreme points of the mouth, draw short semicircles, placing them vertically. 7. Inside the smaller circle, duplicate the right border of the main figure. 8. Colour the drawing with yellow and orange pencils. | |
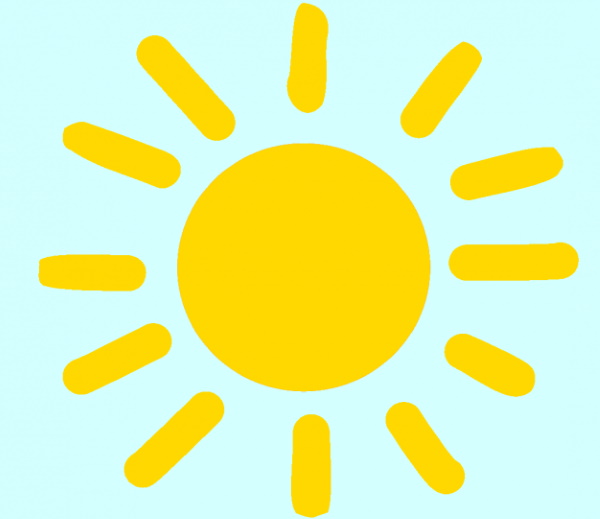 | 1. Draw a medium-sized circle in the middle of the sheet of paper you are using.
2. Color the inside of the circle with a yellow pencil. 3. Step back 2-3 cm from the main outline and draw several straight lines at the same distance from each other (sun rays). Instead of straight lines, it is acceptable to draw elongated rectangles or ovals. 4. Color the inner part of the rays with a yellow or orange pencil. 5. If the main drawing was painted over with yellow, it is recommended to re-draw the outline of its component parts with a contrasting pencil, for example, orange or red. |
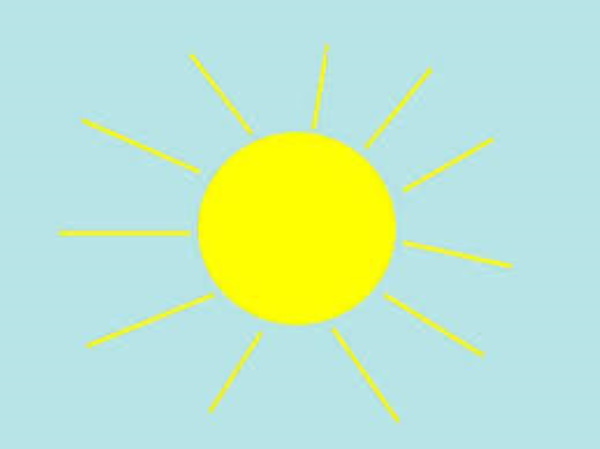 | 1. Paint the work surface light blue or blue.
2. In the middle of the sheet of paper used, draw an even circle, then color it with a yellow pencil. 3. From the main outline, along its entire length, draw straight lines of the same size, directed in different directions (rays). The straight lines should be located at the same distance from each other. |
With the help of paints
The easiest way to draw the sun with paints is like this:
| Sun drawing option for kids | Recommended workflow algorithm |
 | 1. Mark the horizon line using a horizontal line so that the working plane is divided into 2 equal parts. 2. Step back 1 cm from the bottom border of the sheet of paper you are using, then draw a horizontal line with smooth curves in the indicated area (the border of the seashore). 3. From the horizon line, draw a semicircle curved upwards, placing it at any point of the dividing line (the outline of the sun). 4. Paint the top half with yellow and orange paint, making the border between the shades blurry. |
 | 1. Determine the middle of the working plane.
2. After applying a sufficient amount of paint to a previously moistened brush, draw a spiral with any number of bends in the center. 3. Step back from the border of the main contour of the sun 1-2 cm, depending on the format of the sheet of paper used, then use strokes to depict the rays of the sun. The rays can be of any length and width, but they must be located at exactly the same distance from each other. |
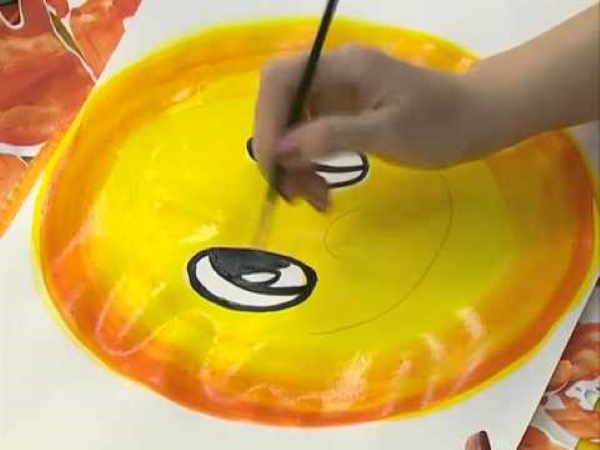 | 1. On the sheet of paper you are using, draw the outline of the sun (a large circle), filling most of the working surface with it.
2. Outline the outline with orange paint, then paint the inside of the main shape with yellow paint. 3. Let the paint dry, and then draw 2 identical ovals inside the circle, placing them at the same level (eyes). 4. Divide the inner part of the eyes into 2 halves with a semicircle, placing it vertically. 5. Detail one of the parts inside the contour of the sun’s eyes, adding pupils and highlights. 6. Step back 2-3 cm from the eye level and then draw a semicircle curved downwards in the indicated area (the mouth of the sun, stretched into a smile). |
With a cute face
The sun (a drawing for children is best created in the style of a cartoon character) is often drawn by children with a cute face.
The simplest algorithms for creating such images are:
| Sun drawing option for kids | Recommended workflow algorithm |
 | 1. Draw an even circle in the middle of the surface of the sheet of paper you are using, filling most of the working surface with it. 2. From the upper edge, draw several ovals inside the image, the borders of which should be slightly curved. Place them at the same distance from each other (bangs). 3. Step back 1-2 cm from the drawn bangs, then draw 2 semicircles curved upwards at the same level. 4. From the semicircles, draw another semicircle, strongly curved upwards (eyes). 5. Divide the inner part of the drawn eyes into 2 halves with a slightly curved vertical line. One of the halves must be colored. 6. From the upper borders of the eyes, draw several smoothly curved lines (eyelashes). 7. Between the eyes, 2-3 cm down, draw a small semicircle with an upward bend (nose). 8. Draw the mouth of the sun under the nose using 2 semicircles located 1 cm apart from each other, the edges of which should be located at one point. |
 | 1. In the middle of the sheet of paper you are using, draw an even circle, the inside of which must be colored yellow.
2. Inside the circle at the top, draw 2 small semicircles (eyebrows). 3. Draw small triangles under the eyebrows, placing them at the same level (eyes). The inner part of the figures should be painted in a contrasting color. 4. Between the eyes, draw a semicircle with a bend to the left, placing it vertically (nose). 5. Place a lot of dots under the eyes in a chaotic order (freckles). 6. At the bottom of the inner surface of the circle, draw a semicircle curved downwards, and from its extreme points draw another curve, the bend of which should be 3-4 times stronger than the bend of the first (mouth). 7. If desired, detail the drawing of the sun’s mouth by drawing the tongue and teeth inside. 8. At a distance of 2-3 cm from the main outline, draw ovals of different sizes, one of the ends of which should be pointed (rays). |
With rays
The sun with rays is considered a classic drawing, with which children begin to learn the basic skills of fine art.
The simplest algorithms for creating such an image look like this:
| Sun drawing option for kids | Recommended workflow algorithm |
 | 1. Draw an even circle in the middle of the sheet of paper you are using. 2. Step back from the main outline 2-4 cm, depending on the format of the paper sheet used. At the specified distance, draw a zigzag line, the bends of which should be different, but periodically repeating (rays). 3. Paint the distance between the outline of the main figure and the rays yellow. 4. At the top of the inner surface of the circle, draw 2 small semicircles, placing them at the same level (eyebrows). 5. Draw 2 identical circles under the eyebrows, 2-3 cm away. 6. Inside each of the circles, draw another circle of a smaller size. 7. Paint the inner part of the smaller circle, leaving a small area white – the highlight (eyes). 8. Draw a small oval between the eyes, placing it vertically (nose). 9. Draw a semicircle curved downwards under the nose (mouth). 10. If desired, add detail to the picture by adding freckles, hands, or hair to the sun. |
 | 1. In the middle of the working plane, draw a medium-sized circle (the main outline), the inner part of which must be painted yellow.
2. Draw 2 large ovals or circles (eyes) inside the circle. Divide the inner part of the eyes into 2 parts using a slightly curved horizontal line. The upper part should be painted dark, leaving one small area (glare) unpainted. 3. From the borders of the drawn eyes, draw several smoothly curved lines (eyelashes). 4. Draw a horizontal line under the eyes. 5. From the horizontal line, draw a triangle downwards, slightly rounding its corner (mouth). Detail the image by drawing the teeth and tongue (optional). 6. From the main outline, along its entire length, draw several triangles with slightly rounded corners, placing them at the same distance from each other (rays). 7. Fill the inner part of the triangles with curves located in a chaotic order. 8. Colour the picture using yellow, red and orange colours. |
With unusual rays
The sun (it will be more interesting to create a drawing for children if you slightly diversify the standard lesson algorithm) with unusual rays can be drawn in several ways.
Namely:
| Sun drawing option for kids | Recommended workflow algorithm |
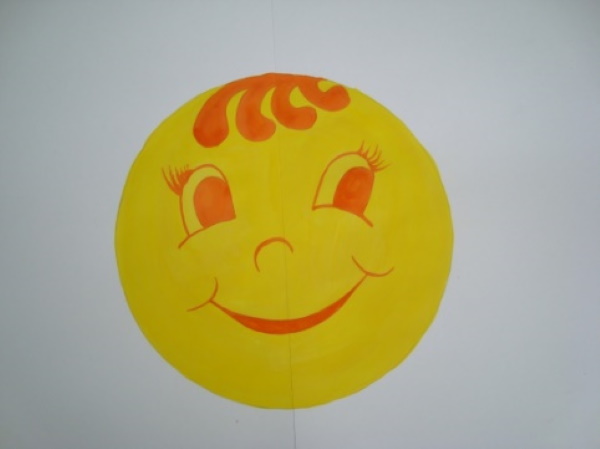
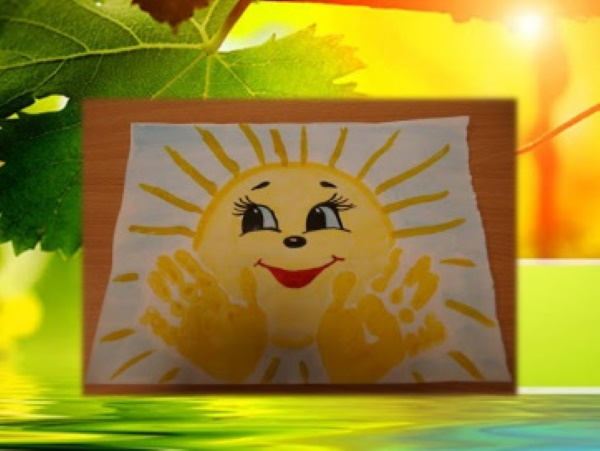
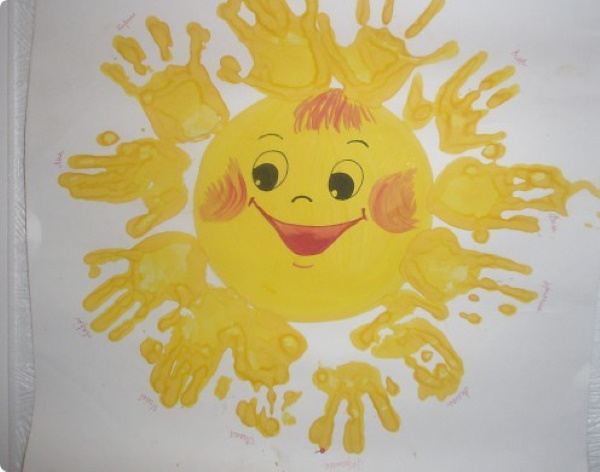 | 1. Draw a large, even circle in the middle of the work surface, then paint it yellow. 2. Let the paint dry on its own. 3. On the inner surface of the main figure, use pencils to draw the bangs (many lines located close to each other in the upper part of the image), eyebrows (2 semicircles), eyes (2 identical ovals located at the same level, the inner part of which is divided into 2 parts using a slightly curved line), mouth (2 semicircles curved downwards, located at a distance of 2-3 cm from each other, the edges of which are at one point), cheeks (2 pink semicircles located on the side surface of the inner plane of the drawing). 4. To draw the rays, in this case you should spread yellow paint over the inside of the child’s palms. 5. Place the bases of your palms close to the outline of the drawing and make several prints (sun rays), re-applying paint to your palms if necessary. |
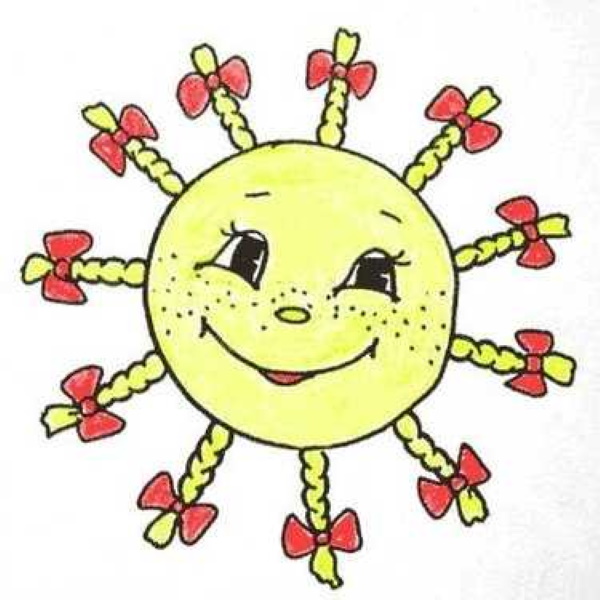 | 1. Draw a circle, filling most of the work plane with it. The inner part of the circle should be painted yellow.
2. Inside the outline of the main figure, you need to draw 2 smoothly curved semicircles (eyebrows). 3. Under the eyebrows, you should draw the eyes (2 strongly curved upward semicircles, drawn from straight lines), the nose (a small oval located between the eyes) and the mouth (a semicircle curved downwards, located at a distance of 3-4 cm below the nose). 4. If desired, the drawing can be detailed by depicting freckles, tongue, eyelashes. 5. From the outline of the main part of the drawing, draw a set of curved lines of the same length, grouping them by 2. The bends of the lines should be minimal, even and symmetrical (braids). 6. Draw bows on the edges of the rays using 2 isosceles triangles, the upper corners of which should be directed in opposite directions. |
With clouds
A more complex version of the sun drawing is to complement it with images of clouds.
You can create such a composition like this:
| Sun drawing option for kids | Recommended workflow algorithm |
 | 1. Draw a medium-sized circle in the left corner of the working plane. 2. Color the inside of the circle yellow. 3. Inside the outline of the main figure, it is necessary to depict 2 semicircles curved upwards (eyes), and between them, at the bottom of the inner plane, draw a mouth (a straight horizontal line from which a semicircle is drawn downwards). 4. If desired, the image of the sun can be detailed by drawing cheeks, tongue or teeth. 5. Step back 2-3 cm from the main outline and draw several semicircles of the same size (rays). 6. In the center of the working plane, draw a cloud so that the upper left part of this figure covers a small area of the sun image. 7. Inside the cloud, draw 2 semicircles curved upwards (eyes), drawing cheeks and a smiling mouth underneath them as indicated in point 3. |
 | 1. Draw a large cloud in the middle of the sheet of paper you are using. The outline of the main object should be represented by smoothly curved lines.
2. Inside the cloud, in its upper right part, draw a semicircle (the outline of the sun). 3. Inside the outline of the semicircle, draw 2 small downward-curved semicircles located at the same level (eyes), between them - a triangle (nose), and under the nose a mouth (a long, downward-curved semicircle). 4. Step back 2-3 cm from the outline of the sun and draw the rays using short thin lines. 5. Color the picture. |
The sun on the palm of your hand
The sun (a drawing for children can also be drawn as a source image, which the young artist will need to copy later) can be drawn on a patushka like this.
Table:
| Sun drawing option for kids | Recommended workflow algorithm |
 | 1. The working plane must be divided into 2 halves using a horizontal line. 2. From the lower left corner of the sheet of paper used, draw 2 straight lines, directing them towards the center of the working plane. 3. From the extreme points of the lines, draw horizontal lines of different lengths (the upper one should be longer than the lower one), and then connect them together (a person’s palm). 4. On the upper edge of the palm, draw a circle of small diameter (the sun). 5. Colour the drawing. The lower part of the working plane should resemble the sea, the upper part – the sky, and the sun, using different shades of yellow, is recommended to be painted so that there is a semblance of a glow from its rays around it. |
 | 1. Spread yellow paint evenly over the surface of the child’s palms, then leave handprints on the lower part of the working surface, placing the palms with the bases facing each other.
2. Draw a semicircle between your palms so that its extreme points lie on the side edges of the prints. 3. Inside the contour of the sun, you need to draw 2 semicircles of the same length, located at the same level (eyebrows). 4. Under the eyebrows, draw the eyes with 2 semicircles. The inner part of the eyes should be detailed by painting one of the parts of the space formed by the vertical line (pupils). 5. Draw a small oval (nose) between the eyes. 6. Under the nose, stepping back 2-3 cm, draw 2 semicircles, the edges of which are located at one point (the mouth of the sun). 7. From the contour of the sun, draw an arbitrary number of lines, placing them at the same distance from each other (rays). |
Sunrise
A picture of a sunrise can be drawn by children aged 7-9, provided they have basic fine art skills. It is not recommended to set such a task for younger artists, so as not to cause negative emotions in children regarding creativity (denial may be associated with insurmountable difficulties arising in completing the task).
| Sun drawing option for kids | Recommended workflow algorithm |
 | 1. Mark the horizon line with smoothly upward curved lines (the boundaries of the hills). 2. From the dividing lines, draw a semicircle (sun) that fills the maximum space of the upper part of the working plane. 3. Draw 2 small ovals at the bottom inside the sun outline, placing them at the same level (eyes). 4. Stepping back 2-3 cm from the outline of the main object, draw 2 more semicircles, exactly repeating the curves of the first (the glow of the sun). 5. Draw several straight lines from the outer semicircle, placing them at the same distance from each other (rays). 6. At the bottom of the working plane, draw another semicircle (hill), extending it from the bottom border of the sheet of paper used. 7. Below the horizon line, sketch out the outlines of trees, paths, lakes, and so on. |
 | 1. From the lower boundary of the working plane, draw a semicircle curved upwards (hill).
2. Paint the inside of the hill green. 3. From the semicircle, draw another semicircle with a large upward bend (the sun). 4. Inside the sun outline, draw 2 small semicircles at the same level (eyebrows). 5. Draw 2 identical ovals (eyes) under the eyebrows, inside which you need to put dots or draw small circles. 6. Draw a small circle (nose) between the eyes. 7. At a distance of 1-2 cm from the outline of the sun, at equal intervals, depict deformed ovals, approximately the same in size (rays). |
The sun at sunset
The sun at sunset is drawn using similar algorithms to those used to depict sunrise:
| Sun drawing option for kids | Recommended workflow algorithm |
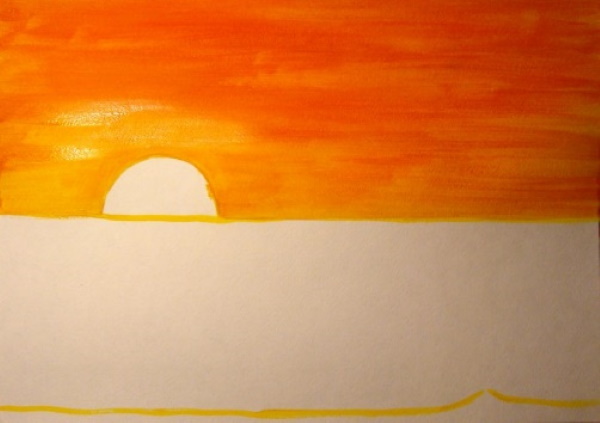
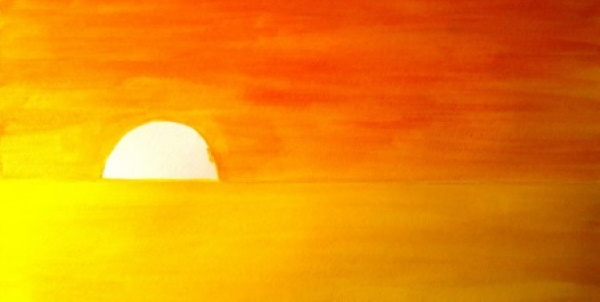 | 1. Mark the horizon line, depicting it so that the working plane is divided into 2 halves. 2. Paint the lower half yellow (the sea illuminated by the rays of the setting sun). 3. Paint the upper half of the plane orange and yellow, minimizing the sharpness of the transition of shades. Draw a small semicircle (the sun) from the horizon line. The inner surface of the sun must be painted white or silver, contrasting with the main shades of the image. |
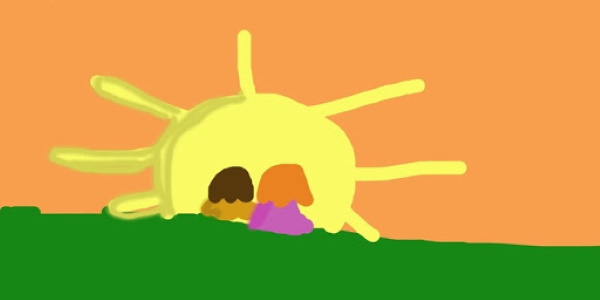 | 1. Draw a horizon line by drawing a diagonal line from the left edge of the sheet of paper being used to the right so that the resulting upper part of the working plane is twice as large as the lower one.
2. Draw a semicircle upward from the horizon line, then color it yellow. 3. From the outline of the main figure, draw straight lines, directing them randomly in different directions (sun rays). 4. From the dividing line against the background of the sun, draw schematically the figures of 2 people, using curved lines and simple geometric figures. 5. Color the lower part of the work plane green and the upper part (except for the sun) light pink. 6. It is also recommended to paint the figures of people in any shades, according to the wishes of the young artist. |
The bright sun is the easiest object for children just beginning to master the visual arts to depict.
Drawings of the celestial body can be used in classes with young artists of all ages, adjusting the tasks depending on the developmental characteristics and mental characteristics of a particular group of children (for example, a child of 3-4 years old is more restless than one of 8-9 years old, which means that it will be physically more difficult for him to cope with the creation of a multi-component drawing).
Video about drawing the sun
How to draw a smiling sun: