Spring is the beginning of a new cycle of life! Everything comes to life and blossoms: nature begins to live a new life, women begin to transform, updating their hairstyles and wardrobe. Spring dictates its own rules, bright and frank!
There is not always enough money for a new wardrobe, and here women's hands will come to the rescue, which will help to bring ideas to reality, add freshness and originality to old things. In this article, we will help to make your favorite thing even more beautiful with the help of an openwork edge, knitted with knitting needles according to the patterns.
Let's look at several master classes on knitting an openwork edge (or border) with knitting needles using patterns that will help bring interesting ideas to life.
Choosing knitting needles
First, let's try to figure out the thickness of the spokes. In their usual numbering, the metric system is used, which reflects the diameter of the spoke in mm. Where with an increase in the diameter in mm, its thickness increases.
Everything is clear here, but now there are many foreign goods on the shelves of stores, which have their own numbering. When buying in a store, you can visually estimate the thickness of the knitting needle, or ask the seller to take its measurements. However, when buying knitting needles on the Internet, you can get into trouble.
For example, in Great Britain, the larger the needle size, the smaller its diameter. There is also an American system or a Chinese system, where there are also discrepancies with the Russian metric system of measuring knitting needles.
For comparison, the correspondence of knitting needle markings in different countries is given below in Table No. 1.
Table No. 1. Marking of knitting needles in different countries
| Metric system, mm | US (American system) | Imperial (English system) | Chinese system |
| 2.0 | 0 | 14 | 16 |
| 2.25 | 1 | 13 | — |
| 2.5 | — | 12 | 15 |
| 2.75 | 2 | 12 | 14 |
| 3.0 | 3 | 11 | 13 |
| 3.25 | 3 | 10 | 12 |
| 3.5 | 4 | 9 | 11 |
| 3.75 | 5 | 9 | 10 |
| 4.0 | 6 | 8 | 9 |
| 4.5 | 7 | 7 | 7 |
| 5.0 | 8 | 6 | 6 |
| 5.5 | 9 | 5 | |
| 6.0 | 10 | 4 | |
| 6.5 | 10.5 | 3 | |
| 7.0 | — | 2 | |
| 7.5 | — | 1 | |
| 8.0 | 11 | 0 | |
| 9.0 | 13 | 00 | |
| 10.0 | 15 | 000 |
Now let's figure out the correspondence between threads and knitting needles. First, you need to think about what yarn will suit your product in color, composition, texture and thread thickness.
Usually the recommended needle size is indicated on the packaging.
When choosing knitting needles, follow this rule:
- if the product should be dense, then it is worth taking knitting needles 0.25-0.5 mm smaller than recommended;
- If the product should be airy, soft and lacy, then, on the contrary, the knitting needles should be 0.25-0.5 mm larger than those suggested on the thread packaging.
If the yarn package does not indicate the recommended needles, take the yarn and twist it in half, not too tightly. This will be the thickness of your needle. In other words, the needle should be twice as thick as the yarn!
Selecting a pattern
Along with choosing the knitting needles and threads, you need to choose the pattern with which you want to knit the edge of the sweater. It is better to knit the chosen pattern 1-2 rapports in order to correctly calculate the required number of loops for knitting the product (rapport is a fragment of the pattern that is repeated several times along the entire length or width of the product).
To calculate the number of loops, you need to measure the length of the product and the length of the pattern repeat. Then divide the length of the product by the length of the pattern repeat, then multiply the resulting number by the number of loops.
To the obtained value, it is necessary to add one loop from each edge as edge loops, which at the beginning of the row are always removed without knitting, and at the end of the row are always knitted with purl loops.
Openwork set edge for a blouse
For a blouse made of thin fabric, you can use thin thread and thin knitting needles to openwork edge with knitting needles did not look rough on the finished product.
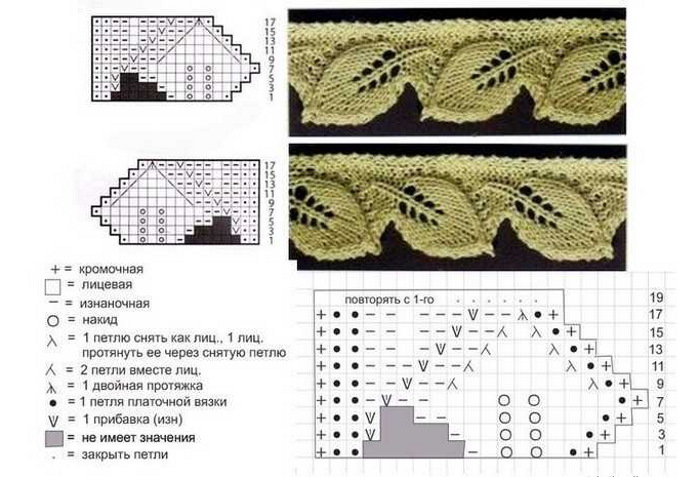
For the openwork edging of the blouse, the pattern knitted according to diagram No. 1 is suitable.
Scheme #1
| V | U | U | V | 29 | ||||||||||||||||||||||||
| V | U | U | V | 27 | ||||||||||||||||||||||||
| V | U | U | V | 25 | ||||||||||||||||||||||||
| V | U | U | V | 23 | ||||||||||||||||||||||||
| __ | __ | __ | \ | — | — | — | 21 | |||||||||||||||||||||
| U | V | U | 19 | |||||||||||||||||||||||||
| U | V | U | V | U | V | U | 17 | |||||||||||||||||||||
| U | U | V | V | V | U | U | 15 | |||||||||||||||||||||
| U | U | V | V | V | U | U | 13 | |||||||||||||||||||||
| U | U | V | V | V | U | U | 11 | |||||||||||||||||||||
| U | U | V | V | U | V | U | V | U | U | 9 | ||||||||||||||||||
| U | U | V | U | V | V | V | U | V | U | U | 7 | |||||||||||||||||
| U | U | V | U | V | V | V | U | V | U | U | 5 | |||||||||||||||||
| U | U | V | U | V | V | V | U | V | U | U | 3 | |||||||||||||||||
| U | U | V | U | V | V | U | V | U | V | V | U | V | U | U | 1 | |||||||||||||
| 1 | 2 | 3 | 4 | 5 | 6 | 7 | 8 | 9 | 10 | 11 | 12 | 13 | 14 | 15 | 16 | 17 | 18 | 18 | 19 | 20 | 21 | 22 | 23 | 24 | 25 | 26 | 27 | 28 |
The schematic symbols are as follows:
- U-one yarn over;
- V-2 loops knit together with a front loop;
- _ _ _ \ — — — 7 loops must be knitted together with a rightward tilt (this means that 4 loops are left on an additional knitting needle behind the work, then knit the next 3 loops and knit the loops from the additional knitting needle with face loops).
All odd (front) rows are knitted according to the pattern, and all even (back) rows are knitted with front loops. The height rapport is repeated until the required length of the border on the sweater is obtained.
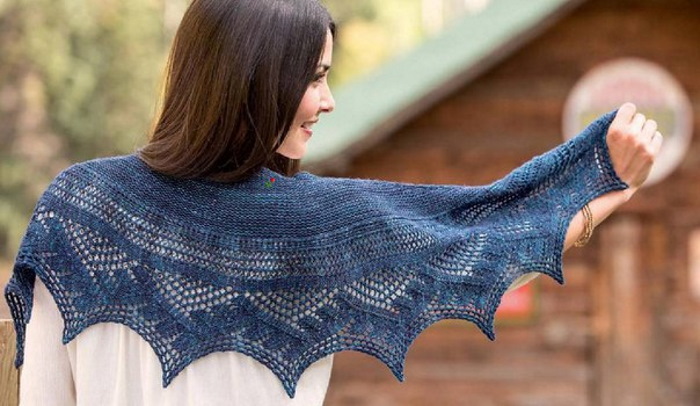
Openwork edge for a scarf
A new spring look can be created with a scarf in the color of your coat, jacket or handbag. You don't have to run to boutiques to do this, but you can tie a piece of fabric or an already knitted scarf that you wore last season. An openwork edge on a scarf will add more sophistication, femininity and romance to a woman's look.
The binding of a scarf has its own peculiarities. For example, the binding of a baktus (a triangular scarf) must be started from one of the extreme corners to the central corner. Having reached the central corner, do not close the loops, but remove them with a pin.
Then continue from the other extreme corner to the central one, where you need to connect both edges. To do this, you need to knit the loops of each edge together by pulling through two together. If you get a rough, noticeable connection, you can sew it with a needle or crochet hook.
This is how it is tied so that the corners of the pattern are symmetrically directed from the corners of the scarf to the center. If the slope of the corners in the pattern is not clearly expressed, then you can tie it using circular knitting needles, picking up loops in a circle.
When tying, you must not forget about the corners! To prevent them from becoming blurred (not noticeable), you must cast on two loops in each loop on three corner loops.
To tie a scarf with an openwork border, it is better to use pattern No. 2.
Scheme #2
| U | V | V | U | 8 | |||||||||||||||||
| U | V | V | U | 7 | |||||||||||||||||
| U | V | V | U | 6 | |||||||||||||||||
| U | V | V | U | 5 | |||||||||||||||||
| V | U | U | V | 4 | |||||||||||||||||
| V | U | U | V | 3 | |||||||||||||||||
| V | U | U | V | 2 | |||||||||||||||||
| V | U | U | V | 1 | |||||||||||||||||
| 1 | 2 | 3 | 4 | 5 | 6 | 7 | 8 | 9 | 10 | 11 | 12 | 13 | 14 | 15 | 16 | 17 | 18 | 19 | 20 | 21 |
Conventional symbols for the diagram:
- U — one yarn over;
- V - two loops are knitted simultaneously.
Openwork border (edge) for a skirt
To tie the edge of a fabric skirt, it is better to knit the border separately and stitch it onto the skirt. And if the skirt is knitted, then after knitting the border, you do not need to close the loops, but continue knitting the skirt with the main pattern.
For the openwork edging of the skirt, we suggest using pattern No. 3.
Scheme #3
| X | \ | O | \ | O | 35r | |||||||||
| X | X | \ | O | \ | O | 33r | ||||||||
| X | X | X | \ | O | \ | O | 31p | |||||||
| X | X | X | X | \ | O | \ | O | 29p | ||||||
| X | X | X | X | O | V | O | \ | O | 27p | |||||
| X | X | X | O | / | X | \ | O | \ | O | 25r | ||||
| X | \ | O | X | X | X | X | X | O | \ | O | 23p | |||
| X | X | \ | O | X | X | X | O | V | O | \ | O | 21p | ||
| X | X | X | \ | O | X | O | / | X | \ | O | \ | O | 19p | |
| X | X | X | X | \ | O | X | X | X | X | X | O | / | O | 17p |
| X | X | X | X | O | V | O | X | X | X | O | / | O | 15p | |
| X | X | X | O | / | X | \ | O | X | O | / | O | 13p | ||
| X | \ | O | X | X | X | X | X | O | / | O | 11p | |||
| X | X | \ | O | X | X | X | O | / | O | 9p | ||||
| X | X | X | \ | O | X | O | / | O | 7p | |||||
| X | X | X | X | X | O | / | O | 5p | ||||||
| X | X | X | X | O | / | O | 4p | |||||||
| X | X | X | O | / | O | 3p | ||||||||
| X | X | O | / | O | 1p | |||||||||
| 1 | 2 | 3 | 4 | 5 | 6 | 7 | 8 | 9 | 10 | 11 | 12 | 13 | 14 |
Legend:
- X - one front loop;
- O - one yarn over;
- / - two loops knitted together from the front side;
- \ — draw through two loops (remove one loop onto an additional knitting needle from the front side of the knitting, then knit the next loop and draw it through the previous loop).
Openwork edge (border) for socks
In cold weather, you can also look quite attractive, especially since the modern fashion for shortened trousers allows you to do this. Knitted socks according to pattern No. 4 will decorate the autumn-winter wardrobe of any fashionista.
Scheme #4
| — | X | X | X | X | X | — | X | 2p |
| — | \ | o | X | o | / | — | X | 1p |
| 1 | 2 | 3 | 4 | 5 | 6 | 7 | 8 |
Legend:
- X - one front loop;
- — — one purl loop;
- O – one yarn over;
- / - knit two loops together with a front loop;
- \ — draw through two loops (remove one loop onto an additional knitting needle from the front side of the knitting, then knit the next loop and draw it through the previous loop of the row).
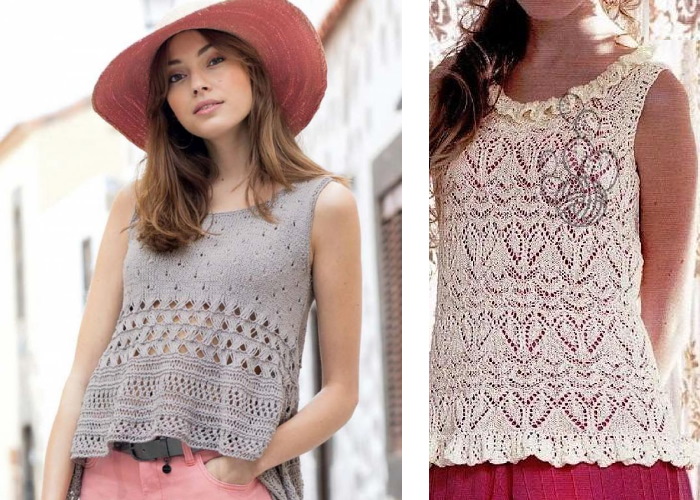
Openwork edge (border) of the top
Summer is the best time to wear thin, translucent and airy outfits. An openwork top will be appropriate both for going out with a beautiful skirt and with jeans in your everyday wardrobe!
It can be knitted both from very thin threads and from thicker yarn. It depends on what kind of thing we want to get at the end. From threads of 1-2 mm thickness, you can get a very delicate, thin as a spider web top. From threads of the "Iris" type, the product will be denser, which will hold its shape.
On average, 250-450g of yarn is needed for the top. It depends on many factors:
- model size;
- thickness of the needles (on average from 2-4 mm);
- the thickness of the yarn (and its density, in other words, the ratio of the weight of the yarn to its footage);
- density (looseness) of the pattern;
- the presence (or absence) of sleeves.
It is better to buy yarn for the entire product at once, because yarn from the same manufacturer, but from different batches, can be of different shades, and the top will not have a neat appearance.
After choosing the yarn and pattern, you can start working. We suggest using pattern #5. The top will be openwork, but not completely transparent.
Scheme #5
| | | — | — | — | — | — | — | — | — | — | — | — | — | — | — | — | — | — | — | — | — | — | — | — | — | 27 |
| | | o | | | | | | | | | ^ | | | | | | | | | o | | | o | | | | | | | | | ^ | | | | | | | | | o | | | 25 |
| | | | | | | o | | | | | ^ | | | | | o | | | | | | | | | | | o | | | | | ^ | | | | | o | | | | | | | 23 |
| | | | | | | | | o | | | ^ | | | o | | | | | | | | | | | | | | | o | | | ^ | | | o | | | | | | | | | 21 |
| | | | | | | | | | | | | | | | | | | | | | | | | | | | | | | | | | | | | | | | | | | | | | | | | | | 19 |
| | | | | | | | | | | | | | | | | | | | | | | | | | | | | | | | | | | | | | | | | | | | | | | | | | | 17 |
| | | — | — | — | — | — | — | — | — | — | — | — | — | — | — | — | — | — | — | — | — | — | — | — | — | 15 |
| | | | | | | | | | | o | ^ | o | | | | | | | | | | | | | | | | | | | o | ^ | o | | | | | | | | | | | 13 |
| | | | | | | | | o | | | ^ | | | o | | | | | | | | | | | | | | | o | | | ^ | | | o | | | | | | | | | 11 |
| | | | | | | o | | | — | ^ | — | | | o | | | | | | | | | | | o | | | — | ^ | — | | | o | | | | | | | 9 |
| | | | | o | | | — | | | ^ | | | — | | | o | | | | | | | o | | | — | | | ^ | | | — | | | o | | | | | 7 |
| | | o | | | — | | | — | ^ | — | | | — | | | o | | | o | | | — | | | — | ^ | — | | | — | | | o | | | 5 |
| | | | | — | | | — | | | | | | | — | | | — | | | | | | | — | | | — | | | | | | | — | | | — | | | | | 3 |
| | | | | — | | | — | | | | | | | — | | | — | | | | | | | — | | | — | | | | | | | — | | | — | | | | | 1 |
| 1 | 2 | 3 | 4 | 5 | 6 | 7 | 8 | 9 | 10 | 11 | 12 | 13 | 14 | 15 | 16 | 17 | 18 | 19 | 20 | 21 | 22 | 23 | 24 | 25 |
Legend:
- I – one front loop;
- — — one purl stitch;
- O - one yarn over;
- ^ - knit two loops together with a front loop.
Knitting a top according to this pattern begins with counting the number of loops needed. To do this, knit one pattern repeat from loop 14 to loop 25. Take measurements around the widest circumference of your body (for some, this is the hips, for others, the chest). Measure the pattern repeat. Divide the circumference measurement by 2, which in turn will be equal to the width of the front or back in cm. To count the loops, you need to divide the width of the front or back in cm by the length of the pattern repeat in cm, multiply by 12 pattern repeat loops. Then subtract 13 loops.
We cast on the counted number of loops and knit first from loop 1 to 25, and then repeat from loop 14 to 25 until the end of the pattern several times. We always remove the first loop of the row without knitting. And the last loop of the row must always be knitted with a purl loop.
The pattern shows only the front rows. We knit the back rows according to the following pattern: we knit the front loops with front loops, and we knit the back loops with back loops.
We repeat the rapport from the 1st row to the 28th to the armhole level. Then we close 2 loops for the armholes on both sides in the following way: close the four outer loops two at a time together, so that in the next row there are 2 loops left instead of 4 loops, which are knitted according to the pattern.
So close in every second row 2 more times. Knit according to the pattern another 12 cm. For the neck of the front shelf, close the middle 14 loops, knitting the loops that are after the closed ones, on an additional knitting needle.
Next, we tie the thread to the second half, and knit both sides in parallel. Next, for the neck, we close 2 loops on each side from the center 2 more times in every second row. And once for 1 loop.
On the back, we start closing the neck opening 15 cm from the armhole level. To do this, we close the middle 10 loops, and then 1 time 2 loops on each side, and 1 loop on each side 2 times in every second row.
Knit another 2 cm up on each side parallel. Then close for shoulder slopes 2 loops together on each side and 1 time 1 loop in every second row. Then knit 2 more rows and close the remaining loops.
Sew the shoulder and side bevels of the front and back panels together. Wash and iron the finished product.
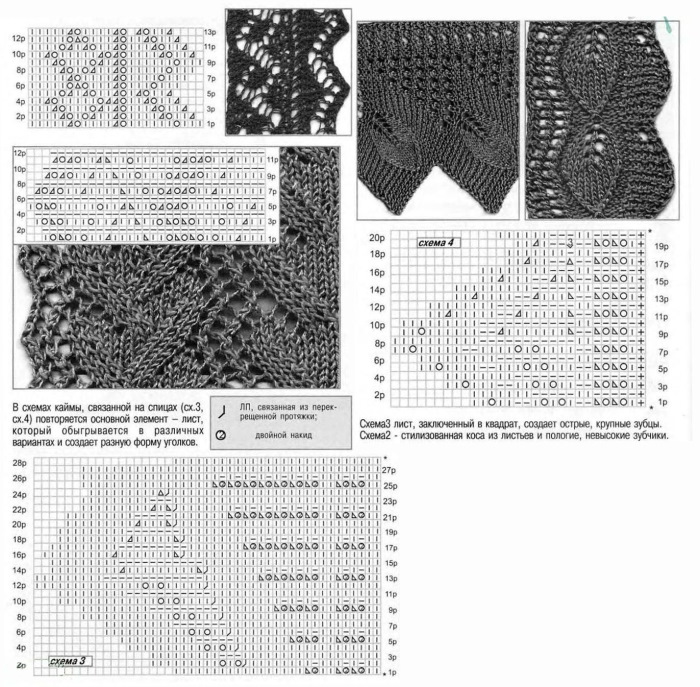
Openwork edge (border) for a shawl
The openwork edge of the shawl can be tied in the same way as the edge of the scarf. For its tying we suggest using pattern #6.
Scheme #6
| ^ | — | — | — | — | U | | | U | — | — | — | — | Y | — | ^ | — | — | — | — | U | | | U | — | — | — | — | Y | 12 |
| — | ^ | — | — | — | U | | | U | — | — | — | Y | — | — | — | ^ | — | — | — | U | | | U | — | — | — | Y | — | 11 |
| — | — | ^ | — | — | U | | | U | — | — | Y | — | — | — | — | — | ^ | — | — | U | | | U | — | — | Y | — | — | 10 |
| — | — | — | ^ | — | U | | | U | — | Y | — | — | — | — | — | — | — | ^ | — | U | | | U | — | Y | — | — | — | 9 |
| — | — | — | — | ^ | U | | | U | Y | — | — | — | — | — | — | — | — | — | ^ | U | | | U | Y | — | — | — | — | 8 |
| — | — | — | — | — | | | | | | | — | — | — | — | — | — | — | — | — | — | — | | | | | | | — | — | — | — | — | 7 |
| U | — | — | — | — | Y | — | ^ | — | — | — | — | U | | | U | — | — | — | — | Y | — | ^ | — | — | — | — | U | 6 |
| U | — | — | — | Y | — | — | — | ^ | — | — | — | U | | | U | — | — | — | Y | — | — | — | ^ | — | — | — | U | 5 |
| U | — | — | Y | — | — | — | — | — | ^ | — | — | U | | | U | — | — | Y | — | — | — | — | — | ^ | — | — | U | 4 |
| U | — | Y | — | — | — | — | — | — | — | ^ | — | U | | | U | — | Y | — | — | — | — | — | — | — | ^ | — | U | 3 |
| U | Y | — | — | — | — | — | — | — | — | — | ^ | U | | | U | Y | — | — | — | — | — | — | — | — | — | ^ | U | 2 |
| | | — | — | — | — | — | — | — | — | — | — | — | | | | | | | — | — | — | — | — | — | — | — | — | — | — | | | 1 |
| 1 | 2 | 3 | 4 | 5 | 6 | 7 | 8 | 9 | 10 | 11 | 12 | 13 | 14 | 15 | 16 | 17 | 18 | 19 | 20 | 21 | 22 | 23 | 24 | 25 | 26 | 27 |
Legend:
- ^ - one draw through (remove one loop onto an additional knitting needle before knitting, knit the next loop and pull it through the removed loop);
- U — one yarn over;
- Y - knit two loops together;
- — — one purl loop;
- | — one front loop.
Openwork edge (border) for a blanket
To knit the openwork edge of the blanket, you can use pattern #7, where from the 1st to the 22nd column of the rapport one side of the openwork edge of the blanket is knitted, and from the 24th to the 45th column the other side of the openwork edge of the blanket is knitted.
Instead of 23 columns, the main fabric of the blanket is inserted, which can be knitted according to the following pattern: all odd rows - with front loops, and all even rows - with back loops.
Scheme #7
| 45 | 44 | 43 | 42 | 41 | 40 | 39 | 38 | 37 | 36 | 35 | 34 | 33 | 32 | 31 | 30 | 29 | 28 | 27 | 26 | 25 | 24 | 23 | 22 | 21 | 20 | 19 | 18 | 17 | 16 | 15 | 14 | 13 | 12 | 11 | 10 | 9 | 8 | 7 | 6 | 5 | 4 | 3 | 2 | 1 | |
| 12 | / | — | o | Y | o | — | — | — | — | — | — | — | — | — | — | — | — | — | — | — | — | — | — | — | — | o | Y | o | — | \ | |||||||||||||||
| 11 | / | — | o | / | — | \ | o | — | — | — | — | o | \ | o | \ | — | — | — | — | / | O | / | O | — | — | — | — | O | \ | — | \ | o | — | \ | |||||||||||
| 10 | / | — | o | / | — | Y | — | \ | o | — | — | — | — | — | — | — | — | — | — | — | — | — | — | — | — | — | — | O | \ | — | — | — | \ | o | — | \ | |||||||||
| 9 | / | — | o | / | — | o | — | o | — | \ | o | — | — | — | O | \ | O | \ | — | — | / | O | / | O | — | — | — | O | \ | — | o | Y | o | — | \ | o | — | \ | |||||||
| 8 | / | — | o | / | — | o | / | — | / | o | — | \ | o | — | — | — | — | — | — | — | — | — | — | — | — | — | — | O | \ | o | \ | — | \ | o | — | \ | o | — | \ | ||||||
| 7 | / | — | o | / | — | o | / | — | — | — | / | o | — | \ | o | — | — | o | \ | o | \ | / | O | / | O | — | — | O | \ | — | o | \ | — | — | — | \ | o | — | \ | O | — | \ | |||
| 6 | — | o | — | / | o | / | — | — | — | — | — | / | o | / | — | — | — | — | — | — | — | — | — | — | — | — | — | — | \ | O | \ | — | — | — | — | — | \ | O | \ | — | O | — | |||
| 5 | — | — | o | — | / | o | — | — | — | — | — | o | / | — | o | / | — | O | / | O | / | \ | O | \ | O | — | \ | O | — | \ | O | — | — | — | — | — | O | \ | — | O | — | — | |||
| 4 | — | — | o | — | / | o | — | — | — | o | / | — | o | / | — | — | — | — | — | — | — | — | — | — | — | — | \ | O | — | \ | O | — | — | — | O | \ | — | O | — | — | |||||
| 3 | — | — | o | — | / | o | — | o | / | — | o | / | — | — | o | / | o | / | — | — | \ | O | \ | O | — | — | \ | O | — | \ | O | — | O | \ | — | O | — | — | |||||||
| 2 | — | — | o | — | — | — | — | — | o | / | — | — | — | — | — | — | — | — | — | — | — | — | — | — | — | — | \ | O | — | — | — | — | — | O | — | — | |||||||||
| 1 | — | — | o | — | — | — | o | / | — | — | — | O | / | o | / | — | — | — | \ | O | \ | O | — | — | — | \ | O | — | — | — | O | — | — |
Legend:
- / - knit two loops together with a front loop;
- \ — pull through two loops (remove one loop onto an additional knitting needle before knitting, knit the next loop and pull it through the previous loop);
- O - one yarn over;
- Y - knit 3 stitches together;
- — — one purl stitch.

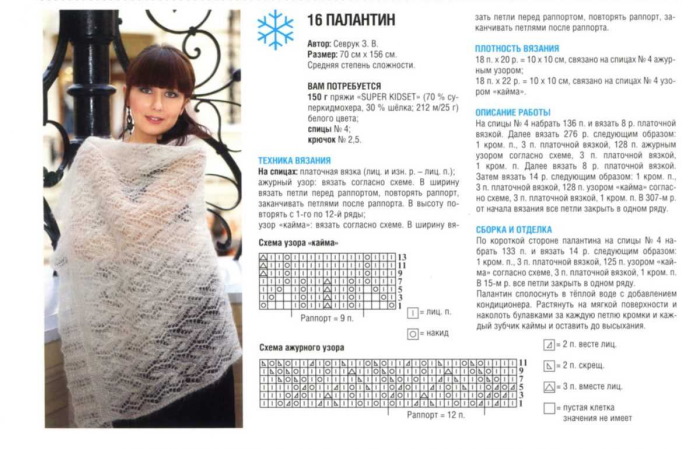
Openwork edge (border) for a stole
A stole is a very convenient item in the cold season, which can be worn as a headdress, as a scarf around the neck, and even as a cape on the shoulders on a cold summer evening.
The stole can be knitted with garter stitch, and for decoration you can make an openwork edge of the product, which we will knit simultaneously with the main fabric. To knit it, we collect a number of loops that will be divisible by 12, plus one edge loop on each side (+2 loops) to get the required width of the product.
Knit according to the pattern:
1 edge (front loop), repeat (from 1 to 12 loops) to the end of the row, 1 edge (back loop). Up we knit 2 repeats according to diagram No. 8, which shows only front rows.
We knit the purl stitches according to the pattern obtained on the wrong side of the knitting (we knit the purl stitches with purl stitches, and we knit the front stitches with front stitches).
Then we knit according to the following pattern:
One edge loop (knitted with a front loop); repeat from 1 to 12 columns; garter stitch (this is when both the front and back are knitted only with front loops); repeat from 2 columns to 12 columns; 1 column of the repeat; edge (knitted with a back loop).
We knit according to this pattern until the required length of the stole. We finish the product in the same way as we started (we knit an openwork pattern according to pattern No. 8 along the entire width of the stole, we knit 2 repeats in height).
For a stole you will need from 350 to 500g of yarn (with a yarn density of 500m per 100g).
Knitting pattern for openwork edge of stole No. 8
| | | | | | | | | | | | | | | | | | | | | | | | | 14 |
| — | — | — | — | — | — | — | — | — | — | — | — | 13 |
| | | | | | | | | | | | | | | | | | | | | | | | | 12 |
| — | — | — | — | — | — | — | — | — | — | — | — | 11 |
| | | | | | | | | | | o | Y | o | | | | | | | | | 10 |
| | | | | o | | | o | U | | | ^ | V | | | o | | | 9 |
| | | | | | | | | | | | | | | | | | | | | | | | | 8 |
| | | o | | | o | U | U | Y | V | V | o | | | o | 7 |
| | | | | | | | | | | | | | | | | | | | | | | | | 6 |
| | | o | | | o | U | U | | | V | V | o | | | o | 5 |
| | | | | | | | | | | | | | | | | | | | | | | | | 4 |
| | | o | | | o | U | U | | | V | V | o | | | o | 3 |
| | | | | | | | | | | | | | | | | | | | | | | | | 2 |
| | | o | | | o | U | U | | | V | V | o | | | o | 1 |
| 1 | 2 | 3 | 4 | 5 | 6 | 7 | 8 | 9 | 10 | 11 | 12 |
Legend:
- | — one front loop;
- -one purl loop;
- Y - three loops knitted together;
- - one yarn over;
- U – 2 stitches knitted together;
- V- draw through two loops (slip one loop as if to knit, take 1 knit loop and pull it through the slipped loop).
We hope that our patterns and descriptions will help beginner knitters to knit a beautiful border or edge for their favorite thing, be it a shawl, scarf, hat, socks, jumper, skirt or even a blanket for a sofa or a newborn baby. With an openwork edge, such things will become much more beautiful, elegant and original – just the way you want them.
Video on how to knit an openwork edge with knitting needles
The border is suitable for decorating items knitted from top to bottom. The pattern repeats 8 loops and 14 rows.