One of the sections of the Preschool Education Program is visual arts. From an early age, children are taught to sculpt, draw, make appliques and crafts from various materials, work with plasticine and clay.
The benefits of modeling for children of different ages
All types of creative activities are useful for children of any age group. Plasticine is a flexible, pliable material that can be used to make any shape.
Modeling with plasticine is one of the most favorite and interesting activities for children and older kids.
This type of fine art contributes to the all-round development of children. Modeling gives them the opportunity not only to create, but also to touch the fruits of their creativity.
In addition, modeling exercises contribute to:
- development of imagination;
- development of imaginative thinking;
- development of correct perception of the surrounding world;
- development of the speech apparatus and brain activity;
- activation of thought processes;
- development of concepts about form, color, space and proportions;
- development of coordination of movements;
- development of fine motor skills of fingers and hands;
- development of independence, perseverance and discipline.
It should be said that there are different methods of teaching modeling for children of different age groups. In addition, the classes solve problems of development and education in the process of creative activity.
What is applique?
Plasticine applique is a type of creative activity that is somewhat different from simple modeling activities, where children make various figures.
The word “applique” is literally translated from Latin as “application” (“to apply”).
Even in ancient times, people decorated their clothes, shoes and other household items by sewing pieces of fur, fabric or leather onto canvas. Decorative applique using paper appeared much later.
Applique is a type of decorative and applied art. It is a popular technique of sewing or gluing (overlaying) details, patterns (ornaments) or figures from various materials onto a base. In preschool institutions, creative classes are held with children, where paper or plasticine is used for work.

Today, the concept of "plasticineography" has appeared. This is the name for the technique of modeling with the application of the working material to the base (substrate). In essence, this is the same plasticine applique, where the parts are applied to thick cardboard, plexiglass or other material. The result is interesting pictures with images of objects and various plots.
Necessary tools and materials
To work with plasticine and create an applique, you need to prepare the following tools and materials:
- thick cardboard for the background/base (white or colored);
- plasticine that can be easily kneaded;
- templates or stencils on which the plasticine will be applied;
- board and rolling pin for rolling out plastic material;
- plastic stacks for cutting plasticine and parts;
- syringes for squeezing out plasticine "sausages" (flagellas);
- wet wipes;
- water bowl.
In addition to standard materials for modeling, you can prepare various decorative and natural elements that will be used in the work.
These could be:
- small beads and buttons;
- scraps of fabric and colored threads;
- pebbles and shells;
- seeds and cereals (peas or rice);
- cones, twigs, leaves and other details.
The set of materials depends on the intended plot of the applique.
Application techniques
Plasticine applique is a type of visual activity that is accessible to children from preschool age.
Different age groups use different applique techniques. In addition, modeling classes solve problems of raising and developing children by age. Plasticine training is conducted according to the principle of "from simple to complex".
Early preschool age
The youngest preschoolers aged 2-4 are taught the simplest basics of modeling and working with soft plastic material. Children are introduced to the properties of plasticine. They learn to pinch it off, roll it out and glue it to cardboard.

During the activity, children develop fine motor skills of their fingers and hands, and also develop concepts of color, space, and shapes. In addition, children develop perseverance.
Middle preschool age
Children of the middle age category (4-5 years) are taught new techniques of plasticine applique in classes. They become familiar with various ways of using improvised materials in their work.
During classes with plasticine, applique and various subjects, the students develop not only fine motor skills, dexterity, fantasy, imagination, discipline and perseverance.
Senior preschool age
Pupils of older age groups (5 to 7 years old) already know the basic techniques of working with plasticine and applique. In modelling classes they are taught to combine several methods of execution in one work.
Children are able to think up more complex plots for their plasticine paintings themselves. They can already act collectively and create interesting joint applications in textured and modular techniques.
| No. p/p | Name of the applique technique (plasticine painting) | Features of implementation | Age group |
| 1. | Smearing |
| First youngest (from 2 to 3 years) |
| 2. | Straight |
| Second youngest (3 to 4 years old); |
| 3. | Contour |
|
|
| 4. | Mosaic | Laying out an image using plasticine “balls” of different sizes. |
|
| 5. | Multilayer |
|
|
| 6. | Modular |
|
|
| 7. | Textured |
| Preparatory (from 6 to 7 years old). |
Working with templates
In classes on making plasticine appliques in different age groups, image templates of varying degrees of complexity can be used.
During the work process, students can:
- mold onto a base with a ready-made image of a detail made of plasticine;
- lay out the outline of the image using plasticine “flagellas”;
- fill the space inside the outline of the image with plasticine in bundles, and also work using the mosaic technique;
- lay out the outline and fill the space inside it with plasticine “flagellas”.
In older age groups, children can make story-based “plasticine” applications without using templates.
Plasticine applique
Plasticine applique is one of the most interesting and exciting types of children's creativity. The theme of the work and the level of its complexity can be very different (depending on the age of the children).
For children 3-4 years old
At the age of 3-4 years, children are familiar with the technique of rolling, kneading and flattening plasticine.
Caterpillar
Work on making the applique "Caterpillar" of low complexity. It will require the children to have the most basic techniques in working with plasticine.
Materials needed:
- medium-soft plasticine (you can use multi-colored plasticine);
- a board or mat for rolling out plastic material;
- stack for cutting parts;
- cardboard (you can use a drawn template);
- wet wipes;
- Caterpillar toy or its image as a sample.
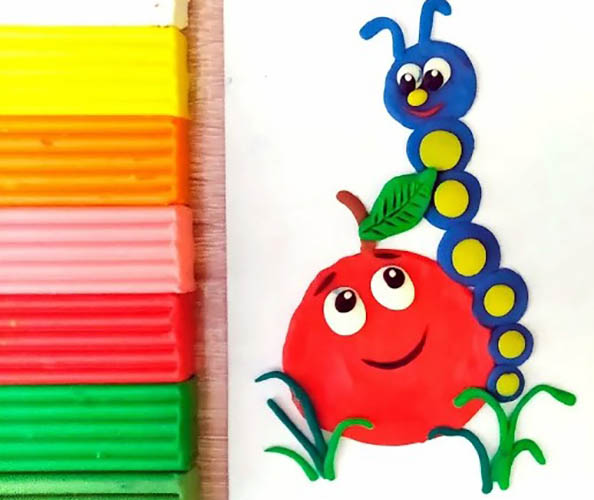
Procedure for performing work:
- Before completing the task, children should look at a picture of a caterpillar or a toy and determine the shape of the parts.
- Cut off (break off or pinch off) small pieces from a block of plasticine.
- Roll several balls of multi-colored pieces in your palms.
- Place the balls one after another on a cardboard base (placing them according to the drawn template).
- Press the balls with your fingers, giving them a flat shape.
- Cut or pinch off a small piece from a block of black plasticine and roll it into a thin “tourniquet” (“sausage”).
- Divide the "flagellum" into 2 parts and attach them to the cardboard base to the caterpillar's head, slightly bending them in different directions. These are the caterpillar's antennae.
Next, you can ask the children to make grass using green plasticine, placing it on a cardboard base and using the "smearing" technique. This process can be transferred to the initial stage of the work.
For children 5-6 years old
At this age, children know almost all the techniques and methods of working with plastic material and applique. For work, you can choose more complex images and plots.
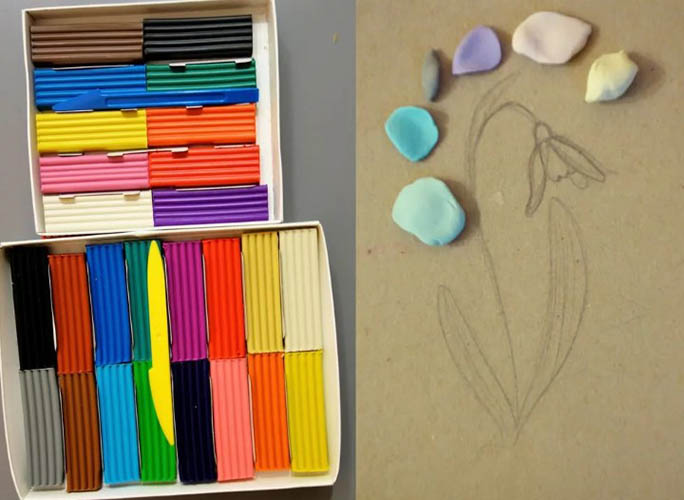
Snowdrops
An applique made of plasticine on the theme of "Snowdrops" can be timed to coincide with the arrival of spring. Before the lesson, you should look at the images of snowdrops with the children, clarify the colors and shapes of the objects.
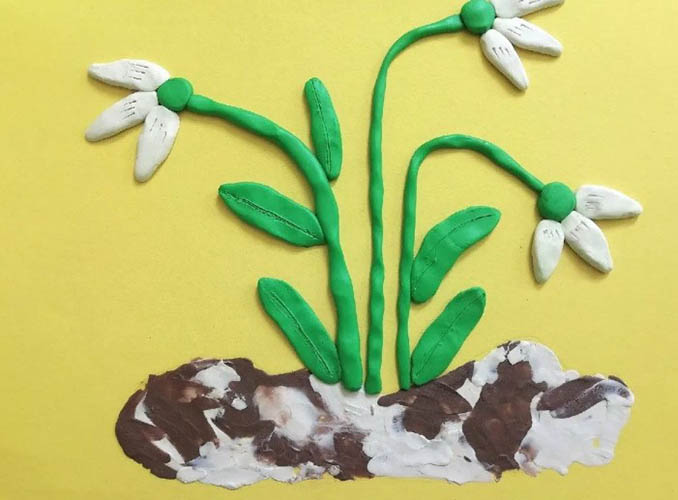
To complete the applique you will need:
- colored cardboard;
- soft plasticine;
- plastic stacks;
- work board;
- wet wipes.
Procedure for performing work:
- Knead the green plasticine thoroughly.
- Use a stack to cut off 3 pieces of different sizes.
- Roll the pieces into three ropes on a board.
- Glue the longest cord to the blue cardboard base in the center, slightly bending its upper end. This is the stem of the snowdrop.
- On both sides of the first stem, stick 2 other bundles, slightly flattening them and bending the tops. These are also the stems of the flower.
- Cut a piece from a green plasticine block, knead it, roll it in your palms into an oval shape (a thick "sausage") and flatten it. This is a snowdrop leaf.
- Make another leaf in the same way.
- Glue the leaves to the bottom of the stems, securing them to the cardboard.
- Apply stripes to the leaves with a stack in the form of veins.
- Cut off (pinch off) 3 small pieces from a block of green plasticine and roll them into balls.
- Attach the balls to the tops of the stems and flatten them. These will be the centers of the flowers.
- Pinch off a small piece from a white block of plasticine, roll it into a sausage, flatten it and sharpen one end. This is a snowdrop petal.
- Glue a petal to the middle of the top of one of the stems.
- So, make 8 more petals one by one (3 for each stem).
- Roll out 3 small thick "sausages" (ovals) from white plasticine, flatten them and stick them at the bottom of the picture under the stems of the flower. This is snow.
The spring painting "Snowdrops" is ready.
Additional recommendations:
- Instead of white plasticine, you can use small pieces of cotton wool to depict snow. To do this, the lower part of the cardboard under the flower should be smeared with glue, and cotton wool should be applied to it.
- In addition, you can use colorless cardboard instead of colored cardboard, and ask the children to make a blue background from plasticine. In this case, the "smearing" technique will be used. Children should be familiar with it from the younger group. Thus, several plasticine applique techniques will be used in the work.
- This craft can be made with children as gifts for mothers on March 8th.
For children 6-7 years old
Children aged 6-7 are familiar with all the techniques of modelling and appliques from plasticine. They can perform more complex works, including collective ones.
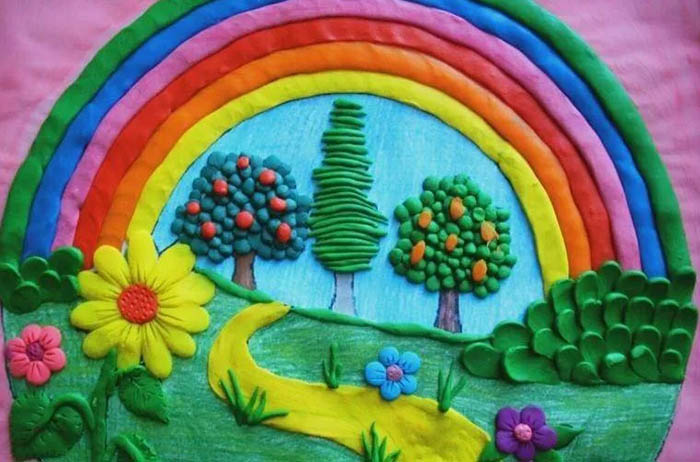
Summer
Children can do this work independently or in a group of several people, where each will be given their own task for making the parts.
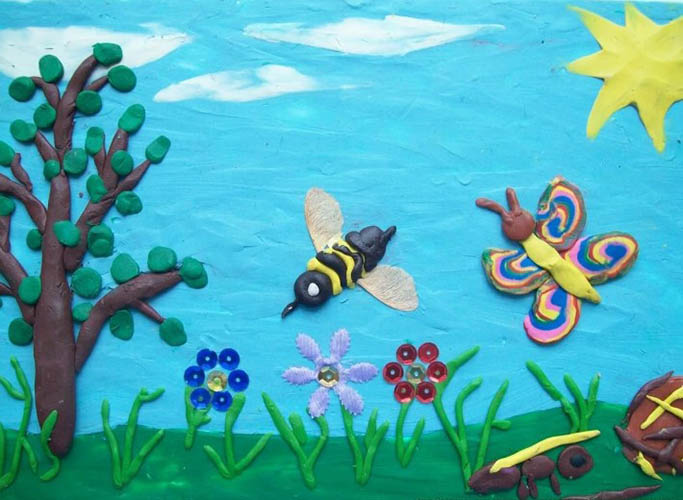
For the applique you will need the following materials:
- a sheet of colored cardboard (any shade of blue) with the outline of a tree drawn on it;
- a set of multi-colored plasticine;
- plastic stacks for cutting plastic material;
- rolling mat (board);
- wet wipes.
Procedure for performing work:
- For applique work, children receive sheets of thick cardboard with the outline of a tree trunk and crown drawn on them.
- From brown plasticine you need to roll several thin ropes.
- Place the finished bundles within the contour of the tree trunk, gluing them tightly to each other on a cardboard base.
- From a green block of plasticine you need to pinch off small pieces and roll them into balls. You should use plasticine of different shades of green.
- The finished balls should be applied to the cardboard in the space of the tree crown borders, slightly flattening them and overlapping them.
- Next, roll small balls from yellow and red plasticine and place them in several places in any order on the green crown of the tree. These are ripe fruits.
- Under the resulting tree, stick grass from green plasticine. It can be applied with strokes using the "smearing" technique. Or simply lay out the grass from short flagella, slightly flattening them and pressing them to the cardboard.
- Roll thin strands of different lengths from red, pink and yellow plasticine and twist each one into a circle. These are flowers. They need to be stuck on the grass under the tree.
- Place the sun in the upper part of the cardboard base, in the left or right corner. To do this, roll a ball of yellow plasticine and flatten it slightly.
- Roll several thin ropes from the same plasticine and stick them around the sun. These are the sun's rays.
The plasticine applique "Summer" is ready.
Additional recommendations for completing the work:
- To obtain plasticine flagella of the same thickness, you can use plastic medical syringes without needles. They must first be filled with plasticine flagella through the top, insert the pistons into place. Then place the syringes with plasticine horizontally in a bowl of hot water. The entire process takes place under the supervision of the teacher (or parents).
- When the plasticine is warmed up, it should be carefully squeezed out of the syringe with a piston onto a flat surface. Then you need to let the bundles cool down and harden slightly. After that, they can be cut and used in work.
- You can organize the execution of one work with children in a modular technique. Then 2-3 children can take part in it. Each will make different parts of the picture: one - bundles for the trunk and leaves from plasticine balls for the crown of the tree, the second - prepare parts for flowers and grass, the third - make fruits and the sun with rays.
- When the work is finished, you can spray it with hairspray. This way the composition will retain its original appearance longer, and the plasticine figures will not deform or “float”.
Drawing, modeling, applique and other types of visual activities are very useful for the development and education of children of any age. And crafts made of clay, plasticine and various natural materials give children the opportunity not only to create, but also to touch the fruits of their own labor.
Video about the application
Master class: applique on cardboard Snail: