For children, working with natural materials is creative work. By creating crafts from pine cones, children show their imagination and develop motor skills. Due to the fact that such work requires accuracy, children develop the ability to take a responsible attitude to the tasks assigned to them.
Materials and tools
When working with natural materials, you may need the following items:
| Name | Description |
| Glue | Most often, PVA glue is used to make crafts from cones. This is a synthetic substance, not very suitable for children to work with. Therefore, an adult should carefully monitor safety so that the child does not taste the material or smear it on his hands. It is advisable to use organic varieties of liquid glue in the work. For example, UHU Klebefix. |
| Gouache or watercolor paints | Gouache gives a more saturated color than watercolor. When working with cones, it is worth using the first option. Gouache is denser, it covers the scales much better, making the layer uniform. But watercolor may not cope with the task. Inexpensive paints will not be able to cover the natural brown tone of the cones. |
| Paint brushes | You can buy brushes with natural or synthetic bristles. For water-soluble paints, it is better to use squirrel (material). The brush handle should be comfortable for the child. |
| Glue brushes | The easiest way to work is to use a brush with synthetic bristles. This is the most durable and reliable material. The main thing is to wash off the glue in time after work so that it does not have time to dry. |
| Hot glue and a gun for him | Hot glue will provide one of the best fastenings. The downside is that it is not very convenient for working with children. It is used in situations where an adult and a child are making a craft together. If the work is carried out with a large number of participants, then it will not be possible to hand out a hot glue gun to everyone. In addition, children are prohibited from working with such a power tool.
For working with cones, a glue stick with a diameter of 7 mm is mainly used. |
| Colored plasticine | When choosing plasticine for working with children, you need to consider many factors. The usual variety of this material is very hard. It will be difficult for children aged 3-4 to mold from it. It is not recommended to use it in work.
Wax – soft, flexible. But not suitable for fastening parts. |
| Colored cardboard | Laminated or regular is used. |
This is the basic material needed to make crafts.
But sometimes additional elements are needed:
- cotton wool;
- toothpicks;
- scissors;
- beads;
- various decorations.
Most of the materials for crafts are available in everyone's home.
Simple crafts from pine cones for children 3-4 years old
Pine cone crafts for kids at the age of 3-4 years, they give the opportunity to reveal their creative potential. In addition, in the process of creation, children develop fine motor skills. This directly affects speech and its improvement.
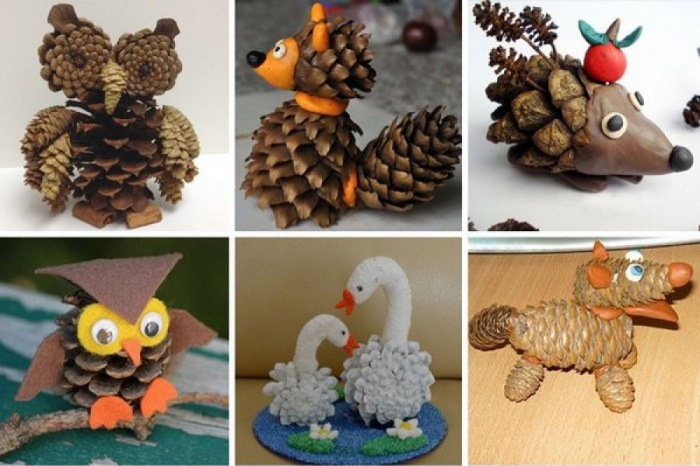
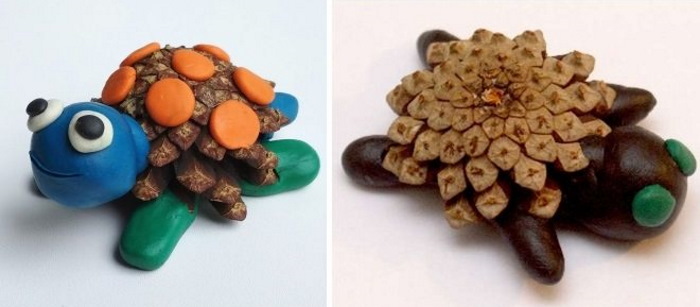
Hedgehog
Materials:
- brown and black plasticine;
- toothpick;
- pine cone;
- board or film for modeling.
Sequence of actions:
- The body of the hedgehog is made on a board from brown plasticine. The piece of material is given an oval shape, pulling the tip forward to form the muzzle.
- The pine cone is attached to the plasticine on top. It should represent thorns.
- Make a small circle from black plasticine and attach it to the muzzle. It will represent the hedgehog's nose.
- Use a toothpick to make holes - they represent the hedgehog's two eyes.
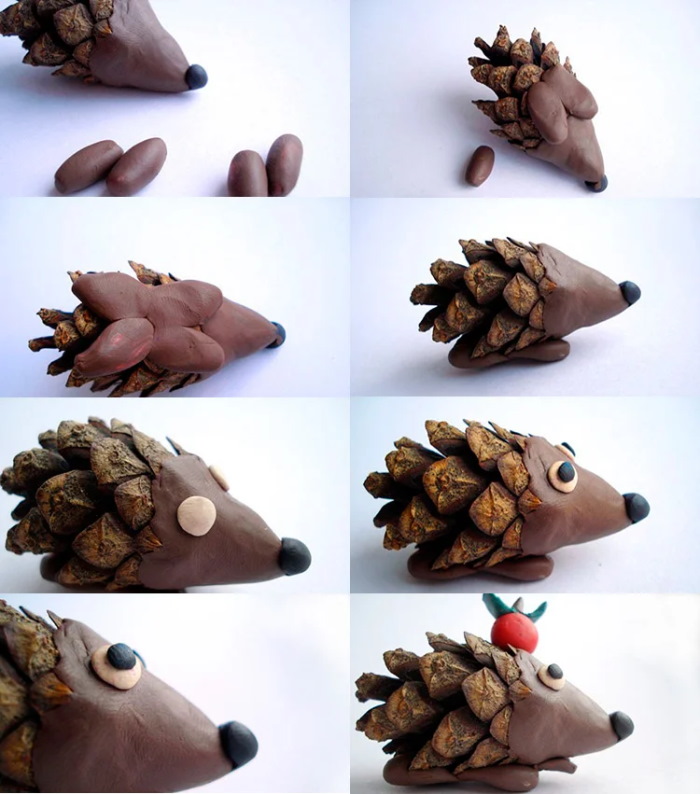
You can decorate the craft. For this, use red plasticine. Roll 2 balls from it. They imitate apples. Attach the balls to a pine cone.
Christmas tree for the New Year
Materials:
- gouache or watercolor in green;
- paint brushes;
- non-spill cups with water;
- open pine cone;
- glitter or other options for decorating the Christmas tree.
Sequence of actions:
- The cone is placed with its pointed tip upward. It should form a cone.
- They paint the pine cone with green paint.
- Let the paint dry and sprinkle glitter or other embellishment on top.
If the cone is not stable, then a stand is made for it. You can use cotton wool. The advantages of this material are its high plasticity. It is easy to make any shape from it.
The cotton wool will represent a snowdrift in which the tree stands. If there is no such material, then the cone is attached to a plasticine base.
Fir-tree meadow
This is a collective work. It is appropriate in group lessons, when children create a craft with joint efforts.
Materials:
- pine cones;
- green paints;
- moss;
- dense material for the craft (must be able to withstand moss and pine cones);
- PVA glue;
- figurines of forest animals.
Sequence of actions:
- Spruce cones are painted with paints.
- Moss is glued to the stand for the craft.
- Cones are placed on the moss with their pointed ends facing upwards – they imitate forest plantings.
- Figures of forest animals are placed between the Christmas trees.
If there is no hard surface, then proceed as follows:
- Take a hard sheet of green cardboard.
- Moss is glued onto it.
- The craft, standing on cardboard, is carefully moved to any hard surface.
Children are assigned to color the cones. Each participant is given one. The moss can be glued on one at a time.
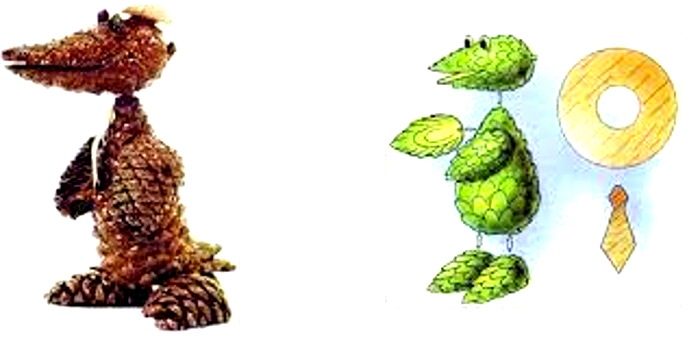
Crocodile
Crafts from pine cones for children do not require many details. In addition to natural materials, sometimes a simple set for creativity is enough.
So, for the “Crocodile” craft you need to prepare:
- 2 spruce cones;
- green paints;
- paint brush;
- plasticine: green, white, black.
Sequence of actions:
- The cones are painted green and left to dry.
- The cones are fastened together at the base using green plasticine to make one large one. This will be the crocodile's body.
- Make 2 balls from green plasticine. These will be the eyes. Glue them to the part that will be the front of the crocodile.
- Pieces of white are added to the green plasticine balls. They are first rolled into a circle.
- Pupils are made for the eyes from pieces of black plasticine.
- The crocodile's limbs are made from green plasticine and attached to the body made from pine cones.
You can use unopened pine cones for work. They are smaller in size than spruce cones. Therefore, 3-year-old children may find it easier to work with them.
Turtle
Materials:
- pine cone;
- plasticine gray, black;
- toothpick;
- scissors or knife (for an adult).
Sequence of actions:
- The top part of the open pine cone is cut off with scissors or a knife. For the craft you will only need the wide bottom part.
- Roll the turtle's body out of grey plasticine. The length is selected to match the size of the cone. The body needs to protrude slightly in front and behind the shell.
- The lower part of the cone is attached to the body - this will be the shell.
- The muzzle is designed on the protruding part of the body. For this, bead-like eyes are made from black plasticine.
- Use a toothpick to draw a mouth on the turtle's face.
- The turtle's limbs are made from grey plasticine and attached to the bottom of the shell.
If the child finds this work difficult, the process can be simplified:
- Roll 3 sausages from grey plasticine.
- They are placed on top of each other to create the simplest snowflake shape.
- A shell is placed on a snowflake.
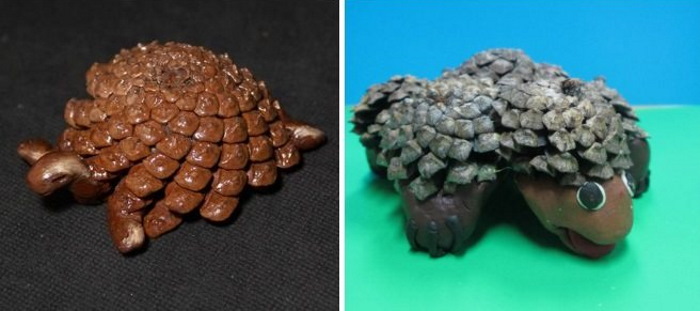
All that remains is to make the eyes and design the turtle's face.
Flower
For this craft, children will need to give the initial work with the pine cones to an adult so that the natural material takes the shape of a flower.
Materials:
- An open pine cone.
- Water.
- Liquid glue.
- Brush for glue and paint.
- Colored paints.
- A glass of water.
- Green plasticine or cardboard.
Sequence of actions:
- An adult needs to modify the cone. To do this, a couple of hours before starting work with a child, the upper part of the natural material is wetted.
- Cover the top with wet gauze in several layers, leaving the lower, wide part of the cone dry and untouched. It should remain open.
- Due to the moisture, the top of the cone will close. Once this happens, fix everything with glue.
- After the glue has dried, give the pine cone to the child.
- Using a brush and paints, he makes the pine cone colorful.
- Leave the cone to dry and move on to making the petals. Make a ball out of plasticine.
- Flatten the ball and then stretch it out to the sides, giving it the shape of a petal.
- Green petals are attached to the bottom of the flower.
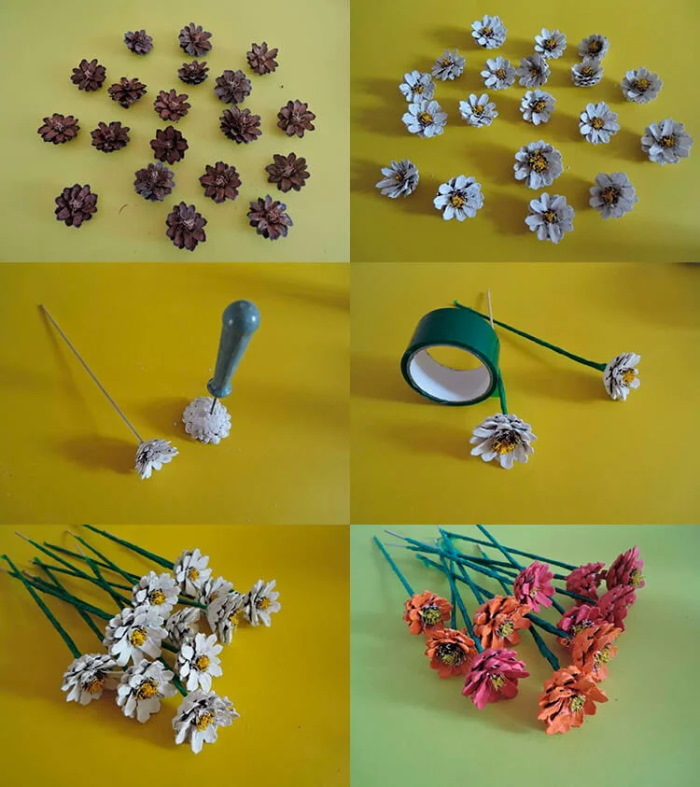
Green plasticine petals can be replaced with cardboard.
Little Owl
Materials:
- a large open pine cone;
- cotton wool;
- toothpick;
- cardboard: orange, yellow, black.
- scissors;
- glue.
Sequence of actions:
- Fill all the empty spaces inside the cone with cotton wool. Use a toothpick for this. You don't need to stuff it tightly. You should get an imitation of the light plumage of an owlet.
- A solid number 8 is cut out of black cardboard.
- Cut out 2 circles from yellow cardboard – these will be the eyes.
- Yellow circles are glued into the center of the black eight.
- Small diameter ovals are cut out of black cardboard and glued into the center of the yellow circles.
- Glue the eyes to the top of the pine cone.
- A small triangle is cut out of orange cardboard – the beak.
- Glue a paper beak under the eyes.
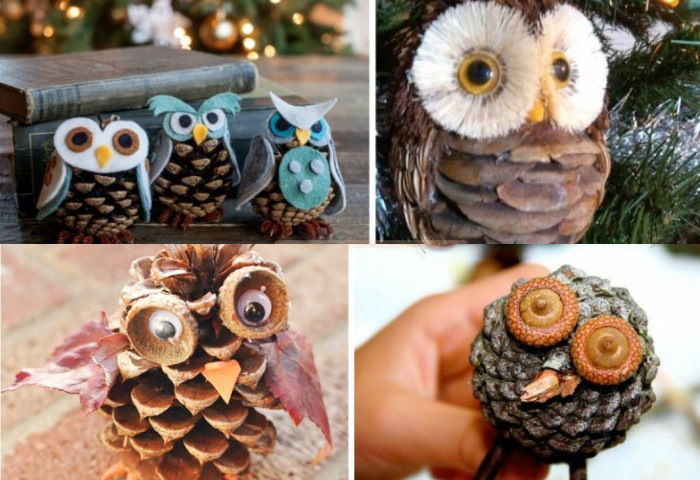
If desired, you can make a nest for the owlet.
For children 5-6 years old
Crafts from pine cones for children aged 5-6 years are still relevant. The motor skills of children in the older group are already well developed. Therefore, their work is complicated. Crafts are created using not 2-3 items, but 5 or even more.
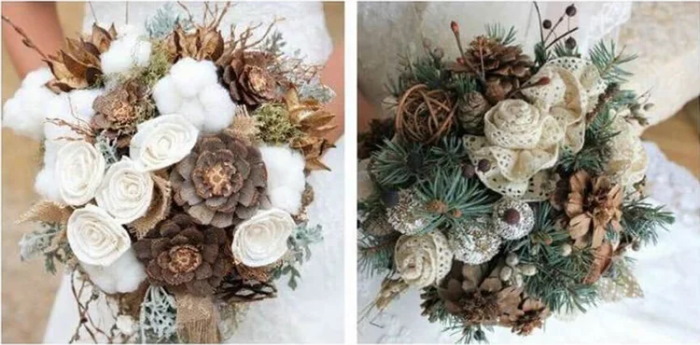
Bouquet of pine cones
Materials:
- a glass (will be a vase for flowers);
- open pine cones;
- paints of different colors;
- plasticine;
- paint brush;
- scissors;
- a glass of water;
- flower stem sticks.
Sequence of actions:
- The cones are painted in different colors and left to dry.
- The sticks are aligned to length.
- Using plasticine, sticks are attached to the base of the cones.
- The finished flowers made from cones are placed in a vase.
It is advisable to use plasticine of the same color as the cones for fastening. This will make the craft look harmonious.
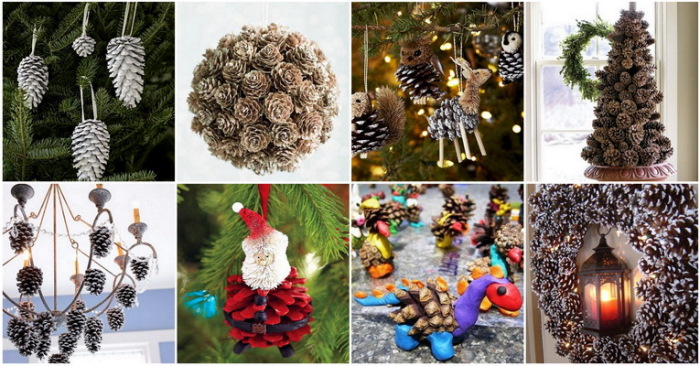
Christmas tree
Materials:
- green thick cardboard;
- spruce cones;
- green plasticine or hot glue;
- green paint;
- a glass of water;
- paint brush;
- decorations (you can choose any: ribbon flowers, beads, multi-colored tinsel).
Sequence of actions:
- A cone is made from cardboard.
- The cones are painted green and left to dry.
- Attach the pine cones to the cone using hot glue or plasticine. Do this in a random order. You can do it this way: an adult applies glue, and the child attaches the pine cone. Or use plasticine. Attach the pine cones with the blunt base to the cardboard.
- The spaces between the cones are filled with decorations.
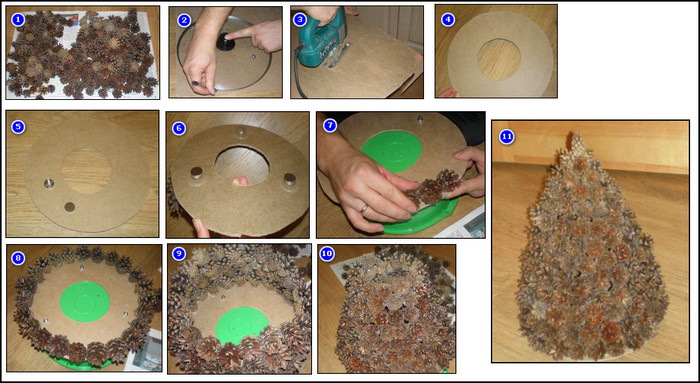
The number of cones depends on the height of the tree.
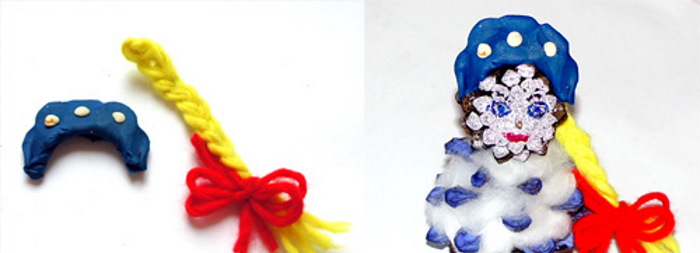
Snow Maiden
Materials:
- 2 pine cones, opened;
- red and yellow wool threads.
- cotton wool;
- markers: blue, black, red;
- plasticine blue and white;
- paints: white and blue;
- toothpick;
- paint brush;
- a glass of water.
Sequence of actions:
- The largest cone is painted blue.
- Allow the paint layer to dry.
- Using a toothpick, distribute the cotton wool between the cone's fibers, filling its voids.
- They start working with the second cone, a smaller one. Its flat part (base) is painted white.
- Let it dry.
- The eyes and mouth are drawn with markers.
- Take a piece of blue plasticine and make a crescent out of it – this will be a kokoshnik.
- Beads are made from white plasticine. They are used to decorate the kokoshnik.
- A braid is made from yellow threads. You can simply cut off a piece and make it look like hair. The end of the braid is tied with a red thread.
- A braid of woolen threads is attached to the back of a small cone, behind the drawn face.
- The kokoshnik is placed above the face.
- Using plasticine, connect the body (pine cone with cotton wool) to the head of the Snow Maiden.
Finish making 2 arms from blue plasticine. To do this, roll out small sausages and attach them to the body on both sides.
Penguin
Materials:
- spruce cone;
- white paint;
- brush;
- a glass of water;
- plasticine black, orange, white;
- cotton pad;
- open pine cone.
Sequence of actions:
- Take a pine cone and paint one part of it white. This will be the penguin's front chest.
- Leave the workpiece to dry.
- Take an open pine cone and paint it completely white. Put it aside until it dries completely.
- Make a ball out of black plasticine – this will be the penguin’s head.
- Circles are made from white plasticine – eyes. Pieces of black material are placed in their core – these will be pupils.
- The beak is made from orange plasticine.
- The legs and wings of the penguin are made from black plasticine. To create the upper limbs, the material is rolled into a sausage. The legs are made from a flattened ball.
- All parts of the penguin are connected: the head is attached to the blunt end of the cone. It is important that its sharp top points downwards, and the base will be the top of the body. The eyes and beak are attached to the head. The limbs are glued to the body.
- A penguin is placed on a cotton pad.
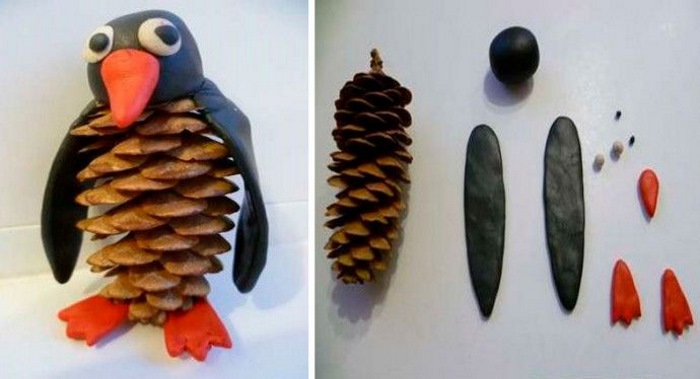
A white cone is placed next to it. It imitates an ice block. For beauty, it can be sprinkled with silver glitter.
For children 7 years old
Crafts from pine cones for children of the preparatory group help relieve stress. Unlike the middle and senior groups, children study much more different information. Because of this, the need for rest increases.
Making crafts from natural materials relaxes children. This helps restore their mental balance.
Swan
Materials:
- closed pine cone;
- cotton wool;
- toothpick;
- white plasticine, red, blue.
Sequence of actions:
- The body of the swan is decorated. To do this, the voids in the cone are filled with cotton wool. It imitates the plumage of the bird.
- A sausage is rolled from a piece of white plasticine. It is given the shape of a question mark. This detail is the head and neck of the bird.
- Near the base of the beak, the swans make a "bridle" out of black plasticine. To do this, form a diamond and attach it to the end of the head.
- The beak is made from red plasticine.
- The beak is attached to a “bridle” made of black plasticine.
- Connect the swan's body to the neck.

A ball is made from a piece of blue plasticine. Then it is flattened, turning it into a circle. This will imitate a pond. The craft is placed on it.
Birdie
Materials:
- spruce cone (preferably with a stalk);
- plasticine white, black, green;
- scissors;
- glue;
- twigs for the bird's legs;
- birch bark or cardboard.
Sequence of actions:
- Take a fir cone – this will be the bird’s body. Make eyes on it. To do this, make circles 3 mm in diameter from white plasticine.
- The eyes are attached near the stem, which imitates the beak.
- Pupils for the eyes are made from black plasticine.
- Attach the pupils made of plasticine to the center of the white circles.
- A tail and 2 wings are cut out of cardboard or birch bark.
- Attach the wings to the sides of the cone with glue or plasticine.
- The tail is attached to the back of the body.
- They make legs for the bird from twigs.
- Using glue or plasticine, attach the legs to the body from below.
- Make a ball out of green plasticine and then roll it out. This will be a meadow.
- They attach the bird to the clearing by dipping its stick-like legs into green plasticine.
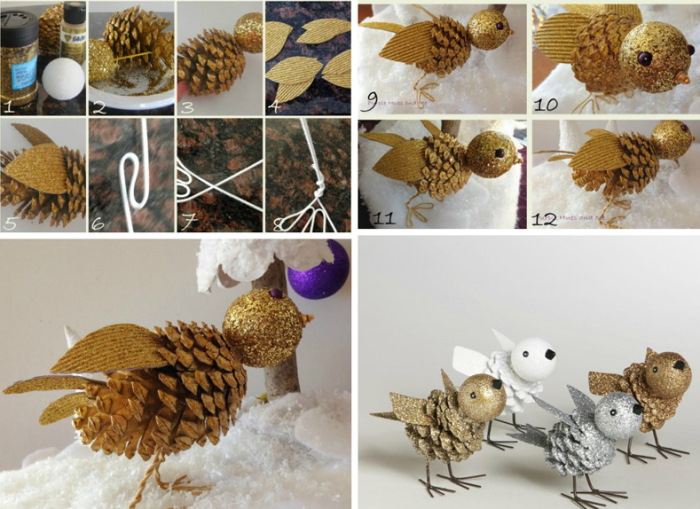
The craft will look more attractive if you prepare bird feathers in advance. They can be collected outside. They are used to decorate the tail and wings. Feathers look much more beautiful than birch bark or cardboard. If the cone does not have a stalk, then an additional beak is made from black plasticine.
Deer
Materials:
- 2 spruce cones: large and small;
- 4 twigs for legs;
- brown plasticine;
- scissors;
- glue gun;
- acorn;
- twigs for horns (preferably with numerous knots).
Sequence of actions:
- The sticks for the legs are made the same length using scissors.
- They take a pine cone, which will serve as the body of the deer.
- Heat up the glue gun.
- Branches for legs are attached to the deer's body.
- Take a smaller pine cone.
- The upper scales in the narrow part of the cone are removed.
- Fill the void with hot glue.
- An acorn is placed on the glue. It is important to consider that the smaller cone is the deer's neck. Therefore, it will be positioned vertically. The acorn head should be glued so that the animal looks straight ahead. The shape should be the letter "G". Where the short line is the acorn, and the long line is the cone.
- Using hot glue, connect both cones: the body horizontally and the neck vertically. They should form an angle.
- The nose and eyes of the deer are made from pieces of brown plasticine.
- Make 5 balls from brown plasticine.
- A ball is placed on the bottom of each leg - these will be hooves.
- From the remaining 5th ball, make a tail, attaching it to the back of the deer's body.
- Make horns. To do this, either use glue to attach twigs to the surface of the acorn. If there is no such material, then replace it with plasticine. To do this, make 5-6 sausages and connect them, imitating horns. Then they are attached to the deer's head.
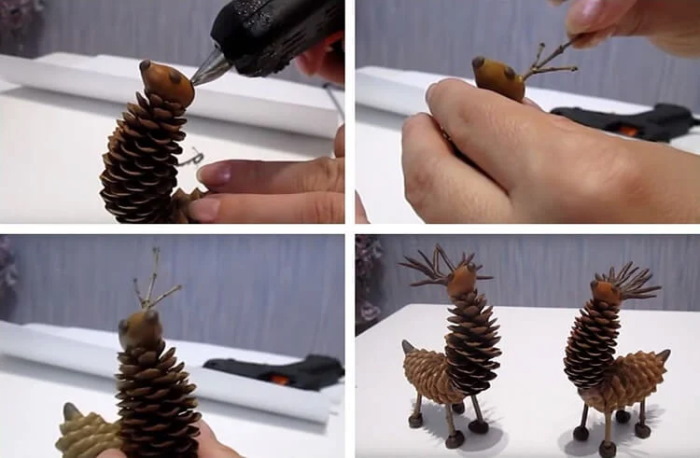
You can suggest that your child make 2 deer from pine cones. You will get a beautiful composition.
Wreath
Crafts from pine cones for children are suitable in the context of New Year holidays. The child will be motivated if you show him examples of finished works and suggest decorating the house for Christmas in a similar way.
Materials:
- white paint;
- pine cones;
- glitter;
- ribbon;
- hot glue or plasticine;
- a hollow circle made of thick cardboard;
- beads;
- paint brush;
- a glass of water;
- scissors.
Sequence of actions:
- An adult draws a circle on cardboard. The diameter is small – 10-15 cm.
- The child cuts out a circle.
- The cones are painted white using a brush and left to dry.
- A ribbon is tied to a circle of cardboard in the shape of a loop.
- Using hot glue, attach the cones to the circle. An adult drips the product onto the cardboard, and the child fixes the natural material. It is safe. If there is no hot glue, then use plasticine.
- When all the cones have been glued, decorate them with glitter.
- Beads are glued to white plasticine or hot glue along the entire perimeter of the circle. The decorations are attached to the scales of the cones.
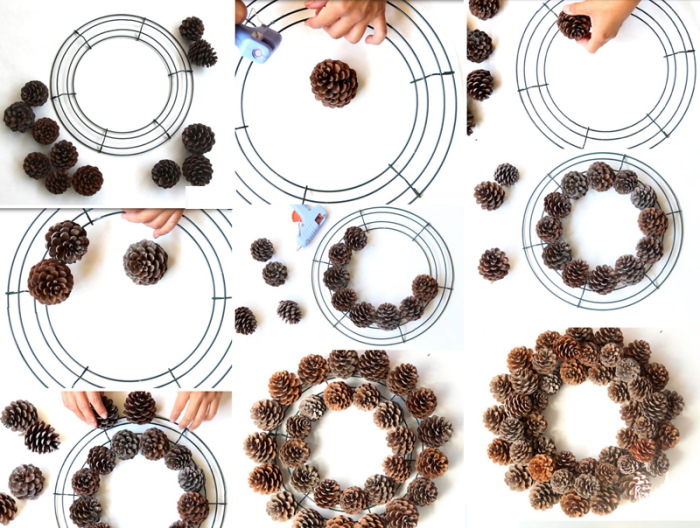
If desired, an adult can make a bow out of the ribbon and attach it near the top of the wreath.
Tips and tricks
Useful information:
- In my works I often use plasticine as an additional material. Sometimes I need to make holes in it. I use toothpicks most often. But when working with small children this object is quite dangerous. You can replace it with a ballpoint pen that does not have ink. It is safer.
- When the cone dries, it opens up. This can spoil the appearance of the craft. To keep the cone closed, it needs to be processed. To do this, they are placed in wood or other transparent glue. Leave to dry. After that, cover the cone with varnish. This will protect the craft from damage.
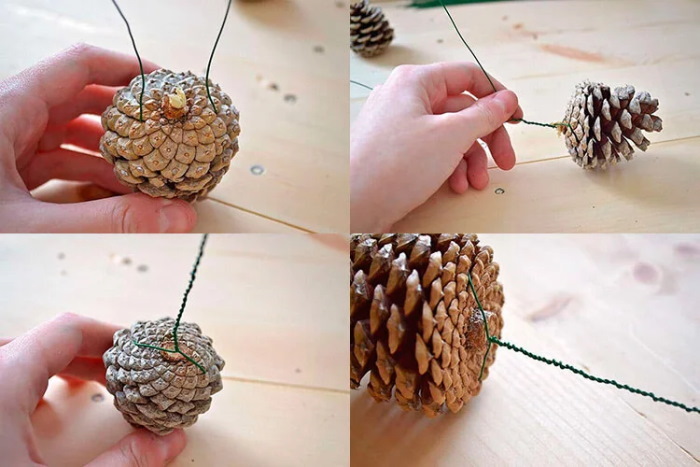
- If you need a closed cone for the craft, and only have an open one, you can change the shape. To do this, wet the material under running water and wrap it in a damp piece of fabric. After 1-2 hours, the cone will begin to close. As soon as this happens, wrap it tightly with thread. Another option is to coat it with glue.
- If you need to use white color in your craft, but you don’t have that paint, then replace it with corrector.
Crafts made from pine cones are used as a pedagogical tool. For children, creating something new from scrap materials is an exciting process. Children are introduced to aesthetic culture, their finger movements improve. All this has a beneficial effect on the overall development of the child.
Video on how to make crafts from pine cones
This video shows 10 ideas for crafts made from pine cones.