Spruce and pine cones are a great material for making crafts and decorating your home. Natural raw materials from the forest not only look original, but also have a pleasant pine aroma. Hand-made products will become an original decoration for the New Year holidays.
How to choose the right pine cones for crafts
When collecting, it is better to give preference to clean material without dried resin and insects. Any remaining dirt can be easily removed with a cotton swab dipped in an alcohol solution.
The internal cavity of forest coniferous raw materials is cleaned by soaking it in vinegar essence diluted with boiled water in a ratio of 1:1. After processing, the scales may close, but their original shape will remain.
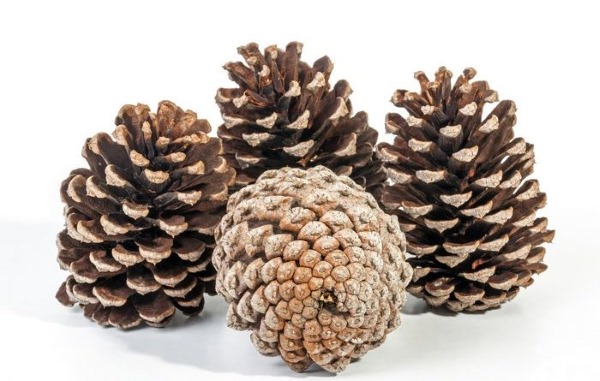
To create crafts from closed cones, it is recommended to collect the material in the autumn and in sunny weather. This is due to the fact that the raw material will be well cleaned and dried. October is the best period, when the raw material is wet and the covering scales are tightly closed. Here you can also find cones of non-standard shape.
Tools for work
In addition to forest raw materials, auxiliary tools will be needed to complete the artistic work, of these, the most frequently used are:
- scissors – must have blunt ends for the safety of children;
- awl or a large needle - a tool made of durable material is welcome, and it must have a thread passed through the eye;
- simple pencil – needed for drawing lines or contours;
- paints – necessary for the design of the proposed toy or decor, preferably gouache;
- tassels – softer for painting items, harder for glue;
- stack – designed to form the surface of clay or plasticine in creativity;
- tongs or pliers – used when screwing in wires and hooks;
- clear varnish – gives the finished product strength and smoothness.
Accessories that are dangerous to a child should only be used under adult supervision or with the help of an adult.
It is important that the teacher or parent knows the specifics of working with the devices and, as necessary, introduces the child to them.
In the process of handicrafts, several methods are used to attach elements to each other:
- Plasticine – the most accessible and easy way for children to connect parts. To make it unnoticeable on finished products, you will need to choose a color similar to the material being fastened. In addition, with the help of plasticine, it is convenient to “revive” animals by molding their eyes, nose and paws.
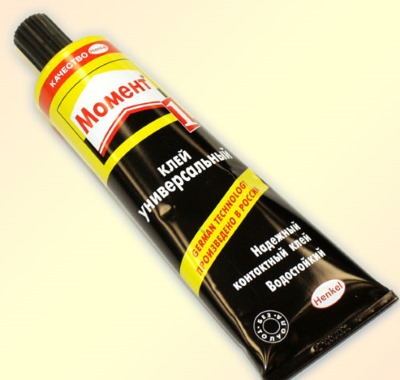
- Transparent glue "Moment" – a durable option for connecting elements when working with pine cones. Glue is applied to the parts to be fastened and pressed tightly against each other for a few seconds. It is recommended that this stage of the work be performed by adults so that the child does not inhale the glue fumes.
- Thin wire – will be needed when making certain types of crafts – a basket of pine cones, a New Year’s wreath.
Toothpicks are used less often. Material coated with glue can serve as a fastener for the body and head.
Processing pine cones for crafts
When you need open cones during your creative work, you should dry them well. Natural preparations can be collected in the spring after the seeds have been released. It is important to note that open specimens do not change their shape.
If it is necessary to use unopened cones in the work, then after cleaning the scales, it is treated with glue. You can use regular PVA glue or wood glue.
Less often, the craft requires raw materials of a curved shape. To obtain the desired blank, it is left in boiling water until it becomes elastic, and then the required appearance is formed, securing it with insulating tape.
The material intended for making the figures must be clean and dry. Cones that have been previously processed must be thoroughly dried.
There are 4 drying methods:
- Outdoors – choose a dry, well-ventilated place, cover the surface with paper and leave for 2-3 weeks.
- In a frying pan – place the raw materials in a cast iron pan, leave on low heat and, turning occasionally, bring to readiness.
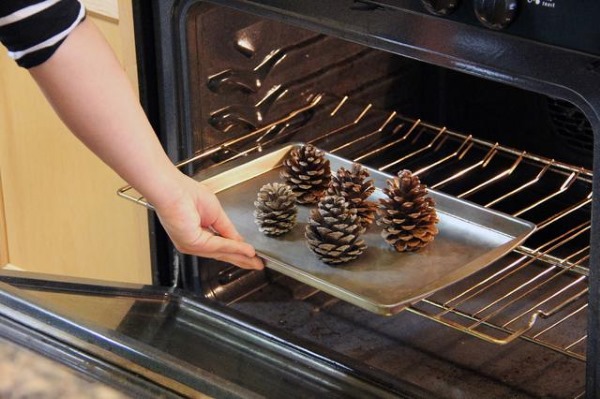
- In the oven – place foil or parchment paper on a baking sheet, distribute the cones not too tightly against each other and keep for 30 minutes at a temperature above 200ºС.
- In the microwave – the glass surface must be covered with napkins, the blanks must be laid out and the electrical appliance must be set to maximum power for 1 minute.
Pine cones require more time to dry than spruce cones. In addition, due to the lightness and volatility of the seeds, it is better to prepare them in a large and tall box.
Incorrectly processed elements can become deformed over time. Spruce cones are especially susceptible to external changes.
To ensure that your creative work remains perfect, you must follow these recommendations:
- boil the collected ingredients for 30-40 minutes;
- remove accumulated moisture by drying;
- carefully treat the finished material with wood glue;
- If you want to obtain light-colored cones, you should soak the raw material in a container with universal bleach.
Natural raw materials after heat treatment will become clean and safe. Crafts made from pine cones can be covered with paint of the desired color, varnish or artificial snow. The choice will depend on the intended decoration.
In some cases, when performing artistic work, it becomes necessary to drill or cut the material. With such an impact, the scales of cones, especially spruce ones, break and crumble. To keep them intact, you need to get the drill tip into the center of the workpiece as accurately as possible and deepen it with rotations without applying force. The resulting hole is covered with glue.
The principle of processing and creative work with spruce and pine cones is identical. The only difference is that crafts made from spruce material will have an elongated shape.
What other materials can be used?
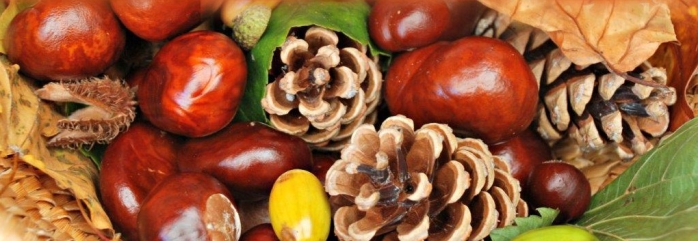
Besides pine cones, there are many other natural materials that can be combined with pine cones – bright leaves, chestnuts, different shaped stones, acorns – great improvised means for children's and adult craftsmanship. Combining raw materials of different shapes and textures will allow you to create an artistic work of any size.
In art grain crops, nuts, matches, and threads are also successfully used or other handicraft items. Additional elements will make the work more realistic and creative, breathe life into the animal figures. Experts assure that the combination of artificial and natural parts is welcomed in any craft.
Craft ideas for kindergarten
Crafts made from pine cones are a good solution for decorating the interior on the eve of the New Year holidays. From available components, you can make something new and interesting with your own hands at any time. Creating original crafts is an activity for the whole family.
Christmas tree
A DIY Christmas tree is the main creation before the New Year.
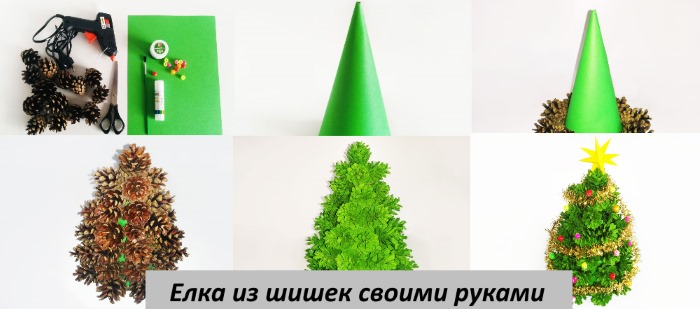
To make the figure you will need:
- cones of various sizes;
- glue gun;
- spray paint;
- cardboard;
- scissors.
The first stage of the craft is to form a cone with a base from cardboard. Spray paint on carefully cleaned and dried cones. If desired, the raw material can be left in its natural form.
Next, you should select the largest cones and, using a glue gun, start from the base and glue them around the bottom of the cone. Moving towards the top, use smaller and smaller materials. As a result, small elements remain for the peak of the cone.
The process of making a Christmas tree is completed by decorating it with glitter, beads, and ribbons. It is important to tastefully select the color scheme when decorating.
Bear
Crafts made from pine cones with your own hands can be made in any size: as a table souvenir or a garden figure. They will captivate children in creativity, developing perseverance, diligence and imagination. Even a child can handle the proposed version of the bear design.
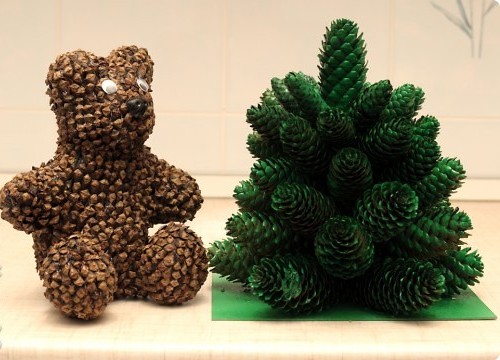
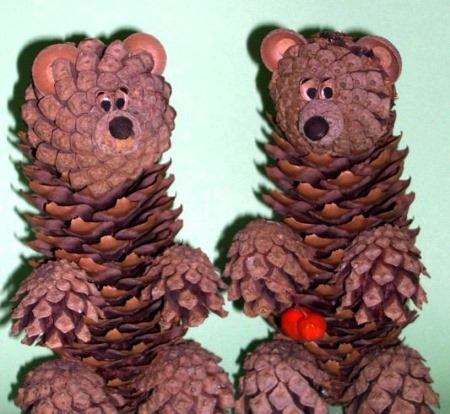
Materials for creativity should be prepared in advance (table 1).
Table 1
| Item No. | Number of cones | Purpose |
| 1 | 1 pc large | Torso |
| 2 | 1 pc smaller size | Head |
| 3 | 4 pcs. medium | Paws |
| 4 | 2 pcs small | Ears |
All elements need to be assembled, securing them together with glue or wire. From plasticine you need to mold eyes and a nose. The bear made of cones is ready. You can decorate the new product with a bright bow made of ribbon.
Candlestick made of pine cones
A small project of a New Year's candlestick attracts with its simplicity and originality. A preschool child can cope with the original idea.
To create it, you will need a minimum set of raw materials and tools:
- wax candle - it is recommended to take a wide one;
- small cones;
- cardboard or strong paper;
- glue.
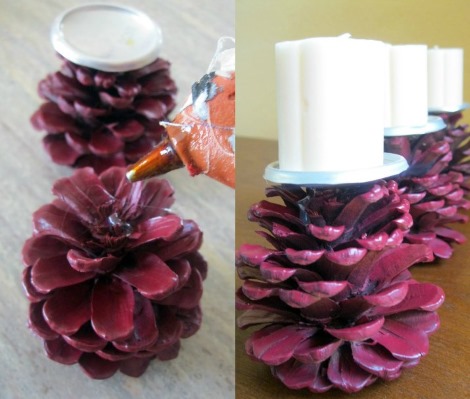
The prepared candle must be wrapped in cardboard and secured. The paper must hold well and fit tightly to the walls of the candle. Next, the base of each cone is coated with glue and attached to the workpiece.
To add brightness to the candlestick, the materials are pre-painted or sprayed with glitter. Quick candlesticks can be made in advance or on New Year's Eve.
Hedgehog
Using gifts of nature and decorative elements, you can create fascinating children's toys. Acorns, chestnuts, leaves, and artificial elements are used for their production.
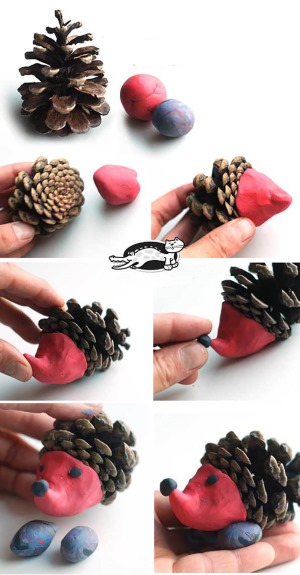 Creativity begins with the preparation of the necessary components. In this work you will need opened pine cones and plasticine: black and white.
To decorate the hedgehog, decorative elements and colored plasticine are used.
Step-by-step execution of the figure:
- From a small piece of white plasticine you need to form the animal's face and attach the blank to the flat part of the pine cone.
- Next, you need to bring the toy to life by making ears, and using black plasticine – eyes, a nose and paws.
- Using multi-colored plasticine, you need to mold mushrooms and apples. The fruits are pinned on the hedgehog's back.
Crafts made from pine cones with your own hands can be used as a fun toy for a child or a nice souvenir for loved ones.
New Year's wreath
New Year's wreath is the most beautiful decoration made from fir cones.
Making the decor, if you follow the step-by-step instructions, will not take much time:
- The newspapers need to be rolled into a ring, wound with wire - this will be the basis of the product.
- The resulting ring should be wrapped with beautiful fabric (organza) and the ends secured with a glue gun.
- Fir cones are attached to the frame along the entire perimeter.
- The resulting wreath can be decorated with tinsel, beads or ribbons.

Spruce blanks can be prepared in advance, painting them in gold or silver. When preserving the natural look, the material is supplemented with green branches with red ribbons. Spruce decor looks more impressive if sprinkled with glitter.
To simplify the process of creating a New Year's wreath, you need to take a ready-made base as its basis. A separate item can be purchased at any craft store.
In this case, creativity begins directly with attaching processed cones and decorating the product. Creativity can be diversified by adding materials such as chestnuts, acorns or nuts.
Garland
The production of the garland begins after the preparation of the cones. Large and open blanks are best suited for creation. The materials, cleaned of dirt and painted with the required paint, must be strung onto the tape, maintaining the same distance between the elements.
Step by step instructions:
- First, you need to measure the distance in the room where the garland will be placed.
- Next, cut the tape according to the measurements, leaving a small allowance for sagging.
- The cones are laid out and their location is marked on the tape.
- Holes are made in the marked places, and loops for hanging are sewn on the ends of the tape.
Now you can start processing. It is necessary to carefully break off the top row of scales, coat the processed area with glue. Next, screw the screws with hooks into the center of the workpiece using pliers. Finished products are hung on a ribbon, matching in color, shape and size.
Crafts can be made in the evenings with your family. Original figures and decorative items made from pine cones are a reason to reveal your child’s creative abilities and make New Year’s gifts with your own hands.
Article formatting:Natalie Podolskaya
Video about making DIY pine cone crafts
Crafts from pine cones - the best ideas in this video:
An interesting tree made of pine cones, I'll have to suggest this idea to my child for the New Year's exhibition at school 🙂