Learn to use a pencil can be done quite quickly at any age. The article briefly describes the basic requirements for images and gives examples of easy pencil drawings for beginners.
Rules of drawing with a simple pencil for beginners
Drawing begins with learning how to hold a pencil correctly. The sheet of paper is fixed vertically or at an angle. When drawing contours, the hand touches the paper only with the little finger, so as not to smear the lead.
Hatching
Hatching appeared from the need to quickly reflect the play of light in the drawing. Academic hatching is a multitude of parallel lines. Smooth surfaces are depicted by two-way hatching, forming thin diamonds. Glare surfaces are created by diamonds of different widths. When shading a drawing, the pencil can be held as usual, like a pen.
The artist uses many hatching techniques. These include small circles and ovals, applied like a drawing of a bunch of grapes. They also hatch with lines that repeat the contour or direction of movement. The selection of hatching methods is aided by artistic intuition and a deep understanding of the structure of nature, which come with experience.
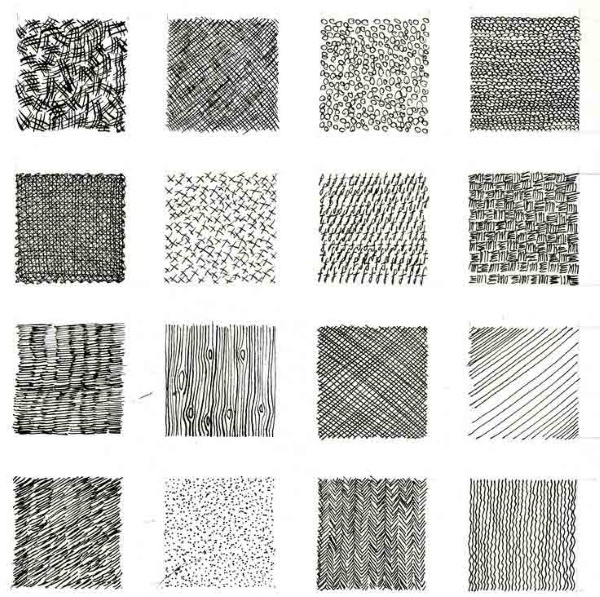
Beginning artists can create chiaroscuro by shading, for which the pencil is cut at an acute angle to increase the drawing area of the lead. Shading is done by movements along the strokes. A synthetic brush and a cotton swab are used to even out the tone. Light spots are created with a soft eraser.
Circuit
To draw the outline of the object being depicted, you need to practice a lot.
Stages of training:
- Drawing straight lines.
- An image of simple geometric figures with sides in the form of segments.
- Reproduction of curved lines with their gradual complication and lengthening.
- Drawing a circle. Preparatory markings are required.
- Drawing curves conjugate to a circle. If you can't do it right away, you can draw straight lines, which are then transformed into curves.
- Selection of the area within which the contour currently being worked on is placed.
- Maintaining proportions.
Perspective
At a distance, objects are seen by a person in a reduced size and with a changed form. Realist artists, in order to convey a truthful image in a drawing, use the observer's perspective. They acquire this skill as a result of studying and long-term practice of the laws of such exact sciences as linear perspective and axonometry. Axonometry is used in drawing.
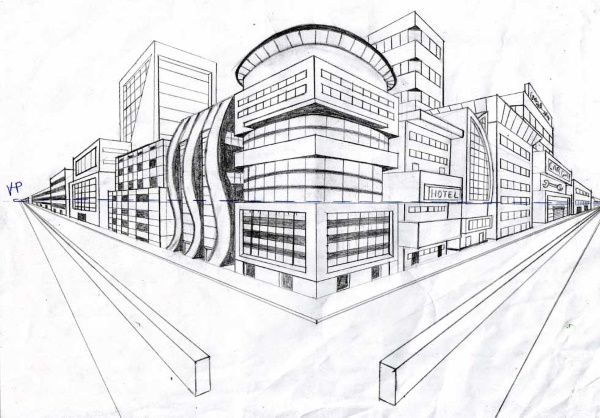
Often used in the depiction of architectural objects. Linear perspective studies the rules by which drawings on a plane look as if a person sees it alive. The eye's perception of close and distant objects is subject to different patterns. It happens that artists place the focus of a painting not in the foreground, but in the middle or distant levels.
Then the remaining details are drawn less clearly. Painting ceilings or looking from above also have their own laws of perspective. According to the rules of linear perspective, parallel lines intersect at the observer's horizon.
To depict an object facing the viewer, one-point perspective is used. Most often, 2 vanishing points are used. 3 points are chosen when drawing a very tall object.
Light and shadow
Thanks to the transmission of light and shadow, the viewer sees a three-dimensional image on the plane of the paper sheet. Light and shadow in the drawing clearly highlight the shape of the object, the volume and even the material from which they are made. The observer also understands where the light comes from and feels the strength of the illumination. The play of light and shadow evokes sensory perception.
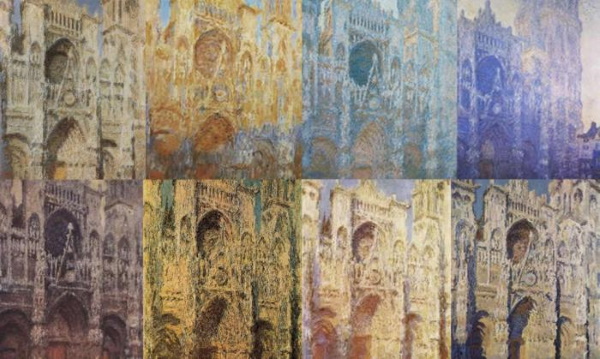
The ability to use chiaroscuro and perspective in painting is especially important, since illumination and distance affect a person's perception of the color palette. Optical effects that affect the appearance of objects depending on the strength and direction of light are vividly conveyed by C. Monet in the triptych "Rouen Cathedral at Different Times of the Day".
The laws of chiaroscuro were developed by Renaissance artists and are being improved and supplemented to this day, as draftsmen and brush masters want to reliably depict reality in light from several sources. In low light, there are no contrasting boundaries between light and shadow. Tonal transitions are soft, with a large palette of shades.
The midday landscape requires clear, albeit short, shadows, clear contours. The setting sun covers many details with a dark veil, breaks through between some objects with lonely rays, causes long shadows. Lighting, when the light source is behind the image, is called backlighting.
It looks especially impressive in forest or park landscapes. Frontal and back lighting makes objects flat. Side lighting allows you to depict the maximum number of characteristics of a three-dimensional object.
The shape of the falling shadow depends on:
- location of the light source;
- shapes of the subject of the image;
- the slope of the surface on which it is visible.
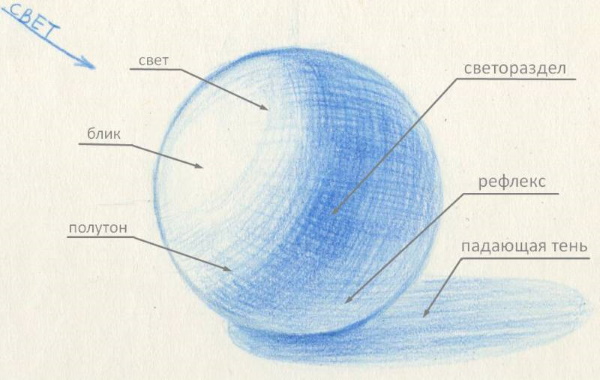
It lies along the rays of light. The shadow is thicker near the object, then it becomes lighter. If there is a window, lamps or candles in the drawing, it is necessary to take into account that the objects closest to the light source are clearly visible. As the distance increases, the contrast decreases. This effect is called light perspective. Light falling on the object perpendicularly forms the lightest spot on the object.
Rays reflected on shiny surfaces are depicted as highlights. The reflection of illuminated surfaces cast on shadows (reflex) is also taken into account. So when drawing a separate object, the highlight is depicted as the lightest, then the illuminated place. Where the rays pass tangentially, the halftone is darker, the reflex is even darker. The shadow is the darkest part of the drawing. Light does not penetrate there at all.
Construction of the composition
Composition requires that objects be placed on the sheet in such a way as to create the impression of a single whole. Free space and the scale of the image must be balanced. Objects are placed stably, grouped together. Their sizes must be harmoniously combined.
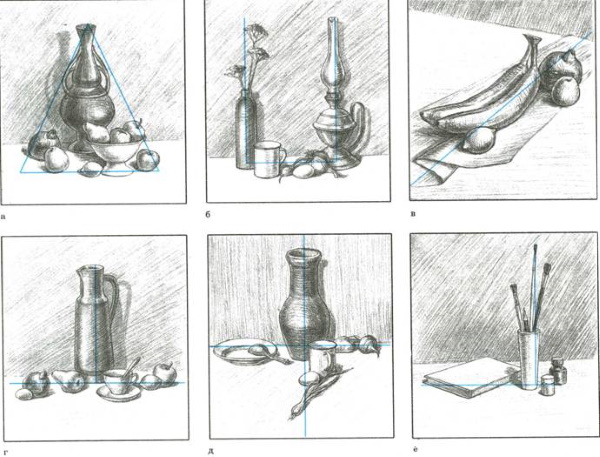
To check that the optimal option for placing the composition has been selected, it is recommended to mentally:
- move it in different directions;
- alternately enlarge and reduce the image;
- check whether any object has left the zone of general perception.
Easy drawings for copying in a sketchbook
A sketchbook is a small travel album for drawing. It allows you to make sketches on the way to work, during a trip or a short walk. It produces a lighter version of the sketch, since short lines are easier to draw. For some beginners, this can be useful in the first steps of learning to draw.
Cube
Easy pencil drawing for beginners often involves the ability to draw a cube to depict more complex objects, of which this figure is a component. Drawing a book, a house, a cabinet, a stove requires the same skills. A cube is easy to depict with 1, 2 or 3 vanishing points. It is easiest to develop an understanding of the laws of perspective on it.
When the cube is turned to the viewer with one face, 1 point is selected. Rays are drawn from the vertices of the face, converging at this point. On these rays, in accordance with the law of linear perspective (the further, the smaller), the lateral edges are laid off. The resulting four points are connected, forming the face farthest from the viewer. Auxiliary lines are erased. The cube is ready.
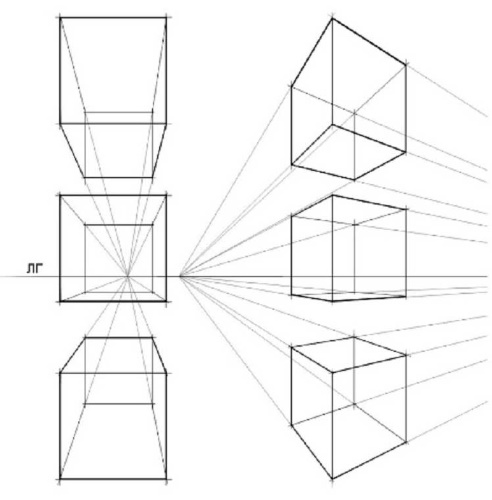
If the edge is closer to the viewer, two vanishing points are used, located to the left and right of it. From the ends of the segment that forms the edge, horizontal edges are laid off along the rays directed to the vanishing point. The connection of new points forms a face.
Rays are drawn from its vertices to another vanishing point. The process is repeated until all edges are drawn. Auxiliary lines and invisible details are erased.
Sphere
The ball, no matter how you turn it, always shows a circle.
The difficulty lies in the shading, which gives the figure volume:
- A square is drawn.
- A circle is inscribed in it.
- To highlight the boundaries of light and shadow, curves are drawn that are connected to the arcs of a circle. They resemble the meridians and latitudes of a globe.
- Depending on where the artist depicts the light source, the shading tones are hatched. The falling shadow is depicted as an ellipse.
Cylinder
Easy pencil drawing for beginners - cylinder. For this, use a prism with a square at the base. It is drawn in the same way as a cube, only the side faces have parallel edges of a different length.
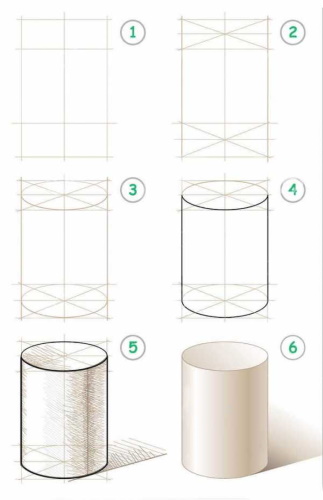
Next:
- The midpoints of the edges are located on the base squares.
- Ovals are drawn through them.
- The ovals are connected to each other by lines parallel to the long edges of the prism.
- The prism and all unnecessary things are erased.
Dishes
Easy pencil drawing for beginners - still life of dishes. First, make a composition: each object is marked with a circle. Each thing is drawn taking into account the above-described rules of group images. Step-by-step drawing of a plate, glass and mug will serve as an example of displaying dishes on paper.
Plate:
- An oval is drawn.
- A smaller oval is drawn inside it.
- The curves connected to the oval form the depth of a shallow or soup plate.
- Patterns are written out.
- The shading is applied inside.
- Contour lines are outlined.
- The shadow is shaded from the outside.
- Extra lines are removed.
Glass:
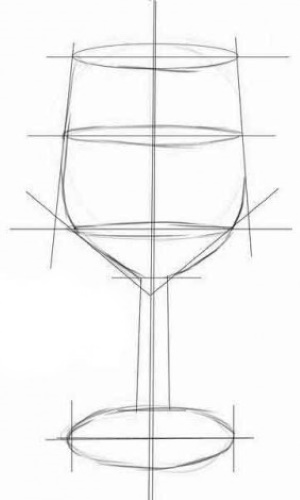
- A vertical line is drawn.
- A circle is drawn on top, and a smaller oval on the bottom, so that the straight line is their axis of symmetry.
- The line in the middle thickens and turns into the stem of the glass.
- The upper circle, by analogy with drawing a cylinder, is transformed into a bowl, maintaining complete symmetry relative to the original axis.
- The marking lines are erased.
- The outline is drawn with thick lines.
- The drink in the glass is shaded.
- Shadows are depicted.
Mug:
- A square or rectangle is drawn for the mug.
- A rectangle or trapezoid is added for the handle.
- The body of the mug is painted with ellipses parallel to the image of the edge.
- A rim is depicted indicating the thickness of the mug.
- The handle is given a volume of arbitrary shape.
- The inside of the vessel is shaded.
- The marking lines are erased.
- The outline is being drawn.
- The shading is thought out and applied to reproduce the play of light and shadow.
Plants
A person observes trees, leaves, flowers practically everywhere. Plants become elements of ornaments, still lifes, landscapes and even portraits. When depicting plants, it is necessary to have a nature or a ready-made drawing in front of you.
The tree located directly in front of the viewer is usually more detailed:
- The trunk is depicted.
- Branches of all levels are outlined with thin lines.
- The boundaries of the crown are defined with short strokes (there is no symmetry).
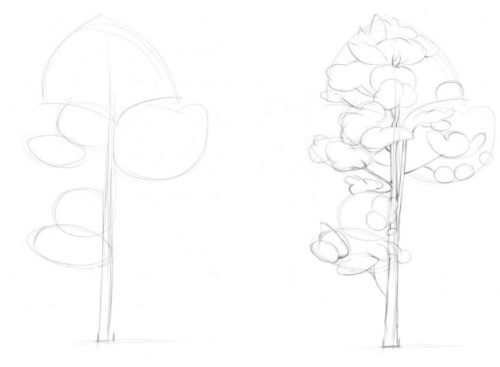
- Leaves of a specific shape are selected in a suitable scale.
- Several areas filled with leaves are drawn inside the crown.
- Leaves are added to the branches that remain visible to the viewer.
- Thicken the branches, knots, depict the roughness of the bark, hollows, everything that your imagination suggests.
- Think about where to place the light source.
- Outline the shadow areas.
- Use a soft pencil to depict the tones on the branches and trunk.
- Highlight the trunk with a darker tone.
- Detail the leaves.
- Distribute shadows on the leaves.
- Draw the outlines of several leaves from the crown to add volume (small details are not necessary).
The tree in the background might look like this:
- A sketch of the trunk and crown is made in the form of a cloud.
- External elements emerge from beneath this cloud: branches, leaves, a few strokes on the bark.
- The entire volume of the crown is filled with foliage.
10 Pencil Drawing Lessons
To give courage to beginning authors, it is necessary to show that already at the very beginning of training it is possible to create attractive drawings. They will become not only the result of the student's work, but also excellent exercises for further development of skill.
Tulip
Easy drawing for beginners - tulip. Flowers are often included in a simple geometric shape.
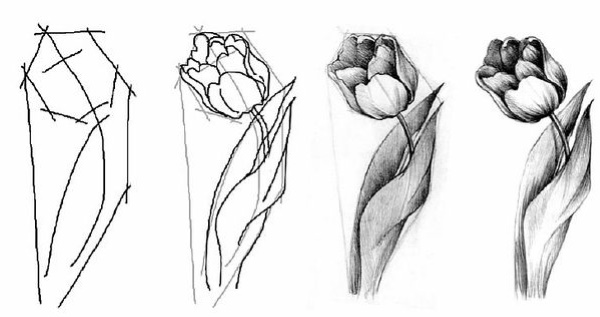
The tulip resembles an oval:
- Draw a straight line other than vertical.
- Using it, draw an oval.
- Place dots on the elongated ends of the oval. Draw a curved line through them.
- Mark the line of the stem and the 2 outer leaves, taking into account the rules of composition.
- Looking at a live flower or a sketch, draw the petals using a line on an oval.
- Thicken the stem.
- Using the marked lines as a central vein, draw the leaves.
- Closer to the stem, a third, smaller leaf is depicted.
Erase extra lines.
When drawing several tulips, the boundaries of the composition are also outlined, ensuring that no element looks separated from the group.
City
Step by step instructions:
- Rectangles define the outlines of houses.
- They draw windows that are proportionate to approximately the same height of floors in all buildings.
- Displays building finishes, roof shapes, turrets and other selected design elements.
- Trees and other elements that add variety to the urban landscape are drawn in silhouette.
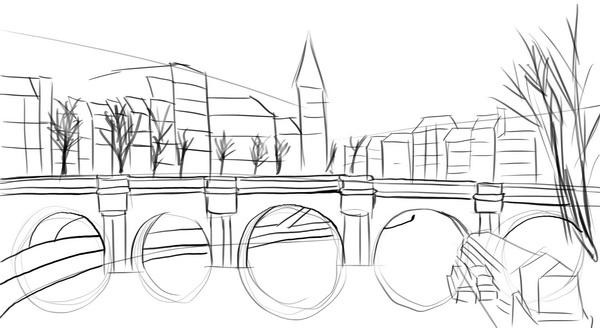
- Fragments of houses obscured by the main buildings are added to the background.
- They are drawing the contours.
- They denote the plane of the earth's surface.
Cat
Step by step instructions:
- The body is drawn, resembling a rectangle with curved sides. The back is slightly narrowed and convex. The long sides are slightly curved upwards.
- The neck is added - two curves convex forward.
- The profile of the head is outlined - almost straight parallel lines. The line from the far top of the neck extends to the forehead. The second one goes from the upper edge of the side of the neck closest to the muzzle to the chin. Then an almost vertical short line is drawn to the nose. The nose and forehead are connected by a downward curve.
- The belly is depicted as a downward curved line from the chest to a point located approximately 2/3 of the way down the body towards the tail.
- The base of the tail is outlined with two lines.
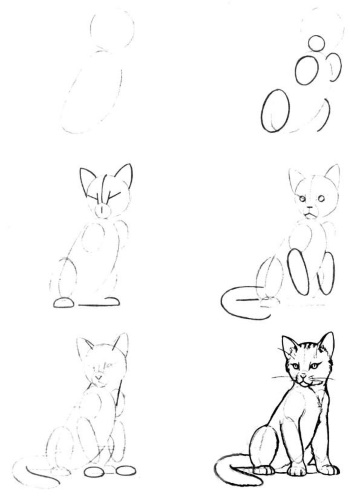
- The top of the ear is marked on the continuation of the guide neck.
- The edge of the ear is drawn in the form of a small cut leaf.
- The far ear appears as a small triangle.
- An almost triangular eye is depicted under the forehead.
- Mustaches are drawn near the mouth, eyebrows, and ears.
- Two curves curved towards the front start at the edge of the abdomen and the extreme rear point of the body, converging at the knee joint and running almost parallel to the foot.
- One line of the front leg starts at the lower vertex of the rectangular body. The second line cuts off a section of the body already at the neck. They narrow towards the foot.
- The small front and elongated back legs are drawn in.
- A pose for the tail is selected and depicted.
- The pupil is drawn.
- Unnecessary lines are erased.
- The body is shaded taking into account the laws of light and shadow.
Wolf
The animal's head is drawn as a circle. The back of the neck is outlined tangent to it. The near ear is drawn on the extension of the neck. By extending the line of the distant part of the near ear to the intersection with the opposite part of the circle, we get a point, above which a rectangular muzzle is drawn. From the point of contact of the neck with the circle, a perpendicular is drawn in the direction of the muzzle.
It will cross at the location of the nostrils. The second ear, smaller than the first, is drawn in the form of a triangle slightly inclined towards the muzzle. The nose, mouth, eye, and inner part of the ears are outlined. The contours are almost erased, leaving barely noticeable outlines. The fur is drawn from the top of the head in the direction of the muzzle with clear strokes. The markings are erased. The fur is finished.
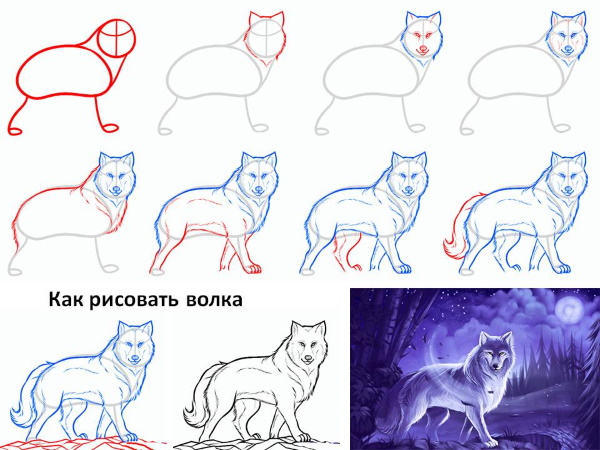
On the smooth parts of the skull the fur is shaded. On the bends, where it joins the neck it is clearly visible.
The body is drawn by analogy with the body, limbs and tail of a cat. It is given characteristic distinctive features. The fur is necessarily drawn. Otherwise, there will be no resemblance to a wild animal. Where necessary, the drawing is shaded.
Anime Pikachu
You can't press hard on the pencil here, as there will be a lot of auxiliary lines:
- First you need to draw a circle.
- From its center, draw 1 horizontal and 1 vertical line.
- Draw circles for eyes on the horizontal line.
- Draw a mouth that is symmetrical relative to the lower part of the vertical, like a parabola, closed at the top by a wavy line.
- Make the head round at the top and bottom, and flattened at the sides. Draw ears from the upper corners of the square, similar to tulip leaves.
- The ends of the ears and eyes are painted over. The small circles remain as light pupils. The semicircles adjacent to the outlines of the head indicate the cheeks.
- Draw a circle at the bottom, slightly larger than the head, intersecting it slightly. Straighten the circle on the sides and at the bottom, so that it looks like a square with rounded corners.
- Insert arms between the circles in the form of raglan sleeves.
- Draw small fingers at the bottom, like halves of grapes.
- Draw the hips in the form of semicircles at the bottom of the sides of the body. Feet are halves of elongated ovals. Observe the proportions.
- Two three-step zigzags connected by a straight line form a tail. From the base of the tail, each subsequent step is lengthened.
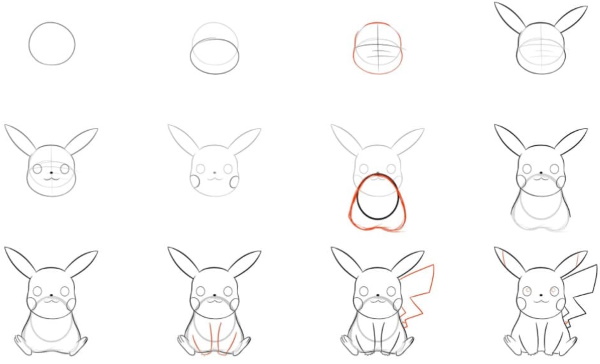
- Draw the outer contours with a thick line.
Dragon
It is easier to draw a snake-like dragon, since it has no wings. It is, in fact, a scaly snake with lizard legs. The head and body are outlined with circles and sticks. The dragon's body is formed. The unnecessary auxiliary lines are gradually erased.
Eyes and teeth are drawn on the head. Spikes start on the head and go along the back. Claws are drawn. Skin folds are finished, lines are rounded. It remains to add and correct small strokes until the dragon matches the author's idea.
Automobile
Step by step instructions:
- It is necessary to define the limits for the drawing with marks on four sides.
- Next, draw the frame of the car without the internal parts and wheels.
- They draw windows and side mirrors, a spoiler.
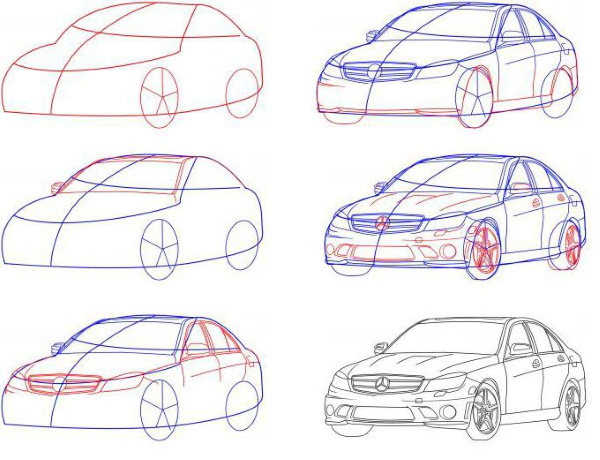
- Add wheels with a rim pattern.
- Draw the doors. Draw a line on them, on which the door handles are placed. Draw the high and low beam headlights, the hood and the bumper.
- The remaining details and what is visible through the glass are drawn. The foreground is outlined with a thicker line.
- Shade the shadows starting with the light tones so that if you make a mistake it will be easier to erase.
Human
A simplified version of a drawing of a person, made in pencil, for beginners:
- First, make a sketch of the head in the form of an oval. Measure its length. On a vertical line drawn down from the end of the head, put off 6 more such dimensions.
- The neck should be approximately 2 times narrower than the head.
- Each shoulder is equal to the length of the head. They are drawn slightly sloping.
- The waist is slightly below 2.5 head lengths, counting from the crown. From this point, draw a horizontal line wider than the head, but narrower than the shoulder span (symmetry relative to the vertical line). Connect the ends of this line to the ends of the shoulders.
- The length of the head, measured four times from the crown, gives the lowest point of the body. Here a segment is drawn, perpendicular to the vertical, wider than the waist, shorter than the width of the shoulders.
- The knees are located below the 5th mark, a short distance from the vertical line. They are indicated by small circles.
- The hips are formed by connecting these circles with the pelvic line.
- The ankle joints are marked with circles at a level slightly above the last seventh mark. They are connected to the knees with convex outward lines.
- At the 7th mark, the feet are depicted as small elongated ovals.
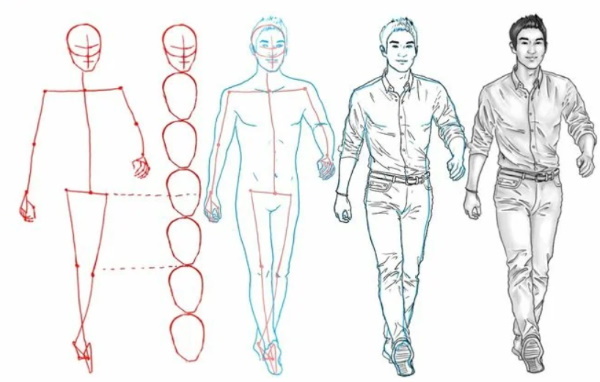
- The elbows are marked with circles at waist level.
- Draw the circles of the hands just above the pelvic line. These are the proportions of an average person. In real life, the length of the arms varies greatly among different people. Other parameters are more suitable for the average scheme.
- Connect the elbows with the wrists and with the shoulders in a curved, convex manner.
- They depict palms and fingers (reaching the middle of the thigh).
- Draw the details of the face: eyes, nose, mouth, eyebrows. Depict hair and ears (located at the level of the nose and have the same length).
- They draw clothes: trousers, a T-shirt, boots.
- Erase auxiliary lines.
- Outline the contour.
- They apply chiaroscuro.
The arrangement of the parts of the face on the head by levels is shown in the table below:
| Zones | Organs |
| 1st from top | Hair, forehead, eyebrows |
| 2nd (middle) | Ears, eyes, nose, lower part of hair |
| 3rd (lower) | Mouth, chin |
Horse
This is one of the most difficult animals to draw. The body of different representatives of the fauna is drawn approximately according to the same scheme. In order to depict a horse in volume, it is necessary to know its anatomy. Since the horse has short hair, the muscles stand out in relief. Applying shadows is a very difficult task.
The horse's legs end in solid hooves instead of nails or claws. From the side, the end of the leg resembles a cap, the visor of which is the hoof. It is better to draw animals from photographs, since "live" they can change the angle at any moment. Having studied the photo, draw the horse's legs. Draw the fur, its tufts at the very hooves.
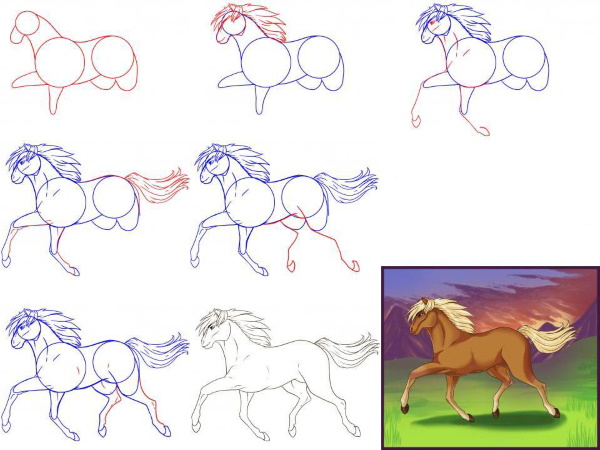
Instructions:
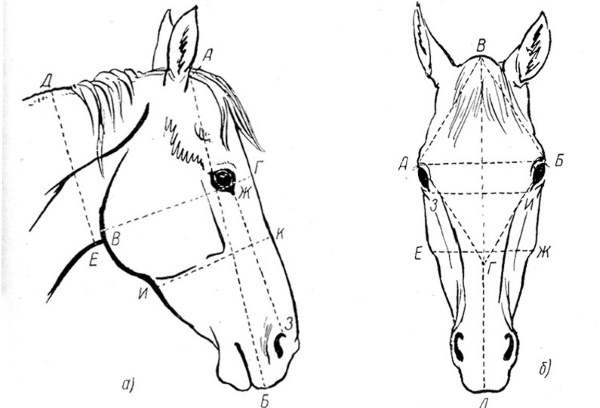
- The head is drawn based on three circles: a large one is the head, a smaller one is the muzzle, and a small one is the nostrils.
- Connect the circles and draw ears.
- The muzzle is divided into 3 horizontal parts by straight lines perpendicular to the line connecting the centers of the 2 circles of the muzzle.
- The two lower ones depict lips.
- Inside the small circle, draw a nostril in the form of an oval with an inverted comma inside.
- Draw 2 lines from it to the ear.
- A line is drawn through the center of the large circle, parallel to the tangent lying on the two small circles.
- The upper semicircle of the head is divided in half again by a line parallel to the previous one. The eye is located in the rhombus between the last 2 lines and the 2 lines coming from the nostril.
- The muscles of the head under the skin are drawn. The flat cheeks are indicated and covered with fur.
To draw an eye, draw a circle. - They divide it into 4 parts by parallel lines.
- A perpendicular to them is drawn through the center.
- Another perpendicular is drawn slightly above the first.
- An oval is drawn below the perpendiculars.
- The eyelid is placed in a narrow strip and to the right of the oval.
- Creates thick, straight eyelashes.
- The eye needs to be shaded with a dark tone.
- Next, you need to draw the area around the eyes and apply shadows. The eyelashes should stand out.
- On the muzzle, only the lower lip is emphasized. In this area, the horse has whiskers sticking out everywhere.
- The ear is drawn in the shape of a round mound, from the upper half of which grows a twisted petal of the auricle, filled with fur.
The horse's mane is thick and long. It falls from a straight line on the spine. The horse's tail is shorter than the hair on it. Therefore, its end cannot bend like a cat's. The main thing for beginners is to feel the pencil as your own hand, to master the rules of drawing simple pictures in practice.
Author: Svetlana Bulgakova
Video about drawings for beginners
How to draw a face and hair: