Making paper crafts with your own hands is an interesting form of creativity. You can do them together with children, which helps develop their imagination and creative thinking.
The Benefits of Making Paper Crafts for Kids and Adults
Do-it-yourself paper crafts can be useful for both adults and children in the process of their creation. This type of creativity will help parents to take a break from work and household chores, spend time with their child and strengthen their relationship with him, or allow them to create something to decorate the interior of the house.
The process of creating crafts benefits the child in the following ways:
- develops perseverance;
- stimulates imagination;
- accuracy is trained;
- an understanding of harmony and proportions develops, and a sense of color is formed;
- mental activity is stimulated;
- problems of folding shapes are solved;
- spatial thinking is trained;
- independence develops;
- fine motor skills are developing.
What tools do you need to prepare to create crafts?
To work with paper you need the following tools:
- paper (white, colored, corrugated, sometimes cardboard is needed);
- glue;
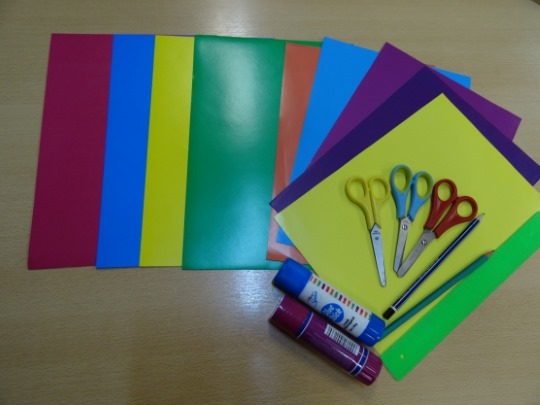
- scissors;
- hole punch;
- Scotch tape (regular and double-sided);
- ruler;
- pencil.
Paper Bookmarks: Step by Step Instructions
While reading a book, you always want to mark the page where the reading process was interrupted. In this case, a bookmark can help, which you can make yourself. At the same time, they can be completely different in both shape and color, with the addition of decorations. Below are various options for making bookmarks for books from paper.
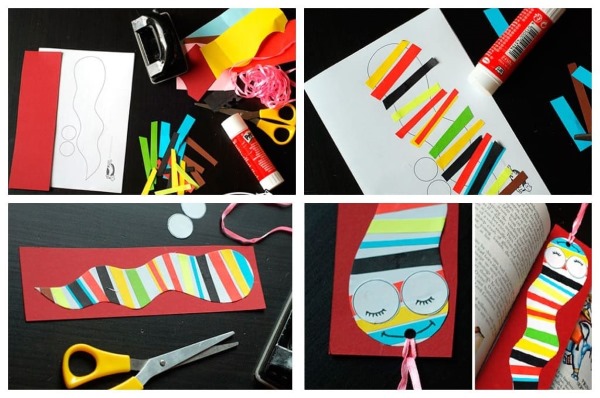
Option #1 – worm bookmark:
- The first step is to print out the template of the future bookmark and cut it out.
- Next, you should cut out about 20 pieces of multi-colored strips of different widths.
- Then the cut out bookmark template needs to be glued to a strip of cardboard and cut out. This will be the basis for the future bookmark.
- Next, use a hole punch to make one hole in the area of the worm's head. It will be needed to attach the ribbon later.
- Next, you need to glue colored stripes across the entire length of the worm across its body.
- Finally, you need to glue the eyes to the worm and secure the ribbon through the hole in its head.
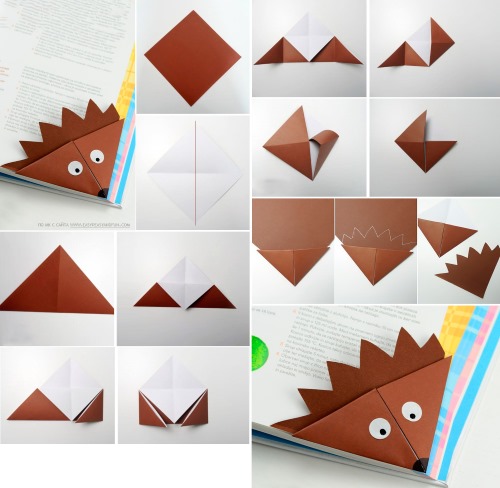
Option #2 – hedgehog bookmark:
- To begin, a sheet of light brown paper needs to be folded diagonally in two directions.
- Next, the sheet should be folded to form a triangle. The top part of the sheet is folded to the middle.
- Then you need to bend both sides of the triangle to the right middle.
- Next, you need to unbend the edges, and then bend the left part of the figure parallel to the central vertical line of the triangle. The same actions need to be done with the other side.
- Then both ends are folded into the resulting pockets.
- Next, a sheet of dark brown paper is inserted into the corner of the bookmark.
- Then, on a sheet of brown paper, draw the spikes, cut them out and attach them with glue along the edge of the bookmark pocket.
- The last step is to draw the eyes and nose.
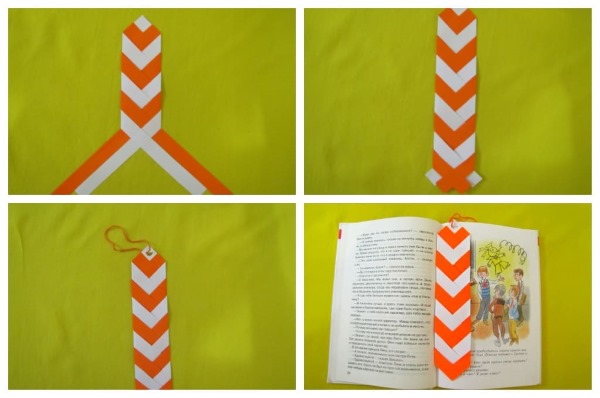
Option #3 – bookmark with a tie weave:
- First, you need to take 3 strips of paper (2 pieces of white and 1 piece of orange). You need to glue the white and orange strips to the white strip with double-sided tape.
- Then an orange strip is glued parallel to the white strip.
- After this, weaving begins. To do this, the workpiece must be turned over so that there are 2 strips on the right and left, i.e. with the corner facing up.
- Next, 2 connected strips are folded from the right inwards. The same must be done on the other side.
- The braid is braided to the end using this pattern.
- The final step is to glue the strips together and trim the ends. Using a hole punch, make a hole in the base of the tie and thread and tie the ribbon through it.
Volumetric 3D paper crafts for interior
Crafts made with your own hands can be used as additional decor for the interior. Volumetric 3D paper flowers are one of the most popular elements of wall decor.
Below are options for making 3D flowers for interior decoration.
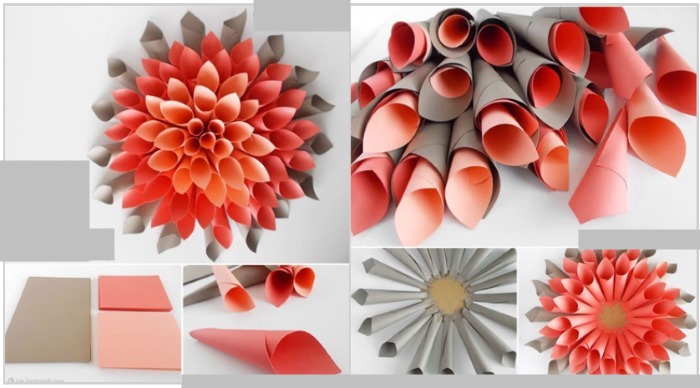
Option #1:
- First, you need to make 25 small paper bags ("cones") from light green paper. To do this, apply glue to the edge of the sheet and wrap it in a bag.
- Next, a base of the required size is cut out of cardboard.
- Then you need to glue the prepared small bags made of light green paper to the edge of the base.
- After this, the same small bags are made from pink paper, and the ends need to be cut off by 1 cm.
- According to this scheme, you need to fill the entire cardboard base with different colors, not forgetting to cut off the ends of the resulting “cones” by 1 cm.
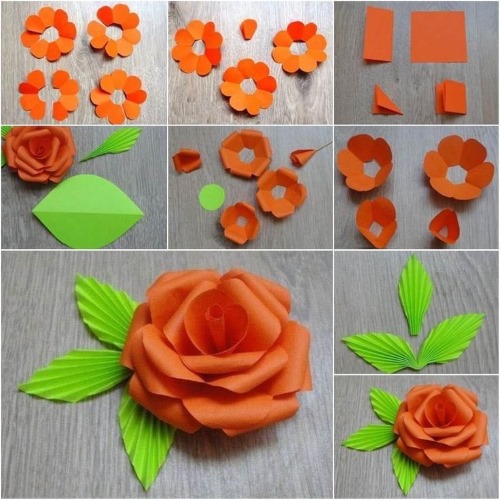
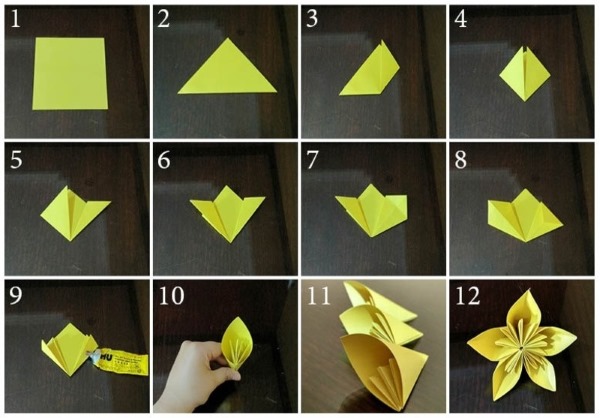
Option #2:
- First, you need to draw petal templates for future flowers on white paper. Large petals are drawn for the first row. Then the resulting template needs to be cut out.
- Then the cut out template needs to be applied to a sheet of yellow paper and 5-6 petals need to be traced with a pencil and cut out.
- After this, a small cut needs to be made at the base of the petal.
- Next, the upper part of the petal is folded over, adding volume, and the cut needs to be glued together with an overlap.
- The resulting petals should be glued together at the bottom, also overlapping.
- Then you need to make smaller petals for the second row. They are made according to the same pattern.
- After making, the petals of the second row are glued overlapping. In this case, they need to be placed so that they cover the joints of the petals of the first row.
- Row No. 3 is made according to the above scheme.
- Finally, you need to make the central part of the petal. To do this, you need to fold the rectangular sheet in half, and make cuts along the edge of the fold with scissors.
- Then the sheet must be unfolded and, bending it in the other direction, you need to glue its edges together using glue.
- Next, the sheet needs to be rolled into a tube, which needs to be glued together along the way.
- The bottom of the resulting middle is well lubricated with glue and glued to the middle of the flower.
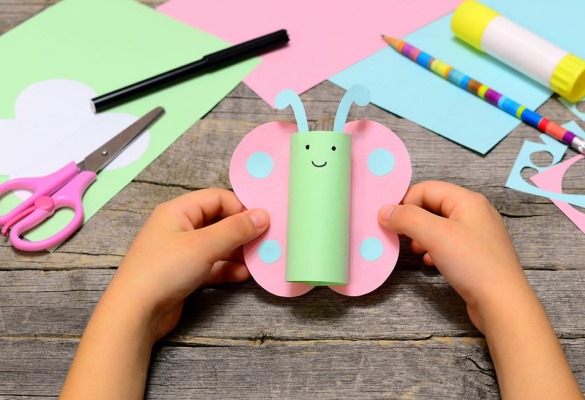
Children's crafts, cards with appliques
DIY paper crafts help develop a child's fine motor skills and creative imagination.
Paper is an environmentally friendly material, which allows you to safely use it when working with children. Below are several options for making children's crafts from paper.
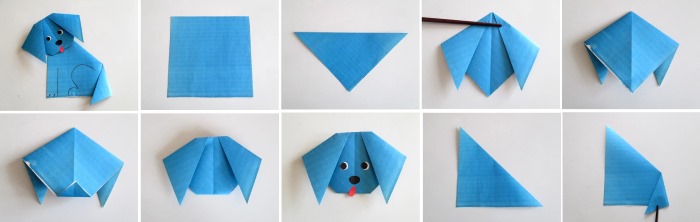
Option #1 – a paper puppy:
- To begin, take a square of colored paper, the opposite corners of which are connected by folding it in half.
- Next, the corners need to be folded down, thus forming the puppy’s ears.
- Then the central corner should be folded back, which will form the puppy's chin. The head is ready.
- Next, you need to take a square of colored paper to make the body.
- The opposite corners of the square are connected by folding it in half.
- The resulting triangle must be unfolded so that it becomes a rectangle.
- The corner of the figure must be folded to form a tail.
- You need to draw the puppy's legs onto the resulting body.
- Next, you need to cut out the eyes, nose and tongue from colored paper and glue them to the puppy’s head.
- The final step is to glue the head to the puppy's body.
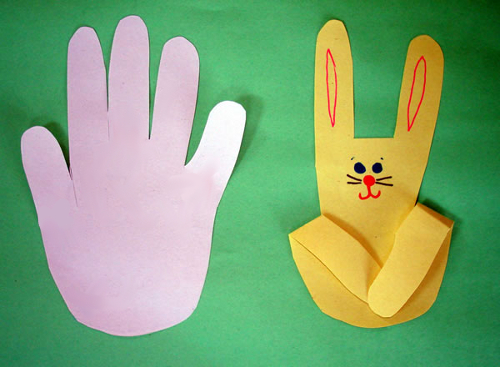
Option No. 2 – paper hare:
- On a sheet of colored paper, you need to trace the palm with a simple pencil and cut it out.
- Next, you need to cut off the middle finger.
- The thumb and little finger are then bent to form the hare's paws.
- After this, the paws need to be glued together.
- The final step is to use a felt-tip pen to draw the hare's ears and face.
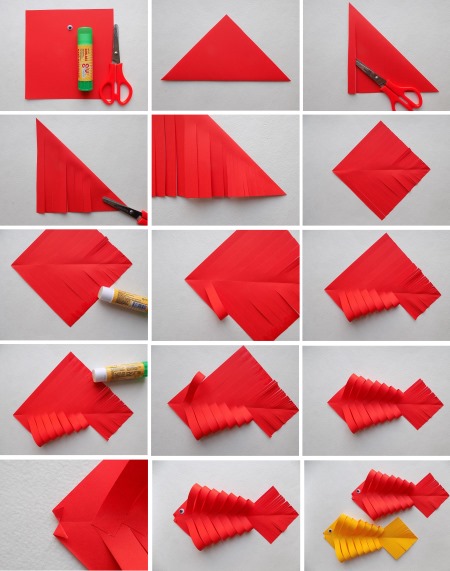
Option No. 3 – paper fish:
- To begin, you need to fold the paper square in half and cut off the corners.
- The resulting fishtail needs to be cut with scissors into 6 strips.
- Next, each strip needs to be thrown to the other side using the braiding principle, and at the end, they need to be secured with glue.
- At the end, you need to draw the eyes of the fish with a felt-tip pen.
Postcards with hand-made appliques are one of the best gift options for family and friends. They demonstrate true tender feelings that are felt towards a person. The soul of the person who made them and collected them piece by piece is put into them. There are many ways to design postcards that you can do both yourself and with children.
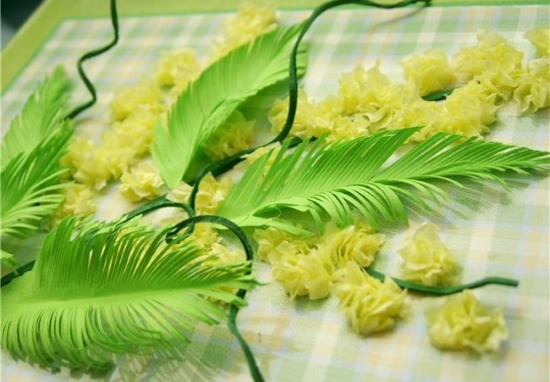
Step-by-step production of a card with the applique "Mimosa":
- This postcard is perfect for March 8. For its base, on which the applique will be attached, it is best to take a sheet of colored cardboard or thick colored paper.
- Then, on the chosen base, you need to draw a mimosa branch with leaves and color the resulting sketch with felt-tip pens.
- Next, you need to take yellow corrugated paper and cut it into small pieces.
- Then small balls are rolled from the resulting pieces. These are the blanks for the future mimosa.
- After this, the blanks need to be glued to the drawn mimosa branches in a random order.
- To make leaves for mimosa, you need to draw a leaf on green paper and cut it out.
- Next, use scissors to make cuts along the edges so that the sheet becomes fluffy. You will need 5 of these sheets.
- The resulting sheets need to be glued to the mimosa branches using glue or double-sided tape.
- If desired, you can add a congratulatory message to the card.
Flower ball made of corrugated paper
Step-by-step production of a flower ball from corrugated paper:
- First, you need to choose a foam ball of the desired size. You can buy it in craft stores or make it yourself. To make the base of the house, you will need thick wire and fabric tape.

The wire needs to be bent to form a circle, which then needs to be wrapped with fabric tape, while fixing it with a glue gun in several places of connection. The color of the base should be in harmony with the style of the future composition.
- Next, flowers are made. To do this, you need to cut 2x20 cm strips of corrugated paper of different colors.
- Then you need to stretch the resulting strips on one side.
- On the other side, which is not stretched, you need to twist the strip, gathering and folding the folds.
- Next, the edge of the future flower is tied with a thread or wire. You need to make as many of these flowers as possible.
- Flowers are glued to the base with Moment glue or a glue gun as tightly as possible to each other.
Origami, kirigami, kusudama: description of techniques, examples of schemes with description
Do-it-yourself paper crafts are one of the most favorite activities in kindergartens and schools. There are different working techniques that allow you to diversify the possibilities of making crafts from this material.
Origami is the art of folding paper figures, the origin of which comes from Ancient China, where paper was invented. Existing types of origami are presented in the table.
| Type of origami | Description of the type of origami |
| classic | The figure is folded from one sheet of paper without using scissors. |
| modular | The figure is formed from many parts of the same type (modules) |
| simple | Its purpose is to make paper handling easier for inexperienced people and those with limited mobility. |
| folding by pattern | It is a drawing on which all the folds of the basic shape of the model are applied. |
| wet folding | Paper soaked in water is used to give the figures smooth lines, expressiveness and rigidity. |
Origami Sparrow Example - Step by Step Instructions:
- You need to mark the diagonal of the square.
- Then cut along the fold line.
- For work you will need one of the resulting triangles.
- Then you need to mark the vertical fold line and turn it over to the other side.
- Next, you need to make a fold, aligning the corner with the middle of the opposite side.
- The same steps must be taken with the second corner of the triangle.
- After this, you need to fold the figure along the vertical line, releasing the folded corners.
- Next, the angle indicated on the diagram must be lowered downwards.
- Then the angle rises upward.
- After this, the fold indicated in the diagram is performed.
- Next, the corner needs to be raised up.
- Then you need to make a zigzag fold along the marked fold lines.
- At the end, the bottom corners need to be folded.
Kirigami is a type of paper art that involves making figures and cards from paper using scissors. To make such figures, it is preferable to use sheets of paper or thin cardboard, which can be easily cut and folded.
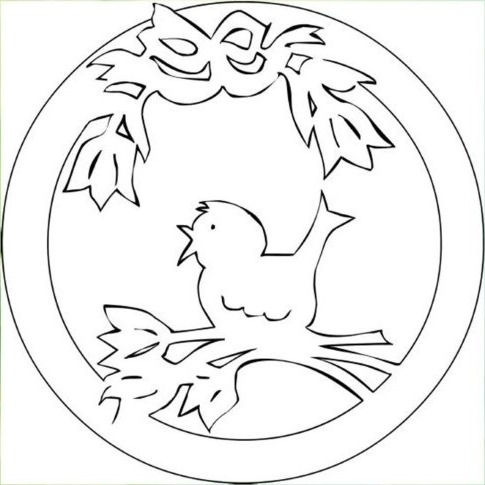
An example of making a kirigami bird - step-by-step instructions:
- First you need to transfer the template to a base (paper or thin cardboard).
- Next, you need to cut out only those parts of the product that you will not need. The main drawing must not be touched. You should start from the middle of the picture, cutting out only the space around the bird and the cutout details on the flowers.
- Then the cut out figure needs to be glued to the chosen background. Finally, you need to bend back the flowers and leaves.
Kusudama is a paper product that is formed primarily by sewing together the ends of many identical pyramid-shaped figures. in such a way that a ball is formed. Sometimes the elements of the product can be glued together rather than sewn. A tassel can also be attached to the bottom as a decoration.
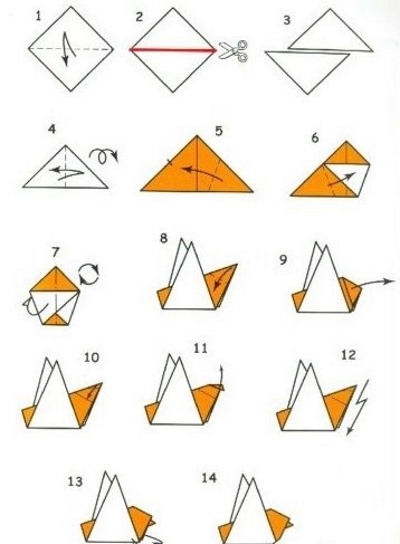
An example of making a ball using the kusudama technique - step-by-step instructions:
- First, you need to fold the square of paper diagonally to form a triangle. After that, the corners of the triangle are folded into the center so that you get a square again.
- Then the folded corners need to be folded back from the center, maintaining the shape of the figure.
- Next, use your finger to straighten the resulting triangles on the sides so that the central line of each of them is extended onto the surface.
- Next, the protruding parts of the triangular figures need to be bent to the center from the top so that the lower part of the figure again acquires a square shape. This way, you get 2 wings on both sides.
- At the end, you need to apply glue to one of them and fasten it to the semicircle using paper clips.
- You need to make 24 of these figures.
- Next, the resulting figures are assembled into flowers consisting of 4 elements using glue.
- Finally, the 6 resulting flowers need to be connected together with a thread so that they form a ball.
Papier-mache egg
Step-by-step production of a small egg using papier-mâché technique:
- First, you need to inflate a balloon the size of your palm and tie it.
- Next, you need to apply liquid starch to it, and then cover the ball with paper in 4 layers and let it dry.
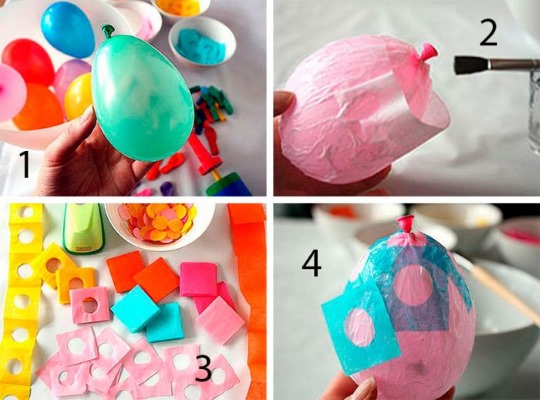
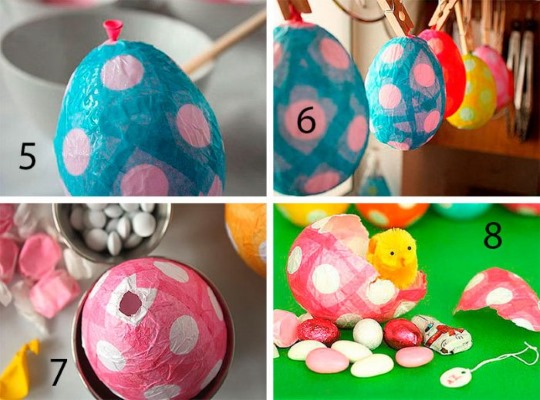
- After this, take the paper, which must be cut into squares measuring 4x4 cm. In half of the cut out figures, you need to make circles with a hole punch with a diameter of 2 cm.
- Then you need to glue the resulting squares onto the ball in 5 layers and let it dry.
- Next, the ball needs to be burst and carefully pulled out. The resulting figure is filled with sweets or toys.
- At the end, the remaining holes are sealed with several layers of squares and the ball should dry completely.
Dove of Peace for May 9
Step-by-step instructions for making a dove of peace for May 9:
- To begin, you need to draw or print a dove template on a white sheet of paper.
The diagram of the pigeon is shown in the figure.
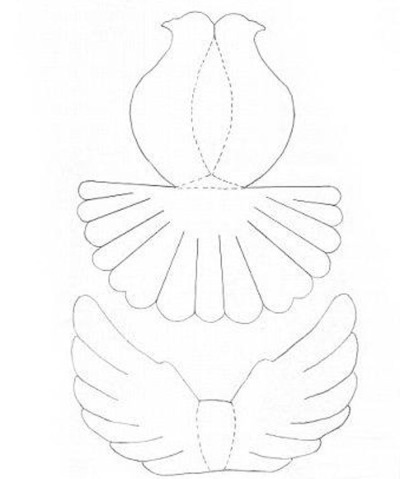
- Next, the workpiece must be cut out, and cuts should be made on the tail with scissors.
- Then, along the dotted lines on the workpiece, you need to make folds so that the lines remain inside. For convenience, you can use a plastic card.
- After this, you need to apply glue to the triangle at the base of the tail and place the dove on it.
- Next, you need to curl the tail feathers. To do this, you need to sharply move the scissors from the base of each feather to its edge.
- Then the dove's head and chest are glued together.
- Next, you need to twist the feathers on the wings in the same way as on the tail. The dotted lines of the workpiece should be at the bottom.
- Next, you need to make folds along the lines. For convenience, you can use a plastic card again.
- After this, the wings are turned inside out so that the dotted lines are at the bottom.
- Finally, the wings need to be attached to the center of the dove's back.
- The resulting dove can be attached to a skewer and a St. George ribbon can be tied to it.
Scrapbooking
Scrapbooking is a form of art that involves making and decorating personal and family photo albums. This may include not only photographs, but also newspaper clippings, notes, drawings and other memorabilia. In this way, it stores items that make up the history of some significant event (for example: a wedding, the birth of a child).
Step-by-step instructions for scrapbooking a photo album:
- The first step is to make a cover for a unique album. To do this, you need to cut out 2 squares of 15x15 cm and 6 squares of 12.5x12.5 cm from paper (these will be the inner sheets of the album).
- Next, you need to glue the paper of the desired color to the cut out squares and cut off all the extra corners on it. The lower and upper corners are cut at an angle.
- Then you will need a thin ribbon 50 cm long. It is glued to the inside of the square, one end of it should be slightly longer than the other.
- After this, you need to glue 2 more pieces of tape, 5 cm long, to the square at the bottom and top of the square.
- Then, the sheet that will be inside the album is attached to the ends of the tape (which are not glued to the square). In this way, all the sheets of the future album are glued to each other.
- At the end, all the pages of the album are pasted over with paper. You can also use decorations if you wish.
Paper gifts for March 8
DIY paper crafts are the most popular gifts for mothers and grandmothers from children and grandchildren.
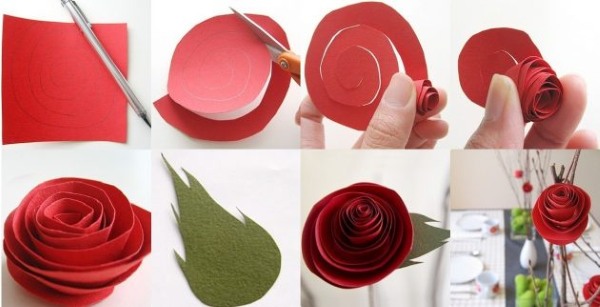
Step-by-step instructions for making a rose for March 8:
- From colored paper of any color you need to cut out squares measuring 15x15 cm.
- After this, use scissors to carefully cut out the spiral counterclockwise.
- Next, you need to start from the end and twist the spiral into a tube. This is how the rosebud is formed.
- The resulting tube should be loosened a little so that the shape of the bud more closely resembles a rose.
- Next, to keep the flower in shape, you need to fix the bud. To do this, apply glue to its lower part and press it to the flower.
- At the end, cocktail straws covered with paper or fabric are attached to the bud. They serve as flower stems. To glue them, you need to apply glue to one end and attach the stem to the bud.
- If desired, you can cut out paper leaves for the roses and attach them to the stems with glue. You can make as many of these roses as you need.
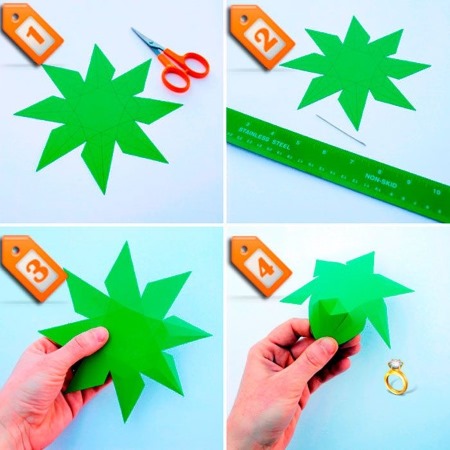
Paper diamond with a surprise - step by step instructions:
- First, you need to draw a diamond template on a piece of paper, or print it on paper of the desired color. Then you need to cut out the blank. The diamond template is shown in the picture below.
- Next, you need to apply a ruler to each dotted line and trace it with a needle to give it shape.
- After this, you can begin to assemble the diamond. To do this, you need to apply glue to its quarry and assemble its first half.
- Then you need to put a surprise inside the diamond (for example: a ring, a pendant) and then you need to assemble the second half of the diamond, also fixing it with glue.
- If desired, you can add glitter to the craft at the end.
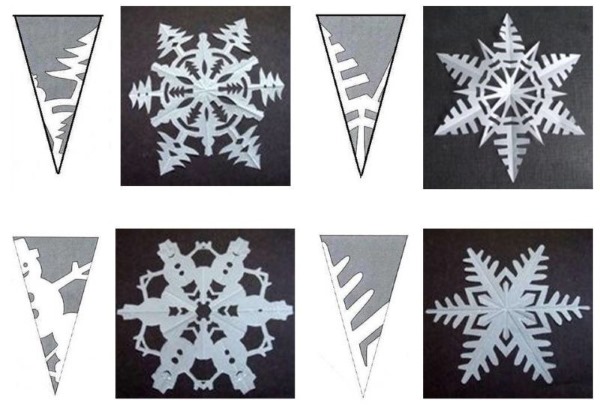
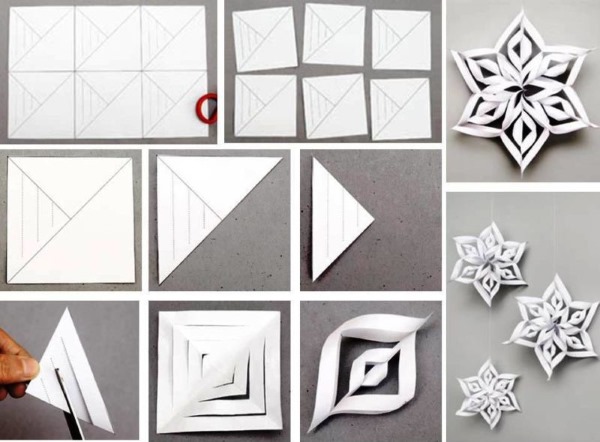
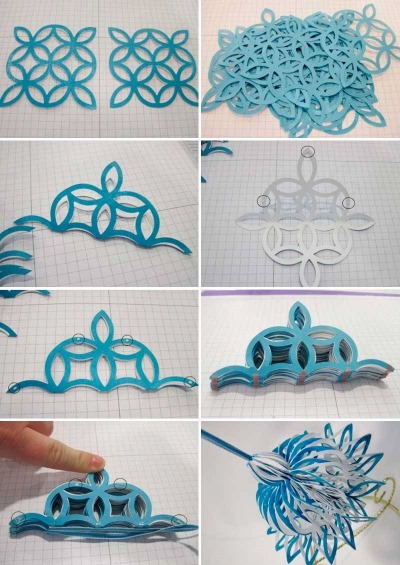
Templates of volumetric snowflakes from paper
Volumetric snowflakes can decorate any room and give it a festive look. Templates for some volumetric figures are shown in the pictures below.
To make them you will need a minimum set of materials:
- white or colored thick paper;
- stapler;
- sharp manicure or office scissors;
- ruler, pencil;
- paper glue.
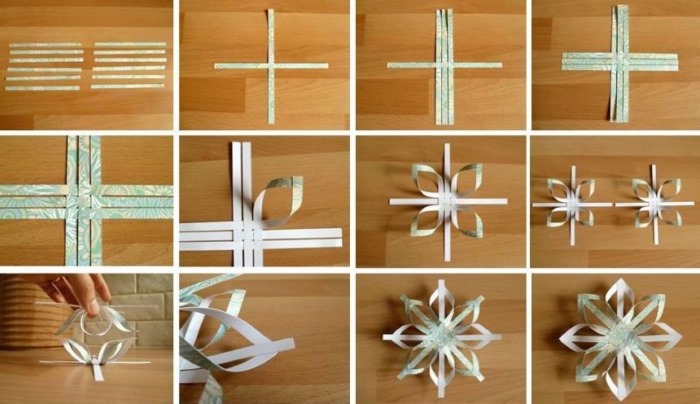
An example of making an openwork snowflake with a diagram and step-by-step description is presented below:
- To create a snowflake, you will need a snowflake element stencil. You can print it out or draw it yourself.
- Next, you need to cut out 18 elements of the figure using the blanks.
- Then the cut out 18 modules of the figure need to be folded in half.
- Each module must be glued to each other in the places indicated on the diagram.
- After all the parts are assembled, you need to glue a ribbon with a loop at the end along the fold line.
- At the end, you need to carefully unfold the figure and fix it with double-sided tape.
DIY Paper Tank
Step-by-step instructions for making a paper tank:
- The first step is to fold an A4 sheet of paper of the desired color in half along its length.
- Then you need to fold the top left corner to the bottom edge, iron it well, and then unfold the corner.
- In the same way, you need to bend the lower left corner to the upper edge, and then unfold it.
- Next, the tank flaps are formed. To do this, you need to place the craft vertically and then bend the right corner down.
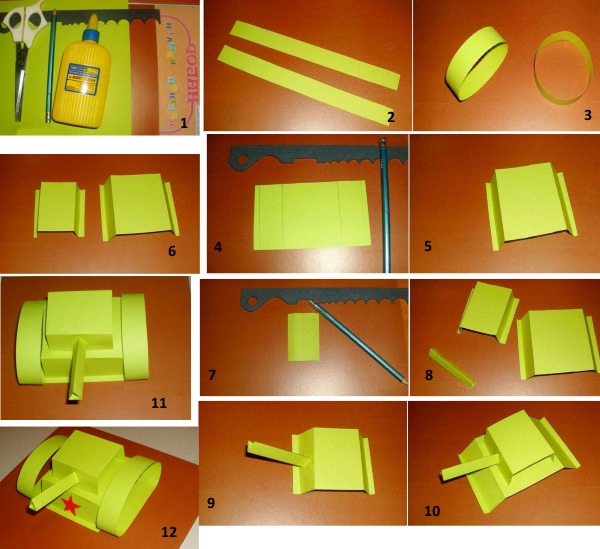
- After this, the lower side must be divided into 2 equal parts. The first part must be left in place, and the second must be folded to the lower right corner. The same actions should be repeated with the left side of the craft.
- At the top in the foreground we have a regular triangle. The same triangle needs to be made at the bottom of the sheet.
- Next, you need to narrow the middle. To do this, fold the bottom side of the sheet to the center line. You need to fold the paper in the middle, and then turn it back to the bottom edge. You also need to do the same on the opposite side of the sheet of paper.
- All the resulting folds need to be ironed with an iron ruler so that they are even.
- After this, a tower is formed. To do this, you need to bend both corners of any triangle upwards.
- Next, you need to twist the craft into a cylinder so that all the resulting elements are on top. The corner of the triangle should be inserted inside the square.
- Then the 2 remaining corners of the triangle need to be folded into the lower pockets of the craft.
- Finally, you need to attach the barrel to the tank. To do this, take colored paper of a lighter or different shade and roll it into a tube.
- The resulting tube is inserted into the turret. The tank is ready.
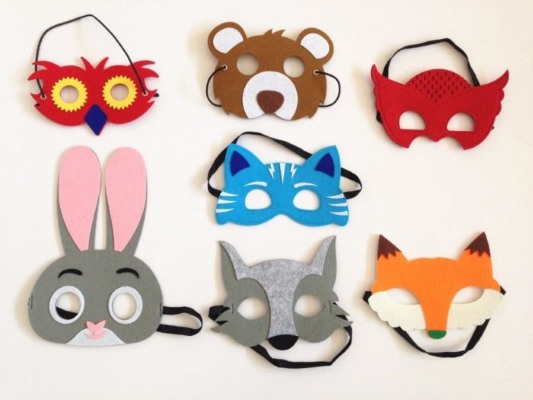
Paper masks
To make a face mask, you first need to prepare a template for it. It will be needed for any type of mask.
To ensure that the template is correct, you must follow these rules:
- measure the distance from the middle of the eye to the center of the other eyelid, making sure the measurement line is straight;
- marks should indicate the distance from one temple to the other;
- the central lower edge of the mask should not be below the end of the nose;
- the sides of the mask and the slits for the eyes can be made in any shape, but they should not restrict visibility;
- To secure the mask, you can use rubber bands or sticks.
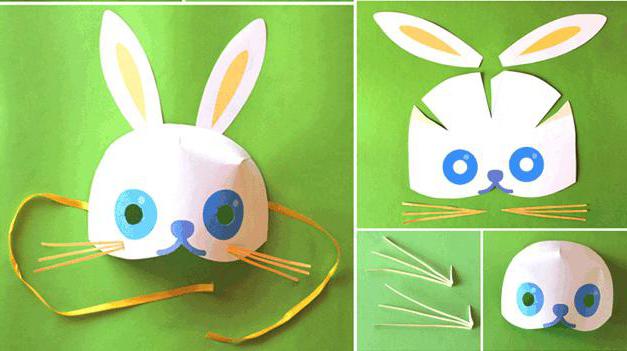
An example of making a paper mask - step-by-step instructions:
- First, you need to make a base for the mask, using the rules described above.
- Next, the measurements are transferred to a sheet of paper, and a rectangle is cut out of it, which must be folded in half.
- On the resulting blank, you need to draw half of the future mask, mark the holes for the eyes, depict their shape and cut out the drawn mask.
- Then the blank is applied to colored paper and cardboard and outlined with a pencil. Next, you need to cut out the mask from paper and cardboard.
- Using glue, you need to glue together the cardboard, the blank and the colored paper.
- Next, the mask needs to be bent a little so that it takes the shape of a semi-oval.
- After this, the mask can be decorated as desired (with stones, feathers, lace).
- Finally, you need to make holes in the mask using a hole punch and thread an elastic band through them.
Jumping paper frog
Step-by-step instructions for making a jumping paper frog:
- The first step is to fold the base of the water bomb: the sheet of paper is folded along one diagonal, then along the second. Then the sheet is folded in half with the wrong side outward and then unfolded.
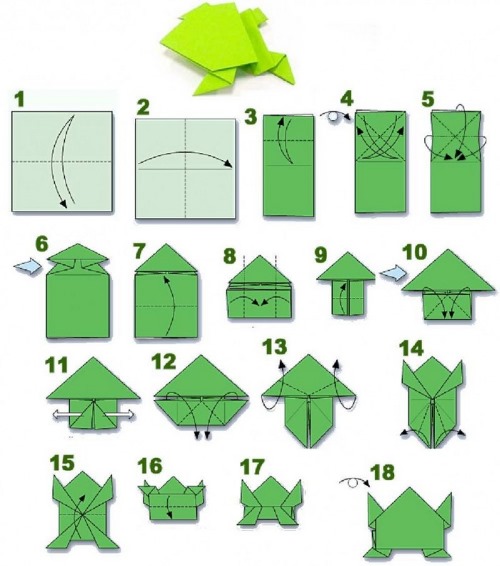
- Then you need to fold the pyramid.
- After this, you need to bend the sides of the pyramid towards the center.
- Next, the frog's paws are formed. To do this, each side of the pyramid needs to be turned away from the center, dividing the angle in half. The same actions need to be done for the second paw.
- Then, turning the frog upside down, you need to bend the lower corners to the upper corner on both sides.
- Next, bend the right corner of the square to the center. You also need to bend the left corner of the figure.
- After this, you need to form the frog's eyes. To do this, you need to bend the lower corners of the face in half, and then you should raise the eyes up.
- To make the frog jump, you need to make a 'zipper' fold at the bottom, near the paws. The size of the fold determines how the frog will jump.
- Finally, draw the frog's eyes with a black marker.
New Year's paper garland
New Year is a family holiday, which is loved by both adults and children. One of the most important attributes of home decoration for this holiday is a New Year's garland. You can buy it in a store or make it yourself so that it turns out original and meets the wishes of the owners of the house.

Garland of hearts from colored paper - step by step instructions:
- From paper you need to make strips measuring 15x2 cm, which can be of one or several colors.
- Each strip needs to be stapled at the bottom.
- Next, the outer edges need to be folded down, and then the next 2 strips need to be attached.
- Then everything needs to be secured again with a stapler.
- These steps are repeated with all the remaining strips until the garland reaches the desired length.
You can create real masterpieces from paper with your own hands. These crafts are used for exhibitions, home decoration, as gifts to family and friends. Paper can also be used to simply spend time with children, teach them to make crafts and develop their imagination.
Article formatting:Natalie Podolskaya
Video about paper crafts
Paper crafts for kids: