The Bargello is an ancient Florentine embroidery technique patterns on any fabric. It is also called "Hungarian stitch", "counted satin stitch". Ornaments that are complex at first glance are considered quite simple to perform even for beginners.
Where can Bargello embroidery be used?
This type of handicraft has a fairly wide range of applications. This method is used to create various colorful panels. Embroidery is used to decorate all kinds of interior items, such as pillows, bedspreads, and furniture upholstery.
It is also used to decorate various accessories. For example, wallets, handbags, phone cases. Often, unusual embroidery is used to decorate clothes - dresses, blouses, skirts.
What do you need for embroidery?
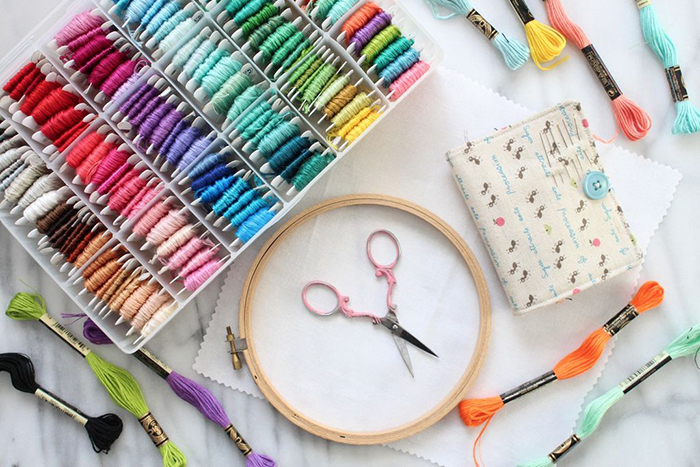
Before you begin the creative process, you should prepare the necessary materials and tools.
Threads
For embroidery you will need floss and wool yarn.

You should also buy sewing, cotton, silk threads. They should be of one color and multi-colored.
Needles
Tapestry needles with a wide eye and a blunt end are mainly used. But sometimes you may need regular sewing needles, as well as beading needles. The best ones are #18, 20, 22. #10, 13, 24 and other types are also used.
Advice! Beginner needlewomen are better off using cotton or wool threads folded several times. For example, floss. In addition, it has a fairly wide range of colors.
Warp
Canvas is used most often for the base. Such a grid has no markings. Usually, it is cotton fabric with single or double weaving of threads. But you can also use thick fabric, as well as a plastic or metal base.
Other accessories
You will also need to prepare other tools:
- scissors;
- hoop;
- felt-tip pens, markers, pencils of different colors;
- pattern schemes;
- square frames for embroidery;
- graph paper;
- ruler;
- thimble.
Types of stitches
Bargello embroidery (for beginner needlewomen it is better to make markings on the canvas to determine the ornament) has distinctive techniques for the direction of stitches. The embroidery process is carried out by making a bias to one side. For example, from left to right, if the motif needs to be repeated or it needs to be branched on the sides.
| Classical | At first, the stitch simultaneously captures 4 vertical threads of the fabric. Then it is necessary to shift 1 thread to the side of the base to make the next step. Next, the stitching is shifted by 2 threads vertically. This method is considered basic. Both parts of the product are mirror-like thanks to it. |
| Square | This horizontal stitch is made by simply turning the embroidery over. |
| Christmas tree | Oblique stitches are made by crossing the threads at an angle at the base. They are arranged in mirror image to each other.
The pattern is much more voluminous if the angles are more obtuse. Such work looks relief. |
Basic patterns in the Bargello technique. Master class, patterns for beginners
Florentine embroidery consists of basic motifs. Patterns with points are created using schemes. Such stitches make it possible to embroider zippers, zigzags. Stitching is carried out in width to obtain a similar pattern.
The Bargello technique is distinguished by the texture and brightness of its products, compared to other embroidery methods.
The second row is made using a different shade. The stitches are raised or lowered by 1-2 threads relative to the first. This method allows you to show your imagination, as well as make the selected ornament more diverse. It becomes possible to shift the pattern, deviate from the standard scheme, and introduce new shades.
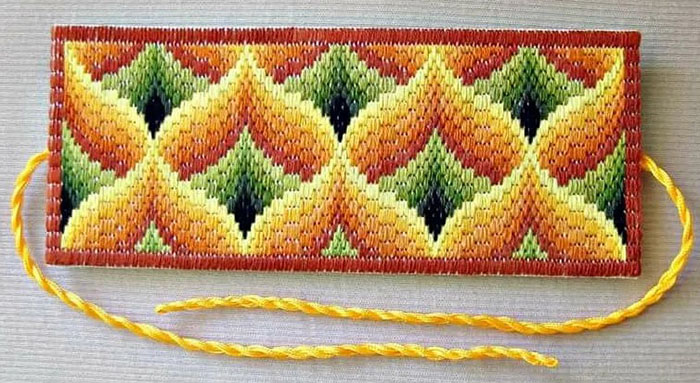
Arches and peaks
The presented method is quite simple to perform. Take threads of at least 4 shades of one tone or use a larger number of colors. Then the work will be brighter.
This method is ideal for beginner needlewomen.
The embroidery is done according to the following instructions:
- The step size is 4 cells of the fabric. They are grouped from 1 to 5 stitches.
- First of all, the first row starts to be sewn from the middle of the fabric, moving towards the edge.
- Then it is finished by moving in the opposite direction of the canvas until the drawing is complete.
Bargello embroidery for beginners: Arches and peaks pattern diagram - Then the next row is sewn in a different shade. They go from the beginning of the net to its very edge.
- The remaining rows are embroidered using the same method. The colors may vary.
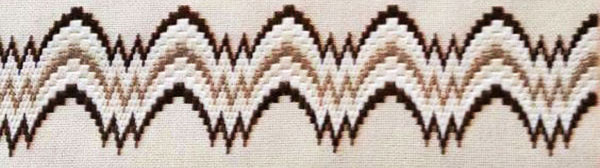
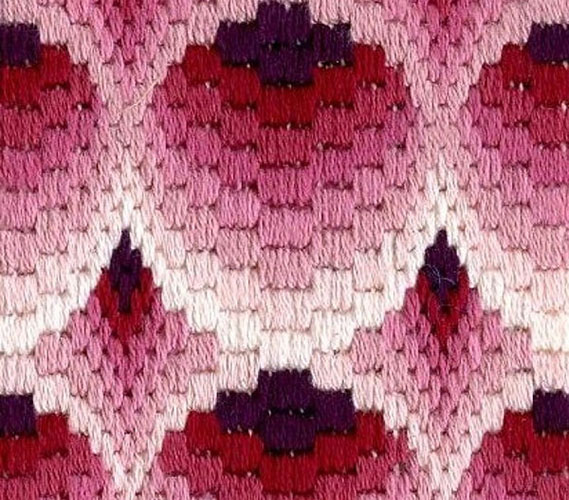
Mirror Wave
This simple Bargello embroidery technique is very suitable for beginner needlewomen. It creates a three-dimensional illusion.

Take 5 colors of one tone as a sample or more if desired. Use 6 threads.
Stages of work:
- The process starts from the middle of the canvas. First, move in one direction, then in the opposite direction, focusing on the diagram. This is how the wave of the first row is created.
- Then continue embroidering with threads of a different color. From one end they move to the other.
- Three-dimensional motifs can be achieved if you use your imagination a little on the topic of color combinations. For example, combine shades differently.
Chess pattern
This element is a little more complicated than the previous patterns. It is only necessary to perform it carefully. It is necessary to take 4 tones of each of the 2 colors. Plus one more contrasting shade additionally. The number of colors is 9. The threads are folded four times.
This pattern will take shape much more easily if you embroider rows of each color in sequence.
This method is much better than sewing rows of one shade separately, leaving space between them for other colors.
Job Description:
- First, you need to prepare 9 needles with threads of different colors threaded through them.
- Next, embroider each row in turn.
A more 3-dimensional pattern can be achieved by using the darkest tone to create spaces. A light shade will not give this effect.
Advice! For those just starting to master the Florentine technique, it is preferable to choose the "flame" ("zigzags") pattern. This technique allows you to set the height of each stitch in the first row. Then the motif is repeated, changing only the color palette.
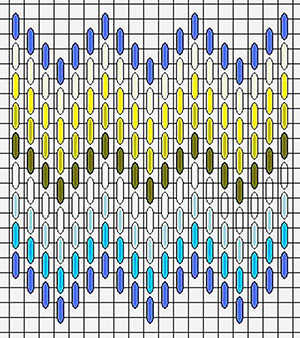
Hearts
Such patterns look great on sofa cushions. The threads take 5 colors of one shade and 2 contrasting tones. They are folded four times, and also more times. From a separate stitch they move to a group of 4 steps.
Work process:
- First, the outer contours of the heart are embroidered with pale shades to create the shape.
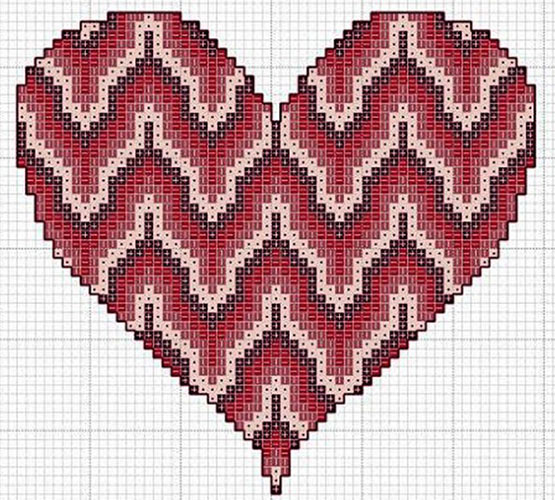
- Next, fill the inner drawing with other tones.
- Then the diamond is sewn with contrasting threads of a different color.
- The opposite effect can be achieved by changing the colors. For example, the borders of the ornament are embroidered with dark shades, and the middle with light ones.
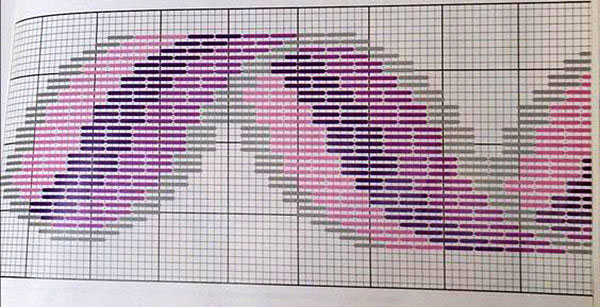
Ellipses and Rhombuses
Diamonds in ellipses frame are another interesting element of embroidery. It is necessary to take threads of 5 shades of one color in 4 additions.
You can also use multi-colored ones.
Progress of work:
- Blocks are made up of 2, 3, 4 stitches. Embroidering starts from the center.
- First, sew the outer contour.
- Then the inside is filled with other colors.
Cubes
This is a beautiful, simple, three-dimensional template. Take 6 thread tones of one color or 5 and another 1 contrasting dark tone for the middle of the cube.
The thread is folded four times. One element has 2 stitches.
Step-by-step work process:
- First, you should start embroidering from the outer edges of the cubes.
- Sew the outlines of a pair of square figures.
- Then the middle is filled with other tones.
Advice! To avoid confusion, it is necessary to adhere to this sequence. Before filling the inner space with other shades, do not immediately sew the outer borders of a larger number of elements. Then the template will look different, and the error will be impossible to correct.
Boxes
This is another version of the previous cube shape. You will need threads of 3 colors. They are folded 4 times.
The step consists of 2 stitches.
How to work:
- To begin, sew the outer lines of the figure with a dark shade.
- Then the middle is filled with other tones.
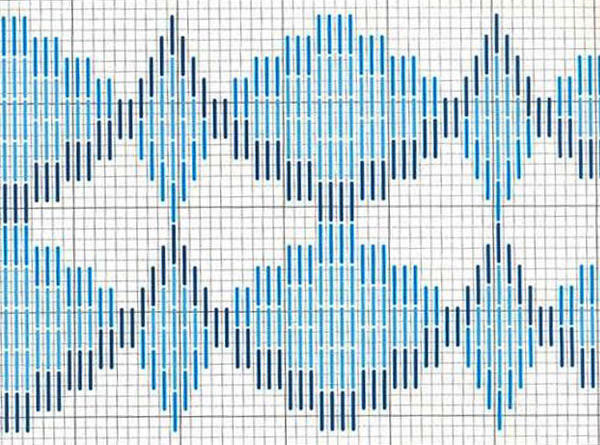
Zigzag
Bargello embroidery (this pattern is very suitable for beginners, you can master it in a few minutes) in a simple zigzag technique is not particularly difficult to perform.

The threads should be taken in 5 shades of one color or several colors, as desired.
Instructions for performing the work:
- The thread is folded 4 times. The step is 1 stitch.
- First of all, the first row is embroidered from the center of the canvas, moving initially in one direction.
- Then they move in the opposite direction.
- Next, to complete the row, continue working in the opposite direction.
Other variations of the zigzag:
The technique is the same. The beginning of the work is the usual - from the center of the grid. And the sides are worked in the same way.
After each new row, continue from the edge to its end. Take an odd number of shades. For example, 3 - 5 tones to make a drawing. The step size of one row is 4 cells, another - 2 squares. They alternate between each other.
Bubbles
This pattern is not complicated. The basis is a thread of 4 different colors of one shade, and also 3 of another tone for the diamonds.
The threads are folded four times. The supposed steps in the motif are from 1 to 4. It is necessary to look at the diagram to do the work. The color scheme is chosen at your discretion. Then you can get a three-dimensional ornament.
Chevrons
It is necessary to prepare 4 threads of the same shade. Sewing height – 6 grid cells. Step – 1 – 5 stitches.
Stages of work:
- First, embroider from the central part of the fabric, moving towards the edge.
- Next, the ornament is completed by processing the other side.
- It is preferable to start with the darkest shades.
- Then sew each row from beginning to end.
Advice! In stitches made like "zigzags" up and down or left and right, use one thread, following the pattern. The next row is embroidered in the same way, just changing the color of the thread.
Honeycombs
This is a simple motif of the Bargello technique. You should take 6 tones of threads of one shade or 2 additional contrasting colors to choose from. Then the product will be brighter.
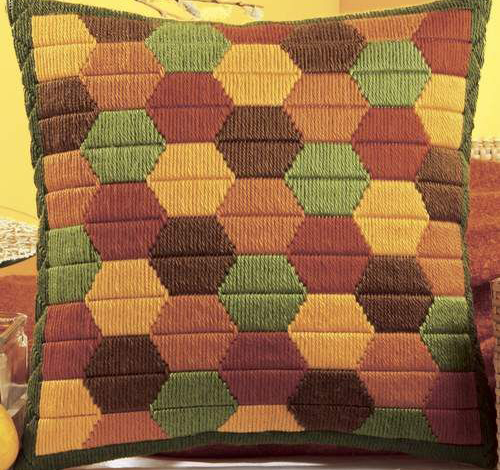
As it should be, the sewing height is marked. These are 4 fabric cells. The pattern group includes from 1 to 7 stitches.
How to work:
- First, the outer contour of the honeycomb is made.
- Next, the space is sewn up with threads of other tones.
- It is much easier to work with this technology than to complete the entire drawing.
Lightning
You should prepare at least 4 threads of one shade, you will also need 3 tones of another color. The stitch has a length of 4 canvas threads.
Work process:
- They start embroidering from the center. Then they move to the outer part of the canvas.
- Then continue in the other direction, completing the row, as well as the outline of the ornament.
- Then the inside of the motif is filled with different shades.
Practical application of Bargello embroidery. Step-by-step description, diagrams
Bargello embroidery (for beginners it is better to choose the simplest patterns or small motifs) will decorate various interior accessories and clothing items.
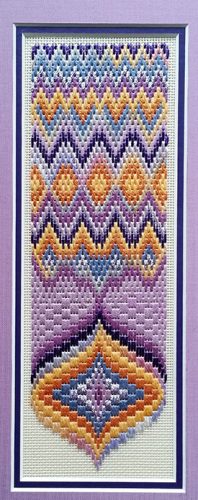
Panel
Two simple panels "Topiary" are trimmed trees with geometric shapes. They will become spectacular, stylish decorations for the house. The size of the products is 12.4X23.6 cm and the drawings are 88X168 cm. The thread is used in 6 folds.
Necessary materials and tools:
- white canvas No. 18 – 2 sheets measuring 23X33;
- rectangular tension frame;
- tapestry needle No. 22;
- metallized cord No. 16 – 1 spool (002, gold) for each painting;
- small glass beads – 1 pack (00557, gold);
- floss ##:
- 2 skeins: 246, 875;
- 1 skein each:
- 1031, 920, 9159;
- 1038, 258, 161;
- 1034,1050, 1036;
- 213, 214, 216 (tree with a round crown);
- 1 skein each: 254, 256 (a tree with a conical crown).
Progress of work:
- First of all, the canvas is attached to the frame.
- Then the center of the canvas is marked with a pencil, measuring the distance from the corners.
- Next, the middle of the rapport is found using the small arrows on the diagram.
- Then they start embroidering from the center. First they make the tree crown, and then the trunk, the tub.
- The glass beads are then sewn on after the embroidery is completed.
- Next, the background ornament is sewn. The work is decorated with a border.
- Then add beads. They are placed at equal intervals as shown in the diagram.
- The work is then checked for errors. The ends of the threads that have not been threaded are hidden. The embroidery is removed from the frame. The product is stretched.
Advice! The work should be done by laying the floss straight along the line from the bottom up. The classic stitch covers at least 4 horizontal threads of the fabric.
Bag
Such a simple pattern will decorate not only a bag. It can be used to decorate pillows, tablecloths, napkins. Color solutions can be very different: bright or muted shades.
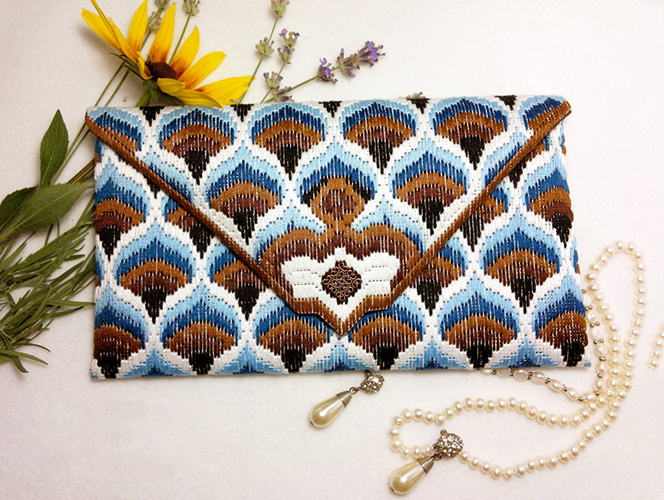
First, select threads and fabrics. The fabric can be round, square, rectangular. Or hexagonal. Patchwork material is also suitable for the base.
Master class:
- First, the thread is threaded into the needle.
- The canvas is then stretched onto a hoop or square frame.
- Next, work begins from the lower left edge.
- First, insert the needle from the back side and bring it out to the front side. Tip! The thread can be attached to the fabric using a few small stitches.
- Then, 3 cells are counted on the canvas and the needle is inserted. The thread is carefully pulled. The first stitch is obtained.
- Then the needle and thread are brought out in the next column from the first stitch. But it must be entered 2 cells higher.
- Usually the length of the second stitch is equal to the first stitch. This means that the thread is brought out to the inside through 3 cells.
- This is how the second stitch is formed. It is shifted 2 cells up compared to the first stitching.
- In this way 4 stitches are made.
- Then each strip is lowered by 2 crosses. The result is a ladder up and down.
- Then continue repeating the same stepped form of 4 lines up and so on.
- The patterns must be done until the end of the line.
- It is necessary to pay special attention to the counting of the motif when embroidering the first row.
- Because everyone else will rely on it. Plus, it's much easier to do calculations that way.
- Next, the second row is done with a thread of a contrasting color or shade.
- The line is made in the same way, but starting from the first row of the initial row.
- It is led parallel to the first one from left to right.
Home Accessories
Bargello embroidery (for beginners, this is not a very complicated pattern) often reflected the architecture of buildings. For example, the style of the cathedral in Siena. Two shades of marble were used for its construction. The pattern depicted carved branches. They are gracefully wrapped with a ribbon. Any background can be chosen.
This pattern looks good on curtain tiebacks. It can also be used to decorate cushion covers by connecting 3 stripes or to decorate a napkin by creating a pattern around the perimeter of the fabric.
Advice! When embroidering with floss, it is necessary to disassemble it into separate threads and then connect them again. This will make them fluffier and more even.
Materials required:
| woolen tapestry threads, | No. 8902 (3 skeins) |
| No. 8914, 8918, 8808, 8904 | |
| white canvas | No. 14, size 16.5X54 cm |
| lining material | |
| adhesive backed duplicating fabric | 10.8 x 54 cm |
| tapestry needle | №20 |
| cotton threads for crocheting | 1 skein of white or any other shade |
How to do the job:
- First, the narrow edges of the fabric are sewn to the frame.
- Next, find the middle of the narrowed side of the grid and mark it with a pencil.
- Then, step back 5 cm from the edge of the canvas. Perform pattern 1, starting from the left edge of the ornament.
- Then the rapport is repeated, counting the threads of the canvas. It is necessary to ensure that the pattern is located exactly in the middle of the strip.
- First, the outline of the print is made, and then the inner field is filled. The background is not sewn yet.
- Next, move on to pattern 2. The pattern is repeated 4 times. Embroider as the previous motif, maintaining its symmetry.
- Then the rest of the pattern is sewn according to diagram 3. Having completed the entire drawing, the background is filled in.
- It is embroidered with cotton crochet threads, folded twice.
Advice! It is necessary to ensure that the thread does not twist. The stitches are made the same as those used to embroider the branches. The work begins from the center of the print, gradually filling the background.
- The length of the grabs is increased or decreased as desired. The rapport is performed according to scheme 2 more or less times.
- Once the work has been checked for errors and any loose threads have been removed, the embroidery is removed from the frame and stretched.
- Next, a piece of backing fabric is cut according to the pattern of the embroidered canvas.
- The patterned fabric is placed with the pattern down, and the cut material is placed on top of it. They begin gluing it, aligning both edges of the 2 fabrics.
- Once the backing fabric has been glued, cut off any excess, leaving 1.25 cm from the embroidered canvas.
- Then the edges of the mesh are folded onto the adhesive base. The corners are connected at a 45° angle.
- Next, a strip of lining material is cut to the shape of the sealing element, leaving an allowance of 1.25 cm on all sides. It is sewn with a blind stitch to the embroidered work.
- The finished grab can be equipped with copper rings.
Advice! Adjacent stitches in the classic version are made from the center of the length of the adjacent stitching.
Cloth
Often, patterns similar to bright bird plumage were used in the creation of traditional Tuscan outfits. They are characterized by crimson, purple, and delicate pinkish shades. And golden colors give them shine.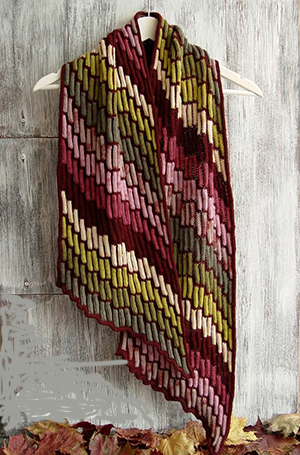
Materials required:
- floss:
- No. 922 (1 skein);
- No. 152, 154, 758,
- 150, 739,3802 (2 skeins each);
- canvas #14;
- mixed fiber threads (wool and silk 50% each, 1 skein)
- tapestry needle No. 22;
- metallic floss No. 5282 (golden color);
- cotton threads No. 1315 (2 skeins).
Stages of work:
- First, the canvas is attached to the frame by the short edges.
- Then the middle of the shortened side is marked with a pencil.
- On the diagram it is a small black arrow.
- First, start from one end of the canvas. Half of the motif is made according to the pattern, stepping back 2.5 cm from the edge.
- It is much easier to embroider from the center of the pattern.
- Then move towards the edges. This technique guarantees precise centering of the rapport.
- Then the entire rapport is embroidered. Particular attention is paid to the size of the stitches.
- Then the line that runs through the middle of each feather motif is stitched with metallic threads.
- They are folded 6 times along one thread of the canvas.
- It is necessary to follow the sequence of shades, focusing on the left column.
- The arrangement of the flowers is named from the outer side of the feather.
- The background is made with long stitches. Red wool threads are used (No. 7107).
- Next, the entire pattern is completed according to the diagram.
- Then one row along the edge is stitched "crosswise". Take metallized threads, folded in 4.
Advice! The first few rows should be schematically transferred to the fabric so as not to get confused in the pattern. The beginning and end of the stitches are marked with dots using felt-tip pens or markers. It is better to select shades that match the tones of the threads.
Bargello embroidery is an interesting technique that is quite suitable for beginner needlewomen. The complex-looking ornament can be easily mastered if you strictly follow the sequence of work.
Video about Bargello embroidery
Secrets of Florentine Bargello embroidery:
I made small panels to order. To send goods, I ordered polypropylene bags (BOPP) on the site pak24. They are intended for both food and non-food products.
Excellent. Can you advise where to get a salamander pattern made in this technique?
You know, bargello embroidery looks very impressive, especially when there are patterns to choose from. Here I found what interested me https://handmade-milota.com/vyshivka-bardzhello/