When knitting, you can decorate the product with a beautiful edge. This move will allow you to decorate the item in an original way and will show the craftswoman's skill. The methods of decorating the edges of hats, scarves, gloves and other accessories have been inherited by modern needlewomen from their ancestors. At the same time, there are now many more techniques than there were 40 or 50 years ago.
Methods of knitting edge loops
A beautiful edge when knitting allows you to add a twist to the product. In this way, you can decorate the end of any yarn item, be it a skirt, scarf, hat, mittens or vest. Beginner needlewomen create the edge of the product simply by casting on stitches and continuing to knit according to the pattern indicated in the diagram. And experienced craftswomen know how to creatively approach the decoration of the hem or sleeve.
Edge loops are not only those that start and finish a thing. They also include side edge loops. There is even a little trick that not all beginners know: to get an even side, you need to remove the initial edge loop behind the back wall if it is the front one and behind the front one if it is the back one. It is not difficult to determine which loop belongs to which loop; you need to look at the pattern.
Edge loops are most often designed:
- chain;
- with teeth;
- knots;
- pearl method;
- rice edge.
You can also fold the thread in half at the beginning of knitting and create a dense double edge with any pattern. This method will help, for example, to prevent the edges of a scarf from curling and stretching when worn frequently. A novice craftswoman needs to know that when creating the side ends of a product, front and back loops are also used, which can be called the "basis of knitting." For example, loops of the first type are obtained by passing the knitting needle with the thread behind the back wall of the loop, and the second - behind the front.
To understand all the intricacies of the design of the sides of knitted items, you need to understand how to shorten and encrypt the types of loops that are used in the work:
| Name | Abbreviation and designation |
| purl | izn. or ip – «-» |
| facial | persons or persons - "X" or "I" |
| edge | chrome - "O" |
| yarn over | nak. – «Ո» |
Also, in knitting the sides, sometimes there is a combination of several loops together, and twisting and removing with subsequent yarn over on the knitted loop. Experts note that almost any pattern known in knitting can be used to decorate the ends of a thing.
Edge "chain"
Externally, the "Chain" pattern resembles a light interlacing of threads in jewelry. Usually, this method is used to decorate the edge when it will need to be sewn later, since the light structure of the loops allows you to connect the product with a thread, needle or hook almost unnoticeably.

To create a chain edge, you need:
- Start by casting on stitches.
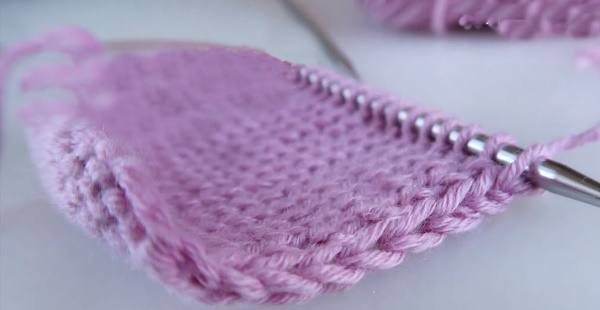
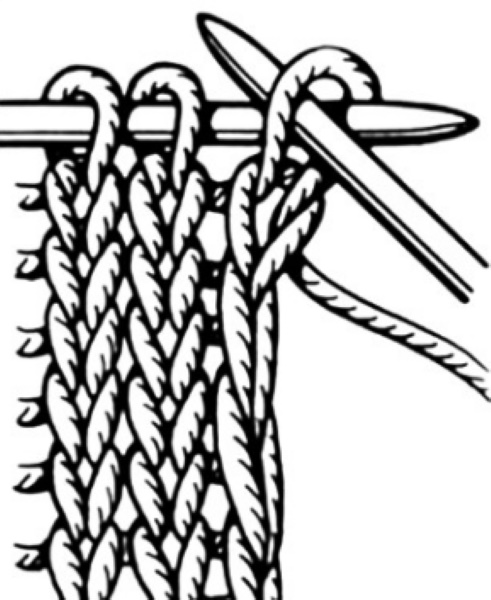
- Slip the first stitch of the row as if it were a knit stitch, leaving the yarn behind the work.
- Knit the rest of the row as front stitches.
- Make the last edge stitch also face-stitched.
- Turn the work over.
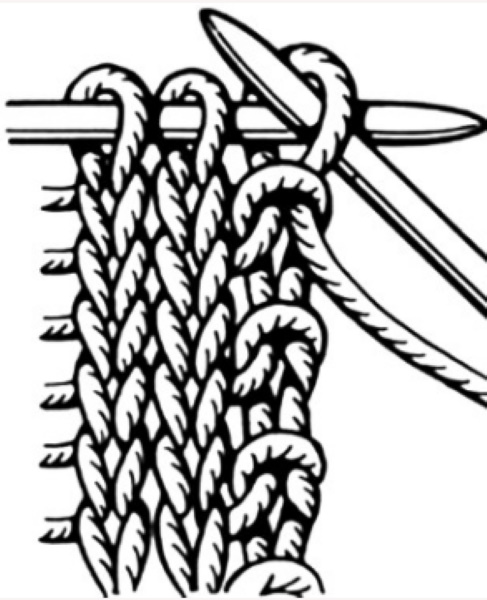
- In an even row, slip the first stitch as if to purl.
- Knit a row according to the pattern.
- Make the last edge of the row also purl.
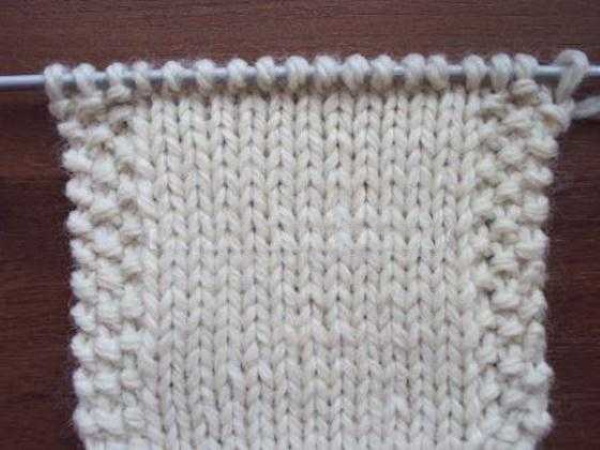
The disadvantage of this knitting method is that the fabric ends up twisting at the sides.
To design a product with an edge that is not subject to curling, you need to:
- Start by casting on stitches.
- In an odd row, knit 1 loop crossed, that is, behind the back wall.
- Form the last edge of this same row with the front one.
- Remove the edge stitches of the next even row without knitting, leaving the thread in front of the work in both cases.
The edge will be beautifully decorated in both cases, and the craftswoman will choose which knitting is more convenient for her to work with.
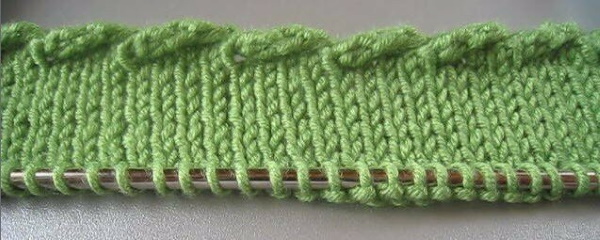
Teeth and knots
When knitting, you can beautifully decorate the edge of the product with teeth or knots. This is how scarves, hats or the edges of a knitted sweater are usually decorated. In addition, the ornament on mittens and gloves looks beautiful.
To decorate the product with a side pattern with knots, you need:
- Start by casting on stitches.
- In odd rows, slip the first edge stitch as if it were purl, leaving a thread in front of the work.
- Knit the last loop of the odd row with an X-loop.
- In an even row, slip the first edge stitch as if it were a front stitch, leaving the thread behind the work.
- Knit the last edge stitch purlwise.

Following these recommendations, a beginner needlewoman will be able to create a harmonious edge that almost does not curl. The serrated pattern will allow you to form an edge for hemming. At the same time, it will be elastic and durable. It is usually created with knitting needles, and a hook is used as an auxiliary tool.
To make the edge scalloped, you need:
- Start by casting on stitches.
- Knit as many rows in stockinette stitch as needed to form the hem.
- Create a base for the ornament in an odd row. To do this, alternate 2 loops together, knit and yarn over.
- Continue creating the second part of the hem with the stockinette stitch. It should be equal in height to the first.
- Open the loops of the initial row and unravel the strip.
- Collect all the loops of row 1 and, using the hook, pull out the end of the thread, unraveling the loops.
- Place 2 edges on 2 open-stitch needles, wrong sides together.
- Knit a row of knit stitches, knitting 2 stitches together at a time. This way the edge is connected and creates a single piece.
- Continue working with the selected pattern for the required length of the fabric.
The edge of the product, decorated with teeth, will be slightly wavy and pleasant to the touch.
Pearl Land
Externally, the "Pearl" pattern resembles small beads sewn into the fabric. Using this knitting technique, you can decorate the edge of a scarf, blanket, shawl or cape. To use the ornament, when calculating the loops, take into account that it is created on the first 3 and last edge loops.
To create a side ornament, you need:
- Start working by forming a “starting strip”.
- Knit the loop of the 1st row 1 purl, 2 – in an X-way, that is, with the front side, 3 – with the back side.
- Work the last 3 stitches of row 1 in the same order with a purl stitch, an X stitch and a purl stitch.
- Knit the edge of row 2 with an X-loop, then purl and X loops.
- Work the last 3 stitches of the row in the same way, including the edge stitch.

The edges of the product, decorated with knitted pearls, lie beautifully and do not curl during wear.
Rice edge
The rice pattern is formed on the side of the product by smoothly shifting the front and back loops. Externally, the ornament is somewhat reminiscent of pearl knitting. The product with such a pattern is created taking into account that for its embodiment on the canvas, 4 loops are needed from each row, including edge loops.
To decorate a product with a rice border, you need:
- Start by casting on stitches.
- Knit the first + 3 loops alternately with loops with “positive” and “negative” designations, that is, front and back in the initial row.
- Finish it in the same way by knitting 3 + the last one alternately with the front and back.
- Knit the initial and final loops of rows 2, 4, 6 and the remaining even ones, following the pattern on the fabric.
- Knit the first + 3 loops in row 3, alternating them as in an elastic band with a step of 1 by 1.
- Finish row 3 by also knitting the last + 3 stitches, alternating purl with knit.
- Repeat the knitting pattern of the initial row in row 5. Repeat the pattern from row 1 to row 4.
Rice looks beautiful on cuffs and plackets of knitted sweaters. It is convenient to attach buttons and other fasteners to such an edge that require a reinforced edge.
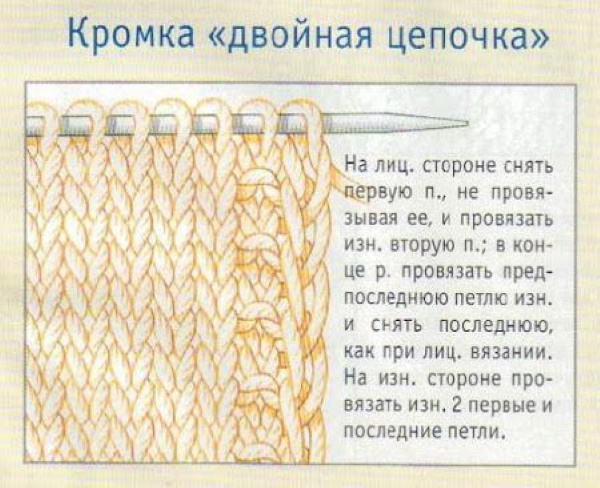
Double chain
The Double Chain pattern will allow you to create a dense edge on a scarf, belt or jacket. It is also used to decorate the strips of knitted sweaters, vests and coats. The pattern is knitted on 2 edge stitches at the beginning and end of each row, so when calculating the loops for the product, you need to take this nuance into account.
To decorate the bar with an ornament, you need to:
- Cast on the required number of stitches on the knitting needles.
- In row 1, slip the edge stitch as if it were a front stitch, and knit stitch 2 as a crossed front stitch.
- At the end of the row, knit 1 penultimate loop with a crossed front loop, and simply slip the edge loop.
- Knit the edge stitch in row 2 as a purl stitch, and simply slip stitch 2 as a purl stitch.
- Remove the second to last stitch in row 2 and purl the edge stitch.
Experts recommend tying only one plank in this way, and decorating the second one in the usual way.
Openwork border on knitting needles
A beautiful edge when knitting can be created using various types of edging. This is how scarves, shawls, stoles, hoods are decorated.
To decorate the edge of the product with a beautiful pattern, you need to:
- Start by casting on stitches.
- Knit row 1 purlwise.
- Create row 2, alternately forming a front stitch after the edge stitch, 5 front stitches, 3 yarn overs, 5 front stitches, 3 yarn overs. Finish the row with a front stitch and an edge stitch.
- Knit row 3, slipping the edge stitch, then purl, purl 5, slip yarn overs onto an additional knitting needle, and wrap the working thread around them several times. Return the bound stitch to the working knitting needle and leave unknitted. Repeat alternating purl and bound stitches to the end of the row. Finish the strip with a purl stitch.
- Start with row 4 to create the main fabric.
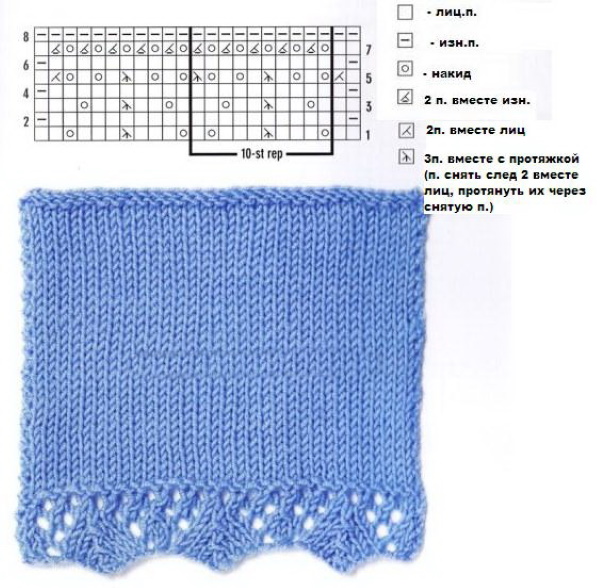
This pattern is popularly called "Spider". Experts recommend that those who start knitting a product from the border, reduce the number of loops by the beginning of the main fabric. If the product is finished with the edge design, then do the opposite and increase the number of working "ears".
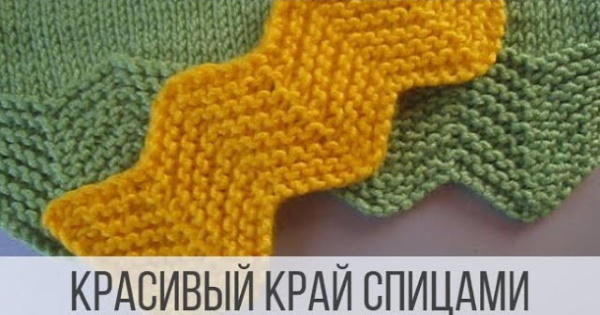
Scalloped border
In needlework, festoons are jagged patterns that run along the edge of a product. You can decorate a knitted item using this technique. A festoon can consist of a different number of loops.
To decorate the product, you need:
- Cast on the required number of stitches, for example, 14.
- Knit row 1, slipping the edge stitch and making a knit stitch, which is returned to the knitting needle with stitches. Next, cast on the 5 stitches following it, like a lasso, from above, and pull the thread tight. Repeat the pattern to the end of the row.
- Create row 2 by making a purl after the edge stitch and forming 2 chain stitches.
- Start with row 3 knitting the main pattern.
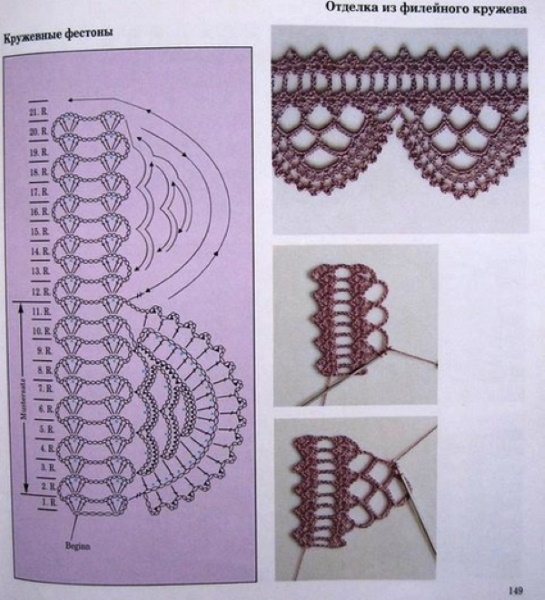
Scallops are often used to decorate children's accessories and things.
Wavy, embossed border
Those who have already mastered the basics of knitting can try to decorate the edge of the scarf with a wavy border. The secret of the technique is to turn the needles with threads in the right direction.
To create a wavy border you need:
- Cast on the required number of stitches, for example, 16.
- Knit row 1 with purl stitches.
- Work rows 2 and 3 in stockinette stitch.
- Start creating the relief border from row 4. To do this, after the edge stitches, knit 4 front stitches and twist the knitting needle with loops (left) towards you. Repeat the work process throughout the entire strip.
- Start knitting the main pattern and fabric from row 5.
Experts note that the thinner the thread, the more rows you need to knit before turning the needles with the front surface. For example, for thin - 4, and for very thick - 2.
Original ways of knitting the edge of a product with knitting needles
There are many original ways to tie the edges of things. One of the most unusual is considered to be the ornament "Garland".
To recreate it on the sides of the canvas, you need to:
- Cast on the required number of stitches on the knitting needles.
- Remove 1 edge stitch in a row without knitting it, then make a yarn over. After that, the front stitch follows, which after knitting needs to be pulled through the removed loop.
- Knit row 2 the same as row 1, but create purl stitches in place of the front stitches.
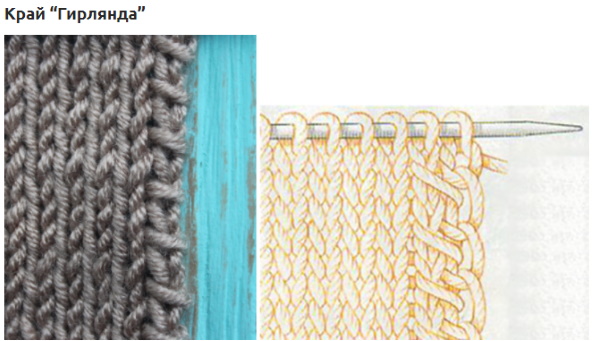
The method of creating the edge is universal, so some needlewomen use it to finish the work.
Beautiful edge based on garter stitch
The border created on the basis of garter stitch looks simple to work with and original on the product. It attracts both beginners and experienced needlewomen.
To decorate the edge of the product with a border, you need:
- Cast on 27 stitches on the knitting needles, which, in addition to the edge stitches, include 12 for the pattern and 13 for symmetry.
- Knit the row after casting on.
- Form row 2 by knitting 6 front loops after the edge. Next, step by step:
- 2 together behind the front wall of the face;
- 4 facial;
- create 1-2 loops, then knit the first one through the front wall with the front one, and the second one through the back one;
- 5 facial;
- 2 together behind the front wall of the face;
- 4 facial;
- create 1-2 loops and knit the first of them through the front wall with the front one, and the second one through the back one.
- Knit the pattern in turning rows.
Usually, 1 row of knitting is enough to decorate the product. In some cases, you can create several lines of this dense "lace".
Based on elastic
A beautiful knitting edge can also be created using elements of the "Rubber" pattern. This option is suitable for lovers of this pattern.
To create an openwork edge, you need:
- Start work by forming the starting strip.
- Knit row 1, alternating the elastic with a step of 2 by 2, where 2 front loops alternate with 2 back loops.
- Design row 2 according to the pattern on the fabric.
- Knit row 3, also alternating the elastic with a step of 2 by 2, but so that 2 purl stitches replace 2 front stitches.
- Knit all even rows following the pattern on the fabric.
After knitting the border, we begin to create the main fabric.
How to knit a beautiful border for a scarf
Instead of a border for a scarf, you can use fringe. It is not difficult to make it when knitting.
To create it you need:
- Start with a set of starting strip yarn.
- Create a front X-loop in the row after the edge loop. Then return it to the original knitting needle, and pull the edge loop towards you until it reaches the desired length, begin to rotate the loop, twisting it.
- Fold the twisted yarn in half and put the end on the knitting needle with the remaining loops. Knit it with an X-loop together with the 2nd loop that was returned at the beginning of the work.
- Continue knitting, creating and knitting twisted loops in the same way as you did with the 1st edge loop.
- Knit an even row with knit or purl stitches.
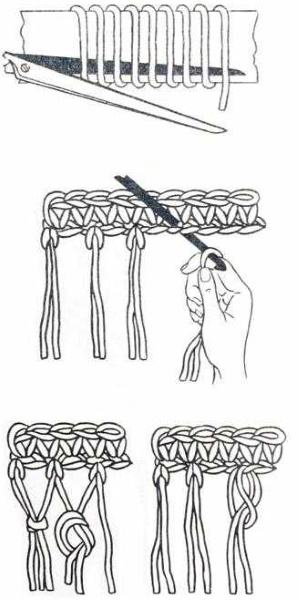
Working in this technique, you can get 1 row of fringe. If you want to release a thread from several rows, then in the odd row continue to work as indicated.
For the hat
You can decorate a hat for an adult or a child with a border consisting of “Leaves” patterns.
To do this you need:
- Start by forming a starting strip where the sum of the loops is divided by 8.
- Create row 1, alternating purl, X-loop knit, yarn over, X-loop, yarn over and purl. The strip must end with 2 X-loop and edge-purl.
- Knit row 2, following the pattern on the fabric.
- Create row 3, following the recommendation of row 1, while an additional loop should appear in place of the yarn over. It is twisted and transferred to the left knitting needle, after which it is knitted purlwise.
- Start in row 5 again forming yarn overs as in row 1.
- Repeat the pattern from rows 1 to 3.
When knitting, a beautiful edge can be made with any pattern you like. It is important to remember that the border should not be too large, so the repeat should only go up once. Before you start creating a new pattern, you need to “test” it by knitting a small sample.
Video on how to make a beautiful edge with knitting needles
How to make a beautiful edge with knitting needles 2 ways: