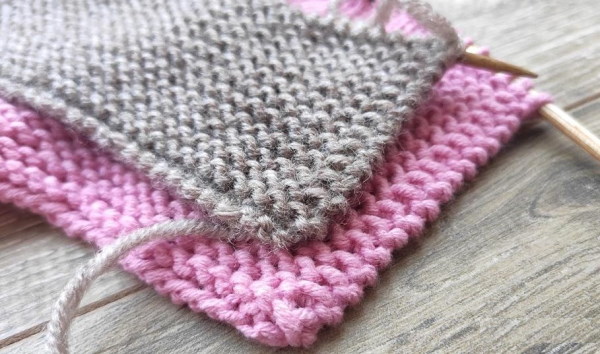
In knitting, an important detail is a perfectly even edge of the fabric. Despite the fact that the product will be knitted well, if the ends fall in and warp, the thing will have a sloppy appearance. The edge will be neat depend on the correctly selected method of knitting edge pieces.
There are many methods, the choice of which will depend on how the edge strip of the knitted item will be used later: for sewing, for collecting loops along the edge for further knitting, for joining elements with a certain seam, or to act as a completed open edge of the fabric. Edge loops are considered to be the extreme holes on a knitted item.
However, the edge can also be knitted from 2 or 3 loops from the edge. When counting the number of loops, they are often not taken into account in the main pattern of the product. Below you can see several options for knitting an even edge.
Secrets of edge loops with knitting needles for an even edge
A smooth edge when knitting will always be beautiful and neat if you know some secrets of edge loops:
- When knitting, it is necessary to ensure that the edge elements are perfect. Due to this, it is very easy to sew the parts together, and the edges that were not hidden in the seam will have a beautiful appearance.
- If the knitted parts will be sewn together later, it is recommended to form the edge loops only once, which are often knitted twice, at the beginning and end of each row. Thanks to this, adjacent elements will be even, which will make it easy to connect the parts, since there will be no hole between the edge and the first hole.
- Edge elements can be applied to an existing pattern or at the stage of model construction. In this case, it is worth making sure that edge loops have been added to the total number of parts. Often, edges contain only 1 hole. However, there can be 2 or more. Edges of several elements are mainly used on seamless parts so that they do not curl.
- Edge elements allow you to create a dense edge on openwork items that are prone to stretching, and on sliding yarn, so as not to deform the fabric. If the edges were made with removed loops or garter stitch, they allow you to control the number of rows. As a result, it is very easy to count the rows by knitting chains or knots in every second row.
- Any decrease or increase must be done within the edges. However, when constructing a piece using loop closure, the edge elements must also be closed.
How to knit an edge loop. Classic method with knitting needles
Any knitting should have a smooth edge if it is not formed in a circle. Edge loops, which are often the first and last elements on the knitting needles, are edge loops. There are also decorative edges, which require 4 elements, 2 on each edge, or 6, 3 on each edge.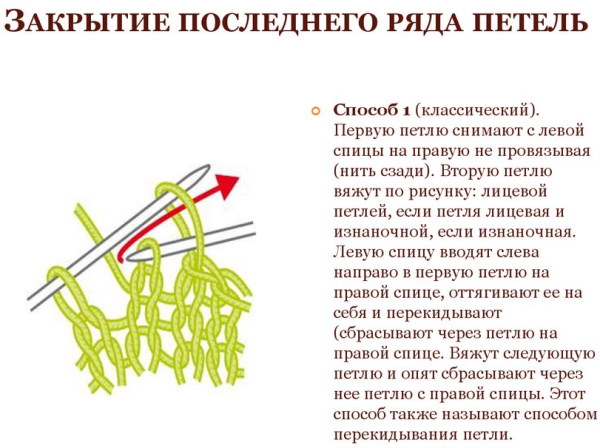
Various options for knitting edge elements lead to the design of different types of edge edges. Such loops create side stripes of a knitted product, so they are considered auxiliary details. During the assembly of the fabric, such loops will be hidden in the seam. However, in some cases, the edges will remain open, so their appearance will depend on the ability to create edge elements.
Edge elements do not take part in the creation of the pattern, therefore they are often not taken into account when calculating the details for the pattern. Therefore, they should be collected additionally, knitting at your own discretion. For example, if the description indicates that you need to collect 42 elements and there is no information about edge elements, it is recommended to add 2 loops for the edges.
The choice of knitting method for edge elements will depend on what the edge of the knitted product should look like.
The feature will depend on the purpose of the edge:
| Purpose | Nuances |
| For sewing parts together | The edge strip will always be hidden behind the seam. |
| For casting on stitches along the edge | Used for sewing sleeves, collars, plackets, so the edge strip will be hidden. |
| Open edge | It is considered the most difficult to process because it is in plain sight. |
When knitting, a common method is to create a chain-like edge. This edge is great for picking up elements along the edge and sewing together pieces, as it creates a flat, even strip. However, the edge will curl up a lot.
Classic method of knitting edge loops:
- In odd rows, transfer the first element to the right working tool, leaving the yarn behind the fabric.
- Make the last piece the front one.
- On the second side of the product, drop the first loop, leaving the thread in front of the fabric.
- Make the last element purl.
This method can be used by both experienced and novice craftswomen. However, professional knitters often use the method of creating a chain-shaped edge, which has a lower degree of twisting of the product.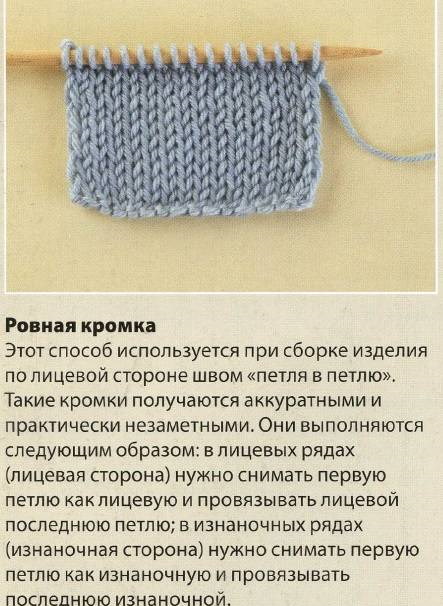
Step by step instructions:
- In odd rows, make the first element crossed.
- Make the last piece the front one.
- Turn the canvas over and remove both the first and last holes.
- Place the yarn in front of the work.
Methods of knitting edge loops
It is possible to create a smooth edge when knitting with knitting needles using simple techniques that can be mastered by beginner knitters. However, when choosing the optimal method, it is necessary to take into account the purpose of using the edge, the structure of the yarn, as well as the style of the model.
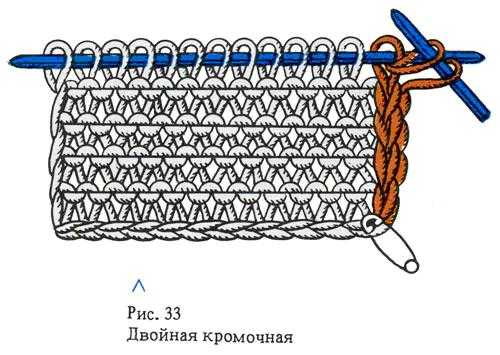
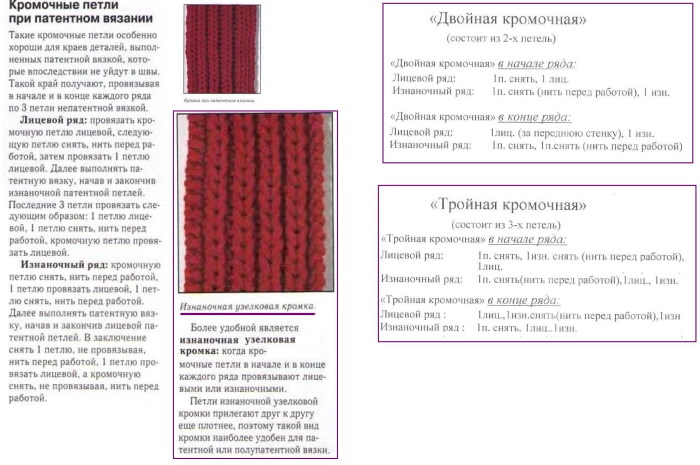
Double chain
When choosing this option, the edge line will have a neat appearance and a dense structure. The scheme is suitable for decorating scarves, belts and cardigans that have an unprocessed border.
The edges of the product should be decorated using 2 elements:
- Transfer the first hole from the front from the left knitting needle to the right one.
- Make the second loop crossed.
- Form the central area according to the pattern. Make the penultimate detail crossed.
- Transfer the last element from the left instrument to the right one.
- Knit the reverse side with 2 purl stitches.
- Throw the penultimate piece over without knitting. Finish the stage with a purl element.
To obtain straight, untwisted parts, decorative finishing is often used:
- In each row, throw the first loop from the front without knitting.
- Make the second hole purlwise. Finish the work in the same way.
- Make the penultimate element purl. Remove the outermost hole.
- On the reverse side, knit the edge with purl stitch.
Pigtail cut
In this version, the edge is formed using 3 loops at the beginning and end. As a result, the seal will be smooth and not twisted. This method is often used to obtain an open, smooth cut.
Step by step instructions:
- When creating the outer side, throw over the first edge element without knitting. Leave the yarn behind the work.
- Cross the next two holes to the right side. For this purpose, additionally use a pin or a short knitting needle. Put the second loop on it, throwing the yarn in front of it. Make the third part face.
- Return the previously removed element to the left tool. Make the detail frontal. Finish knitting in the same way.
- However, the crossing should be done in a different direction. In this case, the third element from the end should be removed to an additional tool before the main product and the penultimate one should be knitted.
- Return the removed hole to the working needle and make it the front one.
- On the reverse side, drop the starting loop, leaving the yarn at the back.
- Make 2 front elements. Continue working, knitting a row according to the pattern.
- Complete the design with 3 front elements.
Triple thread
When knitting, it is permissible to create a straight edge using a triple thread.
To do this, you need the following:
- Fold the yarn from the ball into 3 layers. Throw the folded yarn over your left thumb so that the loop is located between your index finger and thumb. The thread that goes from the folded yarn to the ball should go through your index finger.
- Insert the tool into the hole in the folded thread and pull it towards you.
- Follow under the hole on the thumb, catching the yarn from the bottom up on the index finger and returning back into the loop on the thumb.
When choosing this method, the edge will have a noticeable decorative edge, which is quite elastic.
Machine edge
When choosing a machine edge, the edge will be smooth and compact.
Step by step instructions:
- Stretch the working yarn between your left index finger and thumb. The thread from the ball should pass through your index finger.
- Place the needle under the yarn from left to right, slightly turning the tool. As a result, an edge hole will be made. Hold this loop with your right index finger or thumb so that it does not shift.
- Pass the needle under the thread that comes from the thumb, and, having picked up the yarn on the index finger, pass it back under the thumb thread. This rule applies to the set of face elements.
- Direct the tool under the yarn that goes to the index finger. Hook the thumb thread that comes out back under the index finger yarn. This stage concerns the set of purl parts.
- The loops should not twist, the fixing strands of yarn should be located strictly under the tool.
- When alternating front and back elements, cast on the required number of loops. The last element cast on should be the front opening.
- Turn the work, knitting the first loop as an edge stitch. Make the next piece as a crossed front stitch.
- Remove the new purl hole without knitting, leaving the yarn in front of the fabric. Perform similar actions to the end of the row and turn the product.
With this knitting option, the orientation of the front pieces will be corrected, since new rows will be formed according to the following condition: front ones over front ones, back ones will be removed without knitting, leaving the yarn in front of the fabric. After that, you can proceed to creating the pattern.
This set of loops gives the first four rows a fairly voluminous edge. To avoid contrast, it is recommended to knit the cast-on rows with knitting needles that have a small diameter.
Garland of edgings
Knitting must be done on 4 elements, 2 on each side.
To do this you will need the following:
- From the front side of the fabric, drop the first hole as a front one, leaving the yarn at the back. Make 1 yarn over.
- Knit the next front piece, pulling it through. Yarn over the removed piece.
- From the wrong side of the product, slip the first piece as if it were purl, leaving the yarn in front. Make 1 yarn over.
- Purl the next piece by pulling it through.
- Yarn over through the removed hole.
The method is quite complicated, but it allows you to get a dense and beautiful edge.
Knotted edge
With this method, you can achieve a smooth, clear edge with a slight degree of twisting. At the same time, it is made in the form of neat knots. This option is suitable for garter stitch, acting as its continuation.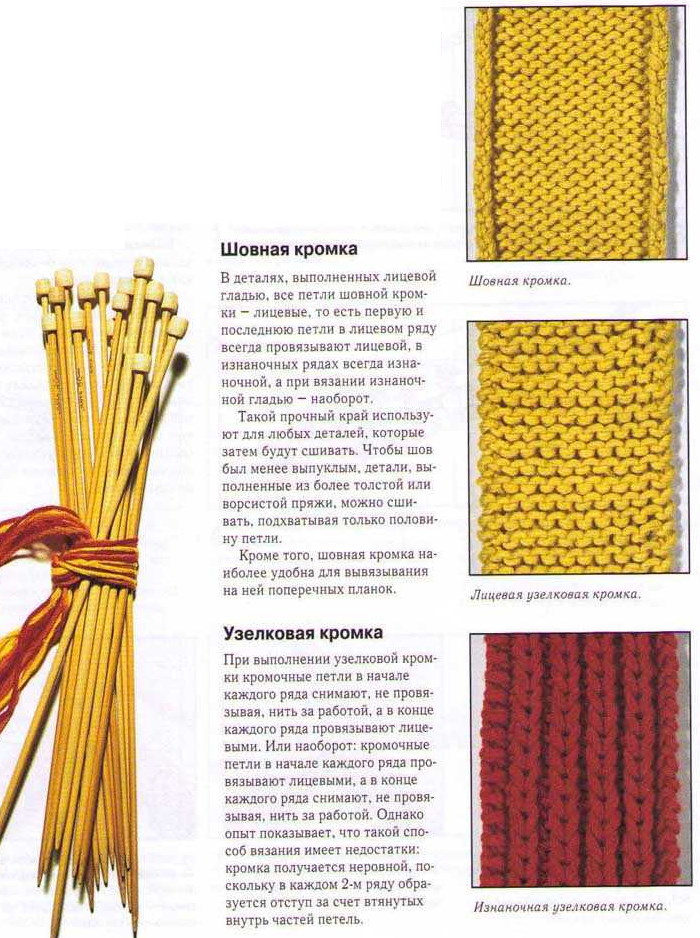
Step by step instructions:
- In the front row, slip the first element as a purl, leaving the yarn in front of the fabric. Make the last loop as a front loop.
- In the purl row, slip the piece as if it were a front piece, leaving the thread behind the garment.
- Knit the last hole purlwise.
Decorative edge
The method allows you to achieve an untwisted, even edge in the form of a chain. It is used to decorate straps with a belt, scarf and other open edges.
The edge needs to be knitted on 4 elements at the beginning and end of the row, 2 pieces each.
Step by step instructions:
- To create the front side, fold the first hole as a front one, and the next one as a back one.
- At the end of the row, make the penultimate element purl.
- Drop the last loop without knitting.
- To create the back side, make the first 2 and last 2 edge pieces purl.
Rice edge
To create a pattern correctly, you need to have threads of the appropriate shade and the right yarn tool.
Step by step instructions:
- Cast on an even number of stitches onto the knitting needles to avoid confusion with the pattern.
- Make the first element an edge one by removing it without knitting.
- Make the new piece front, the next piece back, keeping the alternation until the end of the first row.
- Knit the last hole purlwise.
- To create the second row, remove the edge element without knitting.
- Make the second hole purlwise, the third one facewise, maintaining alternation until the end of the row.
- Make the last element purl.
- Knit row by row, alternating elements, until the fabric reaches the required size.
- When finished, close the loops.
Pearl edge
Edge loops made using the pearl method are suitable for decorating the edges of blankets and shawls. As a result, the knitted work will be neat, with untwisted and unstretched edges.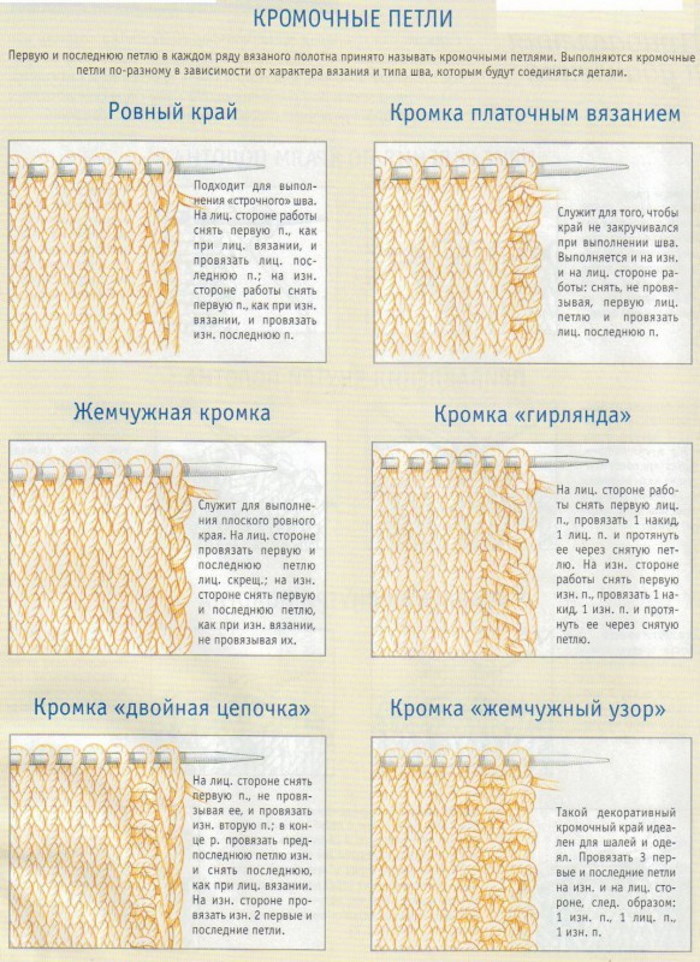
Step by step instructions:
- To create the edge, take 3 elements from both edges of the strip.
- On the front side, the first and third holes should be purl, and the one in the middle should be front.
- The last three elements at the end of the strip are connected in a similar way.
- On the reverse side, the first and third elements should be front, in the middle - back. At the end of the strip, repeat the same steps.
Scalloped edge
Beginners are advised to master simple knitting techniques so that the edge strip is neat and even. In this case, the edge loop will have a jagged edge that will not curl or stretch. At the same time, it will be even and have a neat appearance.
Step by step instructions:
- For the front row, remove the initial element, leaving the yarn behind the work. Make the outer part front.
- For the purl row, remove the starting hole, leaving the yarn in front of the work.
- The last element is done with purl stitch.
Any detail should have dense and even edges, so in the process of knitting with needles it is necessary to control the tension of the working yarn. Otherwise, the loops will be sloppy and loose. It is recommended to tighten the edges a little so that the edge turns out more beautiful. At the same time, it is not recommended to experiment by knitting the edges of the fabric using different methods, since they should all be the same. It is advisable to practice on samples.
Video about knitting a straight edge
Beautiful edge with knitting needles: