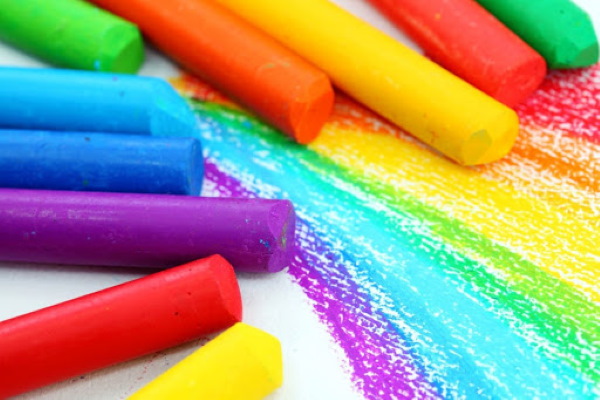
As a tool for creating images, dry and oil pastels appeared at the dawn of civilization, when there were no pencils or paints. Back then, people used a piece of coal or chalk for their first cave drawings. Gradually improving and adding new colors to the palette, pastels became one of the most interesting drawing techniques, a unique tool for creating bright, atmospheric pictures.
What is pastel for drawing, what is it made of
A drawing instrument called a pastel is a product that resembles:
- colored chalk;
- pencil;
- felt-tip pen.
The similarity is external: unlike the listed pictorial tools, pastel produces colors that are brighter and at the same time more delicate and airy.
Its main advantages include:
- ease of application and mixing of colours;
- possibility of correcting the drawing;
- pigment durability: a drawing created using pastel will not fade in the sun, will not fade or change color;
- unique possibilities for creating gradients – smooth transitions from one color to another, from a darker shade to a lighter one;
- texture: the layer of pastel applied to the paper gives it a pleasant velvety texture, which makes pastel drawings look noble.
The disadvantages include:
- tendency for some types of pastels to crumble;
- the need to use a fixative to secure the designs, which slightly changes the colors, making them darker;
- Difficulty in finely drawing images or small, clear drawings: this tool requires space and is not suitable for detail.
The composition of pastels is simple: it is a coloring pigment and a binder, due to which the paint particles do not crumble, providing a convenient form of the bar for work.
The following depend on the binder:
- properties of pastel as a drawing tool;
- strength;
- hiding power (ability to paint over, cover the color of the surface);
- image brightness;
- the possibility or impossibility of shading.
The following are often used in this capacity:
- kaolin;
- gypsum;
- talc;
- gum arabic (acacia resin);
- linseed oil;
- natural or artificial wax.
Pastel Painting Techniques
Working with pastels requires a minimum of tools.
This:
- pastel;
- a sheet of paper (not smaller than A3) with a coarse-grained fleecy structure;
- brushes (sometimes);
- a soft cloth or a piece of foam rubber for blending.
The work is conditionally divided into the following stages:
- Sketching: The pencil lines will show through the pastel layer, so you need to make them almost invisible or use the pastel itself for this purpose.
- Application of primary colours.
- Elaboration of the drawing: creation of color accents, highlighting central objects by drawing them in a more contrasting manner.
- Create smooth transitions between colors.
- Working with background and shadows.
- Depiction of small details that make the drawing more realistic.
Otherwise, the features of the drawing technique and the method of applying paint largely depend on the type and properties of the tool used.
According to this criterion, the following techniques are distinguished:
- dry pastel;
- oil pastel;
- wax pastel;
- watercolor pastel;
- pastel pencils.
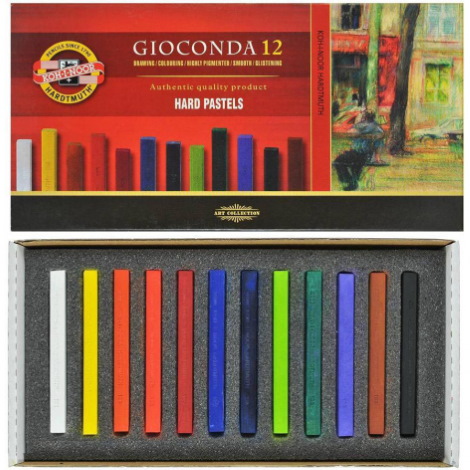
Dry pastel
Dry pastel for drawing resembles children's crayons. The similarity is reinforced by its shape: the bars are square or round in cross-section.
The binding agent is:
- gum arabic;
- gypsum;
- koalin.
Due to its powdery structure, dry pastels:
- goes on paper easily;
- simply removed from the sheet;
- lends itself well to shading and creating halftones.
However, due to its fragility, working with dry pastels is not easy, and the finished drawing may crumble if not fixed.
Depending on the quantitative ratio of pigment and binder, there are varieties of dry pastels:
| Type of pastel | Description |
| Solid | It contains much more binder than pigment. Such crayons break less, but will not give soft lines and uniform coloring of the paper surface. The area of application of hard pastels is drawing individual details. |
| Soft | It consists almost entirely of pigment. In drawing, soft pastel is used mainly for painting large areas, to create a background.
Among the advantages are bright color, the ability to lay on paper easily and softly. The main disadvantage is the fragility of the chalk, its tendency to break or crumble. |
| Ultra soft | This pastel contains so much pigment that it cannot hold the shape of a bar, so it is produced in jars. It is used mainly by professional artists for more accurate color rendering. |
Features and rules of use
The technique of drawing with dry pastels has the following features:
- The sheet of paper is fixed on a horizontal smooth surface. It should be taken into account that the slightest unevenness will definitely "appear" in the image. It is best to use electrical tape to fix the paper.
- The strokes are made horizontally, with short movements. It is not advisable to use zigzag lines, as the color will not be applied evenly. Pastel chalk wears down quickly, so it is recommended to turn it slightly after every 5-6 strokes.
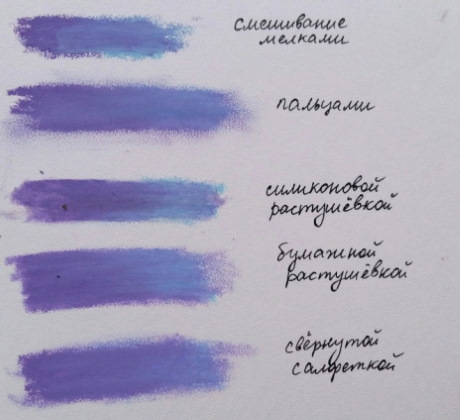
- To smooth out sharp transitions, shading is used. In this case, to avoid contamination of the drawing, areas painted in different colors are shaded with different fingers. For the same purpose, it is recommended to periodically shake off crumbled pastel particles from the paper and clean the surface of the chalk.
- When creating a drawing, a sketch is not made. First, weak strokes are applied, defining the position of the main elements of the image. At this stage, you can easily correct the drawing by removing unsuccessful lines with an eraser. Then, details are drawn in a more intense color.
When working with dry pastels, it is necessary to fix the drawing, but it should be taken into account that the fixative makes the colors darker.
Dry Pastel Drawing Lesson
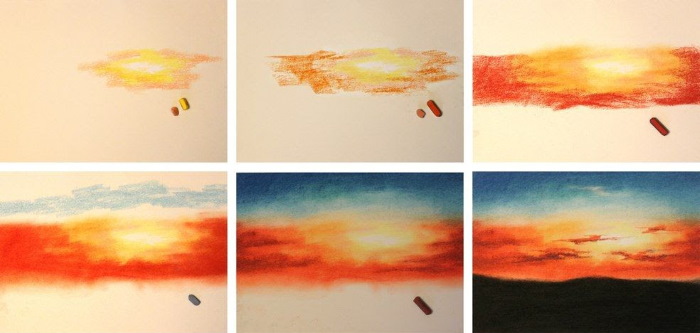
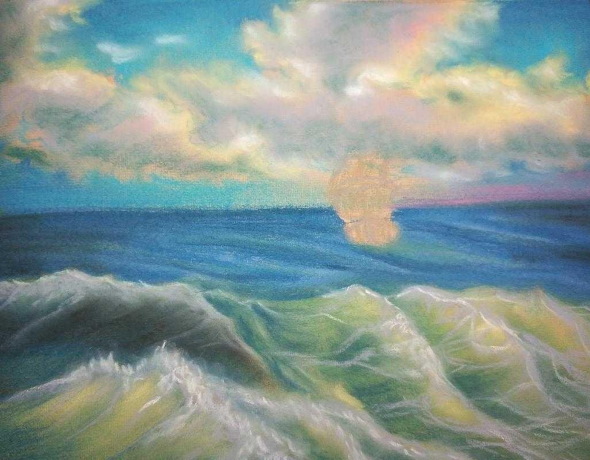
Dry pastels for drawing are great for depicting sunsets, seas or lonely islands.
To work you need:
- Secure a sheet of paper to the table with electrical tape (the tape will not only prevent the paper from shifting, but will also protect the table from careless strokes while you work), pastel crayons, a sharp knife.
- Identify areas of clear sky and the position of clouds colored pink, red, yellow and orange by the setting sun.
- Choose a place where the sun has just set below the horizon and leave it unpainted.
- Use the same chalk, but apply more pressure, to create accents.
- To achieve better shading, apply a little white pigment to the drawing by scraping it off the white chalk using a knife.
- Perform shading - rubbing the paint with your fingers to create smooth color transitions.
- Re-highlight the brighter areas of the sky.
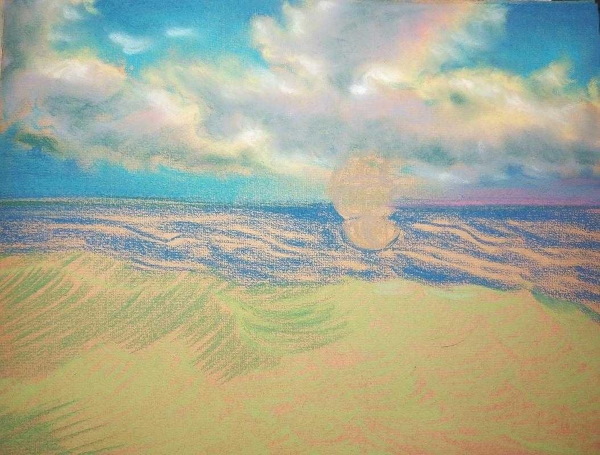
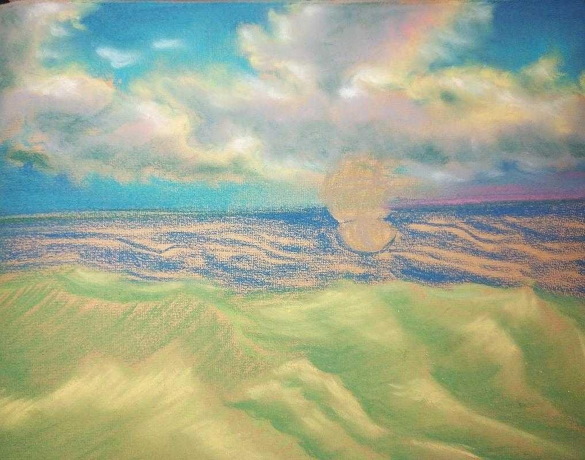

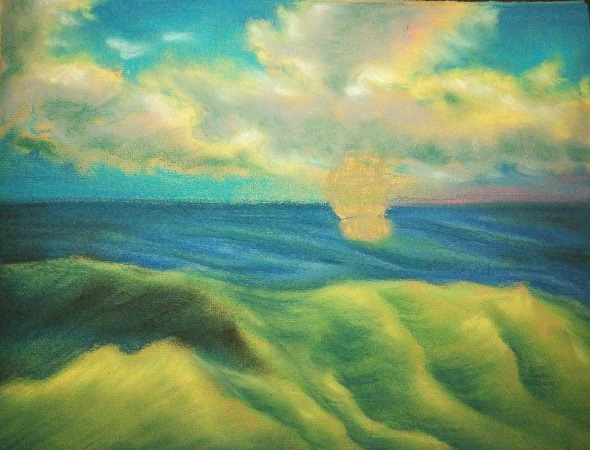
- Draw the sea using the same principle: first, create a background using blue, then, using blue, mark the waves with horizontal strokes, and then do the shading.
- Outline the mountains using black chalk, then color them in.
- Add 2 palm trees to the drawing, first using a light arched stroke to outline the trunk of one of them, and then drawing it more clearly. At this stage, you need to be careful, as it will be difficult to correct the drawing.
- Draw the crown of the palm tree in a herringbone pattern. Draw the second palm tree using the same principle.
- Carefully, so as not to tear the paper, remove the tape, trim the edges and secure the image.
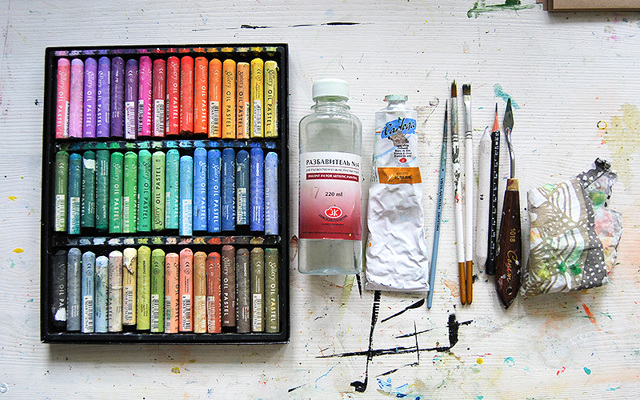
Oil pastel
Oil pastels always contain linseed oil, which, when pressed, binds the pigment particles, giving them the shape of thick rods that look like a marker.
Oil pastels are greasy and hard to the touch and have the following characteristics:
- leaves bright and clear lines on paper, their surface has a slight oily sheen;
- the applied strokes are practically not shaded and cannot be corrected;
- the design does not crumble and does not require fixation, but its surface is slightly sticky and over time greasy stains may appear on it;
- When heated in the hands, pastel stains the fingers, which is why inexperienced artists often end up with ruined drawings;
- Oil pastels do not impose any requirements on the surface: you can draw with them on any paper, canvas, wood, glass, stone.
The final image resembles a work done with oil paints.
Features and rules of use
Working with this tool begins with drawing the main lines that define the contours and shape of the object. Next comes the coloring stage, and then the application of shadows and highlights, which give the image volume, a sense of texture and make them more realistic.
Instead of shading, which is not applicable for oil pastels, in order to smooth out sharp transitions between colors and shades The following methods can be used:
- mechanical: successive application of paints. Gradient shading, hatching, and color overlapping are used. The method allows for achieving a bright, realistic image, but requires a certain amount of experience and skill in working with oil pastels;
- using compounds that dissolve the oil contained in the pastel. The method is simpler, but the image is slightly blurred and unclear. These shortcomings are removed by subsequent correction;
- by heating the surface of the drawing with a hair dryer. Under the influence of heat, the oil softens and then hardens, “sealing” the drawing, removing some of the stickiness inherent in oil pastels. When heated, the clarity of the image is also slightly lost.
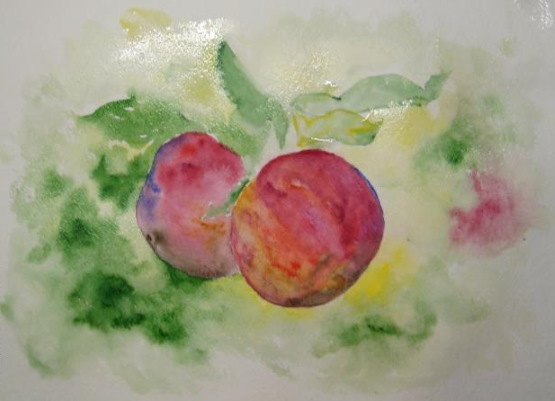
Oil Pastel Drawing Lesson
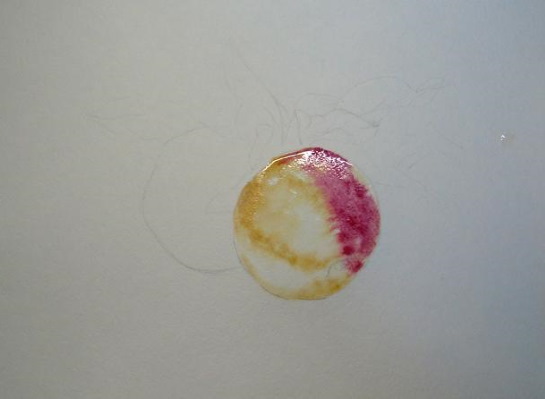
To depict a pumpkin with oil pastels, you will need:
- pastel;
- sheet of paper;
- brush or special shading tool;
- solvent (pinene);
- simple pencil;
- rags.

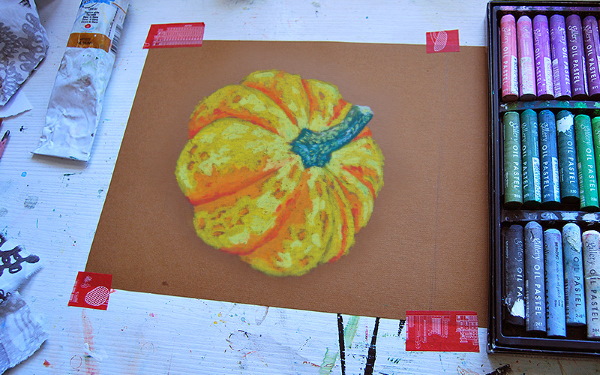
The stages of work are as follows:
- Create the outline of the pumpkin. The work is done with a simple pencil, using barely noticeable, thin strokes, otherwise the pencil lines will be visible through the pastel layer.
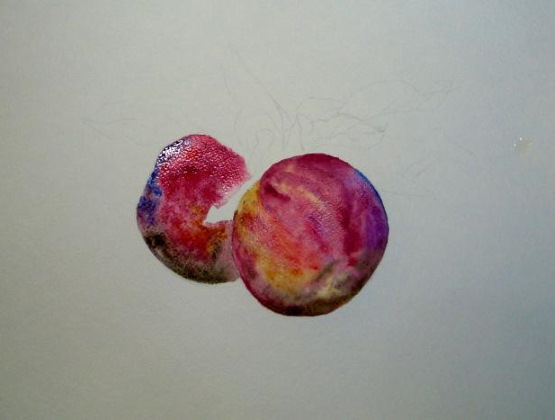
- Apply the main colors in the following order: bright orange - will mark the depressions between the slices; light orange - will create shadows; yellow (lighter and darker) and orange will convey the unevenness of the surface.
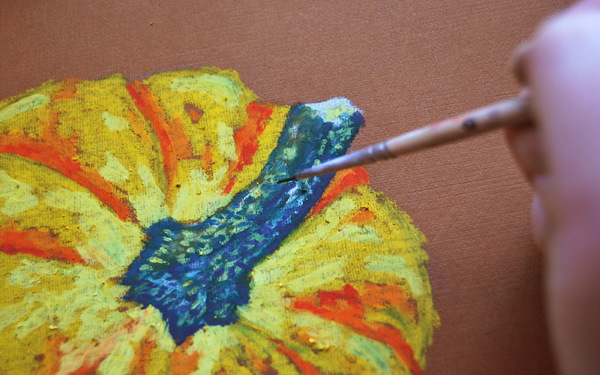
- Draw the tail and use the solvent to slightly smooth out the sharp color transitions.
- Work on small details, such as the pumpkin's tail. This is done with the thinnest brush, for which first the thinner is applied to it, and then the pastel.
- Draw the sections of the tail using blue, light blue, dark and light green paint.
- Add highlights, shadows and create a background.
Wax pastel
Pastel for drawing, in addition to dry and oil, can be wax. This type is similar to oil and is also produced in the form of thick "pencils" with a pointed tip. It is an easier tool to work with.
Features and rules of use
Since wax pastels are durable and do not stain your hands, and the drawings you make with them do not need to be fixed, they are often used in children's art or in the works of inexperienced artists.
Its advantages are considered to be:
- safety: pastels contain natural pigments and polymer wax;
- softness and the ability to leave a juicy, bright mark even with slight pressure, which is especially important for babies;
- convenience: you can hold the wax crayon any way you like, it will still draw;
- practicality: pastels do not crumble or break, are easy to sharpen, and the resulting crumbs can be melted and reused;
- the ability to use any surface for drawing: paper, cardboard, glass.
Since the wax surface of the drawing is non-wetting, this type of pastel can be used together with gouache or watercolor, and can be used to paint in mixed techniques that are not possible with oil or dry analogs.
At the same time, drawings with wax crayons are somewhat rough, simplified, and there are practically no possibilities for creating gradients. For these reasons, professionals rarely use them, preferring oil pastels, which are more difficult to use.
Another disadvantage of wax pastels is that they are not suitable for outdoor work (en plein air) in the cold season., when wax loses its plasticity under the influence of low temperatures.
Work with this tool begins with creating a sketch, for which wax crayons of the appropriate color are used. Then, individual details are painted and drawn. At the last stage, shadows are applied and the background is designated.
Wax Pastel Drawing Lesson
Using wax crayons, you can depict a still life with oranges, for which you will need crayons and a sheet of paper.
The stages of work are as follows:
- To mark the contours, take an orange pencil and draw a whole orange and 2 slices.
- Mark segments on the slices and an indentation on the top of the whole orange.
- Fill in the lighted areas with a brighter color and add red where there will be shadow. You don't have to try to fill everything in yet, it's important to create the main background.
- Remove the white "islands" and outline the shadows more brightly with red pastel. Do not try to make the drawing evenly colored: the remaining white spots will add realism to the drawing, becoming highlights of light.
- Using a black pencil, add volume to the orange with a few strokes, outline the stalk, add contrast to the contours, and then create the background.
Watercolor pastel
This is a relatively new type of pastel, which differs from the described analogues in that water-soluble pigments are used in its production. Oil or wax is used as a binding agent. With the help of watercolor pastel, it is easy to achieve the effect of a watercolor drawing by processing the image with a damp brush.
Features and rules of use
For innovators and dreamers, watercolor pastels offer many possibilities for creating combinations of pastel and watercolor.
For example, you can:
- leave the drawing in a “dry” state;
- treat it with a damp brush to get a watercolor effect;
- first create a watercolor background and then paint on it with pastels;
- moisten the paper and immediately paint a watercolor masterpiece.
However, you need to choose one of the options in advance, since you will need special paper to create a watercolor effect. The first stage of drawing with watercolor crayons is no different from working with oil or wax pastels.
At the 2nd stage, when creating watercolors, it is necessary to adhere to the following algorithm:
- Select an area of one color and go over it with a damp brush.
- If you want to create a smooth transition of colors between the selected and neighboring areas, then the brush goes slightly beyond its borders, but if the border should remain clear, it moves exclusively within the area.
- Move the brush along the lines left by the pastel chalk.
- Start processing the adjacent area only after the paper has dried.
- Rinse the brush periodically.
- The finished drawing should dry, after which you can correct minor flaws or make the image more expressive by adding a few pastel strokes where needed.
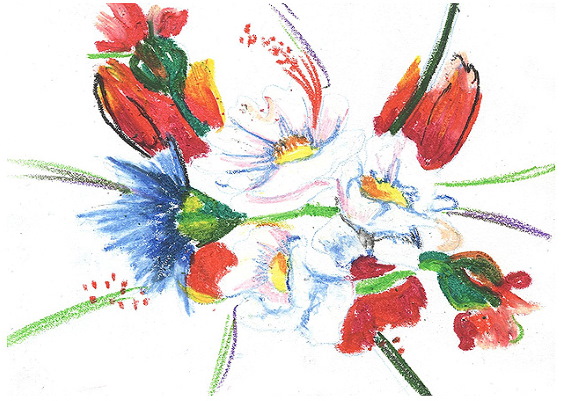
Watercolor Pastel Drawing Lesson
For this lesson you will need:
- watercolor crayons;
- watercolor paper;
- brush;
- water;
- rags.
Since we are going to work with water, it is advisable to fix the sheet of paper vertically. The process of creating a drawing of lilies is conditionally divided into 2 stages: applying the image in pastel and creating watercolors.
At the first stage the following is done:
- A sketch is created with black pastel, lines and small details (stamens) are applied, which are characteristic of a given flower and determine its shape.
- Start painting: the main color will be orange, so it is applied first.
- Add shades of red to the design: scarlet and burgundy.
- Enhance colours by re-applying them and creating accents.
Sprinkle a few drops of water on the surface of the sheet (from top to bottom) and begin creating watercolors, for which:
- Apply the orange color to the areas with a brush.
- After rinsing the brush, repeat the same for all shades of red, slightly going beyond the boundaries of the areas to create smooth transitions.
- Blur the black color slightly, which will give a light gray background.
The painting must dry, after which individual lines are worked out with dry watercolor crayons and color accents are created.
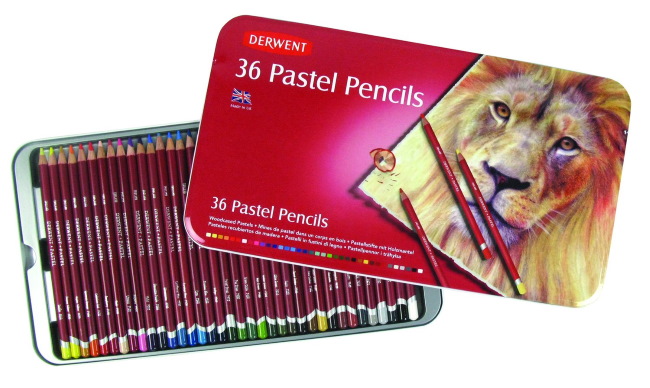
Pastel pencils
Dry pastel for drawing can be represented by pencils. This is a symbiosis of dry pastel and pencil, which has received the advantages of both tools.

Compared to traditional pastels, their main advantage is the ability to draw small elements of a drawing in detail, and compared to a regular pencil, the softness and brightness of the lines.
Features and rules of use
To take advantage of the advantages of a pastel pencil and get a realistic, neat drawing, you need to know the basic rules of working with it and selecting all the necessary accessories.
To draw you will need:
- a tablet that can be mounted at a slight angle;
- quality pastel pencils;
- paper with a rough surface that holds pastel particles well. Professionals usually buy paper that is not white, but terracotta, gray, or light brown.
When applying color, short strokes are used to give the image volume, their configuration should repeat the shape of the object. The work is performed according to the following algorithm: first, light colors are applied, then dark ones. Shadows, highlights and color accents are drawn last.
To create halftones and smooth transitions you can use:
- shading;
- optical mixing method (alternating strokes of different colors);
- a method of mechanical mixing (superimposing one color on another).
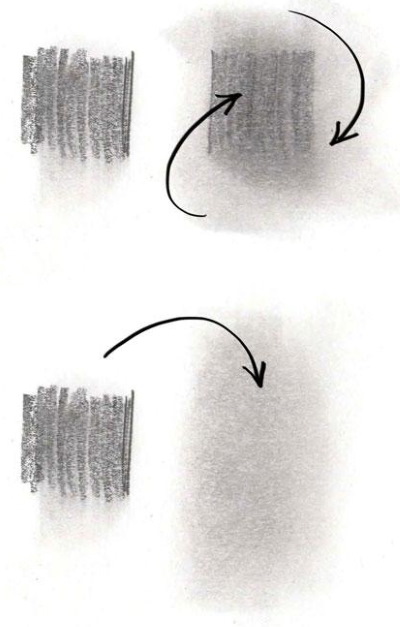
The color saturation can be adjusted using shading, which can be done conveniently with a special shading stick or with your fingers.
To create perspective, distant objects are placed higher on the sheet, their contours are indicated with soft, blurry strokes. Nearby objects are placed at the bottom of the sheet, depicted with clearer lines and carefully drawn details.
In order not to dirty the drawing, it is advisable to apply colors starting from the top and gradually moving down. Shading of areas with different colors is done with different tools, the tip of the pencil is also periodically cleaned, and pastel particles are brushed off the paper with a brush.
Pastel Pencil Drawing Lesson
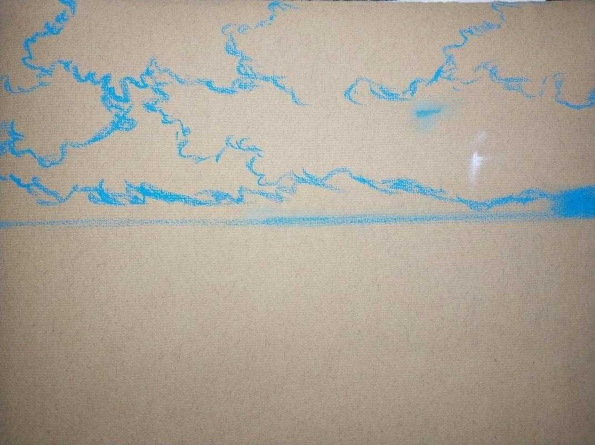
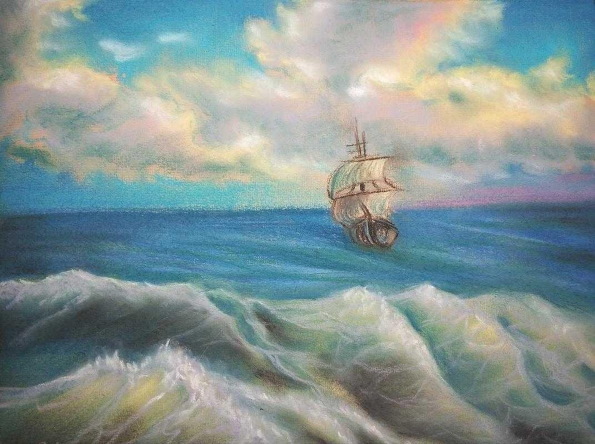
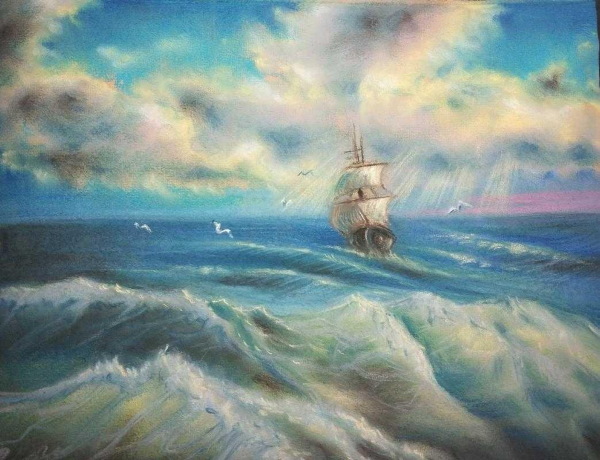
An inexperienced artist can try to draw a seascape. It does not require strict compliance with the original, there is room for imagination, and the completed picture, despite possible inaccuracies, looks realistic.
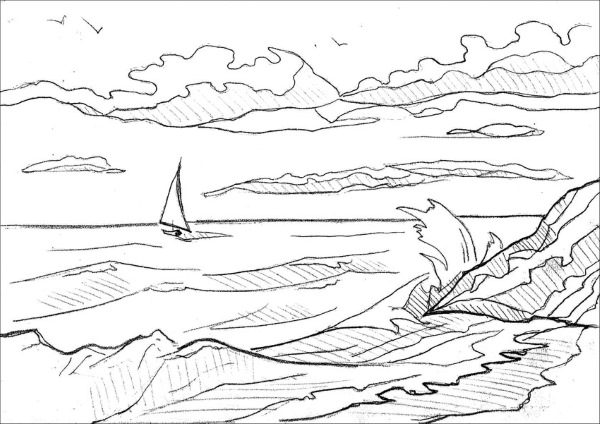
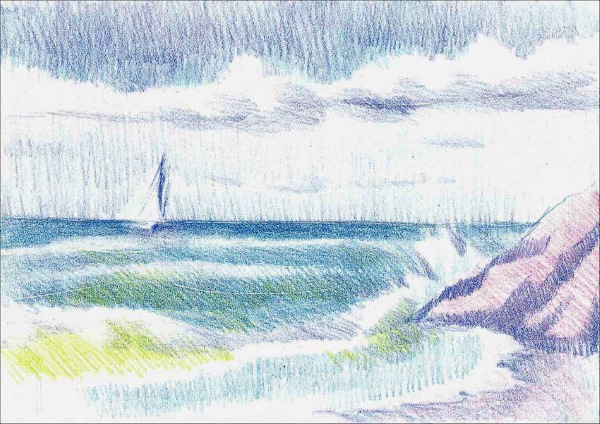
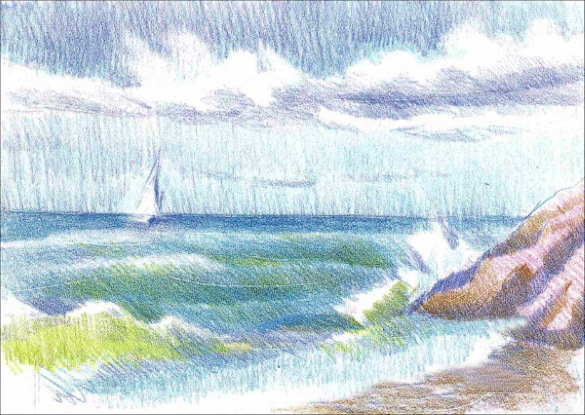
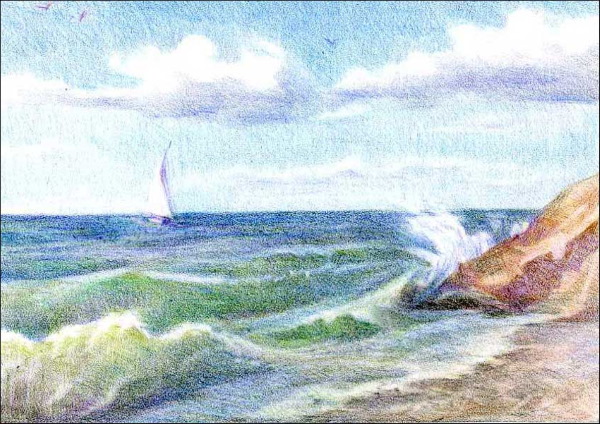
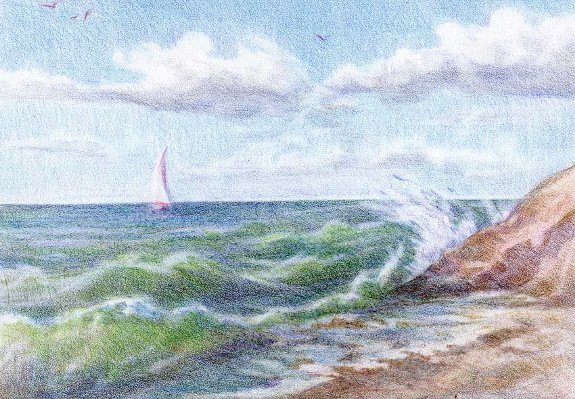
The work is divided into 5 stages:
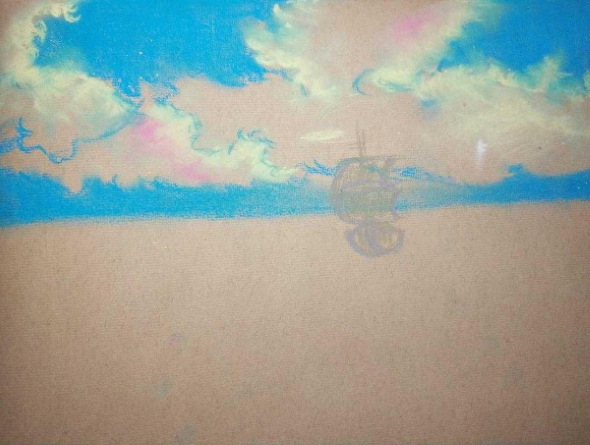
- Creating a sketch. The main elements of the landscape are outlined with thin, barely noticeable lines: it is advisable to start with the horizon line, then outline the position of the sun, then the clouds, sea, rocks, and finally draw the outlines of the yachts.
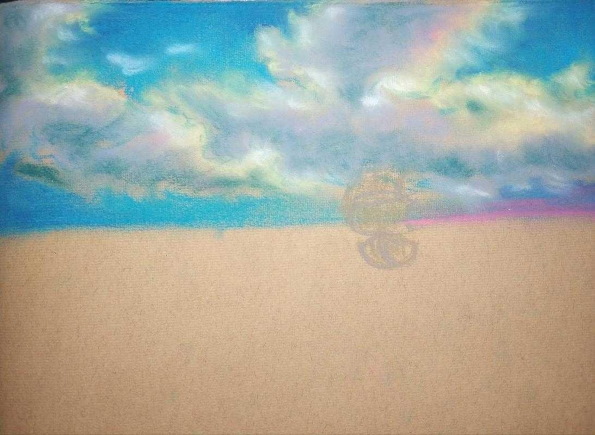
- Overlaying the main colors. At this stage, the main elements of the drawing are lightly filled: blue marks the areas of clear sky and the sea, yellow marks the area of the sky around the setting sun, shades of red mark the sunlit clouds, and shades of brown mark the rocks.
- Creating a rich color background. To avoid smudging the drawing, place a sheet of white paper under your hand and gradually, moving from top to bottom and from left to right, apply short strokes, and then shade the pencil to obtain smooth transitions in the sky, sea, and rocks.
- Detailing. They draw small details: the sun, yachts, cloud patterns, rock silhouettes, curves of the coast, and apply shadows more vividly.
- The final stage. They add clarity to the elements located in the foreground, create accents, and deepen the shadows.
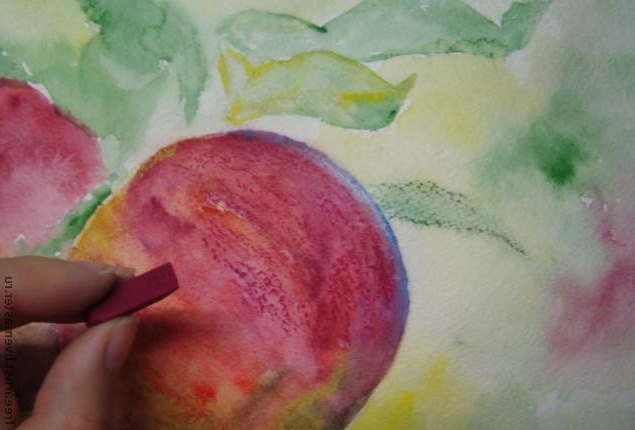
- Protecting pastel drawings. The best way to protect pastel drawings is to place them under glass (it should not touch the surface of the paper). However, it is not always possible to use it, so fixatives are more often used, which create a film on the paper that prevents the paint from crumbling.
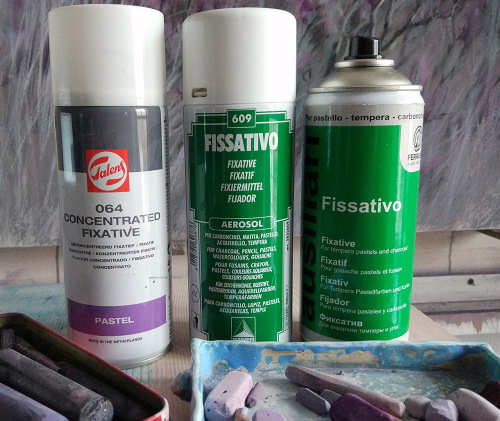
The following types of fixatives are frequently used:
- diffusers;
- aerosols;
- sprayers.
It should be taken into account that the colors change slightly (darken) after processing with fixative, so sometimes artists process their paintings in stages, which gives them the opportunity to adjust the intensity of shades when subsequently applying color.
Hairspray is often used as a fixative, but you should know the following nuances:
- the result is unpredictable: whether the pattern will darken or remain the same is unknown;
- you will need a strong hold hairspray;
- It is necessary to spray it from a large distance, otherwise a strong stream will ruin the design;
- at least 2 applications are required.
Pastel Paint Cost. Best Manufacturers
Pastels for drawing, dry, wax or oil, must be of high quality. This is a prerequisite for a successful drawing. Since in this case the main criterion of quality is the brand, the manufacturer is important.
The leaders in pastel production are:
| Pastel | Description |
| Dry | Sennelier (France) and Rembrandt (Holland). The price of a Sennelier set of 24 colors is 5,350 rubles; when purchased individually, the cost per piece is 300 rubles. |
| Wax | Sennelier, MANLEY (Spain).
The price of a set of 6 MANLEY wax crayons is 350 rubles. |
| Oily | Sennelier, Mungyo Artists (Korea) and Maimeri Classico (Italy).
The price of the Sennelier set for 24 colors is 3600 rubles. Individual purchase is 177 rubles per piece. |
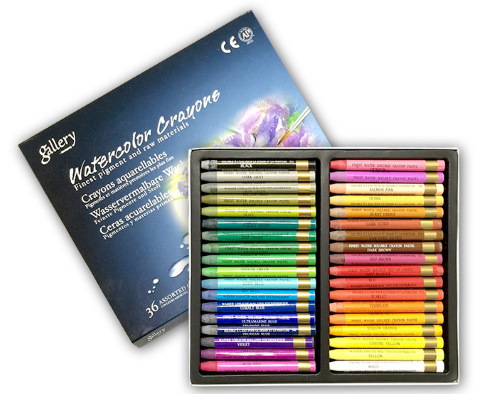
| Watercolor | Mungyo Gallery (Korea) Derwent (England).
The price of a professional Mungyo set for 36 colors is 1,500 rubles. |
| Pastel pencils | Cretacolor, Derwent, Stabilo, Faber Castell.
The price of Derwent sets of 36 colours is 575 roubles, when purchased individually the cost of 1 pencil is 142 roubles. |
The variety of pigments and the colors they create in today's professional sets of dry and other types of pastels for drawing amounts to several hundred. However, a beginner artist should buy a simple set of 6-12 colors: this is enough to create the first masterpiece.
Video about pastels
Pastels for drawing: