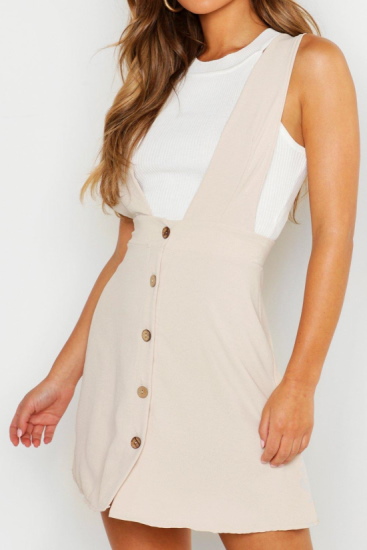
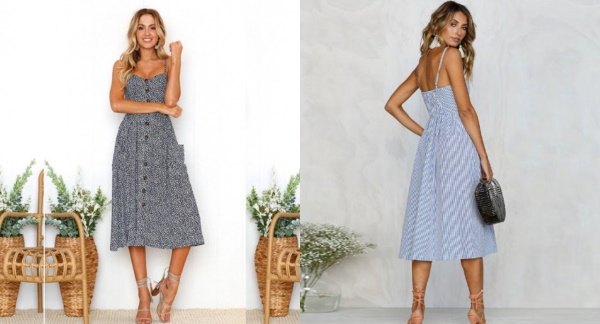
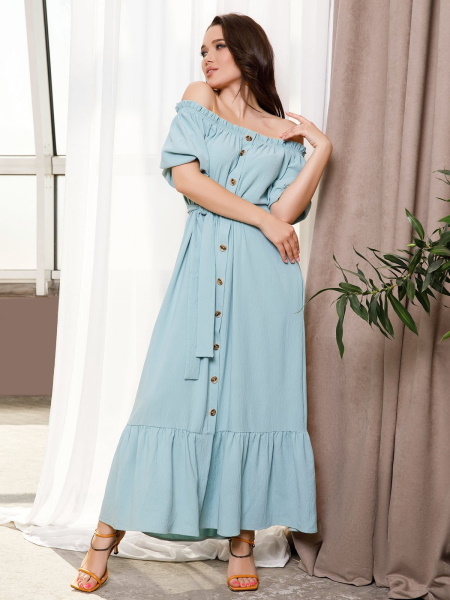
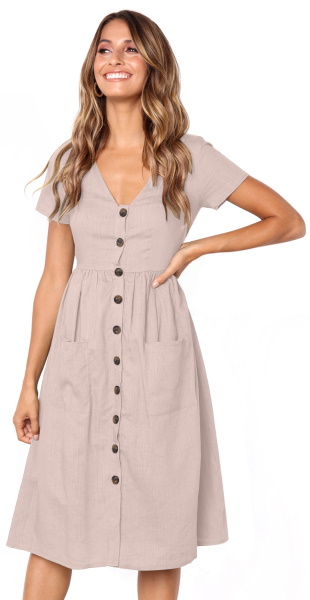
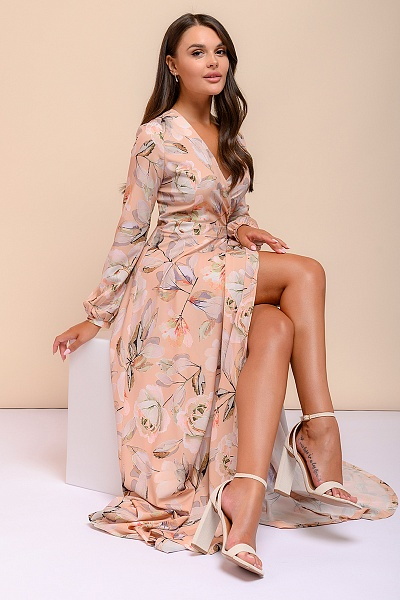
A sarafan, decorated with buttons at the front, is a retro-style summer wardrobe model. Incredibly popular in the 50s and 90s of the last century, it received a second birth thanks to the spring-summer collection of the fashion house Dolce & Gabbana, which presented a spectacular and feminine line of summer sundresses.
These models are made using simple patterns and are sewn from bright, natural fabrics, decorated with voluminous buttons and do not require professional sewing skills to make.
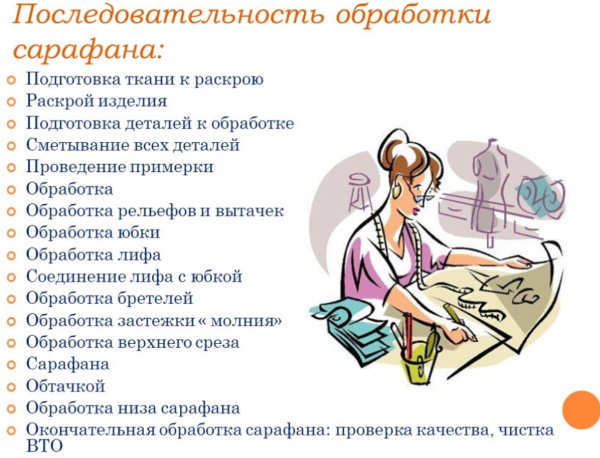
Product characteristics
A buttoned sarafan in the front is a popular retro model of midi or maxi length, made of knitted, linen or cotton fabric, plain or decorated with stripes, small or large polka dots, or floral prints. If desired, you can make a sarafan model with a straight cut or with a Tatyana skirt, with one-piece sleeves, straps, or a frill decorating the shoulders.
Fashion designers recommend sewing sarafans from natural fabrics, adjusting the pattern according to your own wishes and focusing on the parameters of your figure.
With straps
The model with shoulder straps, a fitted bodice and a Tatyana skirt is sewn according to the basic dress pattern, with an additional allowance for tightness of 2-3 cm. The front part of the sarafan is decorated with buttons, and the back is equipped with a zipper. There are also pockets, but the color of the fabric makes them almost invisible.
How to take measurements
Measurements are taken before the pattern is modeled.
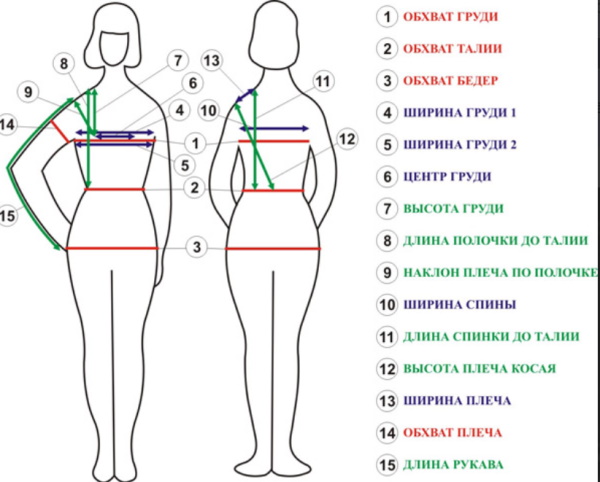
Measurements required for sewing a sundress:
| Type of measurement | How to shoot |
| DI (product length) | A measurement corresponding to the desired length of the sarafan. It is set aside in 2 ways: · from the shoulder to the waist area (FWL – front length to the waist); · from the beginning of the waist to the end of the skirt (LWL – waist length). |
| OB (hip volume) | The value corresponds to the size of the circle passing along the convex part of the buttocks. |
| OT (waist circumference) | When measuring with a tape measure, you need to tightly wrap around your waist and write down the value of the resulting circumference. |
| OG (bust circumference) | The measurement should be taken along a circle passing through the nipple points. |
| CG (center of chest) | The horizontal distance between the tops of both nipples is measured. |
| CH (chest height) | The measured segment is drawn from the jugular vein to the top of the nipple. |
| BS (back width) | The measurement is taken horizontally at the level of the shoulder blades at a distance from one to the other hand. |
| AH (armhole depth) | It is removed using a paper strip 3-4 cm wide, clamped between the armpits so that its other end touches the spinal column. |
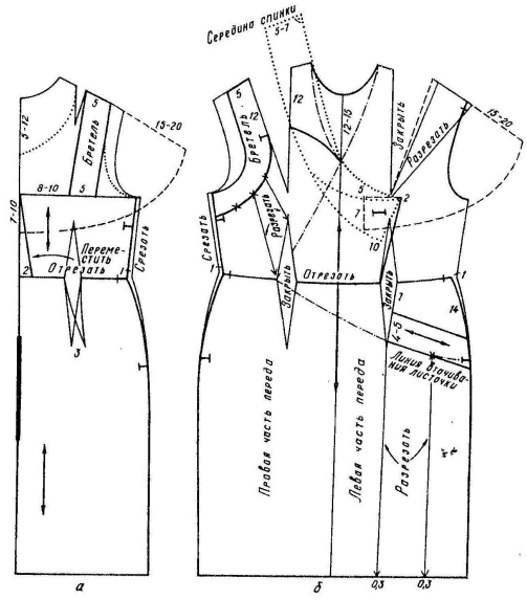
Construction of the pattern
To model the bodice you need:
- Cut the front half of the pattern along the waist line, then change the bust dart of the garment into a waist dart.
- Put aside a segment 25-35 cm long (if necessary, the depth of the cut can be increased or decreased) upwards from point A. From the found value, then draw a horizontal line to the left, equal to 14-15 cm.
- Draw a new armhole line from the point formed by deviating from the previous value by 1 cm.
- To add to the bar, increase the width of section AB by 5.25 cm.
- To make the straps, draw 2 rectangles, each 15 cm wide. In the finished dress, they should be 2 cm wide, sewn into the back and buttoned at the back.
- To create a facing at the top edge of the front part of the bodice, add an additional 4 cm to the drawing.
- The model's back is modeled in the same way as the front of the garment. The length of the back directly depends on the parameters of the female figure.
- Cut out a skirt for a sundress in the shape of a rectangle with a length equal to 75 cm and a width calculated using the formula: OB (hip circumference) * 1.7 cm (or 1.9 cm for thin material).
- Add 5.5 cm to the front part of the pattern, which is necessary for further creation of the strip.
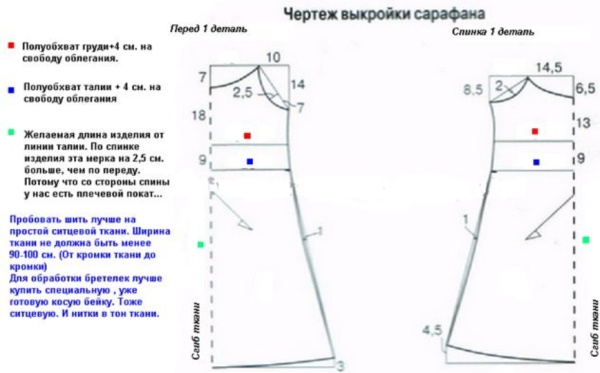
On the sides of the product, add an additional 1.5-2 cm, which will be used later as seam allowances.
Necessary materials
A sundress with buttons in the front can be made from poplin, satin, pique and other lightweight dress fabrics.
Materials required for sewing:
| Type of material | His characteristics |
| Main fabric | 1.8-2 m satin (poplin) 145 cm wide |
| Lining material | 1.4 m viscose |
| Sewing hardware | · hidden zipper; · 11 buttons with a diameter of 2.5 cm |
| Auxiliary tools | · sewing machine; · scissors for cutting fabric; · needles; · threads of a contrasting shade and matching the color of the main fabric; · pins; · tailor's chalk or pencil. |
How to sew?
When modeling a product:
- All details of the sundress must be cut with a mandatory allowance for the side seams (1.5-2 cm) and for finishing the bottom of the garment (4 cm).
- All elements of the bodice (except for the facings) and the skirt are also cut out of lining fabric with a mandatory gathering allowance of 1.4 cm to the OB (hip circumference) value.
- The lining viscose should be used to trim the neckline, the placket and the inner parts of the straps.
- It is necessary to stitch the darts, bodice, back and skirt along the side seams, iron the allowances and process them with an overlock.
- Having gathered the skirt at the waist, you need to determine the position of the pockets. The fabric used to create them is folded and, after the gathering has been relaxed, is sewn onto the finished product.
- Both parts of the workpiece should be swept, having first gathered them to the strips (they should remain free) and the products should be tried on for possible correction of defects.
- To connect the lower and upper parts of the workpiece, you need to lay a machine stitch next to the basting line. The resulting cuts need to be ironed and overcast with an overlock.
- A hidden zipper needs to be inserted into the back seam
- The parts of the straps should be connected in pairs with the front side, stitched along the seams and turned out with the front side. The allowances along the edges here should be trimmed and ironed, and then oblique, figured corners should be created at the ends of the straps. To adjust the length of the straps, you need to try on the product.
- The facing needs to be stitched along the side seam and overcast along the bottom edge, and then, applying the short side, sewn with a machine stitch to the top of the model.
- The strip should be folded and attached to the bodice and back along the top edge. The fabric allowances should be cut off, and the facing, turned over with the right side, should be swept cleanly.
- The allowance left at the bottom of the model should be folded, stitched and ironed.
- The vertical strip running along both edges of the product must be folded over to the front side, machine stitched exactly along the edge of the fabric and ironed.
- On the finished placket and straps, you need to punch and overcast the loops. On the other side of the model, you need to apply the corresponding markings for the loops and sew the buttons along them.
With a shuttlecock
A buttoned sarafan with a frill in the front is made in the same way as the classic model with straps.
The length of the product here is determined independently, and to sew it you need:
- The sarafan, cut out from two rectangles (skirt and bodice), is first basted and then stitched along the side seams.
- Finish the upper armhole with an overlock.
- The frill is made based on measurements taken in a circle over the shoulders. The resulting figure should be doubled, and then an additional 2 cm should be added to it.
- Sew the flounce-frill, fold it along the edges and hem it on both sides. You need to sew an elastic band into its upper part, and then, taking into account the armhole, you need to sew the frill to the bodice of the main product.
- Cut the finished sarafan in the front and use a strip made from the main material to finish the ends of both sides.
- On the right side, punch loops along the entire length of the product, and on the right, make the corresponding markings and sew on buttons.
With one-piece sleeves
A buttoned sundress with a one-piece sleeve is a classic version of the product, can be combined with any style and is suitable for any type of figure.
Unlike other types of sarafans, this model does not have an armhole, and additional measurements are taken to make the sleeves:
- OP (shoulder circumference) – corresponding to the measurement of the forearm;
- OSH (neck girth) – calculated by the circumference extending from the base of the neck;
- VPK (oblique shoulder height) – the distance from the point on the spinal column located in the waist area to the shoulder is measured;
- Dpl (shoulder length) – the calculation is based on the segment that starts from the jugular vein and ends at the shoulder.
When modeling a product using a pattern previously downloaded from the Internet, you need to:
- draw a vertical line corresponding to the distance DPI (length of the lumbar product);
- reduce the size of the darts, while increasing the length of the armhole;
- connect new points and sections of the product with perpendicular lines;
- raise the shoulder line along the bodice by 5 cm and along the back by 0.7 cm;
- moving across the neck from the top of the shoulder, set aside a segment equal to 7 cm.
When sewing a model you will need:
- Cut out the fabric and stitch the side seams of the product. The resulting cuts need to be smoothed out and overlocked.
- Sew the facing parts cut out of the main material to the bodice strip, then, turning it over to the wrong side, sew them to the top edge of the garment. After turning the facing to the right side, overcast it and cut off the excess fabric.
- The bottom of the product should be folded and machine stitched. The resulting allowances should be ironed and overcast.
- The vertical strip on the sundress needs to be folded to the wrong side, machine stitched exactly along its edge and ironed.
- On one side of the strip, you need to punch and sew the loops, and on the other side, apply the corresponding markings and sew on the buttons.
With an open back and elastic band
The model of a sarafan with an elastic band and an open back is made according to a rectangular pattern, the width of which will correspond to the size of the hip circumference, and the length will vary according to the girl’s wishes. The elastic band is inserted at the top of the bodice and under the chest, and its length is measured depending on the density of the tightened product (approximately 75-85 cm). The selected elastic band (for ease of sewing) should be wound on a machine bobbin.
When sewing a model you need to:
- Neaten the cut rectangle along the edges, then, folding it with the serged sides facing inward, sew it. The resulting seams need to be ironed and processed with an overlock.
- Fold the top edge of the product by approximately 2-6 cm (depending on the width of the elastic) and, stepping back from the edge 0.5-0.8 cm, sew with a machine stitch.
- Trim the resulting allowance in width so that it exceeds the volume of the elastic by 0.6 cm, and stitch, having first left openings for inserting the elastic.
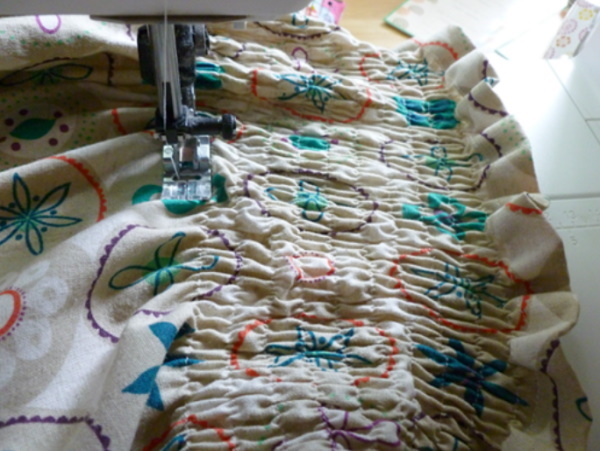
- After inserting the bobbin with the elastic band into the cap of the sewing machine, sew it into the garment with neat stitches, with a distance of 0.4-0.6 cm between them, so that it is located strictly vertically to the bodice line of the sundress.
- Similarly, gather the top of the garment and the area under the bust.
- Cut the finished product in half. The bottom of the model needs to be folded and overcast.
- Bend the vertical strip from the wrong side and stitch it. On one side you need to sew on buttons, and on the other side punch and overcast the corresponding loops.
- If desired, the bodice and hem of the garment can be decorated with decorative gathers or lace.
With a V-neck and wrap
This wrap-over buttoned V-neck sundress is perfect for plus size girls and features short sleeves and a flattering neckline.
This model is made on the basis of a dress pattern, in which:
- the top should be cut off at the waistline;
- the bust dart should be closed, and the waist dart, on the contrary, should be widened;
- the garment must be cut to the top of the closed bust dart;
- a 4 cm segment is set aside from the top point of the side cut, extended downwards by 1 cm and is the beginning of a parallel line passing through it;
- From the found point, you should also draw a horizontal line parallel to the bottom of the product.
- a distance of 14-16 cm is measured from the center line of the front and a segment of 10 cm is set aside from the lower peak of the shoulder dart; the found points should be connected.
When sewing clothes you need to:
- Cut out both parts of the sarafan and stitch along the side seams. The edges need to be ironed and processed with an overlock.
- Sew all darts. Iron the allowances and overcast.
- Connect the sleeve to the base along the main seam, then baste to the shoulder. Match the control points on the seams and stitch both elements.
- Try on the product and eliminate any possible defects.
- Finish the edge of the fold and neck with facing.
- Fold and hem the bottom of the model.
- Sew buttons on one side of the dress, and cut out and overcast the corresponding loops on the other side.
For the office
The office model of a sarafan is made from a rectangle, on the drawing of which horizontal segments are laid out, and the values corresponding to the height of the chest, waist and hips are connected.
When creating a pattern you need to:
- set aside 1/2 of the back width value from one edge of the rectangle along the waist line;
- a similar segment drawn on the other edge should be 1⁄2 the depth of the darts;
- connect both points and the upper border of the rectangle with straight lines passing at an angle of 90 degrees;
- to model the shoulder seams, set aside from the edge of the rectangle an amount equal to 1/4 of the value of the neck circumference (girth);
- lift the marks on the front panel and draw a line decorated with buttons;
- putting aside the armhole area from the center of the pattern, draw a perpendicular line directed towards the lower part of the main figure;
- determine the difference between the OG (bust) and OT (waist) and use this value when creating darts;
- stepping back from both edges of the rectangle a segment equal to 1/4 of the OB (hip volume) value, draw a curved side seam;
- using 2 rectangles (each 50 cm long) model the straps of the product.
When sewing a sundress you need:
- Cut out all the details of the product with a mandatory seam allowance of 1.5-2 cm.
- Sew all darts.
- Sew the side seams.
- Using the facing cut from the main material, finish the top of the sundress.
- Fold each rectangle of straps in half, stitch along the seams, and then, turning them right side out, hand-sew the previously left opening.
- Sew the straps to the bodice of the garment.
- Hem the bottom of the model, having first turned it up by 3-4 cm.
- Bend the central strips of the product and hem them, using a machine stitch to hit the edge of the workpiece.
- Sew buttons onto the strip on one side of the product, and mark and knock out the corresponding loops on the other side, then overcast them.
A sarafan with buttons located in the front is a real hit of the upcoming spring-summer season. Made from light, breathable natural fabrics, such products are easy to model, cut and sew, and can be sewn according to patterns modified in accordance with body parameters even by novice dressmakers
Video on making a button front sarafan
How to sew a simple sundress with buttons: