Such an affordable product as pasta is produced in a variety of configurations. These factors make it a good material for creativity. Crafts made from pasta are unique and elegant masterpieces.
Basic rules for using the material
Crafts from pasta include the basic rules for their production:
| Target | Advice |
| To complete the simplest work | Cheap products will be needed |
| To get an exclusive masterpiece | It is better to choose a high quality product |
| To get a beautiful piece | The product should be pre-painted in the selected color. |
| To extend the life of bulk pasta products | It is necessary to fix the finished masterpieces with varnish or paint. |
| To make the artificial creation last longer | Paste the macaroni onto a ready-made cardboard container or other frame, pre-covered with cling film. It is easy to remove later |
How to Paint Pasta for Crafts
One of the important processes in the production of pasta products is painting.
You can paint the finished craft or assemble the item from pre-painted elements. For optimal results, it is best to combine both approaches.
What to paint with
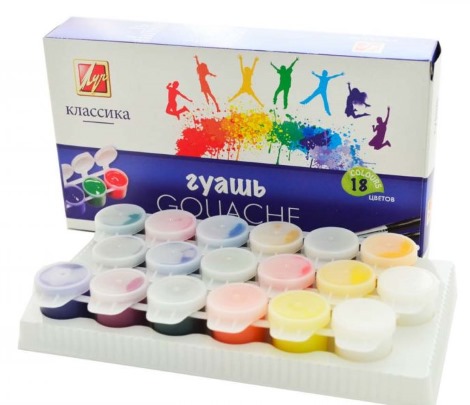
You can paint masterpieces made from pasta with the following paints:
- Pigments for Easter eggs. To do this, prepare the solution according to the manufacturer's instructions, then pour a small amount of vinegar into the composition and place the pasta and liquid in the container. To ensure that the items are evenly colored, they should be constantly stirred with a stick. Then place the colored components on foil and dry at room temperature.
- Gouache You can paint it manually with a brush, then leave it to dry. Or put the required amount of macaroni in a bag or plastic container. Combine gouache with water and pour into the container, then shake it, stirring the contents, and set aside for 15 minutes. After the specified time, drain the excess liquid, and remove the colored parts and lay them out to dry.
- Food coloring You should also dilute it according to the instructions and pour it into the bag with the macaroni. Shake the container to mix the ingredients and keep them there for 10 minutes.
- Green stuff, diluted with water, will give the craft a blue tint.
- Nail polish.
- Turmeric.
- Cocoa solution.
- Acrylic paints.
- Spray paint.
How to Dye Pasta in Different Colors
Crafts made from pasta can be painted in different colors, for this you need to follow these steps:
- You need to take bowls, their number is determined by how many flowers you plan to get in the end. The dishes can be replaced with tightly sealed bags. Fill the container ¾ full with the selected pasta. The volume will vary depending on how much material you need to paint. For small crafts, it is enough to fill the container ½ full.
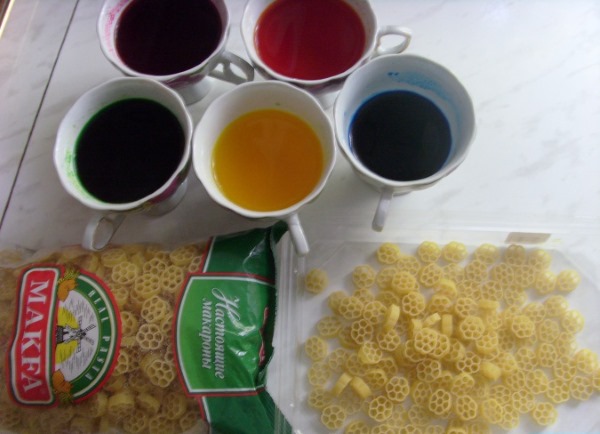
- Then pour vinegar or alcohol into the bowl (about 0.5 cups). The liquid should cover the pasta mass.
- Dilute the dye in drops in alcohol. To obtain bright shades, you should drop a small amount of pigment.
- Place the bowls on a baking tray and set them aside for 8 hours, just make sure it doesn't tip over. Periodically stir them or shake the bags so that the mass is evenly colored.
- After the elapsed time, drain the liquid.
- Place a layer of towels on a baking sheet and place the pasta on top. Each color should be dried separately for 2 hours.
How to paint a finished product
The finished craft can be painted in 2 ways:
- With spray paint. This process is best done outdoors, and it is advisable to wear a mask on your face. The product should be placed in a wide cardboard box, and the aerosol should be sprayed in it.

- Manually. Acrylic paints of the required shades are suitable for this. Place the figure on a white sheet and carefully paint the product with brushes. Make sure that all elements are processed.
How and what to glue pasta in crafts
The following options are suitable for combining pasta in crafts:
- Hot melt glue in the form of a glue gun, which is sold in handicraft departments. The glue here is silicone and comes out hot, and during hardening it forms a hard plastic drop. The supplied consistency hardens quickly, and therefore it is advisable to glue a large number of parts in one feed.
- PVA glue gives a short-lived result, and can come apart at the slightest impact. Using this product, the elements will have to be glued together longer. One of its advantages is considered to be clean work, without drops or adhesive drips.
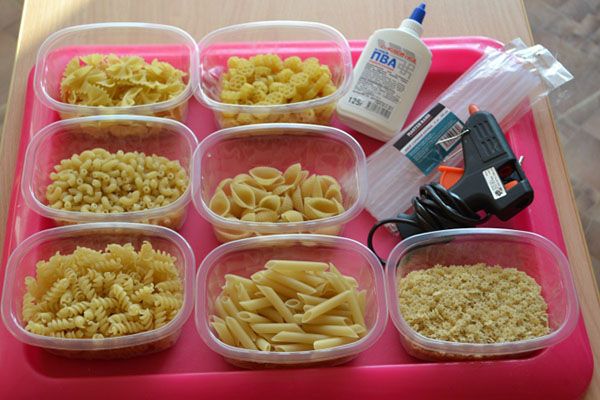
- Glue stick It is considered a cheap but unreliable remedy.
- Other suitable types of glue include Moment, Titan, Dragon and Crystal.
How to shape pasta into a ball
To give the craft a spherical shape, you need to follow the steps below:
- Inflate the balloon to the size you want your future masterpiece to look like.
- Then you should cover it with pasta, but you can't get glue on the rubber. You just need to glue the elements together and lay them on top.
- After the adhesive has dried, you need to take a needle and pierce the balloon.
- It is advisable not to inflate the balloon too tightly, because if punctured, it may explode and destroy the structure.
Crafts
Crafts made from pasta can be of various types and configurations. This is due to the success of the material, which has few limitations (the main one is fragility).
Casket
At first glance, it seems that making a box from pasta is difficult, but in reality, even a beginner in this business can do it.
Step-by-step design of the craft:
- Pre-paint the macaroni into half-rings, tubes and shells.
- You need to make a box of the required size from strong cardboard or take a ready-made cardboard container.
- From the half rings it is necessary to form a voluminous flower so that it looks like a woman's hair decoration.
- Along the perimeter of the box, lay out even rows of half rings, alternating with tubes. Gaps between components should be filled with shells.
- Glue the pre-made flower to the center of the lid. From it, you need to lay out and glue lines of shells and tubes to all sides and corners.

- Leave the finished product to dry. At this time, it is necessary to make legs for the box from polyethylene corks. Cover the upper surface with glue and attach to the corners of the box.
Alternatively, you can paint the craft after finishing the work using a spray can of silver or gold paint.
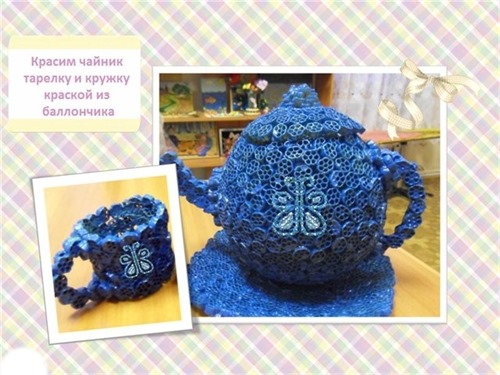
Service
A pasta set may include the following items:
- Tray. To decorate it, you need to take several varieties of pasta and lay them out in any shape, then glue them together. If the edges are uneven, you need to decorate them along the entire diameter with figured pasta.
- Saucer. To create it, you should prepare a foil form. For strength, it is advisable to fold the base several times. Then glue the selected pasta onto the blank. The edges should be glued with shells.
- Cup It is made in the same way as a saucer.
Finished products need to be painted with spray paints.
Samovar
Making a samovar requires some experience.
Step-by-step production of the vessel:
- First, you need to construct the lower base. This will be a board of a suitable configuration, which should be wrapped in foil. Then, the pasta is laid out on it and the legs are attached. The parts are connected with glue and allowed to dry.
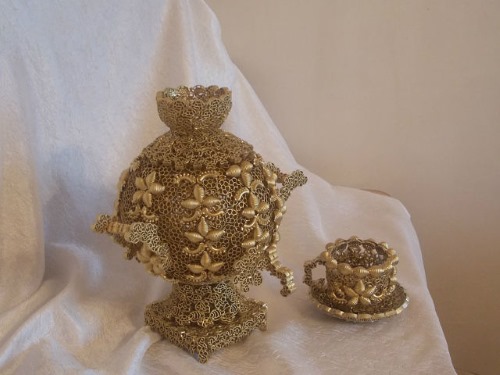
- The base and lid of the samovar are created using a round balloon.
- Having decorated the body of the vessel, you need to glue on the handles and dry the craft.
- Finally, spray paint the dishes in a gold color.
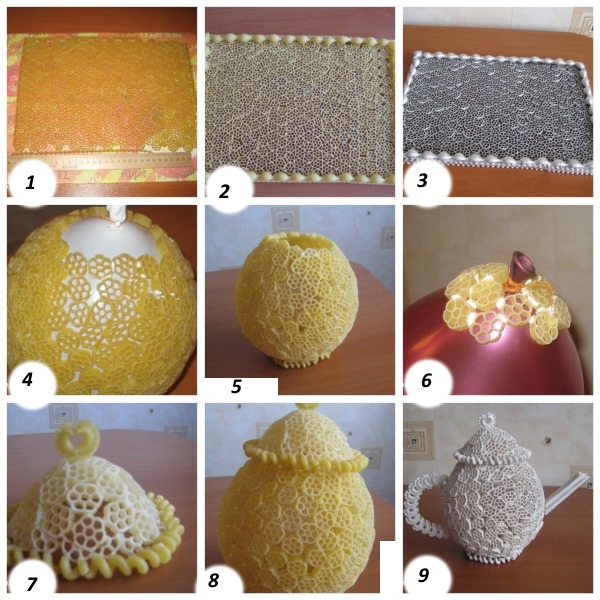
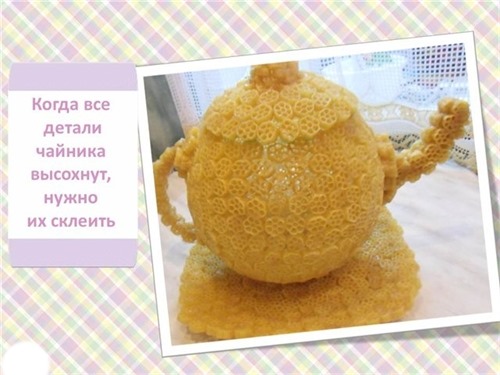
Kettle
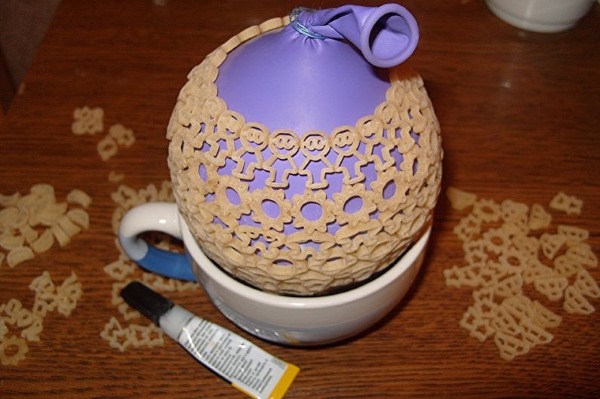
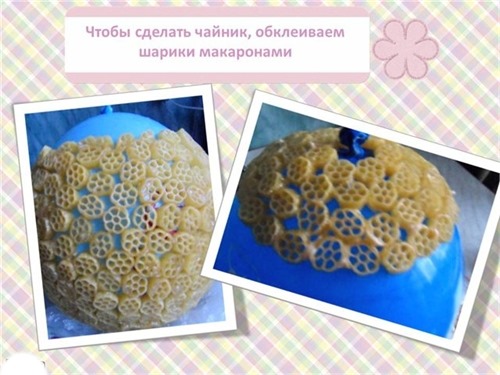
To design a teapot, you need to take the following steps:
- First, you need to inflate the balloon to the size of the future product.
- Paste the resulting base with pasta parts from the bottom up. PVA is applied between the components so that the connection points are glued, and at the same time the glue does not spread throughout the entire structure. Pasting must be completed, not reaching 3-4 cm to the tied air knot.
- Wait until the glue dries and carefully pierce the ball, then pull it out of the pasta masterpiece.
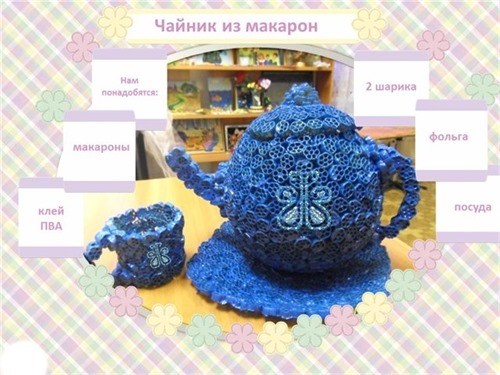
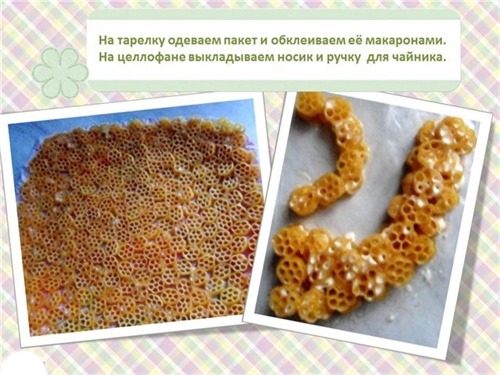
- It is advisable to cover the inside of the teapot with vermicelli, which is shaped like a spring. This will give the dish stability.
- Using another ball, make a lid, the circumference of which is slightly larger than the teapot's clearance. The edges should be glued with springs, and a handle should be attached on top.
- Attach handles to the teapot, choosing a suitable type of pasta for them.
- The nose can be made from spaghetti.
Photo frame
To make a frame, you can take a simple wooden blank.

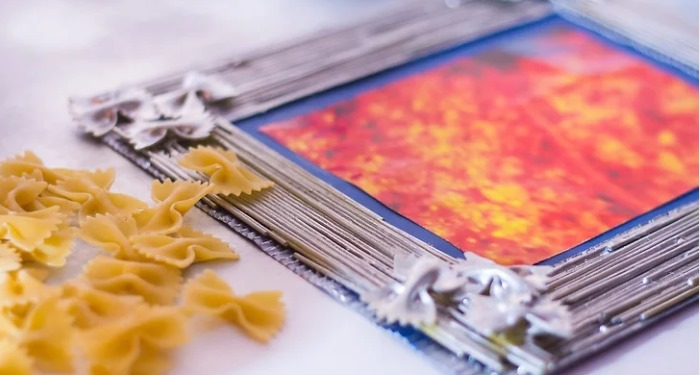
Any kind of pasta will do for decoration. For example, small leaves or bows will add some charm and originality. It is advisable to attach the details with a glue gun. The pasta elements should be painted in advance.
Basket
You can make a basket-shaped craft out of pasta.
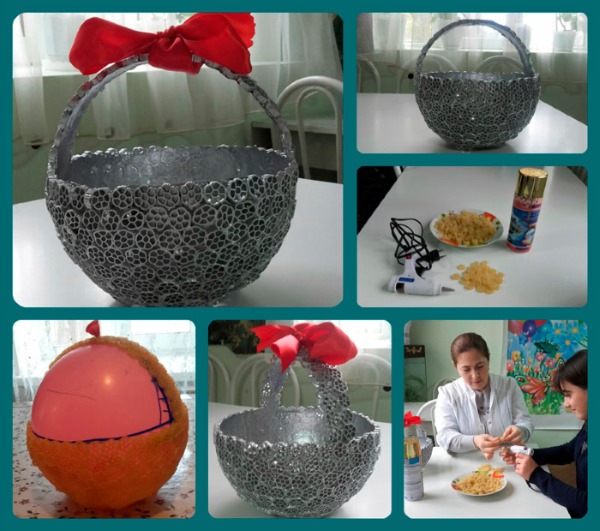
Step-by-step implementation method:
- Glue the scallop pasta with the waves facing outwards to the bottom edge of an old thermos cup.
- The entire base should be covered in a similar manner.
- The combs in the shape of a handle are attached to the top using a heat gun.
- The handle is depicted on paper and the macaroni is attached to one another. When the blank dries, it needs to be glued to the basket. Excess glue is soaked with tape.
Bouquet
You can arrange a bouquet in this way:
- First, you need to form blanks with stamens for the stems. For the middle, you need to cut a cotton swab. Coat the wire (1.2 mm) with glue and insert it into the cut part. Paint the stamen yellow.
- Paint the pasta shapes in 3 suitable colours.
- Using a glue gun, attach the flowers to the wire base.
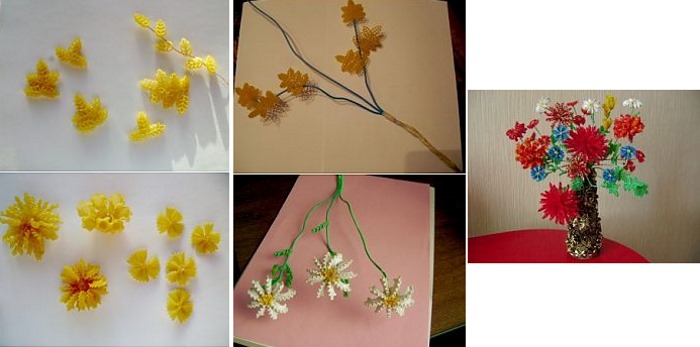
- After this, you need to weave a branch from black tape. It is advisable to make branches from other flowers as well.
- Place the foil leaves with holes on the wire, then weave them into a branch and attach to the inflorescences.
- Fix the resulting composition in a vase using alabaster or cement.
Vase
To decorate a vase with pasta, follow these steps:
- It is advisable to think in advance what kind of composition you would like to make on the surface of the vase and select vermicelli of the desired configuration.
- Prepare a small plastic bottle, treat it with glue and tie it evenly with ribbons.
- Attach pasta and jewelry pieces to the finished base one by one, creating the desired image.
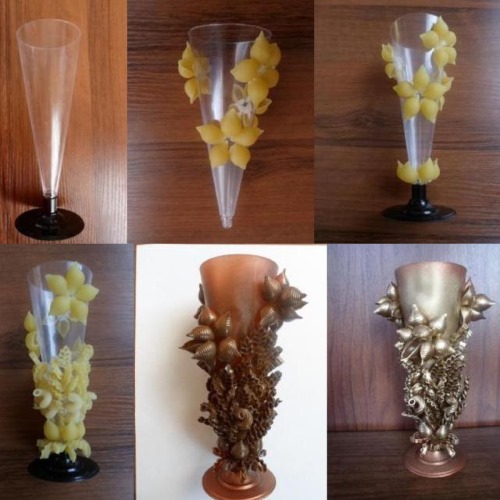
- Excess glue should be removed promptly using plastic sticks or an old rag.
- Finally, you need to spray the aerosol onto the finished craft.
- Create flowers from small bows and combs and attach them to the wrapped twine.
Applications
You can make a rainbow-shaped applique from macaroni using the following technology:
- Cut out 2 blue clouds from colored paper using the template. Place them at opposite ends of an A4 sheet and glue them to the base.
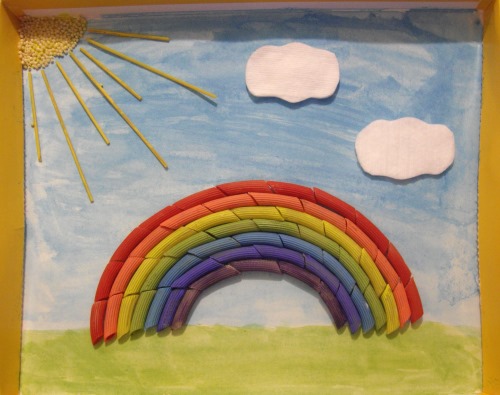
- From the pasta in the form of feathers or horns, lay out a slightly convex line from the top edge of one cloud to the other. At the bottom, lay out the remaining rows in a similar manner, so that there are 7 of them in total.
- Once the glue has dried, paint each row in different shades to create a rainbow.
Jewelry for girls
 Pasta products can be used to create such jewelry for girls:
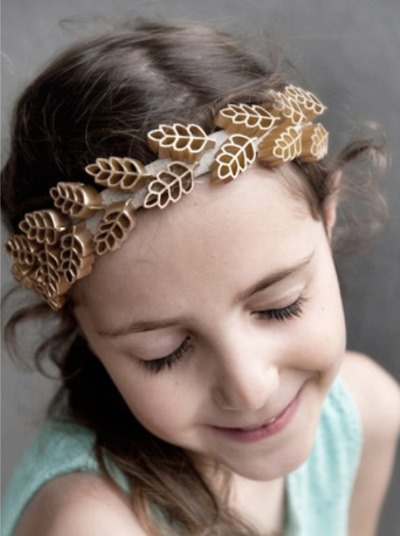
- Ordinary headband It will look more elegant if you decorate it with ears of corn, previously painted with gold spray paint.
- Beads and bracelet. To make them, you need to select pasta of the appropriate shape, then paint them and dry them.
After this, take a fishing line with a needle and string each element onto it in turn.
The product can consist of plain or colored parts.
- Butterfly Macaroni are suitable for forming hairpins. To do this, they should be painted in the desired colors, and then attached with glue to clips or invisible hairpins.
Beads for mom
Crafts made from pasta in the form of beads can be given to mom for any holiday.
This exciting process is recommended to be done in the following way:
- Take 750 g of perforated pasta or divide it equally between 3 small bowls.
- Add 2-3 drops of dyes of different colors to each container. Add water to the container, diluting it with ¼ tbsp. of alcohol.
- Then you need to stir the pasta elements until they are completely colored.
- Drain any excess liquid from the bowls and place the noodles on a baking sheet to dry.
- Measure out a piece of thread of the required length. Tie a knot at the end and wrap your finger with a piece of adhesive tape.
- Alternating colors, string colored macaroni until the thread is full.
- Finally, tie the ends of the threads with a regular knot.
Snowflake
On New Year's Eve, children can make snowflakes from pasta, the principle of which consists of the following actions:
- You need to choose the pasta you like.
- The core should be formed from one or more blanks.
- Around the central part, you need to grow about 6 rays from connected identical or different types of pasta.
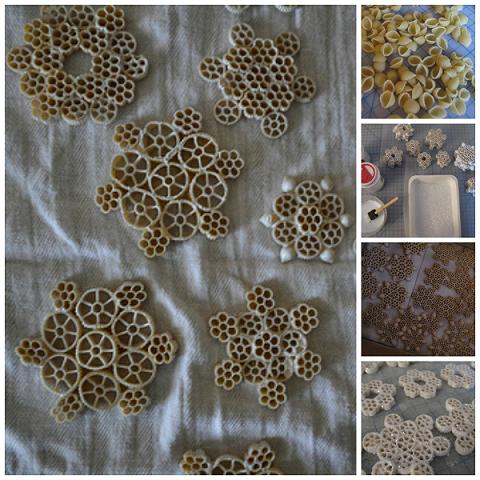
- Before gluing the snowflake, it is advisable to lay out the assembled combination on paper and make sure that all the elements fit together.
- After this, glue the figure and dry the product.
- The next step is to paint the snowflake. If you plan to cover it with glitter, you should do it right after painting, then the glitter will stick to the paint. To fix it, you should spray it with hairspray.
Hedgehog made of pasta
Even a child can make a simple hedgehog.
To do this, you will need to follow these steps:
- From regular dough, mold a figure of a hedgehog in a sitting position. The back should remain smooth.
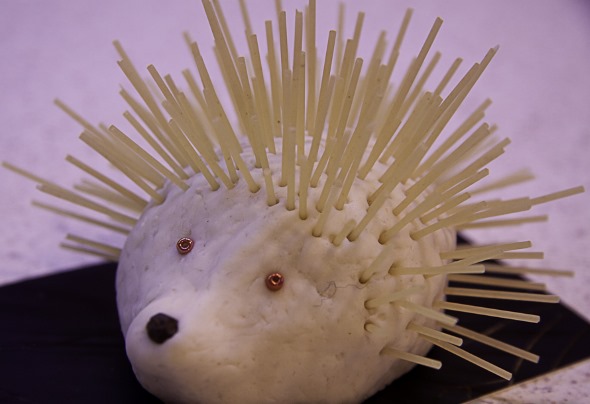
- Place the product on A4 paper, take short thin spaghetti and stick them into the base, forming a full-fledged hedgehog.
- You can use buckwheat or raisins as eyes.
Owl
The three-dimensional figure of an owl is formed from different types of pasta.
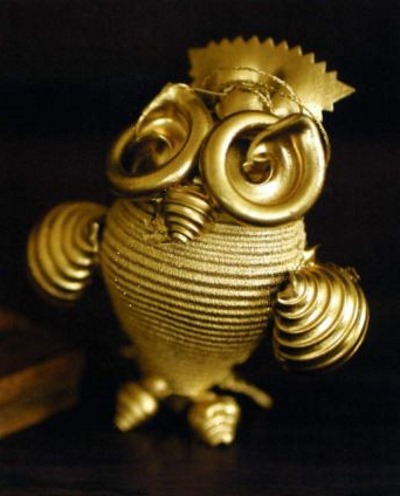 Step-by-step method of its creation:
- Place a large pasta shell vertically on the table.
- Break the food bow into 2 parts. Attach one of them to the head with glue, and glue the other one at the bottom in the form of a tail.
- Make the owl's eyes from 2 small snails.
- Take 3 small shell-shaped macaroni, glue one between the snails, and the remaining 2 at the bottom as legs.
- Attach large shell wings to the sides along the edges.
- Finally, the craft should be painted in a normal color or like an owl.
Snail
By following the following methodology, even little ones can make this easy-to-make snail:
- From plasticine of the required size, form a sausage, which will serve as the body of the mollusk. Smoothly bend one of the edges upwards to form the head.

- Take a large macaroni shell, paint it in the desired shade and decorate the top with plasticine ornaments. Attach it to the body.
- Break a toothpick into 2 parts and stick it in the shape of horns, attach plasticine circles on top. Sculpt eyes and a mouth.
Tree
Step by step tree creation:
- Form a ball with a diameter of 4-5 cm from old newspapers, then wrap it with threads. This will be the crown of the plant.
- Cover the resulting sphere with masking tape, make a hole at the bottom for the trunk. Cover the crown with paint so that there are no gaps, and let it dry.
- Take the pasta and glue it using a hot glue gun, starting from the top. After that, turn the figure over, put it on the fabric and glue the bottom part. Insert a stick into the crown and insert the tree into the bottle to dry, then spray it with aerosol paint and dry again.
- A small vase or flower pot will do as a pot for the topiary. Then take the plaster and pour it into the container, wait until it hardens and place the structure there. Leave the craft to dry for 3-5 days.
It is worth turning on your imagination and not being limited by standards and usual frameworks when making crafts from pasta. As a result, you can independently invent and improve creations, while delighting and surprising people around you.
Article formatting:Natalie Podolskaya
Video about crafts from pasta
Video on how to make children's crafts from pasta:
Nothing works! It's not true: I made a service, got mad; I made a samovar, got mad. I didn't try anything else (I spent half a night to do it (for my son))