Pencil drawings are a great way to develop fine motor skills and develop artistic skills. Numerous step-by-step lessons presented in the article open up wide opportunities for everyone, including beginners. They are easy to understand, suitable for people of different ages. If you practice, you can develop your own vision, or use universal patterns to create different images.
Stages and principles of learning to draw with a pencil
You can learn to draw at any age. About 95% of an artist's talent lies in constant work and skill improvement. It is important not to rush to draw the planned picture. For reference: da Vinci painted the famous "Mona Lisa" for 4 years. Then he left the portrait unfinished, and only after 3 years did he make the last stroke.
Step-by-step pencil drawings for beginners are selected depending on what exactly you want to depict. You can improve in different areas: animalism, landscape, portraits. But this will take more time. To hone your skills, it is better to choose one direction and work only with it at first.
Basic principles of learning to draw with a pencil:
- wish. Without it, they won't start work;
- hard work. Nothing will work out if you don't strive and try;
- calm and the absence of witnesses. Criticism is perceived acutely at the early stages of creativity, it often pushes a person away from his aspirations. Therefore, it is better to paint your first pictures alone, and evaluate them yourself;
- regularity. You need to work on your drawings every day, even if only for 5-10 minutes.
What is required for work?
To begin with, they buy:
- notebook;

- pencil;
- eraser;
- calendar.
The notebook should be large, preferably without lines, with regular white sheets. It is important that its cover is hard. Then you can start drawing anywhere, you don’t need a table for this. The pencil is selected in accordance with individual convenience. Some work with hard leads, others with soft ones. Some are more comfortable with a round base, others with corners.
An eraser with right angles is needed. Then you can erase even small defects in the drawing. Some teachers advise buying several erasers with different levels of hardness.
A calendar or diary will come in handy for making a training schedule. You need to mark the amount of time spent working each day. Achievements are also indicated in the calendar. Artists do not recommend using electronic calendars. In those where people write themselves, there is an opportunity to practice additionally.
Basics of Pencil Drawing from Scratch
Step-by-step pencil drawings for beginners are based on the study of 10 basic laws of artistic skill.
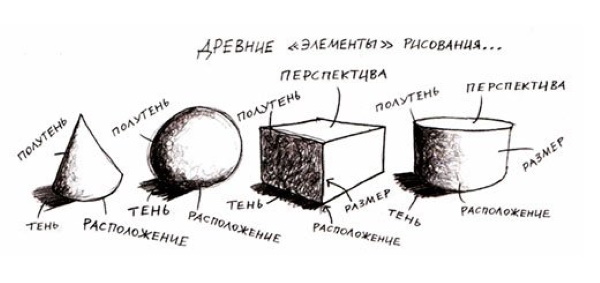
They are discussed in the table below:
| Law | What is it for? | How to achieve |
| Perspective | Creating three-dimensional paintings to show depth. | They use the technique of proportions: objects located closer to the potential viewer are larger than those located further away. |
| Proportion | Creating correct drawn figures when the proportional relationship of the body, limbs and head is maintained. | Remember the ratio of human and animal body parts, or use your eyes. |
| Anatomy | It is required to draw a person or an animal correctly, beautifully, with muscle relief. | To become familiar with the anatomy of humans and animals, to study the ways in which joints and muscles move when performing a certain action. |
| Composition | It is necessary to arrange all planned objects and elements in one drawing. | Divide the allocated drawing space for each individual object. |
| Lighting | Necessary to create volume and convey mood. | To study the laws of shadow casting and refraction of light of different spectra |
| Edges | It is necessary to ensure that the details of the drawing do not go beyond the planned framework. | Learn to step back from the edges of the canvas a given distance on all 4 sides. |
| Color | It is not required to work with a pencil, but in the future it will be useful to reflect the emotional component. | First, the stereotypical perception of colors is studied (black - gloom, red - passion). Then individual emotional moods are introduced. |
| Posing | To create an atmosphere of movement. | Study moving objects, consider how the position of the body of a person or animal changes when performing certain actions. |
| Style | For my own satisfaction. | They are guided by personal tastes and preferences. |
| Ideological | To create unique characters or compositions. | First use associations, then generate your own ideas. |
Drawing is not just waving a brush or pencil. Fine art requires knowledge in many areas from the artist, which must be studied gradually, introducing the information received into your paintings.
Moving from simple to complex
Beginners are highly discouraged from taking on complex drawings right away. It is easier to work with fruits or trees than with a person or an animal. Psychologists say that if you take on a complex task right away and it doesn’t work out, then all motivation for further work disappears. If you plan to develop your drawing skills, choose simple figures without a three-dimensional image to begin with.
To begin with, it is recommended to learn how to draw simple geometric figures. This way, you will gain knowledge about how to correctly place shadows and divide proportions. Training on simple drawings generally sharpens your skills and ability to hold a pencil.
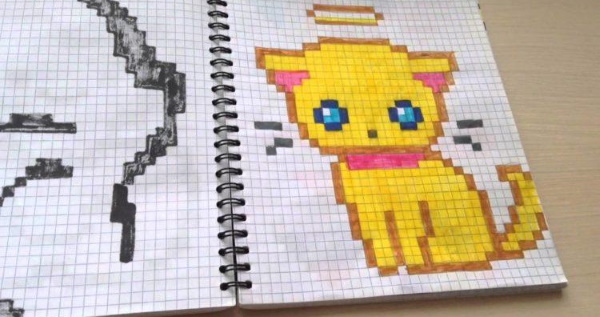
How to draw simple and beautiful images using cells?
To get practice, you don't have to draw on clean white sheets of paper right away. You can start with a notebook in a box. Thanks to the convenient lining, the correct proportions are created here, and it is convenient to reproduce three-dimensional images.
Beginners should follow these tips:
- start with the simplest images on a small number of cells. This is how your hand gets the hang of it. Then you can move on to more complex ones;
- use ready-made schemes. This is not plagiarism, but the development of your own imagination and skills. Many artists began by copying paintings of more famous colleagues;
- Many of the patterns are designed to be executed in color, so there is an opportunity to hone your shadowing skills without complicating the drawing with curves and wavy lines.
Step by step pencil drawings for beginners
Step-by-step pencil drawings for beginners include many different variations of execution.
But artists use a universal instruction that is suitable for any planned image:
- The drawing object is selected.
- It is studied from every side, under light and in shadow, and the play of colours is observed.
- A potential picture is formed, but mentally. The artist thinks about the angle in which he will place the chosen object, what the environment and lighting will be.
- Contours and silhouettes are applied to the painting.
The final stage will be drawing details and shadows. The universal instruction helps experienced artists. Beginners are better off studying the principles of working with each drawing object separately.
Cat
Step-by-step pencil drawings for beginners are based on dividing the entire process into several points. To draw a cat, you need to remember about proportions. It is necessary to correctly place the image on a sheet of paper: body, limbs and head.
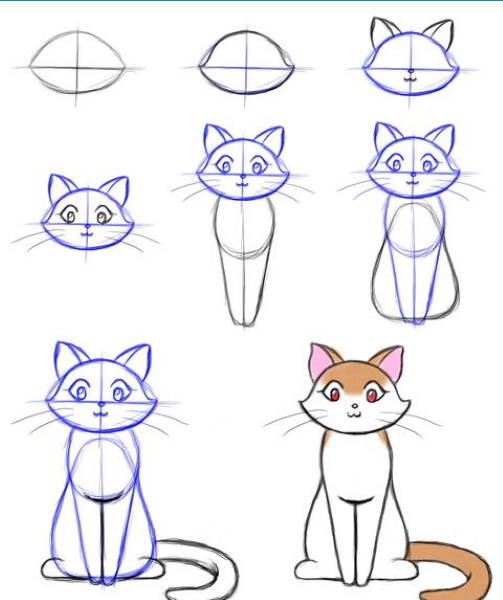
Instructions:
- Using ovals of various sizes and shapes on a sheet of paper, make a sketch, first the body, paws, tail and head. It is better not to start learning to take risks with the image of a cat in motion, for example, jumping. Let it be sideways or sitting in the drawing - it is easier to learn.
- The ovals are connected to each other to form a full-fledged body. It is important to carefully and clearly draw the connection points. The tail can be made straight or curved - as desired.
- Using the proportion markings, draw the details of the head - eyes, nose, mouth, whiskers. You can draw a cat from the back if the proportion markings have not yet been studied.
- Starting from the ears, draw the fur with small strokes. Go down to the head, then to the body, paws and finish with the tail.
- Add shadows. If you haven't yet learned the principles of working with shadows, you can skip the last step. The cat drawing looks good even if it's not three-dimensional.
Eyes of the wolf
The wolf's gaze is not as complex a drawing as it may seem.
Instructions:
- Make a sketch. To do this, draw 2 identical circles on a sheet of paper.
- Make a sketch of the eye sockets, draw the corners of the eyes with a sharp pencil. It is recommended to study real images of wolves beforehand. Pay attention to the fact that the inner corners of the eyes are stretched towards each other and slightly downwards. The outer corners hardly stick out, they cover the pupils and are slightly drawn to the side.
- Draw the eyelids. They are angular, almost half covering the pupil. Fur is drawn along the contour. It can be clear or abrupt, depending on the artist's wishes.
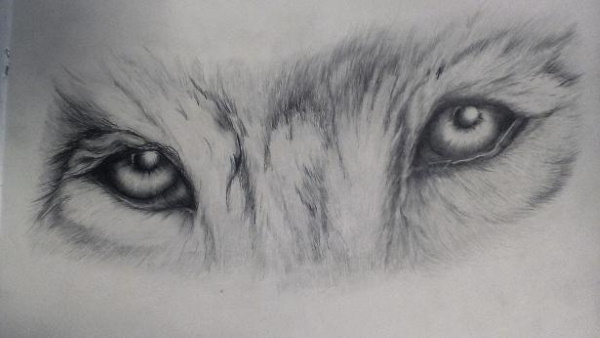
- The pupils are drawn. The side from which the light falls is selected. This will be the light part of the pupil. Then a gradual darkening is applied.
- The final touches are made, extra lines are removed with an eraser. If necessary, shadows are applied to the drawing.
Horse
As with many other animals, people or fictional characters, to learn how to draw a horse beautifully, you need to learn how to draw a muzzle. This is painstaking work, which is impossible to do well without training. Using anatomical knowledge, the body is drawn. It is not necessary to immediately depict the horse in motion.
Instructions:
- A sketch is made. Three circles are drawn: a large head, a medium jaw and a small front part.
- The primary outline is applied. The artist is guided by the markings along the circles.
- The ears, nostrils, and if planned, the bit, and the neck are drawn.
- The mane, eyes, and some other small details that correspond to the idea of the creator of the painting are drawn.
- Defects and unnecessary lines are removed using an eraser, and contours are drawn clearly.
- Shadows are applied.
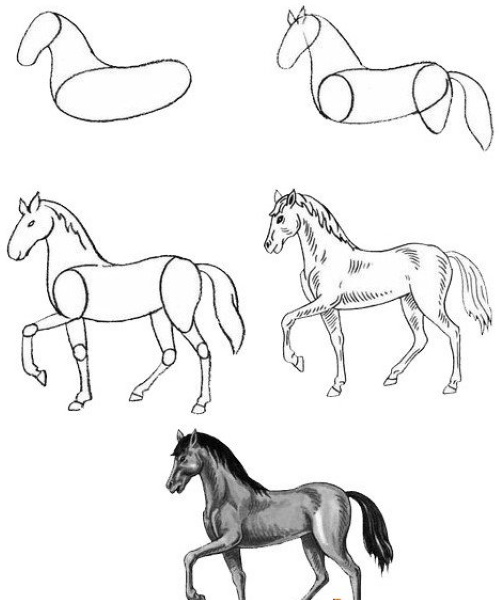
The final stage is drawing the background, if it is planned in the drawing (for example, an image of the moon or the starry sky).
Dragon
In step-by-step pencil drawings for beginners, dragons are absent. Such a drawing is within the power of amateurs who have already honed their skills and got the hang of it. They must confidently hold a pencil in their hand, master all the laws of drawing in practice and be able to work with shading.
Instructions for experienced artists:
- The contours are drawn. Usually, a regular snake is taken as the basis for drawing a dragon. Therefore, any pose can be chosen. The contour is drawn approximately along the spine of this mythical animal, and the sketch is subsequently continued from it.
- The contours of the wings and paws are drawn. Their size and shape are selected according to the artist's wishes.
- The shape of the body is clearly drawn. It is drawn over the wings, since they are located behind. If the dragon is turned back, then the wings are drawn first, and then the body.
- The final stage is clear contouring and application of shadows.

Dragons are mythical creatures, so there are no restrictions. The artist can use his imagination to make his drawing unique.
Tulip
Tulips are beautiful flowers, but when it comes to drawing, they are considered the easiest.
Instructions:
- Make a preliminary sketch. It is not necessary to draw only one flower, you can choose a bouquet or several tulips in a flowerbed.
- The stems are placed in the sketch, the tulips that will be closer to the potential viewer are highlighted. They should be proportionally larger and also cover all the back lines.
- The tulip sketch consists of lines and slightly distorted simple geometric shapes: diamonds, ovals and circles.
- The petals are drawn in the bud. The upper part should be ribbed, the petals are not perfectly even. In total, a tulip has 6-7 petals that overlap each other.
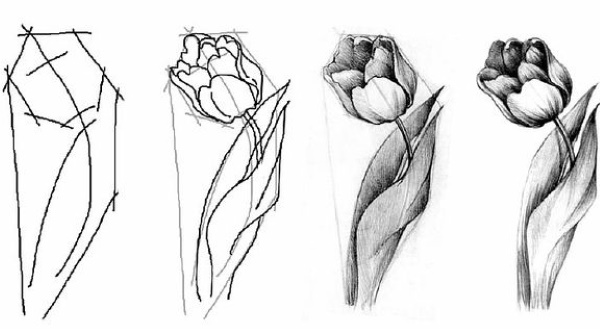
- The stems and leaves are drawn. If there are buds turned back, the attachment of the stem to the flower is drawn.
- The shadows are drawn. It is not necessary to shade, simple lines also look impressive, they add mysterious carelessness and transparency to the drawing.
Narcissus
Daffodils are usually painted in bouquets, at least 3 pieces. On their own, this flower does not look its best.
Instructions:
- Apply 3 circles to the sheet – the buds of the future bouquet (more is possible).
- The petals are drawn. They should be compressed at the base and very pointed towards the end.
- After the direction of the core of each bud is chosen, the stems are drawn. They should be a continuation of the core.
- The leaves are applied. They are elongated and pointed.
- Shadows are being drawn.
Daffodils look more beautiful when color is added. The pencil drawing is too simple.
Rose
As with all other flowers, drawing a rose begins with a sketch of the bud and stem.

Instructions:
- The basic sketch is made, the future leaves are drawn and the petals of the bud are lightly outlined.
- The contours of the stem, thorns and leaves are carefully and clearly drawn.
- The inner petals are drawn. The lines can be abrupt, so the flower looks even more beautiful.
- The leaves become pointed and veins appear on the inside.
- Extra lines are removed, and the places where the stem, leaves, thorns and bud are connected are clearly drawn.
- Shadow marking is performed if it was intended.
Lotus
The lotus is one of the easiest flowers to draw.
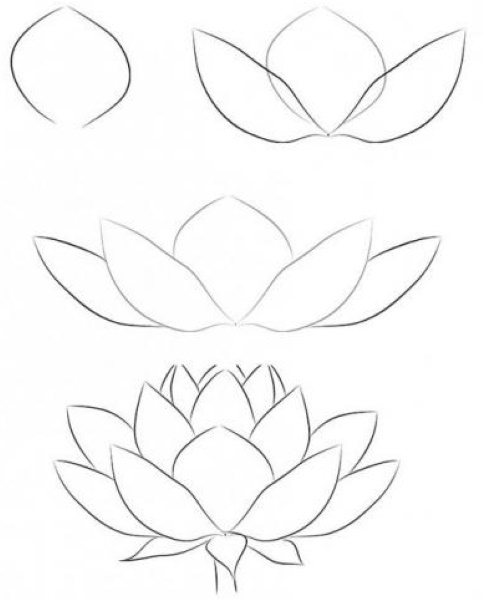
Instructions:
- In the center of the sheet, draw a large circle. This is the base. Smaller circles are added to it, which will later become leaves.
- The future structure of the flower is outlined with additional ovals inside the large circle. It is quite complex, so you can’t do without a mark.
- In the center, small petals are drawn. Further along the circumference, they gradually increase in size. When drawing a lotus, the main thing is to evenly distribute the position of the petals, then the picture will turn out beautiful.
- Next, the leaves are drawn. If necessary, the contours of the water surface and various reflections in it (for example, the moon or the starry sky) are sketched.
Autumn
Autumn landscape is the best thing you can think of for pencil drawing. Gray and dull weather is perfectly reflected in such a design. You need to choose an autumn landscape yourself.
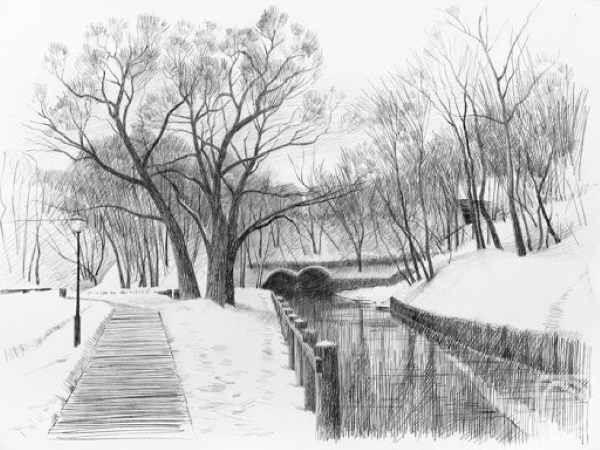
There are some universal tips for every drawing:
- A line of perspective objects and the horizon is displayed.
- The foreground elements are drawn. For example, trees, a river, a bench in a lonely park.
- Sketches of the background are made. Perspectives are not forgotten: the further away the object, the smaller it should be.
- Clear lines of the foreground are drawn, then the background.
- They apply shadows and set the atmosphere – according to the artist’s wishes and imagination.
Winter
Just like with autumn landscapes, winter ones do not have clear instructions. Each artist independently sets the composition of his future painting, using universal advice. But when drawing winter, you need to be well oriented in the shadows, since there is no other way to correctly depict snow cover and snowdrifts.
3D butterfly
Creating the illusion of volume has recently become a popular trend in art.
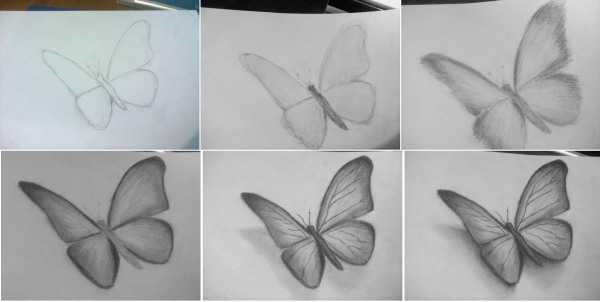
For beginners, we offer simple diagrams for drawing a volumetric butterfly:
- The markings are applied in 5x5 cells.
- A sketch of a butterfly is made – wings, body and antennae.
- The wings are detailed. Here you can use your imagination and make any patterns you want.
- The abdomen is being drawn.
- The image is clearly aligned. The contours should be even, thin and without bevels.
- The shadow is applied in accordance with the laws of drawing.
- The upper part of the wings is cut out along the contour.
3D stairs
Steps are the 3D drawing to start with. They are the simplest of the three.
To work with it, it is better to use a sheet of paper in a grid, then it is more convenient to follow the instructions:
- A diagram is applied to the cells.
- The slopes of the steps are drawn in detail
- The shadow areas are painted over
- The final shading is done.
It is better to use a soft pencil. Then the coloring lines will be almost invisible, and the drawing will become more realistic.
3D bananas
Imitation of fruits lying on a flat surface is quite simple.
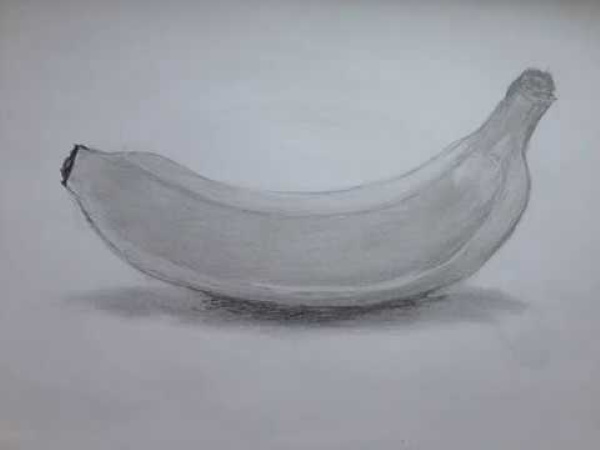
Instructions:
- 2 real bananas are placed on a white sheet of paper, after which the contours are drawn on them. You can also make your own sketches without using fruit.
- Approximately 1 cm horizontal lines are drawn. The places where the banana contours are should be convex, the rest should be even.
- The resulting lines are filled in with a simple pencil, one after the other, to create a three-dimensional image.
Using this technique, you can draw almost any image, and it will look three-dimensional.
anime characters
The basis of drawing anime characters is facial expressions and characteristically large eyes. If you learn to work with them, you will be able to depict any character using the law of posing.
Instructions:
- A simple sketch of the eyes is drawn. They are large and are made in the form of vertically elongated ovals.
- The eye sockets are drawn. The corners of the eyes are located closer to the upper part of the oval - this makes it more expressive and emotional.
- A sketch of the pupils is made. Approximately 1/3 of the oval is indented from the top, a curved horizontal line is drawn. The pupil itself, also elongated, descends from it. Then it is processed with a pencil depending on the emotion that is planned to be depicted (joy, anger, bewilderment).
- The pupils are shaded. A place is chosen where the light will fall. It is not painted over. Everything around it in the pupil is gradually darkened. This creates the feeling that the eyes will "sparkle".
- Extra lines are removed and the eyes are drawn more clearly.
Next, a sketch is made - an oval of the face, hair, nose and lips. If you plan to draw a character in full growth, first set the proportions of the location of the body parts, then work on the face. Each person has artistic talents.
It is impossible for a beginner artist to immediately apply an oil painting to a canvas. But if you follow step-by-step lessons, you can get quite good pencil drawings. Over time, you can improve your skills, move on to paints and brushes, and create real masterpieces on paper.
Video about creating step-by-step pencil drawings
How to draw Bart Simpson: