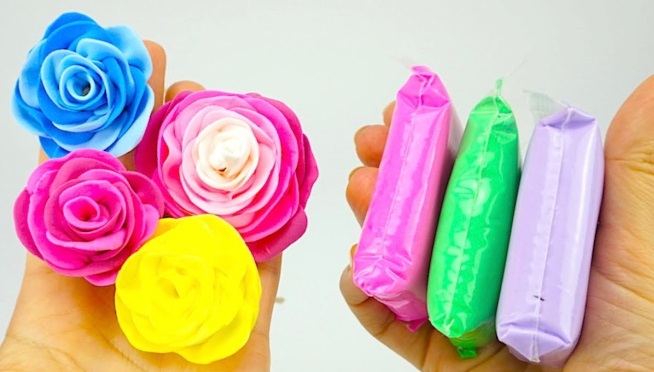
Air plasticine is very light and is considered a good tool for children's creativity. The product is not sticky, soft and it is very easy to make various crafts from it, for example, flowers, animal figures. The main advantage of such plasticine is that the finished craft hardens in the air after 2 hours and can be stored for a long period of time.
Features of lightweight plasticine
Airy plasticine is also called marshmallow, light, velvet or hardening mass for modeling. When in contact with air, after some time, the plasticine mass hardens.
However, it does not withstand water during play with finished products and at the stage of their creation. The air mass is very flexible for sculpting any figures that can be used for a long period of time.
The plasticine figure can be painted with paints or felt-tip pens. If after some time the edges of the product become deformed, they can be restored. To do this, you need to wet the deformed element with water and press it tightly.
Air plasticine has many advantages. However, there are some negative qualities that it is advisable to know about:
| Advantages | Flaws |
|
The craft must be made within a short period of time. Otherwise, the material will be spoiled. |
Preparing materials for modeling
Flowers from airy plasticine can be made from various shades using a special stack. To make the work more comfortable, you can additionally use a rolling pin with a board.
If you need to make shaped elements, you can use a stencil. A thick base sheet is required if you need to make a panel.
The following decorations can be used as auxiliary materials for modeling, which act as decoration:
- acrylic paints or felt-tip pens;
- stones, dry tree branches or grass;
- chestnuts and acorns, dried berries, leaves;
- sand, beads, glitter, salt.
How to soften air plasticine
Air plasticine can be softened if the craft was not finished due to the material drying out.
To restore the product, you must perform the following steps:
- Pour boiling water over the plasticine.
- Leave to infuse for 2 minutes.
- Remove from liquid and mash.
The manipulations should be carried out until all the lumps are gone from the material. During the second procedure, not all the plasticine should be dipped into the hot liquid, but only the part that contains lumps. This is explained by the fact that the mass without lumps will dissolve in water.
Chamomile
It is not difficult to make an artificial chamomile, since it is characterized by a simplified structure and consists of a greenish stem with leaves, a yellowish center and white petals.
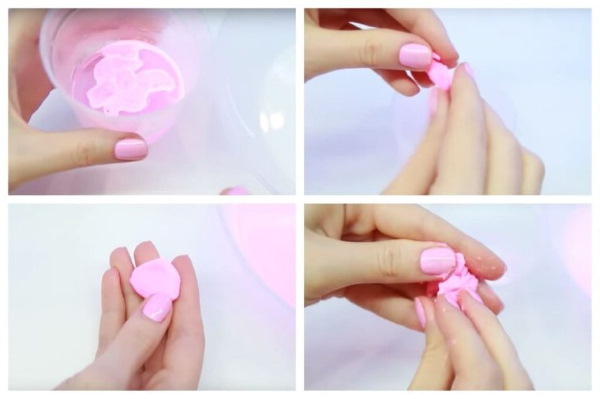
The step-by-step design of the craft is shown in the following points:
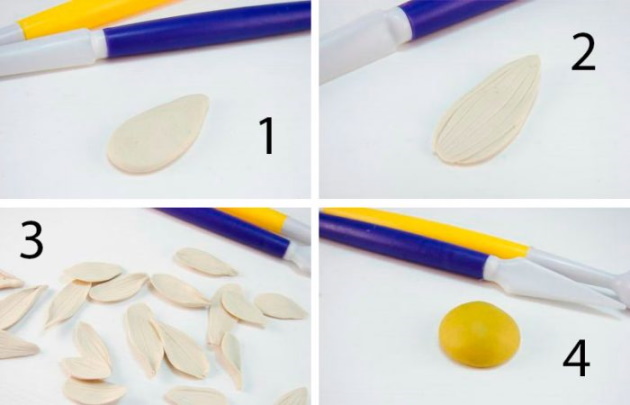
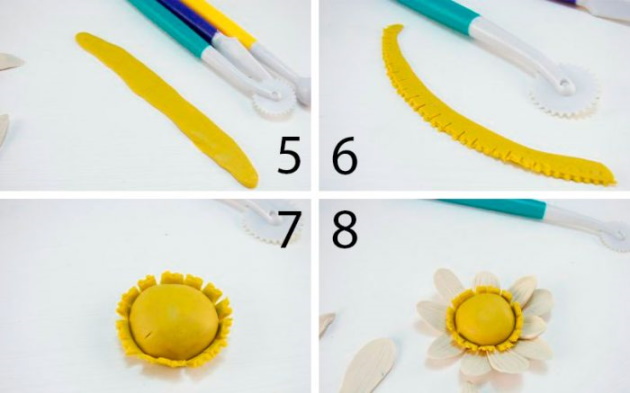
- Crush the white material in your hands and, having flattened it a little, create a teardrop shape from it. Roll out the ends of the future petal with a ball-point stack, apply relief to it with the help of the sharpened edge of the stack. Perform similar actions when creating the remaining 20 petals.
- Roll a ball out of yellow plasticine, flatten it a little and make the center of the chamomile. Make a strip out of a similarly colored material and cut small petals with a spherical stack. Paste them onto the center of the flower with the opposite strip.
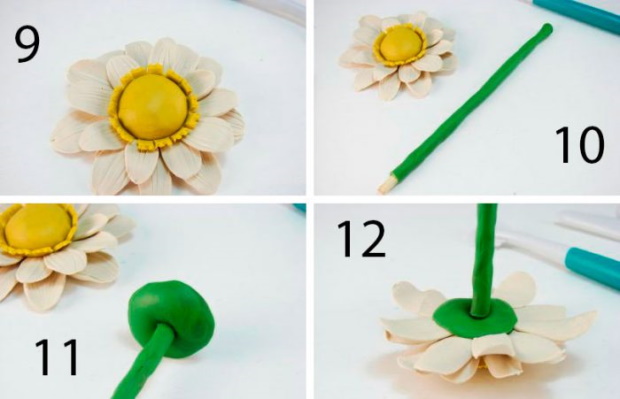
- Attach the finished petals to the central part of the stem, starting with the smaller ones and bending their ends outward.
- Roll out the green material and stick it around the stem base. Leave the base of the skewer clean for the bud.
- The base of the skewer is supplemented with a receptacle made in the form of a flat cake made from a green composition.
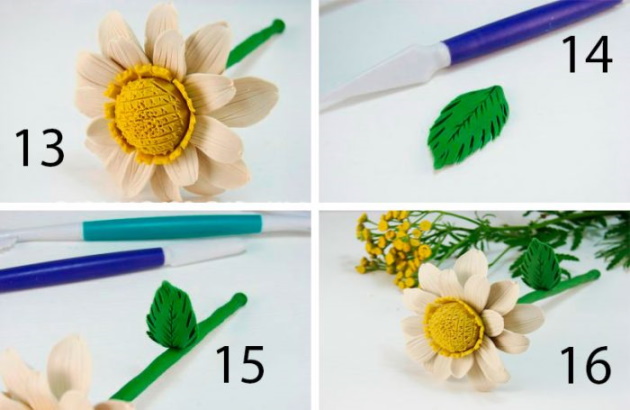
- Place the inflorescence on the receptacle and use a mesh to give the middle of the flower a relief.
- Attach a leaf made of green material to the stem in the form of a drop with veins made with the sharp end of a stick.
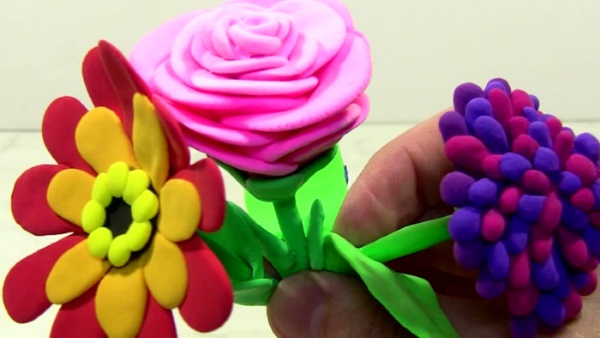
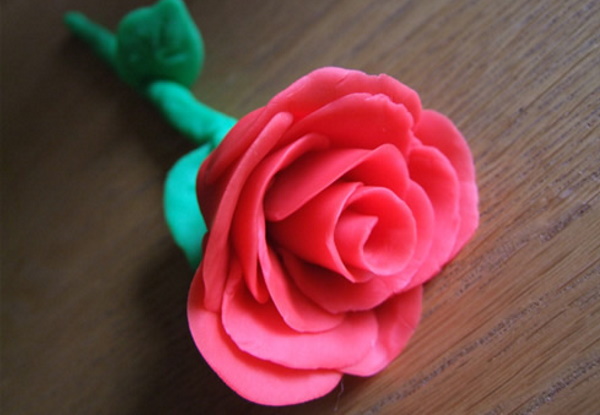
Rose
Flowers made of airy plasticine in the form of roses can be either a full-fledged designer product or a complementary decoration to the overall composition.
The stages of creating an object are described in the following points:
- For the stem, mold the green material into a sausage and carefully twist it, creating a relief column that is fixed to the background.
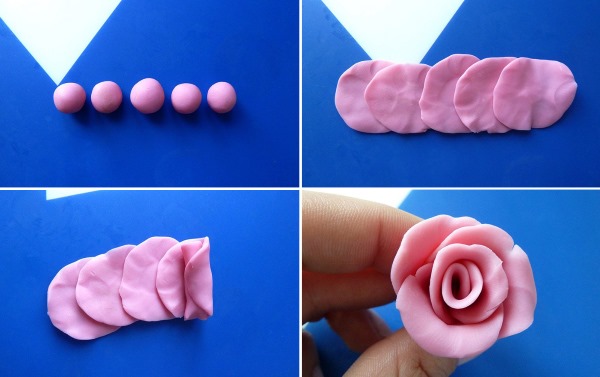
- Create 5 identical flat cakes and an elongated strip with a pointed edge on one side to make petals.
- Distribute the petals from the common center on the top of the stem, laying one on top of the other. Press only the middle, leaving a small volume at the ends.
- Twist the ribbon-like element, starting from the pointed end, into a voluminous bud. Attach it to the flower base and carefully focus.
- Form 2 medium sized leaves to create the stem and attach them to the main background.
- Using a toothpick, draw a line in the middle of each leaf.
Lily
Making a lily is based on performing a small number of easy steps, shown in the master class. For this work, you will need several bars of material.
Green is required to create foliage with a stem, for the bud you should take white despite the fact that in nature there are reddish, yellowish and lilac shades. The color range of the petals is not the same, with darkish dots. Additionally, you will need to prepare pink plasticine.
Strong wire can be used to strengthen the stem, and thin copper pieces can be used to make stamens.
The production of artificial lily is described in the following points:
- Knead the white material in your hands and divide it into 5 portions, shaping each into a thin oval flat cake. This is necessary to create flower petals.
- Tear off a small part of the pink material and, warming it in your palms, spread it on the central area of the petals. This should be done carelessly so that the ends are blurred. The base of the petal should have a green tint, created in a similar way from green material.
- Using the pointed edge of the stack, thickly draw longitudinal grooves along the petals. The rough surface should be exclusively on the inside.
- Apply red plasticine in the form of dots from the inside onto the rough surface.
- The production of stamens is based on the use of several rather long pieces of thin wire. On 1 glue a yellowish ball - this is the pistil, on the others - oval grayish heads.
- Collect the resulting petals in the amount of 6 pieces into a flower head, turn the workpiece over to the back side and fix the green cup in the middle in the area where all the elements are united.
- Place a stiff wire inside it – this is the stem, and fix a bunch of thin stamens from the inside.
- Coat the stem with green material, additionally making 2 oblong leaves from it.
- Attach the blanks to the stem.
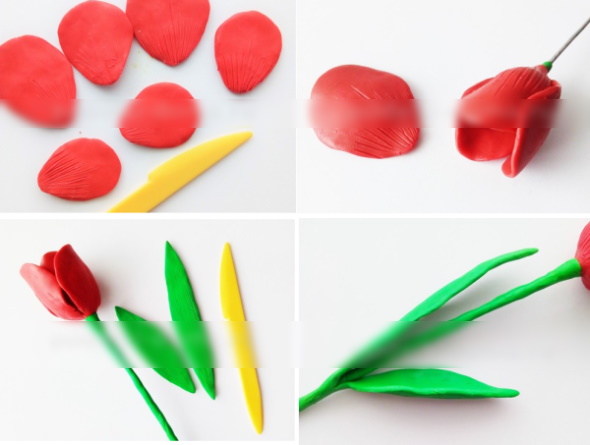
Tulip
Tulips are very popular in spring bouquets. Live flowers can be replaced with a plasticine bouquet, since the modeling technology is very simple, and even a small child can handle it.
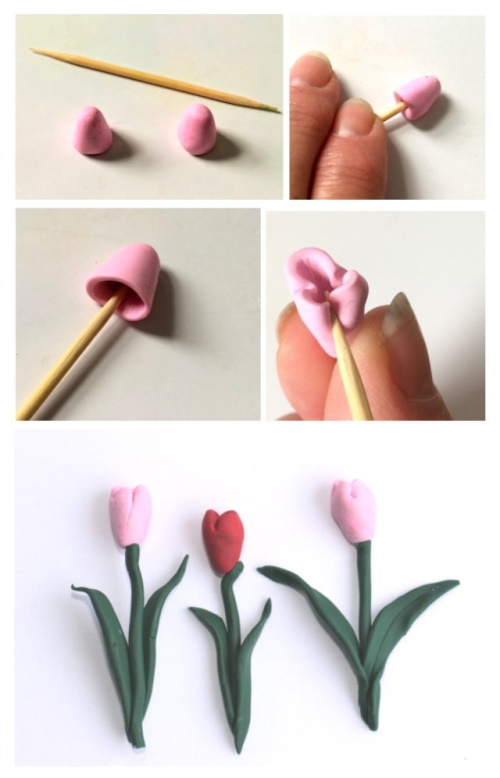
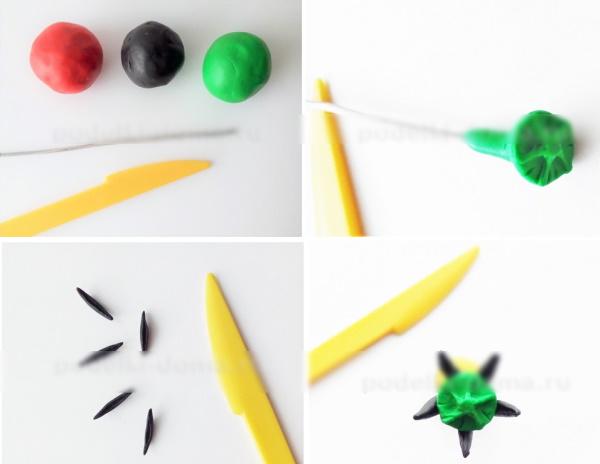
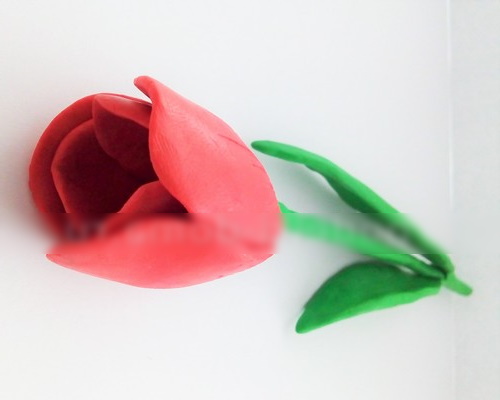
You can make spring flowers from airy plasticine by following the step-by-step instructions:
- For the inner bud, roll out a small amount of green material and make an elongated shape with a small ball at the end.
- Place the element on the wire.
- Use a plasticine knife to give the bud a natural shape, applying small elements to its surface. Flatten the edges of the figure a little.
- Make 5 elongated stamens from black material. Make a hole in each one with a knife.
- Attach green stamens to the green pistil.
- To create petals, you can choose any shade of plasticine. Divide the selected material into 6 parts, giving each a ball shape.
- Flatten the pieces into a flat cake and use a knife to draw veins on their surface.
- Fix the prepared petals to the bud, giving the flower a certain shape.
- Make an elongated sausage from the green material and attach it to the wire, creating the stem of the tulip.
- Attach elongated leaves made from green material with pre-applied veins to the stem.
Lily of the valley
Flowers from airy plasticine can be made not only by adults, but also by children, if the step-by-step instructions are strictly followed. Initially, you need to form flowers from the white airy mass. The more small details there are, the more impressive the overall picture will look.
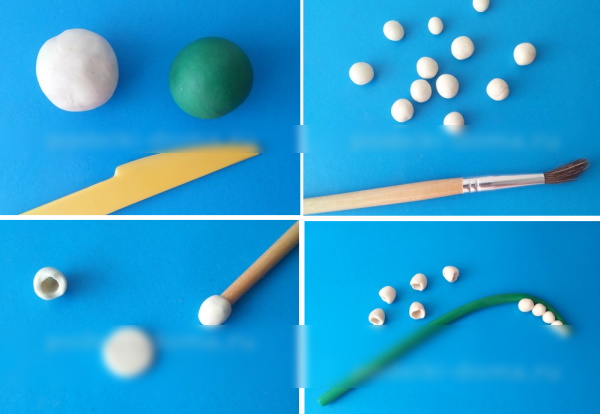
The master class on making lily of the valley is based on the following steps:
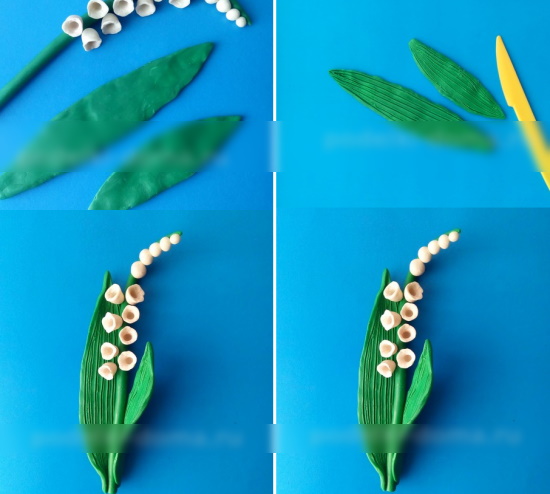
- From the material, mold balls with a diameter of 8 mm. Flatten the blanks, giving each bud volume with the handle of the brush. Some of the buds should remain round.
- From the green light mass, mold an oblong sausage, which will be the stem.
- To achieve a visual resemblance to the original, glue the buds in a checkerboard pattern.
- The green foliage should be large and have vertical stripes to create a textured effect.
- Glue the composition closer to the base and move it to the refrigerator compartment to harden.
Despite the fact that the craft will have some uneven depressions, it will look more like a real lily of the valley.
Orchid
You can create a floral arrangement if you have the following tools:
- small pieces of strong wire;
- straight skewer;
- plasticine of greenish, brown, pinkish and white colors.
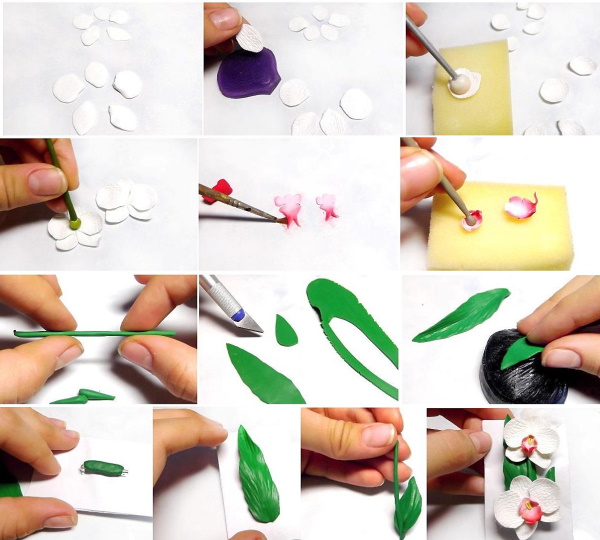
You can make your own orchid by following these steps:
- Knead 3 pieces of material in your hands, cut the wire into pieces of the required length, having determined in advance what size the bouquet will be.
- Knead the brown mixture in your hands into an oblong ribbon, place the wire in the center and, securing the edges with oscillating movements, rub the tube until smooth.
- Make blanks for 3 flowers in the form of 3 small and 3 large petals. Make a pink box that will be located in the center.
- Stick pink balls onto the wire edge, then remove them to form a hole in their center. Shape the petals into a drop by squeezing each one along the back of the mesh.
- Assemble the inflorescences based on 6 petals, fixing the box in the middle.
- To make green foliage elongated and flat.
- Assemble the branch by first fastening the frame and connecting the edges of the wire, which is covered with plasticine.
- Attach buds to the upper edges and place flowers with foliage along the entire length.
- Finally, attach the soft elements, pressing them against the frame.
Iris
To mold irises from airy material, you need to prepare the following materials:
- a baby rolling pin or a cylindrical tube (for example, a lipstick cap will do);
- To create foliage with a stem, you need green material and strong thin wire;
- for flower heads, yellowish, white, bluish and blue material is required;
- a match with a stack.

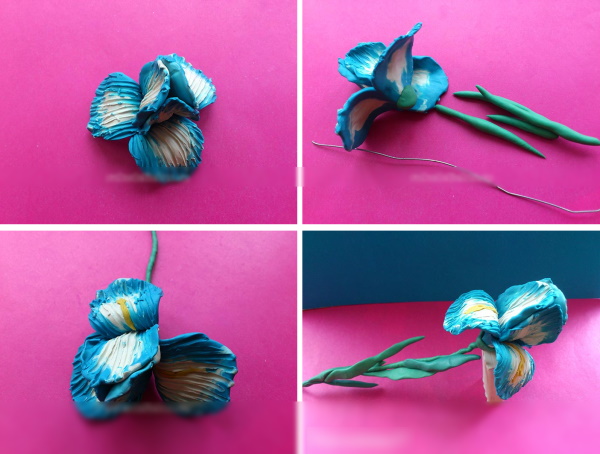
Flowers from air plasticine can be made easily and quickly by following the following step-by-step actions:
- Give the blue with the bluish and white material a cylindrical shape and connect them together, forming an elongated sausage. Roll the workpiece with a rolling pin to a thin strip.
- Gather the ribbon into a bundle so that the blue shade is on the outside, the light blue in the center, and the white inside.
- Cut the tourniquet across into small flat cakes. Press the blanks with your fingers, smoothing the surface of the material.
- Pull all the flat cakes to a thin flower petal. The central area of each piece will be white, which will gradually begin to thicken.
- Apply grooves lengthwise on each petal with a match. Blue and light blue will mix with white coloring, which will make the detail more similar to a real flower. To create one iris, 7 petals are required.
- Fix 4 petals around the circumference so that the ribbed section remains on the outside.
- Press 3 additional petals at the bottom, lowering them down. The ribbed area of the lower petals should face up.
- Attach a green sepal to the lower part of the bud. Take a strong thin wire for the stem and sausages for the foliage from green material.
- Shape the stem base and stick it in from below. In the middle of each lower petal, apply a small strip of yellow material.
- Make thin and elongated leaves from green material, fixing them to the stem.
Tips and tricks
The main feature of interaction with air material is that it hardens very quickly upon contact with air. In this regard, it is necessary to prepare a sealed container in advance, in which the remains of the composition will be located.
Tips and recommendations for working with hardening clay:
- Any figures must be made exclusively with clean and dry hands. In particular, this rule must be followed when making crafts from light airy mass.
- The new material can be folded into a bag and squeezed onto a surface if you need to create small details or decorate a craft.
- The new material is too soft and sticks to your fingers. When working with small elements, it is advisable to knead the plasticine or leave it in the air for about 5 minutes. If the time is increased, it may harden and deteriorate.
- Work with the air composition should be done quickly enough. It is not advisable to prepare too many blanks, so as not to damage the material.
- To ensure that large figures fit together securely, they can be secured with toothpicks.
- In order for the finished large craft to dry completely and evenly, it needs to be periodically rotated in different directions.
- Templates and molds will help to create relief and shaped elements.
Flowers made of plasticine can be decorated on any surface using various tools and auxiliary materials intended for decoration. The air mass is very pliable and does not stick to hands, so it is suitable for children's creativity.
To increase the service life of the finished product, it is enough to keep it in the open air for 2 hours. This time will be enough for the figurine to harden.
Video about plasticine
Flowers from air plasticine: