Inspired by the ideas and showing a little imagination, you can give another life to the empty glass bottles that have accumulated in the house. It will take a little time to turn glass containers into useful and decorative items with your own hands that will create coziness in the house, in the country or in the garden. Original crafts from these containers will become a bright accent in the interior or exterior of any home.
Features of working with glass bottles
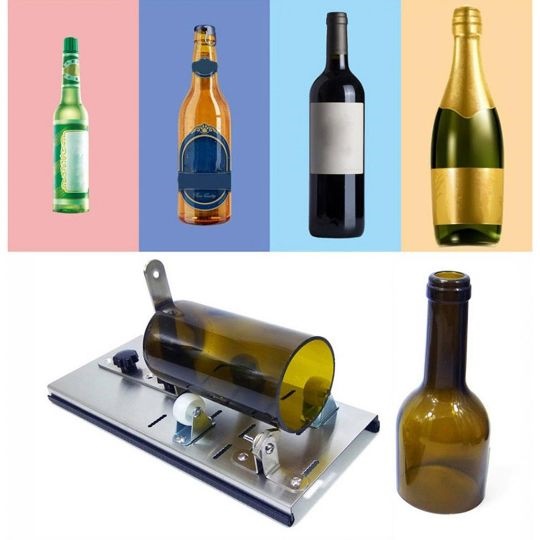
Before starting work, it is recommended to put the glass container in a basin of water for 15 minutes. This is necessary for easy removal of soaked labels, glue residue and dirt. For making crafts, you can use the bottle as a whole, but very often it is necessary to cut the container into 2 or more parts.
 This can be done in several ways, but be sure to take safety precautions.
| Method of cutting glass containers | Materials and tools | Description of the process |
| Glass cutter | Bottle, glass cutter, marker, hot and cold water | You can use a factory glass cutter or a homemade one. When cutting, make 1 pass. This will help achieve even cut edges. To make it easier to separate the parts of the container, it is necessary to pour hot water along the cutting line. The heated glass should be immediately dipped into cold water. As a result of the temperature reduction, the glass along the cutting line will split. |
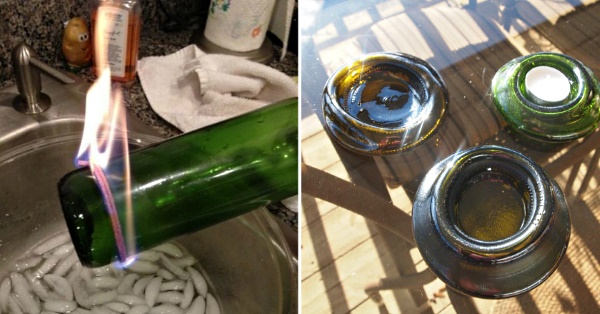
| Candle flame | Bottle, marker, candle, piece of ice | Use a felt-tip pen to mark the line of the future cut on the glass. Heat the place of the line over a candle flame, rotating the bottle evenly. Then cool the heated glass with ice and crack the container with a light tap. |
| Burning rope | Bottle, natural twine, acetone, container with ice water | Cut a piece of string that is enough for several turns around the container. Soak the rope in acetone. After generous soaking, wrap the bottle along the intended line of the future chip, tie the ends tightly and cut off the excess.
Keeping the container horizontal, light the string. The bottle should be twisted, thus ensuring uniform heating. When the burning is finished, immediately lower the bottle into a basin of cold water. Due to the sharp temperature difference, a crack will form on the line of the tied string. After this, separate the glass pieces with your hands. |
After cutting the glass container, it is necessary to sand the cut edges. You need to work carefully, because fine glass dust flies around and can damage your eyes. The safest way to sand is with an emery wheel or file under water. You can also pour water on the sandpaper and quickly move the cut edge over it.
In the master classes below, a glass cutter is used for work, but the bottle can be cut in any way that suits everyone.
Glass Bottle Crafts for Home Interior
Crafts from glass bottles can perfectly complement the style of the interior, create a positive mood in it. You just need to decide where exactly you want to use them and choose a range of options.
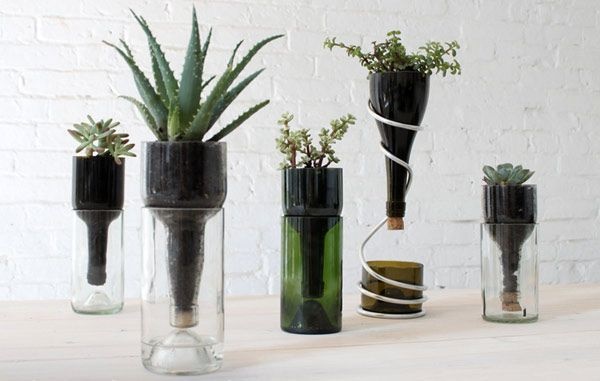
Flower pots
From glass containers you can make not only a beautiful, but also a “smart” flower pot.
 For handicrafts you will need the following materials and tools:
- wine bottle;
- glass cutter;
- marker;
- emery wheel;
- Earth;
- net;
- flowerpot;
- water.
Master class:
- Use a glass cutter to cut the glass container in half.
- Sand the edges of the product with a sanding wheel.
- Pour water into the bottom of the container.
- The top of the product should be turned upside down, the net should be placed there and filled with soil. A long rope from the net should be lowered through the neck down.
- Plant the plant in the soil and place this container in the lower part of the bottle. The neck and the rope will be in the water, so the flower will always have access to moisture. You only need to periodically add water to the lower vessel.
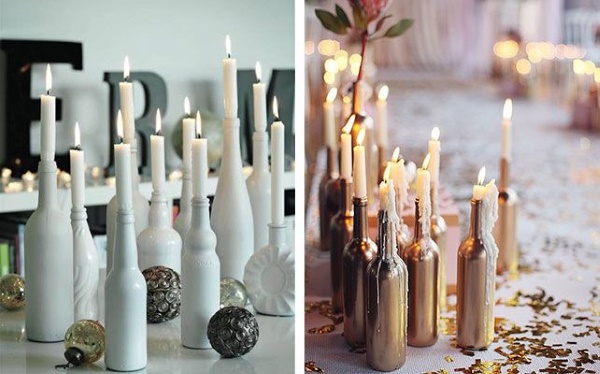
Candlesticks
A bottle candlestick is very convenient to use, since the glass reliably holds the melted wax or paraffin. The easiest way to make a craft is from the bottom half of the bottle.
 To work you will need:
- bottle;
- glass cutter;
- paraffin;
- wick;
- marker;
- file;
- clothespin.
Master class:
- Use a marker to mark a line on the glass where the cut needs to be made.
- Cut the container using a glass cutter or any other method.
- Separate the 2 parts of the bottle with your hands and file the edges so that they become perfectly smooth. The lower part is just what you need to make a candlestick, and the upper part can be used as a lamp, which will be discussed in the next master class.
- Melt the paraffin in a water bath, leaving a small dry piece for the next step.
- Place a piece of wick on the bottom of the candlestick and secure it with dry paraffin. Clamp the top of the wick with a clothespin lying on top of the candlestick.
- Carefully, without moving the wick, pour melted paraffin into half of the bottle. Leave it to dry for 1-2 hours.
If you don’t want to deal with melting and pouring paraffin, you can insert a suitable thick candle into the candlestick.
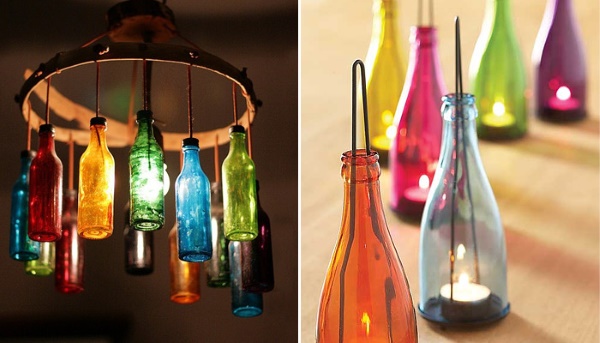
Lighting fixtures
Artificial light is no match for a candle smoldering under a bottle. A handmade lamp fills the room with a cozy, mysterious and romantic atmosphere.
To make it you need:
- long neck bottle;
- candle;
- wooden board;
- marker;
- glass cutter;
- file.
 Master class:
- Prepare a beautiful bottle. It can be completely transparent or slightly colored. Translucent blue, red, green lamps look beautiful.
- Mark the cutting line with a marker. The tops of bottles are used for lamps, but their sizes can be different. You can use half a bottle for the product or a container of its entire height, cutting off only the bottom.
- Cut the bottle along the marked line using a glass cutter.
- File the edges.
- Place a thick candle on a wooden board, light it and cover it with a bottle cap.
Compositions of 3-5 lamps of different sizes look original.
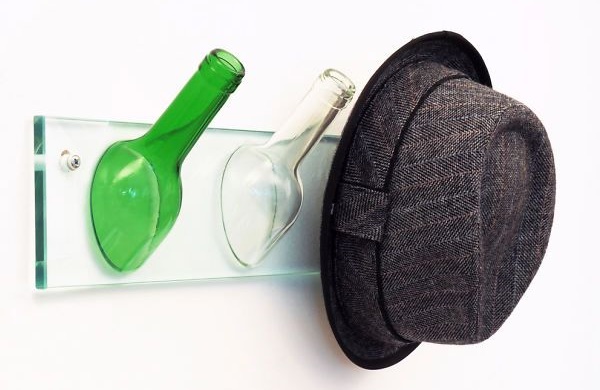
Clothes hooks
The idea of hooks made from glass containers was first introduced by Lucirmas. Since then, stylish eco-hangers have begun to decorate many hallways and bathrooms.
To make such a product yourself, you will need:
- wine bottles;
- mirror base;
- glass cutter;
- file;
- liquid nails.
Master class:
- Using a glass cutter, cut the bottles at an angle so that they will fit on the wall at the desired angle.
- Hang the base on the wall.
- Using liquid nails, glue the cut of the glass neck to the mirror. You can decorate the traces of glue on the hook, if any, with a cord.
For the kitchen
Crafts from glass bottles are used not only as decoration, but also as useful items often used in the kitchen. From these containers you can make unique elements of dishes, vases, shelves, which will give the kitchen individuality and emphasize the sense of style.
Dishes
At home, you can make a glass and a goblet from one bottle. For handicrafts you will need: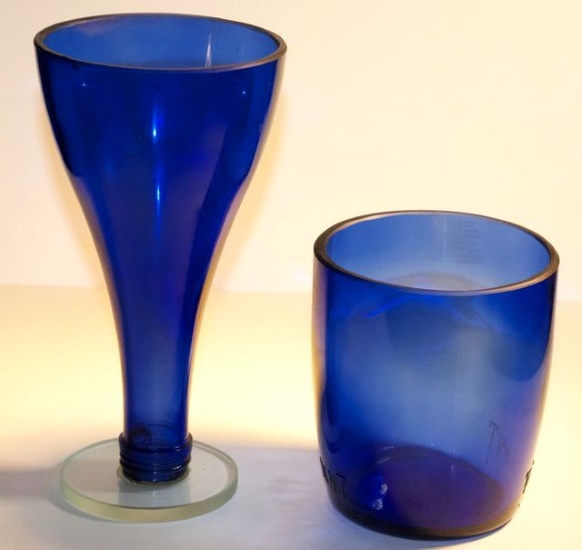
- bottle;
- felt-tip pen;
- glass cutter;
- file;
- glue.
Master class:
- Use a felt-tip pen to mark the bottle into 2 equal parts.
- Cut the container along the drawn line with a glass cutter.
- Carefully sand the edges of both halves. The sanded bottom of the bottle is already a glass.
- The neck of the upper part needs to be screwed with a cork and glued to it the base of a broken glass or a cut and polished glass circle, for example, the bottom of another bottle. Turn the product upside down and the glass is ready.
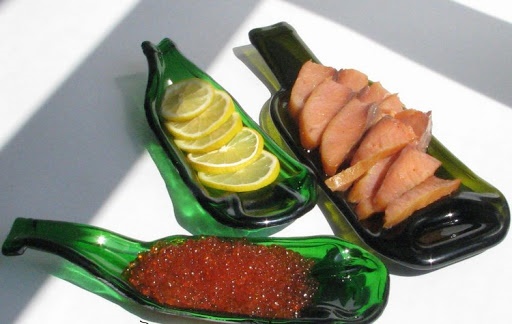
Bottles cut lengthwise are used as original plates. You can also make flat plates from glass containers, but for this you need to contact a glass-blowing workshop. There, at high temperatures, craftsmen will give the glass containers various shapes.
 If you put a small tray or plastic plate on top, having drilled a round hole in them beforehand, you will get a wonderful multifunctional product - a vase with a plate for desserts. It can be painted and decorated with beads, stones or an image can be applied using the decoupage technique.
Vases
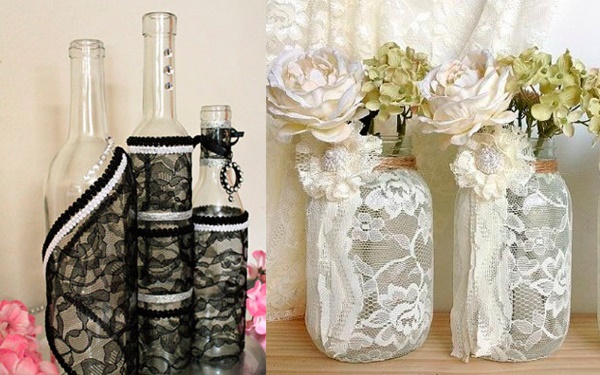
A glass bottle is a ready-made vase. You just need to decorate it to your taste and place it in a visible place. One of the simple but effective ways of decorating is painting the bottle and adding some elements to it.
For handicrafts you will need:
- the bottle is beautifully shaped;
- acrylic paint beige;
- acrylic varnish;
- dark lace;
- sponge;
- wide brush;
- fine grit sandpaper.
 Master class:
- Wash and dry the bottle thoroughly before further painting.
- Paint the container using a sponge. Dip it into the paint and apply it to the bottle surface with dotted patting movements. This method of painting makes it easy to achieve a perfectly smooth surface.
- Lightly sand the dried paint and apply another coat. Leave until completely dry.
- Using a wide brush, coat the bottle with a thin layer of acrylic varnish.
- Immediately after applying the varnish, apply a piece of dark lace to the bottom of the bottle, gently press it to the surface so that the material sticks. In this way, you can attach a narrow strip to the top of the neck. Leave the product to dry.
Shelf
To create a kitchen shelf you will need: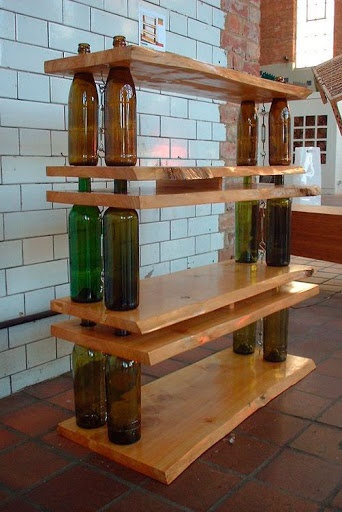
- 4 boards of the same size;
- 8 bottles;
- stud m10-2m and nuts with washers.
Master class:
- Mark 4 holes along the edges of 2 boards (2 on each edge).
- Make holes with wood crowns. The diameter of the hole should be larger than the diameter of the bottle neck, but smaller than the maximum width of the container.
- Drill one hole in the center of each side of each board using a 12mm drill bit.
- Assemble the shelf. Start with the first row, having first inserted the coupler into the first board. Place 4 bottles on the board, and on them - a board with cut holes. Then tighten the stud with nuts on both sides and continue assembling the product in the same way.
For a country house
Crafts from glass bottles perfectly combine with natural elements of the country landscape. The combination of glass and vegetation is a successful type of penetration of artificial material into the natural environment. Glass beautifully refracts and reflects light between green grass and bright flowers.
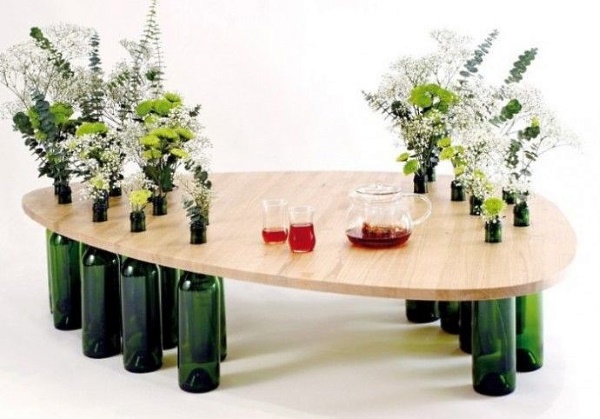
Table for a summer house
In order to make a table for your dacha, you need to prepare:
- 3-4 thick wine bottles;
- shield made of natural wood;
- jigsaw;
- wood drill;
- drill.
 Master class:
- Using a jigsaw, cut rounded tabletops from wood.
- Mark 3-4 support points with a pencil and drill holes in them. Sand everything carefully.
- Insert the bottle necks into the holes. You may need to tape the hole to a cone so that the tabletop sits tightly on the glass legs.
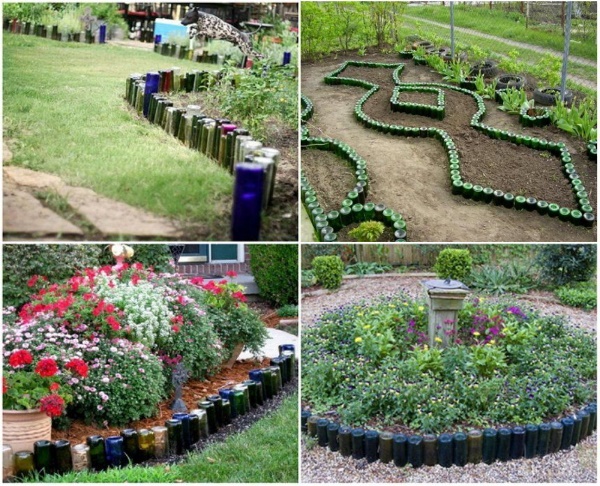
Flower beds
Before you start making a flower bed from bottles, you should decide on its shape and size. Next, for work you will need:
- bottles – from 50 pieces (depending on the size of the flower bed);
- shovel or hoe.
 Master class:
- Draw a sketch of the flower bed on paper, and then use a hoe to draw its boundaries on the ground.
- Using a shovel or hoe, dig a trench 15-20 cm deep along the drawn lines.
- Insert the bottles into the trench with their necks down.
- Fill the remaining voids with soil, compacting it tightly. The containers should be deepened to half their height.
For a garden plot
Crafts from glass bottles very often decorate the territory of garden plots. Many want to decorate the plot beautifully, but also practically, inexpensively and easily. Glass containers are just the right material for this.
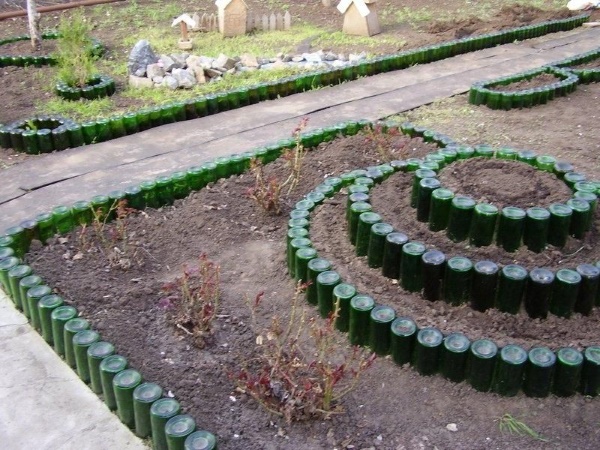
Multi-level flower beds
Creating flower beds in several levels requires a lot of time and materials, but the end result is worth it. After preparing a large number of glass containers, you can begin work.
 Master class:
- Use a hoe to dig a trench 15 cm deep around the flower bed.
- Insert bottles upside down into the trench.
- Add sand or earth into the voids and compact. Half the height of each bottle should be above the ground surface.
- Pour another layer of soil onto the flowerbed and thus enclose it with bottles. The diameter of each subsequent level should be smaller than the previous one. You can make an unlimited number of levels, but the lowest level should be quite large.
Path in the garden
Crafts made from bottles can be quite large-scale. For example, entire garden paths can be created from glass containers. They do not harm garden flora and are safe for health. Paths made of glass containers of different colors look especially funny. You need to think up and draw the desired pattern on paper in advance and collect containers of the desired colors.
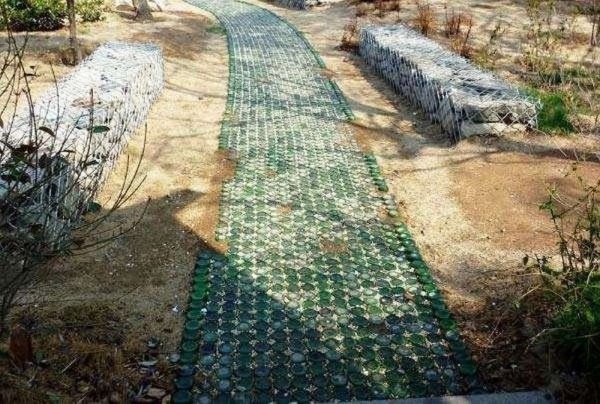
It is important to take into account that, for example, the diameter of a champagne bottle is 8.5 cm. Taking into account 1-2-centimeter gaps, approximately 100 units of glass containers will be needed for 1 sq. m. of path. A half-liter beer bottle has a diameter of about 7 cm. Therefore, 150 pieces are needed for the same area.
Master class:
- Mark the perimeter of the path using pegs and a stretched string. If you plan to make a winding path, you can lay out a rubber hose. A suitable path width is 50-70 cm.
- Dig a trench along the marked perimeter. Its depth should be approximately the same as the height of the bottle.
- Pour some fine gravel onto the bottom of the trench, carefully pressing and leveling it.
- Fill the trench with a layer of sand or soil up to 2/3 of the way.
- Fill glass containers with sand or small gravel. This will give them greater strength.
- Insert the bottles neck down into the ground, tapping them lightly with a rubber mallet. The containers can be placed close to each other or leave centimeter gaps between them. Using a flat board, you need to align the bottles from above so that they are in the same plane.
- Water the soil in the gaps. Then fill it with dry sand. Water again and add sand to the top. The upper gaps between the containers can be filled with decorative pebbles or gravel, or even with cement mortar. The bottles should protrude above the horizon by several centimeters.
In addition to the fact that creating interesting crafts from bottles brings great benefits to the interior and exterior of the home, it also helps to solve a serious environmental issue. Many glass containers do not end up in a landfill, but are reused. There is a great opportunity to combine care for your home and the environment.
Video on the topic: glass bottle craft ideas
10 DIY Glass Bottle Ideas: