A round yoke is a piece of clothing that forms the level of the neckline. Thanks to the classic pattern This type of neckline is considered universal, so it suits everyone. This part of the product can be knitted with knitting needles from the top or bottom.
Necessary tools and materials
Round yoke with knitting needles from above (patterns are presented to familiarize with the knitting technique) When choosing yarn, you need to take several factors into account:
- Type of fiber. Silk threads are suitable for creating smooth and shiny clothes. To make the item breathable and light, it is best to choose cotton yarn. Wool material is perfect for obtaining a voluminous and warm product.
- Thickness of threads. To make the drawing more textured and voluminous, thick material is required. To create narrow and detailed reliefs, it is advisable to use thin threads.
- Texture with a shade. Should match your own preferences and style. You can experiment with different combinations of shades. Also, the thread material can be supplemented with glitter or melange.
For women's models, you will need to take circular knitting needles No. 6 and 6.5. You will need linen or thin cotton threads for work. To knit a sweater for a girl, you need to prepare tools No. 3.5 and 4, as well as mixed yarn based on wool and acrylic. For children's men's clothing, circular knitting needles No. 3.5 and 3.75 are suitable. Acrylic threads can be used as material.
Recommendations for choosing a quality knitting tool:
- If circular needles were chosen for knitting, it is necessary to look at the connecting cable. It can be made of metal, PVC or nylon material, which will be stronger than a plastic tube. The area where the needle joins the cable should be smooth. At the same time, these parts should have the same thickness. In addition, the length of the cable should match the fabric to be knitted.
- The edges of the tools should not be too sharp, otherwise the material will split into fibers. If the knitting needles are too blunt, this will provoke the stretching of the stitches.
- The surface of the knitting needles should be free of burrs, nicks and other damage. The needles should be perfectly smooth.
- If the yarn label does not indicate the required knitting needle size, it is recommended to take a tool that is 1 size larger than the thread material. However, for complex yarn (for example, with pile, fluff), it is optimal to use knitting needles 2 or 3 mm thicker.
Schemes with description of works for beginners
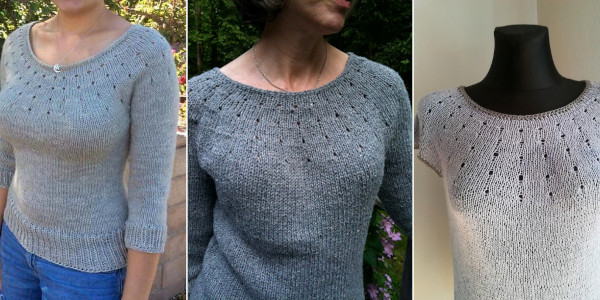
Yokes, designed in a circle with knitting needles, are great for creating children's sweaters, because this pattern helps to emphasize youthful features. However, models with this type of neckline are suitable not only for children, but also for adults.
The top-down design can be complemented with unusual decorative details to further emphasize tenderness and romance.
A round neckline can be created on a coat, jacket, blazer or sweater. The yoke can have different parameters, so it can be wide and reach shoulder level or be under the throat. The choice will depend on the style of the clothing and the desire of the master.
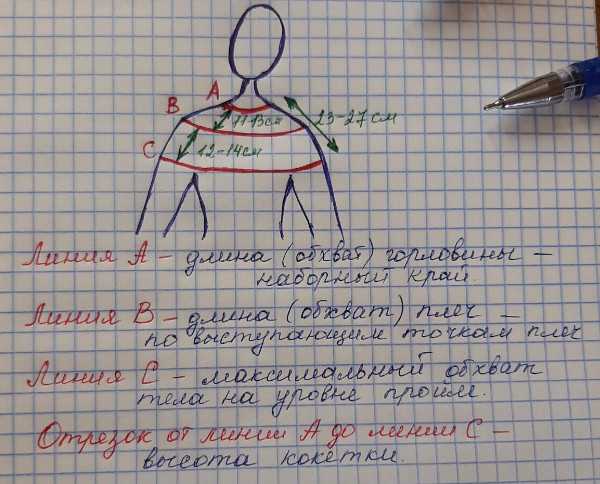
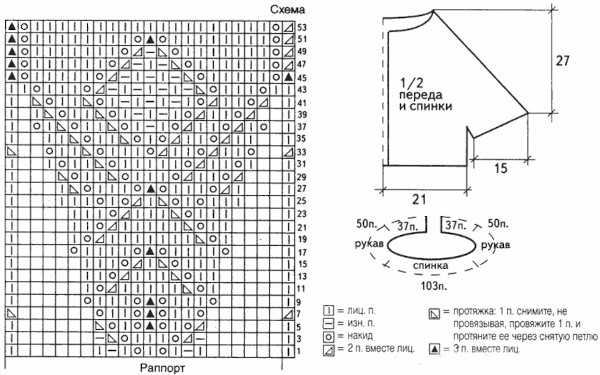
Before you design a pattern, you need to make a few calculations:
| Measure | Where is it located? |
| 1 | Indicates the area where the insert begins. In this case, it is necessary to set the height at which the element will be located. For example, you can make a collar that fits tightly around the neck. To do this, you need to take into account the fastener, which can be done in the front or back. |
| 2 | In this case, you need to measure the shoulder girdle. This will be the distance from the beginning to the central part of the yoke. |
| 3 | The last calculation starts from the top of the element to the armpits. In this area, the yoke should transition into the sleeves with the shelf and back. |
Abbreviations for loops and other elements:
- loop – p.;
- front loop – knit stitch;
- purl stitch – i. p.;
- repeat to the end of the circular row with alternation – *…*.
Women's models
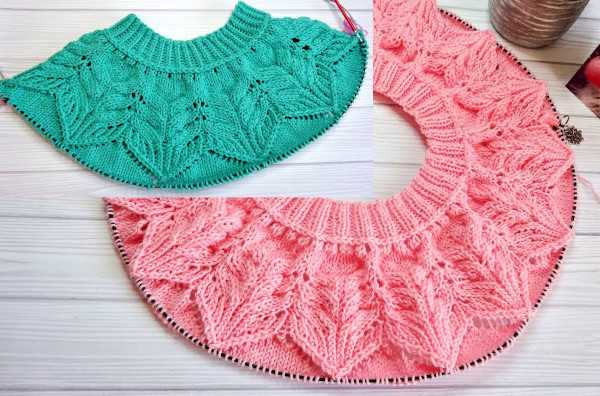
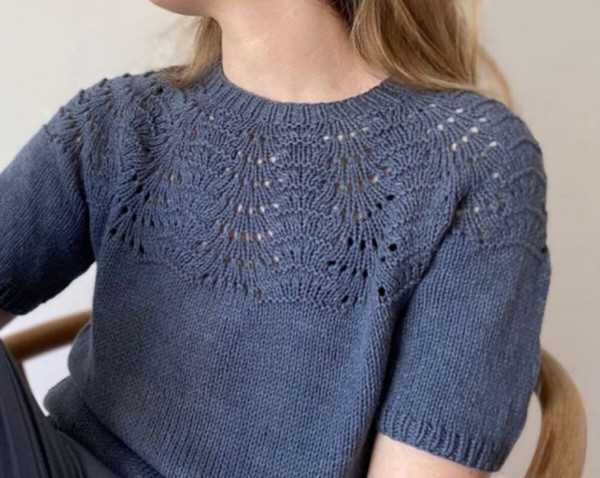
A round yoke knitted from above (patterns can be in the form of braids, cords or jacquard) looks like a raglan design. However, in the first case, there will be no raglan lines, so all the increases will be smoothly woven into the pattern. The product will expand evenly, but this will not be noticeable.
Women's models with yokes are mainly represented by pullovers, which need to be designed with circular knitting tools as a single piece. In this case, there will be no seams.
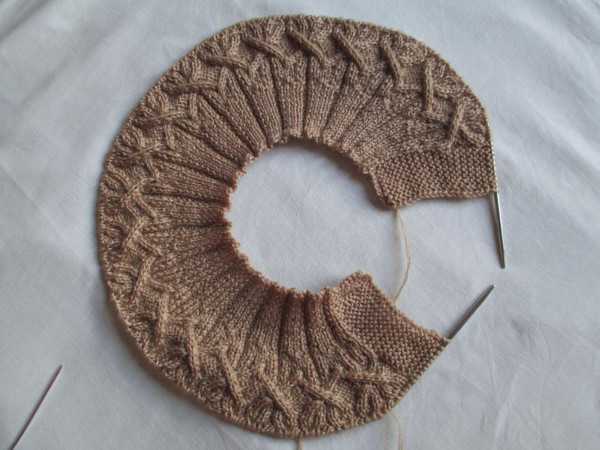
Step-by-step description of the work:
- On knitting tools #6 cast on 60 sts. Then close the fabric into a ring and make 5 rows using garter stitch.
- Then create 1 openwork row from *1 l.p., yarn over and 2 l.p. together*.
- The next 4 rows are done using the garter stitch technique.
- Knit the other 2 rows with the front surface.
- To create an openwork yoke, switch to knitting needles No. 6.5.
- To do this, in each even row, all stitches with a yarn over must be knit stitches.
- When rows 1 through 41 are completed, transfer 30 sts for the sleeves to auxiliary knitting tools. Make the remaining stitches as front stitches.
- Then continue working according to the pattern with an openwork design. To do this, at the beginning of each circular row, shift the ornament to the right by 1 st.
- After 25 cm from the edge of the yoke, make 8 rows using garter stitch. Then close the fabric.
- Transfer the elements that were set aside for the sleeve to circular needles. Additionally, cast on 15 sts and knit them in a circle using an openwork pattern.
- After 20 cm from the edge of the yoke, again make 8 rows of garter stitch and close the product.
- Create the second sleeve in the same way.
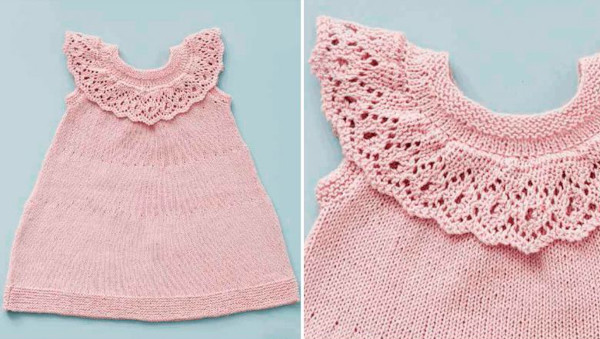
For girls
A round yoke knitted from above (it is advisable to knit the patterns with other threads to separate them from the main fabric) is suitable for decorating a children's sweater with buttons.
According to this pattern, the clothes are intended for a 2-year-old girl. The length of the product will be 34 cm, the sleeve - 32 cm, and the neck circumference - 28x30 cm. The knitting density is 21 rows and 15 stitches, 10x10 cm.
Step-by-step design of the work:
- To design the yoke, cast on 65 sts using knitting needles No. 3.5. After 8 rows, design using the garter stitch technique.
- In row 5, create a buttonhole.
- The first 5 paragraphs of the line should be formatted as 2 lines. p., throws, 2 combined p. and 1 l. p.
- Then move on to larger knitting tools.
- In the 1st row, knit the first 5 sts in garter stitch.
- The pattern repeat should be designed 9 times and 6 times in garter stitch. As a result, 83 sts should be created.
- Create row 31 in the same way. However, in rows 15 and 33, it is necessary to create buttonholes.
- The next line should consist of l.p.
- In row 35 make 6 l. p., yarn over, combine 2 sts together. Form up to 6 outer stitches. Then make yarn over and six l. p.
- The next 2 lines should be formatted exclusively as l.p. As a result, 191 p. should be created.
- In the next purl row, make 6 l. p., 24 i. p., and transfer 30 p. to an auxiliary tool.

- Transfer the next 37 sts to an additional knitting needle. They will be needed for the sleeve.
- 57 stitches are made into a st and transferred to an auxiliary tool. They will be needed to create the back.
- For the second sleeve, make 37 stitches and transfer to an additional knitting needle.
- Identify the areas and knit 30 sts again on additional tools.
- 37 sts, set aside for the sleeve, are designed using the garter stitch technique. Additionally, add 3 sts on each side. As a result, 43 stitches should be created, and the sleeve length should reach 10 cm.
- In the next row, remove 1 st from each side.
- Create 6 more rows and switch to knitting needles No. 3.5.
- Decorate the fabric with garter stitch, decreasing 4 sts in the 1st row. The result should be 29 elements.
- In the garter stitch technique, create an additional 10 rows and close the stitches. In the same way, design the second sleeve.
- To make the main part of the fabric, knit 30 sts of the right shelf. Make the second row in the same way.
- Then cast on 6 sts and make 57 stitches of the back. Cast on 6 sts again and make the next 30 sts of the left front.
- Using the garter stitch technique, continue knitting the fabric to a height of 18 cm.
- Next, using knitting needles No. 3.5, make 10 rows using the garter stitch technique.
- Loosely close all stitches and sew on buttons.
For boys
Round yoke with knitting needles from above (patterns will allow you to create a beautiful and stylish product for the winter season) is suitable for decorating men's children's clothing models. Since knitting should be done from the neck to the elastic, the product will not have seams.
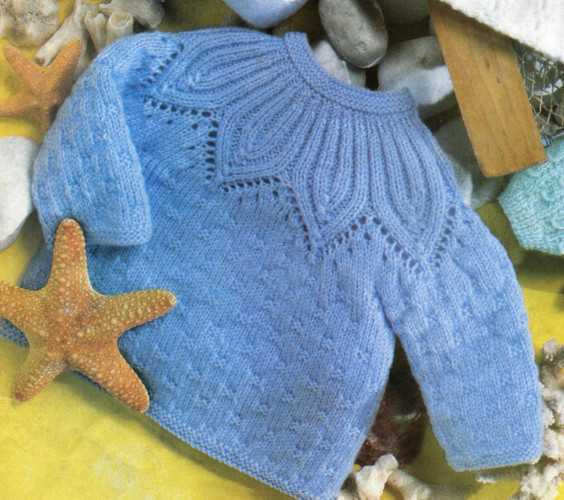
This method is suitable for beginners, because as needed, the fabric can be easily finished or unraveled only the rows of elastic, but not all parts of the garment. Due to the interesting openwork pattern and round yoke, the sweater is perfect for the cold season.
Algorithm for making an openwork pattern:
- In the 1st row make 1 l p, *1 i. p., yarn over and draw through* (slip a stitch as l p, 1 l p. and draw through the slipped stitch). At the end make 1 i. p. and l p.
- In the 2nd and 4th rows, knit 2 l. p., *2 i. p., 1 l. p.*, 1 l. p.
- The 3rd row consists of 1 l. p., 1 i. p., *2 together l. p., throwing over, 1 i. p.* and 1 l. p.
- Repeat the ornament from rows 1 to 4.
Step-by-step instructions for making a round yoke for 6 months:
- Cast on 70 sts using #3.5 tool and work 5 rows using garter stitch.
- After knitting 5, 1 and 3 l p, *1 l p for the back and front walls of the stitch, 4 l p*. Having reached the outer 6 stitches, make 1 i. p., 1 l p., closing the next 2 sts for the button and 2 l p. 81 elements should be created.
- In the 2nd row make 2 l. p., cast on 2 new p., 2 l. p., *9 i. p., 1 l. p.* and 5 l. p.
- To continue knitting in 1 row, knit 5 sl, *1 i. p., 4 sl, yarn over, 1 sl, yarn over and 4 sl*. When 6 stitches remain, knit 1 i. p. and 5 sl. There should be 95 stitches in total.
- The 2nd row consists of 6 l. p., *11 i. p. and 1 l. p.*. Make the last 5 stitches as front stitches.
- The 3rd row includes 5 l. p., *1 i. p., 5 l. p., yarn over, 1 l. p., yarn over and 5 l. p.*. The last 6 elements are made with 1 i. p. and 5 l. p. The result should be 109 sts.
- In the 4th row, knit 6 l. p., *13 i. p. and 1 l. p.*, and also 5 l. p.
- Row 5 includes 5 sl sts, *1 i. p., 6 sl sts, yarn over, 1 sl st, yarn over, 6 sl sts*, 1 i. p. and 5 sl sts.
- In the 6th row make 5 and 1 (marked with a marker) l. p. After *continue working i. p. to the next marked stitch and make 1 l. p.*. At the end, knit 5 l. p.
- Row 7 consists of 5 sl sts, *1 sl st (marked), 7 sl sts, yarn over, 1 and 7 sl sts*, 1 sl st (marked) and 5 sl sts. There should be a total of 137 stitches knitted.
- Design row 8 according to the pattern.
- Row 9 includes 5 sl sts, 1 sl st, *6 sl sts, yarn over, slip 1 sl st, 2 sl sts together, pull resulting stitch through slipped stitch, yarn over, 6 and 1 sl sts* and 5 sl sts. Remove markers.
- In the 10th row make 13 l. p., 1 i. p., *15 l. p., 1 i. p.* and 13 l. p.
- In the 11th row, knit 5 and 1 l. p., *1 l. p.*, 1 i. p. and 5 l. p.
- Row 12 consists of knit stitches.
- In the 13th row, make 5 l p, 1 i p, 1 l p. Then *knit l p through the back and front walls*. Having reached 9 elements, make 2 l p, 1 i p, 1 l p, close the next 2 sts and 2 l p.
- Row 14 includes 2 l. p., a set of new 2 l. p. and *1 l. p.*.
- Then take knitting needles No. 3.75 mm and make an openwork pattern on 10 rows.
Secrets for Beginners
Knitting tips and tricks:
- When choosing a pattern and model of clothing, it is necessary to take into account that the yoke should not exceed the raglan line in length. In order for the clothing to have an excellent fit, this element should be approximately 4-5 cm shorter than the raglan line. For correct calculation, it is recommended to make a sample in advance.
- On the back of the product, the material should be pulled carefully. If the yarn is pulled too tightly, the pattern will be deformed. As a result, the round yoke, which was made from top to bottom, will turn out ugly. If the fibers are very weak, they will sag. As a result, the pattern will spread. Most experts advise pulling the sagging material through every 3-4 stitches. In this case, this thread should be picked up with the working yarn. But using this method can provoke the formation of colored dots on the product that were not planned. In this regard, many needlewomen do not use more than 3 shades at once when developing patterns. Additionally, the pattern will include separate stripes.
- Before knitting the main fabric, it is recommended to make a sample to count loops and rows of 1 cm. In this case, it is necessary to subject the product to wet-heat treatment, and also determine the knitting density.
- The classic yoke type is considered the most common technique because it is characterized by a round shape. This pattern can be used to design a jacket, sweater or pullover. Using a traditional element, it is permissible to knit various details with ornaments to give clothes an original and sophisticated appearance.
- The expanding yoke is characterized by a narrow circle at the beginning, which gradually begins to expand closer to the bottom of the fabric. This type of element helps to create an interesting silhouette and add volume to the item.
- A yoke equipped with a cutout will frame the shoulders or neck. This type of element helps to create an elegant and delicate fabric. In this case, it is permissible to experiment with different cutouts in the form of a square, V-shaped or round.
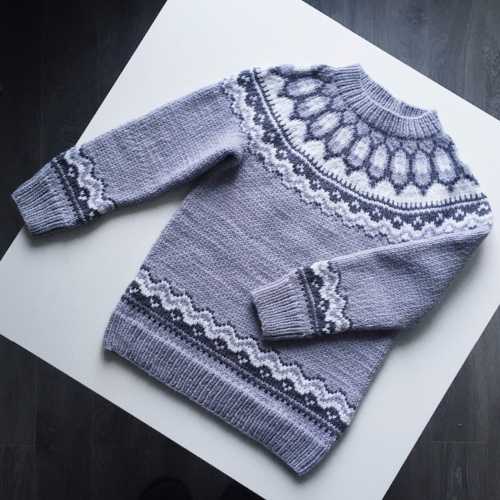
- Jacquard patterns, braids or openwork ornaments are suitable for creating a yoke. In the first option, you need to use threads of the same type and thickness. Due to this, there will be no discrepancies in the knitting density.
- This element does not need to be knitted separately and then joined with the main parts of the product. Knitting of a thing with a yoke is done as a whole piece from top to bottom and vice versa. When designing from bottom to top, it is necessary to consistently decrease stitches. When designing knitting from top to bottom, it is necessary to perform an even addition of loops.
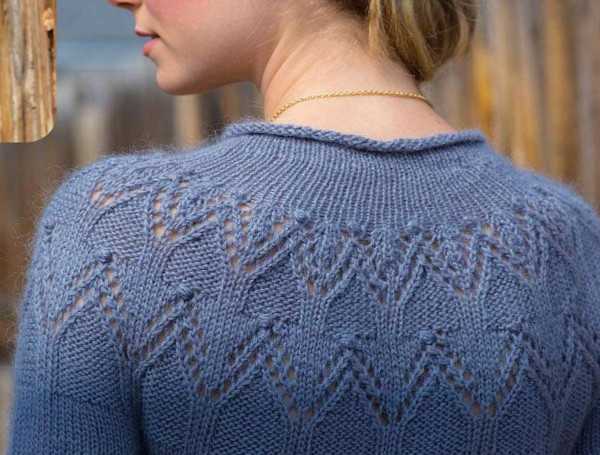
The yoke, which was knitted with needles from the top in a circle, is the top element of the main fabric, which begins at the neck and ends in the area of the armpits.
Such products are often characterized by a raglan sleeve. Models that have been decorated with this pattern will have a beautiful and feminine look, as well as a perfect fit.
Video about circular yoke with knitting needles from above
Description of knitting a round yoke from the top: