Egg trays are one of the suitable materials for various DIY crafts. There are 3 types of egg boxes: cardboard, plastic and foam. Due to the ease of use, standard cardboard trays are most often used for papier-mâché crafts: to create a variety of flowers, animals, and even to decorate rooms.
Foam and plastic trays are used to create original crafts for the home, such as lamps.
Papier-mâché from egg cartons
Depending on where and how the products will be used, different instructions for preparing homemade products are used.
DIY for being outdoors or in a humid environment
Instruction #1
For your first DIY project you will need the following materials:
- Egg trays.
- A large pot of hot water.
- Mixer.
- Facade putty.
- PVA glue.
Stages of work:
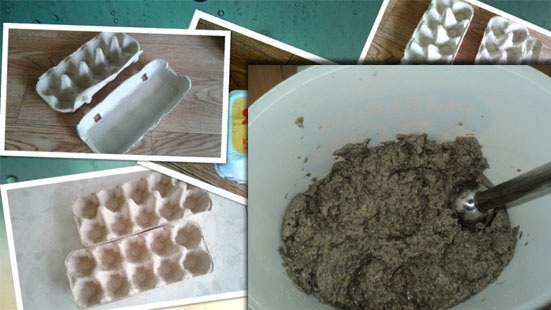
- Tear the egg cartons into pieces and place them in a saucepan.
- Fill the prepared trays with hot water, put on medium heat. Boil for 20-30 minutes.
- After the time has passed, remove the mixture from the heat, cool and beat with a mixer (use a kitchen or construction mixer). A mushy mass should form.
- Put the mixture back on the fire and cook for another 10-15 minutes.
- Beat with a mixer a second time. After the second beating, the mass will become more homogeneous.
- Leave it to cool.
- When the mass becomes warm, approximately body temperature, squeeze it through gauze, mosquito net or cloth.
- Dilute PVA with water in a ratio of 2:1, then add putty in small portions until you get the consistency of liquid sour cream.
- Add the squeezed mass from the egg trays to the putty.
- Mix the mixture well until it becomes homogeneous.
- After kneading, the papier-mâché mass is ready for use. Use it within one hour, after which time it will become unsuitable for work.
Instruction #2
This papier mache recipe is used to create crafts with a smooth surface. This mass does not shrink, products made from it are not afraid of moisture. and it can be used to create tableware and decorative items.
You will need:
- 3 egg trays for 3 dozen eggs.
- Flour 2 tbsp.
- Corn starch 2 tbsp.
- PVA glue 2 tablespoons.
- Mineral oil 2 tablespoons.
- White acrylic paint.
- Glue "Bustilat" 2 tbsp. spoons.
Preparation of the mass:
- Tear the trays into small pieces.
- Place them in a saucepan, pour hot water over them and put them on the fire. Bring to a boil and keep them on the fire for another 5 minutes.
- Allow the mixture to cool to room temperature.
- Squeeze the mixture, but not too much, it should be wet, otherwise the blender will not be able to grind it.
- Place in a blender and grind.
- Squeeze the mass well.
- Place the mixture in a saucepan and add dry ingredients.
- Mix the liquid ingredients separately and pour them into the mixture.
- Mix the mass well, first with a mixer, then with your hands. It should be smooth and pliable.
- If the mass is hard, add PVA glue; if it is too liquid, add starch or flour.
Instruction #3
This recipe is easier to prepare and is suitable for making various crafts with children.
You will need:
- Egg trays.
- PVA glue.
- Ready putty.
Making the mass:
- Tear the trays into small pieces.
- Place them in a container and pour boiling water over them.
- Wait until the water cools and drain it.
- Blend the resulting mass with a blender.
- Add PVA glue.
- Knead the mixture well; it should be soft and elastic.
- Add 1 tablespoon of ready putty. Knead well.
- When it is smooth and elastic, you can start making crafts.
Egg Carton Craft Ideas for Home
DIY egg tray crafts can be varied: from a simple fish to a garden gnome or chandelier.
Frame made from egg trays
You can make an original photo frame using flowers made from egg trays and cardboard as the base of the product.
To create a frame you will need:
- Thick cardboard.
- Scissors.
- Egg trays – 20 cells.
- Glue (Titan or glue gun).
- Dye.
- Photo.
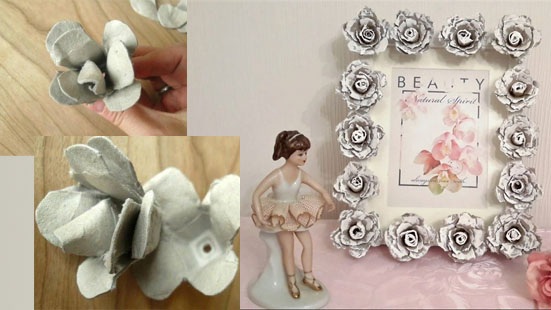
Stages of work:
- Cut a frame out of cardboard, the width of which will be 5 cm.
- Take egg trays and cut them into sections.
- Trim the edges of the cell to create a smooth edge. Prepare 15 cells.
- Cut the prepared cells into 5 parts, leaving the middle intact.
- Round off the resulting edges of the blanks.
- Take 5 blanks and assemble the flower. Make the first blank like this: connect the edge of two opposite petals with glue, attach the next petal on top, glue the remaining two. Make the second layer like this: connect the middles of the blanks, glue the petals to the center of the flower core. All subsequent layers are glued slightly lower than the previous ones, creating the volume of the flower.
- Collect 3 flowers, cut out rose leaves from the remaining cells.
- Paint the rose flowers, its leaves and the frame.
- When the flowers are dry, glue them to the corner of the frame. Add decorative details: beads, glitter or others, if necessary.
Christmas wreath made from flowers made from egg cartons
To create a Christmas wreath you will need:
- Plastic egg containers.
- Foam blank for a wreath.
- Red berry beads.
- Green sisal.
- White beads for decoration.
- Glue gun.
- Red ribbon.
- Scissors.
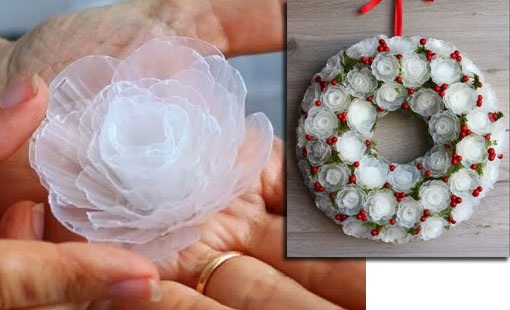
Stages of work:
- Make lots of flowers from plastic egg containers. Do it like this:
- Cut the trays into cells.
- Cut off the corners, the cell should turn into a small glass.
- Cut the sides of the prepared cell into 4 parts - these will be the flower petals.
- Round off the petals. For one flower you need 4 such blanks.
- For the flower core, take the prepared cell, cut its walls and cut out the bottom. You will get a plastic ribbon.
- Flower formation: twist a plastic ribbon, glue its ends together; glue the blanks with 4 petals together; glue the flower core into the center of the blank of 4 petals. When the flower is ready, glue a bead inside the core.
- When all the flower blanks are ready, glue them onto the foam base, cover the spaces between the flowers with sisal and decorate with red berries.
Attach a red ribbon to the base. And the wreath is ready.
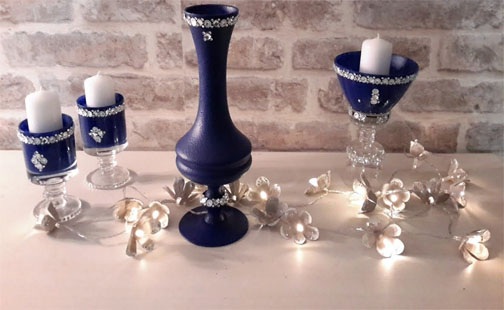
Papier-mache vase
Using papier-mâché from egg trays, you can create an unusually beautiful craft with your own hands - a decorative vase.
For this you will need the following materials:
- Papier-mâché from egg trays.
- A glass or plastic bottle with smooth sides and a wide neck.
- Foam plastic 50 mm
- Scissors and a stationery knife.
- PVA glue.
- Toilet paper.
- Dye.
- Felt-tip pen.
- Scotch.
Video of a master class on making a vase from cardboard (base) and papier-mâché:
Manufacturing:
- Take a bottle, trace its contours on the foam. Come up with an interesting shape for the vase and draw the missing contours on the foam.
- Cut out additional pieces from the foam and attach them to the bottle with tape.
- Cover the resulting structure with papier-mâché in one layer and let it dry.
- When the first layer dries, cover the bottom of the vase with papier-mâché and form the neck. Correct any imperfections that appeared after the first layer.
- Decorate the vase with papier-mâché moldings and toilet paper threads.
- To create paper threads, unwind a piece of toilet paper, fold it into several layers and cut the piece into three parts so that you get three long strips of paper; then twist the paper into a thin rope.
- Decorate with paper threads using PVA glue.
Let the vase dry thoroughly and only then can it be covered with paint and varnish.
Crafts for the garden
DIY egg tray crafts can decorate any garden. You can create decorative figures, garlands, and decorative lamps for a gazebo.
Decorative figure for the garden "Cat"
To create a decorative garden figure, prepare:
- A mass of papier-mâché from egg trays for street figures.
- Plastic bottle 2 l.
- Newspapers, paper.
- Wire.
- Scotch.
- Cardboard.
- Putty.
- White acrylic paint.
- Plastic bottle caps.
- Paints of different colors.
- Varnish.
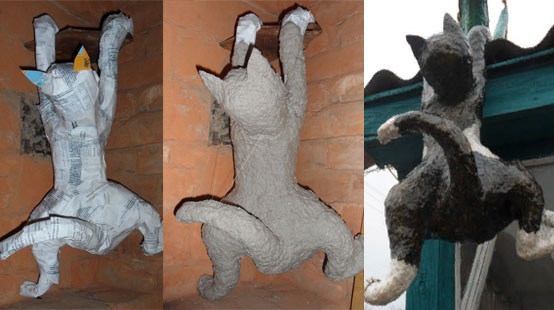
Stages of work:
- We take a plastic bottle - this will be the body, attach wire to it, from which we form paws and a tail.
- We wrap the entire structure with newspapers or paper, giving it volume, and secure everything with tape.
- On the narrow side of the bottle we form the cat's head and fix it with tape.
- We attach ears cut out of cardboard to the head, eyes and a nose made from bottle caps.
- Once the cat's body has been formed, cover it with a layer of papier-mâché, paying special attention to the muzzle: on it you need to give shape to the eyes, nose, and form the cat's "cheeks".
- Let the first coat dry, then apply the second coat and leave to dry.
- After it dries completely, cover the cat with two layers of white paint. Let it dry and you can paint the cat in the color scheme you have in mind.
Cover the finished figure with wood varnish. When the varnish dries, place it in your garden and enjoy your work.
Garland of plastic egg trays
Make a beautiful garland from plastic egg cartons and decorate your garden or gazebo with it.
To create a garland you will need:
- LED garland powered by solar panels or batteries.
- Plastic egg tray.
- Scissors.
- Glue gun or any universal glue.
- Awl.
To create a garland, you need to make flowers from plastic egg trays. You will need as many flowers as there are LEDs on the garland.
Flowers are made like this:
- Cells are cut out of an egg tray.
- Each cell needs to be "refined", remove all sharp corners, leaving a neat "cup". One flower will require 5 cells.
- On each of the 4 cells we make 4 cuts to the center of the bowl - these are the blanks for the petals. Round off each of the petals - cut off the sharp corners. From the 5th cell we make a plastic strip - cut out the bottom, this will be the core of the flower.
- Flower assembly: We twist the plastic tape into a spiral and secure it with glue; we glue the remaining 4 pieces together in the middle and glue the core inside.
When the flowers are finished and dry from the glue, you need to make holes with an awl through which the LED can pass. Insert the LEDs from the garland into the middle of the flower and fix them with a glue gun. When all the flowers are attached, the garland is ready.
It can be used to decorate a veranda, trees or a gazebo.
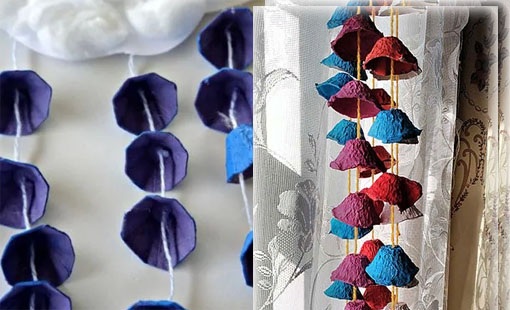
Wind chimes made from egg trays
You can create an original and unusual wind chime from cardboard egg trays.
To create it you will need:
- Base. This can be a regular twig, an old hanger or the bottom of a plastic bottle.
- Egg trays.
- Threads. You can use twine, yarn of bright, saturated colors.
- Paints of different colors.
- Awl (if needed).
- Needle.
- Bells-balls for a collar.
- Scissors.
- Varnish
How to do:
- Cut out cells from egg containers. Trim all corners and cut the walls of the cells to the middle - you will get petals.
- Trim the petals of the blanks so that they are pointed and the blank resembles tulips.
- Paint the flowers in different colors, when the paint dries, cover the flowers with varnish.
- If the wind chime base needs painting, paint it.
- When the flower blanks are dry, use an awl to make holes in the middle of the flower.
- Cut the threads so that they are of different lengths.
- Attach a bell to the end of the thread and use a needle to pull the thread through the flower.
- Secure all threads to the wind chime base.
Pull a few strings up from the base so that you can attach it to a tree branch or hang it from a gazebo.
Crafts with children for the garden, school
Even small children can make DIY crafts from egg trays; they are often asked to make such crafts for an exhibition in kindergarten.
Panel with tulips from egg trays
This kind of panel will be interesting to create for both mother and child.
Materials:
- Cardboard for the base.
- Paints, brushes and sponges.
- Scissors.
- Glue.
- Egg trays.
- Buttons of different colors.
- Decorative cord of green color (can be replaced with a chain of air loops).
- Satin ribbon.
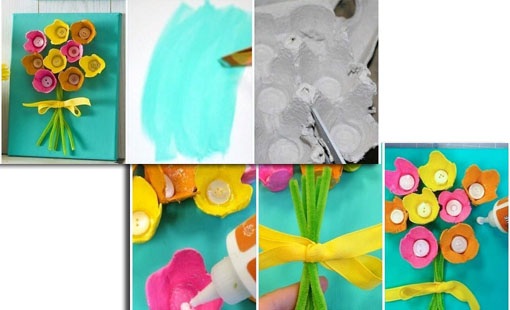
How to do:
- Prepare the base of the panel: take cardboard for the base and paint it with a sponge, so the paint will lay down on the base with a beautiful texture.
- Cut out the egg carton cells and trim off all corners.
- Divide the cell walls into 4 parts, make each part sharp - you will get tulip petals.
- Paint the flower blanks in different colors.
- Cut the cord into 5 equal pieces, secure them with tape and glue them to the base.
- Once the flowers are dry, glue them on top of the cord "stems" to create a voluminous bouquet of tulips.
Glue a button of a contrasting color into the middle of each tulip and your panel is ready.
Egg Tray Crocodile
To create a crocodile you will need:
- 2 egg trays with 10 cells each.
- Colored paper.
- The paint is green.
- Glue.
- Cardboard tubes.
- Scissors.

How to do:
- Remove the top lids from the egg trays.
- One of the trays will be the body, the second needs to be cut into 4 and 6 cells - this will be the jaw of the crocodile.
- Glue 4 legs made from cardboard tubes to the crocodile's body. The height of the legs is 5-7 cm.
- Glue the jaws to the body: the upper one from 4 cells, the lower one from 6 cells.
- Paint the crocodile green, let it dry and glue on the eyes, eyebrows and tongue.
Crafts from egg trays can be completely original and impressive. When making such items, a piece of the author's soul is put into each of them, so they turn out interesting and can please others with their individuality.
Author: Dobriana
Article formatting: E. Chaikina
Useful video about crafts from egg trays
Video about wall decor using papier-mâché made from egg trays:
I was just looking for something to patch up a hole in the wall with - thanks for the idea, I'll try it.