Paper birds made using origami technique, you can decorate bookmarks, create a three-dimensional applique from them, or plant the figures on the branches of indoor plants. Beginner craftsmen need to read the step-by-step instructions for creating paper birds of different shapes and sizes.
Paper Dove
A paper bird (you can make a figurine from colored or white paper), in the form of a dove, is considered a symbol of peace, happiness and well-being in European countries. There is a belief: if a paper dove is in the most visible place in the room, then there will be warm and trusting relations between the members of the whole family. To make such a talisman, you will need a square sheet of paper measuring 17x17 cm.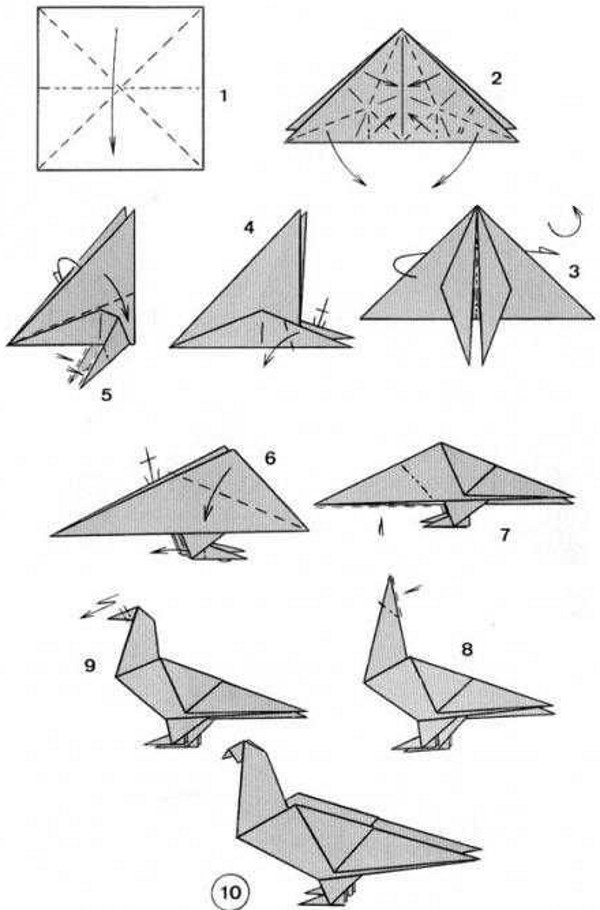
Instructions on how to make a bird:
- Fold the square, marking 1 diagonal strip. You will get a triangle.
- Fold the paper in half. Using your fingers, hold the edge of the paper and carefully align all the sharp ends of the piece.
- Unfold the last folded edge of the triangle. There should be a clear fold line left.
- Pull 1 layer of the triangle base to its top. Smooth the folded area of the paper with your fingers.
- Turn the sheet over to the other side, pull the base of the second layer of the triangle to its top.
- Fold the top corner by pulling it down. Press the place where the paper is folded.
- Return the corner to its original position.
- Unfold the craft and fold the top corner again and iron the fold.
- Return the corner to its original position.
- Pull the right sharp end of the piece towards the middle of the piece.
- Fold the left sharp end in the same way.
- Bend the newly formed sharp ends inward.
- Fold the piece so that the fold line is in the center.
- Pull the resulting sharp tip upward.
- Turn the piece over and tighten the sharp end as well. This is the shape of the paper dove's wings.
- Turn the part so that the wings are facing you. Bend the sharp end, forming the bird's tail.
- Fold each wing so that they point upwards.
- Bend the last sharp end of the paper downwards. This is the pigeon's head. It needs to be slightly stretched to the sides so that the head becomes larger.
On each wing make 2 thin folds for relief. The paper dove is ready.
Parrot
A paper bird (you can make a figurine from paper with patterns) in the form of a multi-colored parrot can become a decoration for a child's room. The list of tools needed for the work can be seen in the table.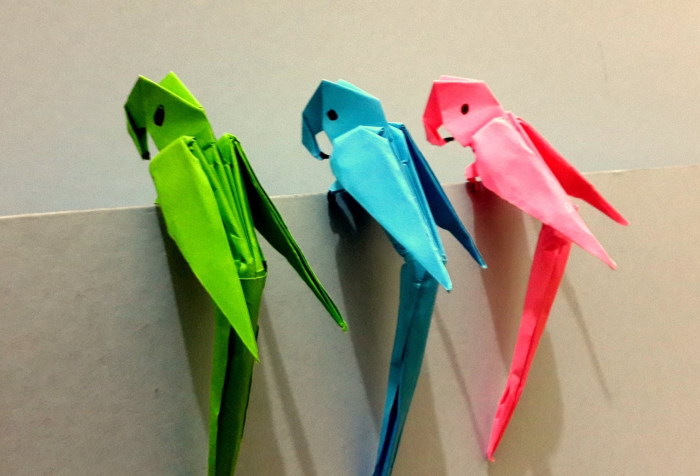
| Colored paper | You will need about 4 sheets of different shades. |
| Scissors | You can use curly scissors. |
| Simple pencil | Required for drawing details. |
| PVA glue | Other types of office glue can be used. |
You will also need plastic eyes with moving pupils.
Instructions:
- Cut out an isosceles triangle from paper of any color. The size can be any. You can cut off a corner from a whole sheet.
- Fold the triangle in half and press the fold with your fingers.
- Unfold the part. A clear line should remain.
- Pull the right sharp end down, using the marked strip as a guide.
- In the same way, bend the sharp tip on the left side.
- Apply glue to the right side of the piece, without touching the lower sharp end.
- Fold the figure by gluing its 2 parts together.
- Bend the remaining sharp ends upwards. This is the tail of the paper parrot.
- The body is the basis of the detail. The upper end of the element needs to be cut into thin strips. Straighten the "fringe". It will imitate the bird's fluffy forelock.
- Cut out 2 large teardrop-shaped pieces from a different color of paper. These are the parrot's wings. They should be glued to the sides of the body. The sharp tips should stick out slightly, so there is no need to coat them completely with glue.
- Cut out 2 paws with hooked toes from yellow or brown paper. Glue them to the base of the body from the front side.
- The beak can be made from yellow or orange paper by cutting out 2 semicircles. You can make a paper cone and glue it to the front of the figure.
- Attach plastic eyes.
If glossy paper was used for the work, then the PVA glue will have to be replaced with a glue stick or double-sided tape. Otherwise, the connection of the parts will be unreliable.
Swan
A paper bird in the form of an elegant swan can be placed on a bedside table in the bedroom. A swan is a symbol of fidelity. Therefore, a bird figurine near the bed can become a talisman of personal happiness. You can make a base for the figurine from a round mirror. Then you will get a composition where the swan swims on a clean, serene lake. For work you will need white paper, as well as a red and black felt-tip pen.
Instructions:
- Cut a 16x16 cm square out of paper.
- Turn the paper over so that the wrong side is facing up.
- Connect the 2 diagonal corners and iron the folded area of the paper.
- Return the corner of the square to its original position.
- Fold the piece along the top right side.
- Do the same with the lower part of the part.
- Turn the part over to the other side.
- From the upper right part of the piece you need to take a corner and pull it towards the center line.
- Also fold the left sharp end of the piece.
- Fold the workpiece in half.
- Fold half of the piece so that it bends in the opposite direction.
- Using the central fold line as a guide, fold the piece.
- Stretch and straighten your swan neck.
- Bend the tip of the neck down, stretch it slightly with your fingers. This is the bird's head. Make 1 thin fold on the top of the head.
Spread the bird's wings and tail. The paper swan is ready. All that remains is to color its beak with a red felt-tip pen and draw its eyes with a black one.
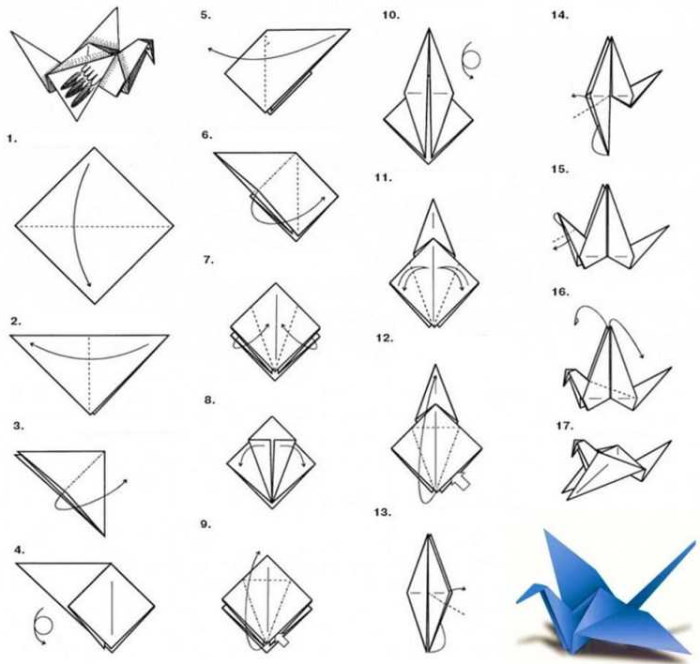
Crane
A paper bird (you can make a paper crane in 5 minutes, despite the long description of the process), in the form of a crane, in Eastern countries is considered a talisman that brings good luck in any endeavors. Such a figure can complement the main gift for a loved one or decorate a postcard. For work, you will need a square sheet of paper of any size.
Instructions:
- Pull the lower right corner of the square to the upper left corner. Press the place where the paper is folded. Unfold the sheet. The line should remain clear and even.
- Fold the sheet vertically. Press the fold, unfold the sheet. As a result, you will get a square sheet, divided by lines into 4 parts. The lines will intersect at a right angle.
- By analogy, draw another diagonal and a horizontal line inside the sheet.
- Now you need to fold the paper so that you get a square 4 times smaller than the base. To do this, the right part of the detail from below needs to be pulled to the center of the sheet. The paper will fold into a figure of the desired shape along the pressed strips.
- Bend the sharp ends of the resulting figure towards the center.
- Bend the upper sharp end of the piece and press down on the place where the paper is folded.
- Pull the bent end. The paper should take the shape of a flower bud that is about to open.
- Unfold the top of the part. To do this carefully, you need to focus on the pressed lines.
- The 2 top folds at the top of the piece will straighten out and face the other way.
- Pull the outer corners toward the center of the piece. The result should be an elongated rhombus.
- Turn the part over so that the other side is facing you.
- Fold the sharp ends of the upper part of the workpiece to the middle. They should coincide with the line marked in the center.
- Fold the newly formed edges towards the center of the piece.
- One fold should be folded towards the next one. After that, the piece should be turned to the other side.
- On this side, the outer sharp corners need to be pulled towards the middle of the piece.
- Fold the first fold towards the second.
- Bend the top sharp end of the figure down and fold it together with the corner located above it.
- Form the head and tail of the crane by pulling the right fold to the left. On the left side of the figure, you need to fold the sharp ends in exactly the same way.
- Bend the resulting crane wings perpendicular to the head.
- Make 1 thin fold on the top of the crane.
- Pull the bird's head and tail slightly to the sides. The paper should turn inside out, and the head and tail will be on the opposite side.
- Spread each wing with your fingers.
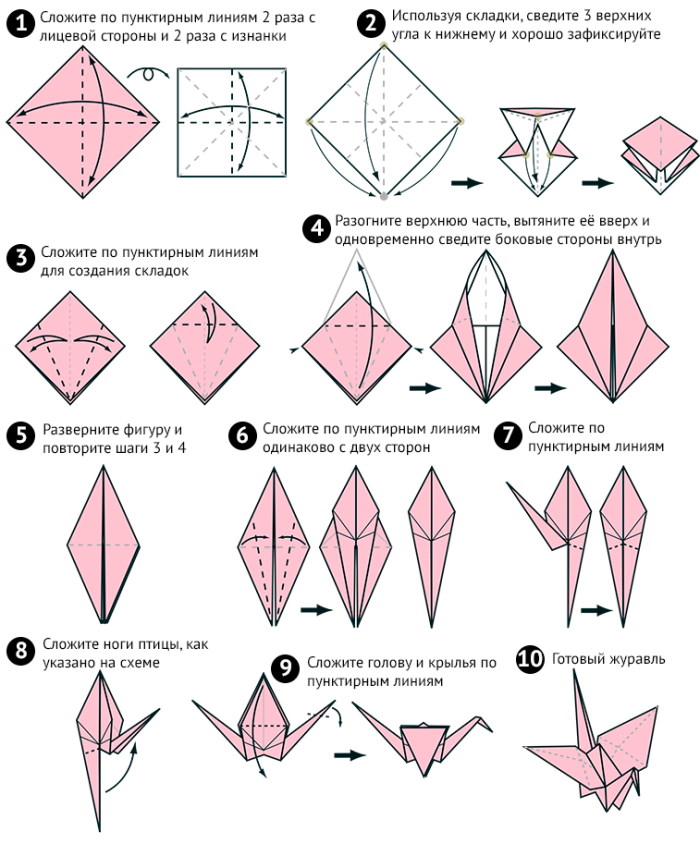
The paper crane is ready. To make a more durable figure, instead of paper you can use double-sided cardboard, foil or special origami sheets (Kami).
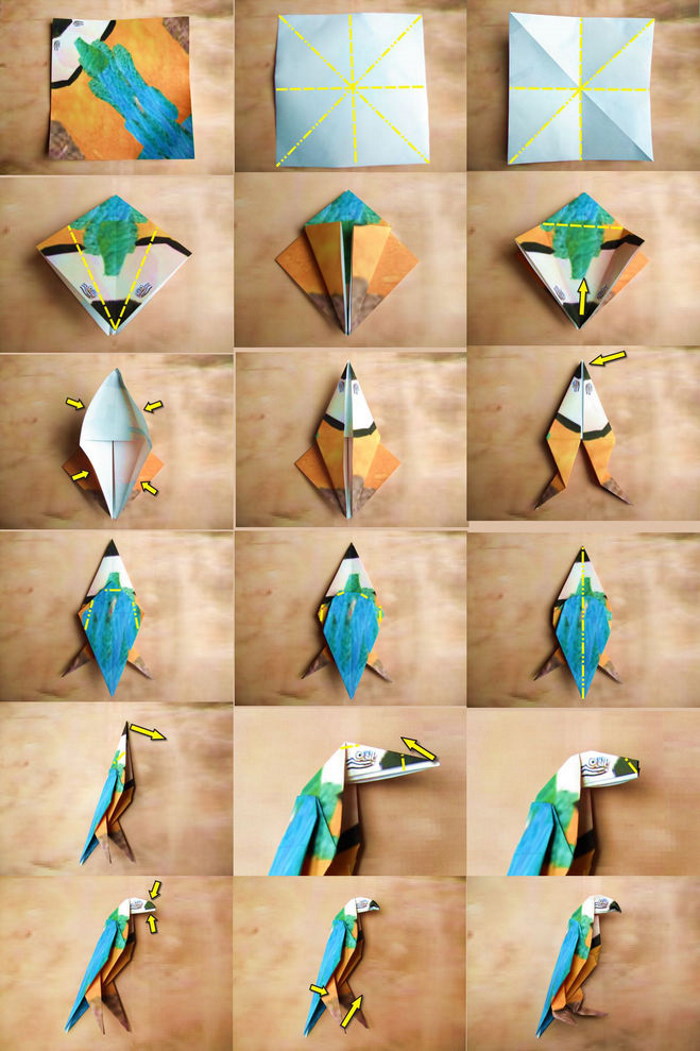
Eagle
The eagle is a symbol of power, determination and wealth. A paper figurine will help the owner acquire these qualities and keep them near him. To create a paper predator, you will need a square sheet of paper of any size.
Instructions:
- Fold the sheet diagonally. Press the folded area with your fingers.
- Bend back the lower sharp end of the leaf. You should get a diamond of the correct shape.
- Turn the part over so that the other side faces you. Pull the triangular base toward the center.
- Press all the folds of the paper well with your fingers. Unfold the sheet.
- Fold the folds inward.
- You should get an isosceles triangle. On one of the sides of the figure, you need to move the corner to the middle. Press the fold line.
- On the reverse side, make folds in the same way. As a result, the part should acquire a symmetrical shape.
- Fold the lower sharp end underneath.
- Extend the first wing. The curve should go from the top of the figure to the tail of the bird, and through the middle of the front part of the chest.
- From the back side, pull out the second wing in the same way.
- Fold the front sharp end of the figure inward.
- Bend the halves of the triangle in different directions.
- Bend the top sharp end of the piece. This will be the eagle's beak.
- Turn the piece over to the other side. Tuck the upper protruding end inside.
- Fold the side of the triangle down.
- By analogy, fold the 2nd part of the triangle.
- Bend each wing of the bird down and straighten it slightly with your fingers.
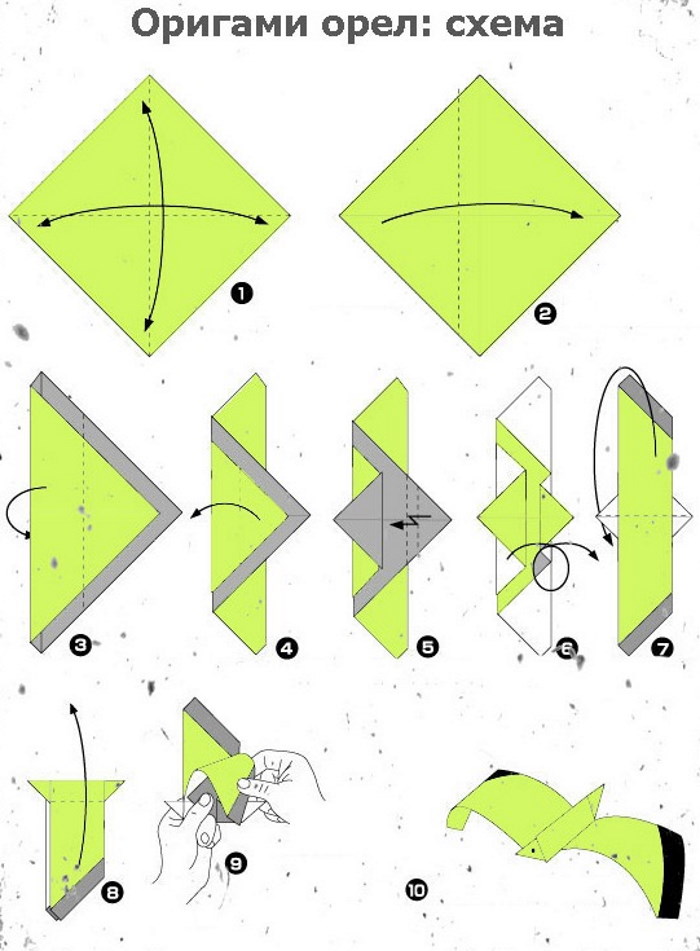
You can add volume to the wings and create the effect of a hovering bird using a round pencil. Each wing should be slightly twisted on the tool so that the paper bends smoothly.
Tips and tricks
To make paper birds beautiful and unusual, you need to know a few secrets:
- Finished works can be tinted using paints, colored pencils and dry pastels.
- The eyes can be drawn, made as an applique, or you can use plastic blanks that are sold in craft stores. You can also use small rhinestones on an adhesive base.
- To attach paper birds to the branches of indoor plants, you will need clothespins. Using hot glue or "Moment", the bird needs to be glued to one end of the clothespin. Then the clothespin is hooked to the branch of the plant. The bird will sit and will not fall.
- Experienced craftsmen advise using thick paper for origami. Album sheets, printer paper and wrapping paper with a matte surface will do.
- It is advisable to use double-sided paper, otherwise the reverse (unpainted) side will be visible. It can spoil the appearance of the product.
- On thick paper it will be more difficult to press the fold lines with your fingers, so you can smooth the folds with a ruler.
- It is not recommended to tear off the paper (creating a square base) with a ruler. The fibers of the sheet will stick out and spoil the appearance of the product. It is better to cut the paper with sharp scissors or a stationery knife.
- All manipulations with paper should be carried out on the table. If you hold the workpiece in the air, some lines will be uneven, and as a result, the bird figure will be unstable.
- Bird tails can be made curly if they are cut to imitate small feathers. You can also additionally decorate the tail with thin curls of paper. To do this, a small sheet of paper needs to be cut into strips and curl each of them, running the tip of scissors along them. You can also use natural small feathers for decoration.
You can create unusual interior decorations from several figures of the same size. For example, you can make a garland from paper swans to decorate the wall of a wedding hall. The birds are strung on a long thread, placing them at the same distance from each other.
To prevent the figures from spinning on the thread, the holes made in the paper with a needle are lubricated with quick-drying glue. Bows of satin ribbons or large pearl-colored beads can be placed between the birds. Then the garland is attached to the wall with tape or the ends of the thread are wrapped around nails.
It is not difficult to learn how to make paper bird figures. The main thing is to choose paper of the right thickness, and also think over the decor of the finished work. Graphic schemes and step-by-step instructions will help novice craftsmen quickly master the art of origami, as well as understand how to make birds of different shapes and sizes from paper.
Origami Birds Video
Beautiful origami bird made of paper: