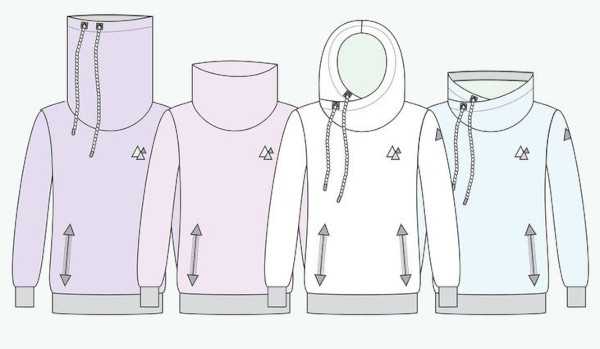
Hood - functional detail of the sweatshirt, which serves not only as a decoration. It also protects from precipitation, wind and cold. The most popular option is a pattern with the construction of this element in an overlapping manner.
Necessary tools and materials
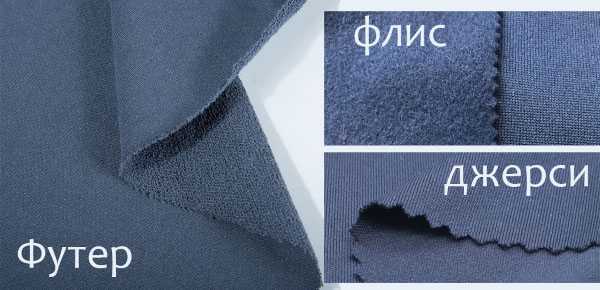
The hood for the sweatshirt (the pattern does not have complex details, so it will be understandable for beginners) can be sewn from 2 types of material:
| Textile | Brief description |
| Fleece | It is a non-woven material made of polyester, for the production of which thin threads of PET fiber are combined into a dense single fabric. If the polymer structure is thick, there will be a large number of small air bubbles inside the pile. Due to this, the clothes will be very warm. Additionally, the material is subjected to several treatments to reduce the degree of combustion with rolling. |
| Footer | The production uses the technology of smooth knitwear. However, several threads are additionally woven from the inside using the drawing method. Due to this, the front part will be smooth, and the back will have a fleece. This fabric can be made entirely of cotton or contain weaving of other threads so that the material is of higher quality. For these purposes, 5% synthetics with lycra or 10% viscose with wool can be used. |
When sewing clothes, you need to follow the rules for working with knitted material. As a result, the product will not stretch in length, but will stretch perfectly in width. Footer with fleece is wear-resistant, while allowing you to easily compress and pack the item.
Additionally, the skin will breathe and not be irritated. The hood will retain its original appearance without deformation after many washes. Also, this item of clothing does not need to be ironed.
With the help of embroidery, an unusual shape or color, the hood will add zest to the clothes, but at the same time will fulfill its direct purpose.
To work you need to prepare:
- pins, as well as a pencil for drawing a pattern;
- tracing paper (if necessary);
- material;
- scissors with threads;
- a tape measure to take measurements.
Scheme with description of works for beginners
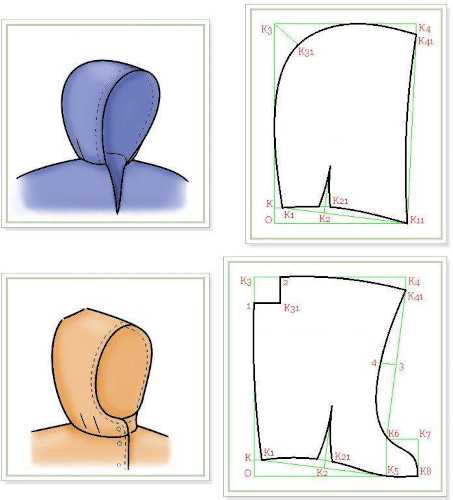
The pattern allows you to make any model of hood for a sweatshirt. For example, this detail can be loose or tight-fitting, have fasteners in the front, be completely closed with a zipper or sewn on with an overlap.
Taking measurements
The hood for a sweatshirt (the pattern with taking measurements is considered the main stage, on which the appearance of the future product depends) must be sewn precisely on the head to prevent it from falling back or hanging down on the forehead. At the same time, the lower border must clearly coincide with the depth and width of the neckline.
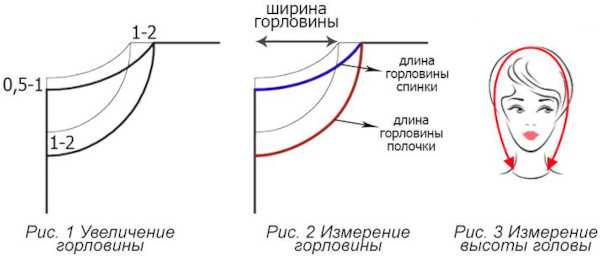
For these purposes, it is necessary to take measurements correctly, using a measuring tape and tracing paper:
- Height. You need to put on a sweatshirt to mark the center point of the front. Then from this point you need to draw a tape measure around the front area to the original point. It is recommended to add 8-20 cm to the result obtained, because according to the original measurements, the hood will be small. To make the part as free as possible, you need to add the maximum number of centimeters. Then the final number needs to be divided in half to determine the height of the front edge of the product. This measurement will allow you to draw the front line of the hood on a sheet of paper.
- Width. To make a hood that will fit tightly to the head, you need to use a tape measure to measure the distance from the protruding cartilage above the lobe of one ear to the other. To sew a looser part, the tape should be applied from the outer edge of one brow ridge to the other. Then, you need to add 6-12 cm to the resulting number (these are allowances) so that the product fits freely. Then the result should be divided in half. This measurement allows you to draw a distance from the occipital to the front edge on a sheet of paper in a straight line. If the part is round, draw to the outer point along the line of the widest area of the product.
These measurements are considered minimal, so it is permissible to make them larger. However, they cannot be reduced.
The hood pattern should match the neckline of the garment for which this detail is intended. For these purposes, it is advisable to use a practically sewn item, in which the ends of the neck are processed using facing.
To create a drawing of the product pattern, you will need to take several measurements:
- The width of the neckline of the front edge or 1/2 of the width of the neckline of the front edge. Measure from the center line of the front and the front edge to the shoulder seam, not taking into account the fasteners with facings. It is recommended to use a flexible measuring tape or cord for measuring.
- 1/2 of the width of the back neckline. The measurement should be taken from the center line of the back to the shoulder seam.
- Neckline depth in front. On the pattern, you need to draw an additional line through the point of the shoulder seam. In this case, this line should be perpendicular to the strip of the front neckline. Then you should try on the item to measure the distance from the point of the shoulder seam to the bottom point of the neckline. In this case, the measuring tape or cord should be applied to the line, which is at an angle of 90°.
- Depth of the cutout on the back. Having transferred the measurements to the pattern drawing, it is necessary to depict a curved smooth line.
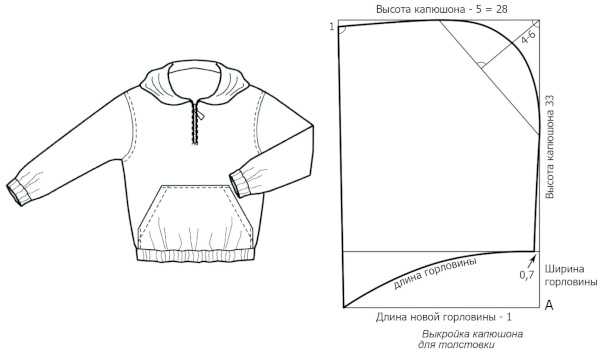
Construction of the pattern
Based on the results of taking measurements, the width and height of the part should be obtained, the point of joining with the shoulder seam should be indicated, and a smooth line should be depicted that allows the product to be sewn into the neckline.
The hood for the sweatshirt (the pattern allows you to give the product any shape) can have several forms:
- In the form of a cap. The edge of this detail should hang down. The length of the hanging end of the hood affects the number of centimeters that need to be added to the top line. After that, the edge of the top line should be joined with the bottom point of the occipital region. When sewing a detail for children's clothing, it is permissible to depict a broken line to emphasize the sharp edge of the hood.
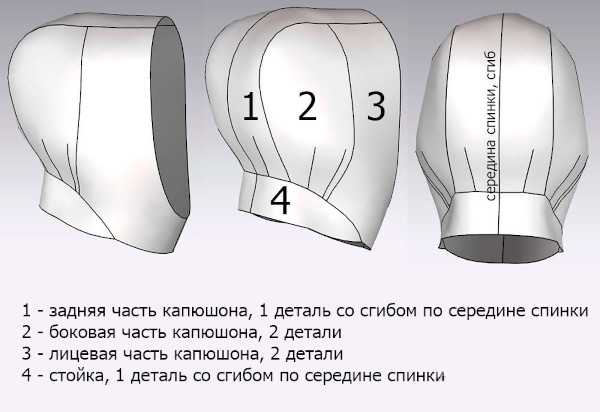
- Round. In this case, it is necessary to round off the straight stripes of the occipital region with the top. Two parts of the hood should be cut out of woven material. For the seam, it is necessary to leave an allowance of 1 cm wide, which should be added along the entire length of the rounded line.
- Rectangular. It is considered the simplest form, for which it is necessary to depict a curved line for the neck, 3 even stripes that are perpendicular to each other, and also it is necessary to indicate the shoulder mark. This construction must be performed according to the measurements taken. To sew the part, the material will need to be folded in half so that the front part is inside. The fold line of the pattern must be placed on the fold of the material. When transferring the contours, it is necessary to make allowances for the seams. To do this, 4 cm must be left for the hem along the front edge, and 1 cm for the seams for the neck and the back of the head.
After taking measurements and determining the shape, you can draw a template of the future product on a sheet of paper or cardboard. Then the pattern must be cut out with scissors.

To cut out the part, the template must be fixed to the material using pins to trace the contours along the fold lines and seams. Additionally, allowances for hemming and seams must be specified. It is necessary to cut along the allowance lines.
Sewing
In order to sew the detail into the neck of the garment, the line of the shoulder seam on the pattern should coincide with the shoulder seam of the garment, and the seam of the back part should coincide with the center of the back of the garment. The lower front edges of the garment should be located on the center line of the front part of the sweatshirt.
Before sewing in, you need to pre-process the edges of the shelves or the slit on the front part with facings, stitch the shoulder seams and sew on the zipper. To ensure that the allowances for sewing the hood into the neck are cleanly processed, it is recommended to use bias tape. The length of the material should match the length of the lower edge of the part.
Step-by-step description of sewing a hood:
- Fold the garment along the fold line so that the front part is inside. Stitch the back of the head.
- Overcast the allowances together. Iron the allowances in one direction. If there is a center seam on the back of the garment, iron the allowances in the same direction as the allowances on the back, or in different directions (if this is done on the back).
- Before processing the front edge of the product, a cord can be threaded through the drawstring (optional). To do this, make a slotted loop on the inside of the allowance to pull the cord through.
- Then fold the hem allowances to the inside twice and stitch.
- The loop for threading the lace must be located on the inside of the product.
- To sew the hood into the neck opening, turn the facings or allowances forward along the front cut of the piece so that they are as flat as possible. When sewing the garment into the neck opening, connect the shoulder seams with the shoulder mark, overlap the front edges of the piece with the edges of the cut on the front side, and the seam of the back part with the center line of the back.
- Then, on the front side, make a fold of the facings or allowances to wrap around the front edge of the piece. Then pin the hood to the neck.
- Place it flat and pin one edge of the bias tape into the neckline so that it is on top of the hood edges and faces down.
- Cut the edges of the binding 5 mm before the front opening of the hood. Stitch along the marked strip of the neck of the garment, capturing the bias binding with the hood.
- Cut the seam allowances near the stitches, diagonally at the corners. Turn the facings or allowances with bias binding inside out along the border of the front neckline and iron.
- After turning, the bias tape can be sewn on by hand or stitched on a sewing machine.

After finishing the work, you need to try on the clothes. If the hood is wider than the neckline, the folds or darts need to be laid at the optimal depth, where the shoulder seam marks are located.
Secrets for Beginners
Useful tips:
- All seams must be tested for strength so that they can withstand any type of load. To check, you will need to pull the fabric in different directions. This helps determine the strength of the seam.
- Knitted cotton material or velvet with a knitted base is often used to sew a sweatshirt. The main garment does not require a lining. It must be sewn exclusively to the hood to hide the internal seams and give the product a beautiful appearance due to the bright print of the lining material or a contrasting shade. Only after sewing in the zipper and creating the shoulder seams is it permissible to sew the hood to the main fabric.
- If the fabric has a geometric pattern, such as stripes or checks, the pattern elements must be laid out so that the pattern in the finished product is correctly aligned. Beginners should not use fabric with an ornament or print. In this case, it is acceptable to choose an abstract or floral pattern that does not need to be matched.
- Before work, you need to decide on the optimal sewing speed. If the pace is slow, this will allow you to sew the parts more accurately. To quickly complete the work, if there is not much time, it is permissible to increase the speed. However, in this case, you will have to constantly monitor the quality of the seams.
- When sewing, you need to use suitable needles, which can vary in size and type depending on the type of material. If the fabric is thin, then the tool should be thin. If the material is thick, it is best to use thicker needles.
- To strengthen the parts or their parts, it is advisable to duplicate them using special materials that can be elastic, dense or thin. Often, on one side of the lining there is a layer of glue for joining with the part. To do this, the material must be applied to the hood and ironed. After joining, the duplicating lining gives the main fabric strength and density.
Often, a hood is an addition to outerwear in the form of a coat, jacket, sweatshirt. If the model does not have this detail, you can make it yourself. The main thing is to take measurements correctly and make a pattern so that the hood looks harmonious with the main part of the clothing.
Video about the pattern of the hood for a sweatshirt
How to make a pattern and sew a hood for a sweatshirt: