An apron, or rather an “apron” or “hem”, as this item of clothing was called in ancient Rus', is an irreplaceable item in every woman’s household.
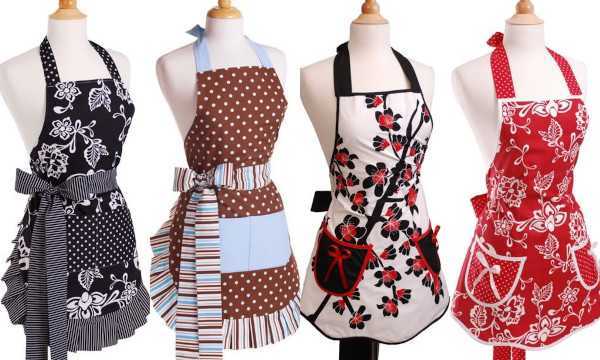
Modern fashion offers a variety of apron style options, from traditional work models to the most unusual and even creative solutions.
The ability to sew a comfortable, loose, light, practical and beautiful apron with your own hands is a useful skill., both for home use and professional activities.
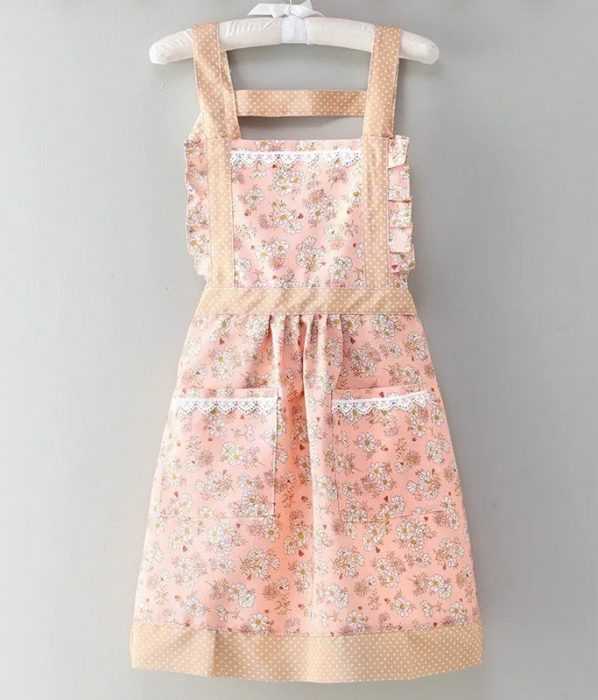
A women's apron should not only be practical, but also beautiful, so that it is pleasant to put on and wear.
Necessary tools and materials
When choosing fabrics, it is worth considering their durability, practicality and resistance to dirt.
| Name of fabric | Brief description |
| Cotton | Natural material that absorbs moisture well and allows air to pass through. Suitable for aprons that will be used in domestic conditions. |
| Flax | A natural and very durable material that "breathes" well, but can be rough to the touch. Aprons made of linen fabric will have a more formal look. |
| Polyester | A synthetic material that is highly durable and moisture resistant. Aprons made from this fabric are suitable for various purposes. |
| Blended fabrics | Combinations of cotton and linen with polyester make the fabric more durable and wear-resistant. The choice of blended fabrics provides a balance between durability and comfort. |
| Leather and leather substitutes | Suitable for creating stylish aprons with a unique design. |
Synthetic materials are often chosen for work clothes because they are water-repellent. Aprons used in high humidity conditions, such as when working with liquids, should be water-repellent.
It is worth deciding on the fittings: zippers, buttons and other decorative elements. If the apron is made of natural fabric, it is better to use threads that match natural materials. Additional materials will be useful for creating trim: ribbons, lace, beads.
The following tools may be needed:
| Name of the tool | Brief description |
| Measuring tape | for taking measurements and cutting fabric |
| Chalk or soap | for drawing lines and contours when cutting |
| Scissors | for cutting and finishing fabric edges |
| Needles | for basting and sewing parts |
| Pins | for pinning together cutting parts before applying stitching |
| Sewing machine | the main tool for joining apron parts and processing seams |
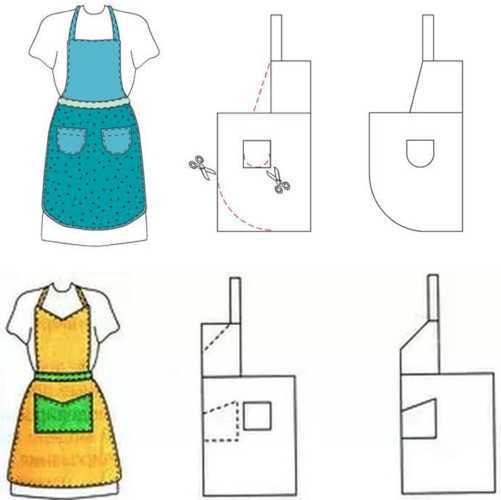
Schemes with description of works for beginners
An apron can be sewn taking into account several key aspects based on the features of the cut and design:
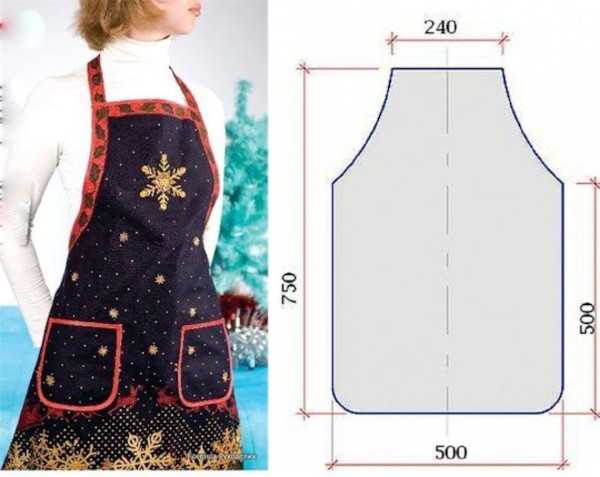
- To determine the size of the bib, you should measure your chest circumference and height, and to determine the length of the straps, you should measure the desired height of the clasp on the neck.
- The fold can serve as a decorative finish, or it can perform a protective function. If the product is subject to severe wear, the fold width should be larger.
- Lace or braid made of thick fabric can be used as decoration. You can create beautiful gathers.
- To strengthen the pocket and waist area, it is worth using an additional layer of fabric or synthetic braid in the same color as the apron trim.
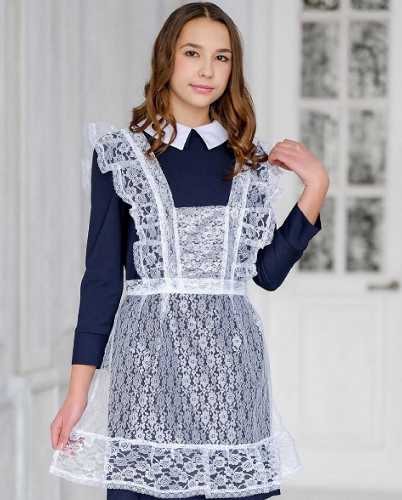
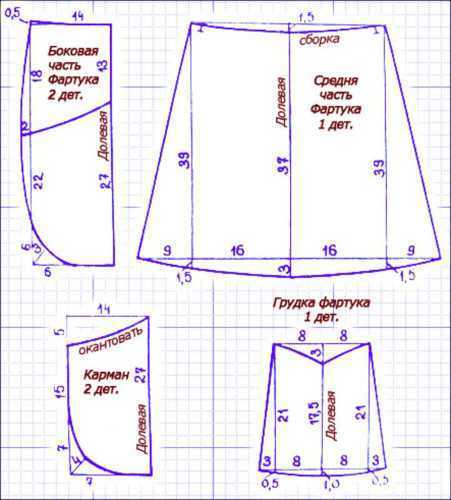
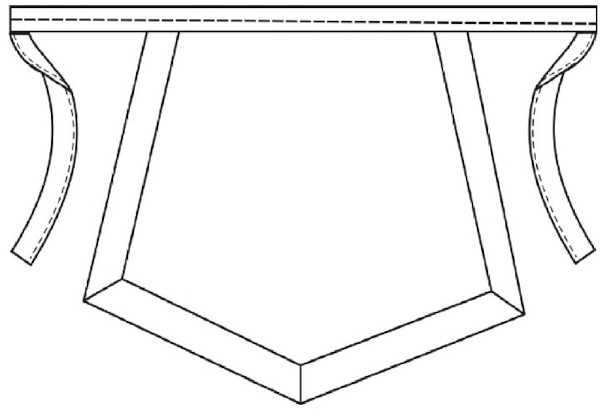
School dress made of guipure with frills for a senior school girl
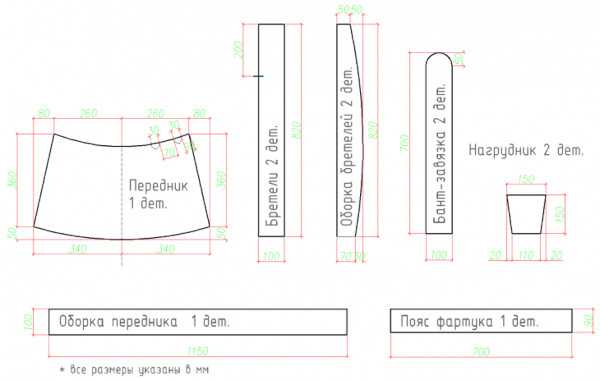
The pattern does not take into account seam allowances and is designed for sizes 42-44.
Preparation includes the following stages:
| Stage name | Step by step process |
| Decating | Soak the fabric in water at room temperature for 10–15 minutes and iron at the temperature recommended for synthetics or blended fabrics. |
| Pattern | Transfer the pattern to the fabric, leaving seam allowances. To make the apron and bib identical, you can first cut out one of them and then use it as a template for the other. Add a seam allowance of 1–2 cm to the measurements. |
| Open | Cut out the details of the apron, bib, and straps. Make lace trim elements: bow, belt, and frills. |
The shape of the bias binding for an apron can be arbitrary, harmoniously combined with the overall style of the product:
- Turn the ends of the piping inwards and fold them. Iron.
- Cut off the excess so that the strips of fabric remaining on the front side are the same width.
- Place them next to each other with the open edge and join them with a machine stitch. The needle should pass a centimeter from the edge of the strip.
Gathering and sewing the frill to the apron of a school apron involves several stages and requires care and accuracy:
- Place the strip of fabric that will act as a frill face up on a convenient work surface. Iron it flat.
- Turn the edges of the fabric and process them. If the fabric has fraying edges, they should be folded twice and stitched. Iron.
- Trim the corner of the bottom hem. It will be exposed when you assemble the frill.
- Select the width of the future folds and measure it along the entire length of the frill. The average value is an interval of 5-7 mm. Determine the number of folds that will fit into the selected space.
- Mark the resulting number on the back of the frill at equal intervals. The most common interval is 20-30 mm. The larger it is, the wider and looser the folds of the future frill will be. An increased interval can lead to the formation of uneven and sloppy folds. With an increase in the amount of fold space, the rigidity of the assembly decreases.
- Place the elastic thread evenly along the edge of the frill. It is important to monitor the thread tension - it should be the same along the entire frill to achieve uniform gathering. You can lay the thread without tension, and then adjust the gathering by loosening or tightening the thread on the machine.
- Pull the elastic thread, carefully gathering the frill. Do this until it is the same width as the bottom of the apron.
- Cut off the excess elastic thread from the edge of the frill, leaving a free end 4 to 6 mm long.
- Using matching threads or monofilament, overcast the edges of the frill on both sides. This will help hide the puncture marks of the sewing machine needle. Iron.
- Sew the lace frill along the edge of the bottom of the apron using a straight stitch. Press.
- Secure the end of the thread to the wrong side of the product.
- The elastic thread can be removed.

You can sew an apron using the following tips:
- If the frill has several layers, you should simultaneously lay the elastic thread on different sides to simultaneously grab all the layers of the frill together. This will help to avoid distortions in the assembly and curvature of the frill during final processing.
- If the size of the frill does not match the size of the apron pieces, first adjust the frill to size, then begin assembling the apron.
The bias binding is sewn to the top of the bib in the same way as was done for the sides of the apron.
The process of sewing the frill to the straps after preliminary gathering will be the same as for the apron. Gathering at this stage will involve more pleats and less space between them.
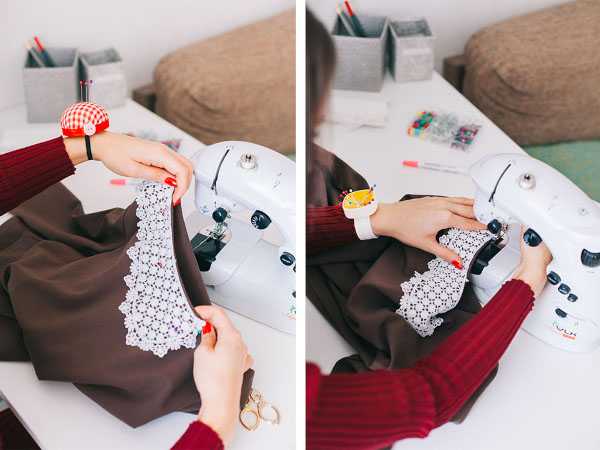
To attach the straps to the bib, you need to:
- Match the edges and baste.
- Sew a line at a distance of about 0.7-1 cm from the edge of the bib so that it coincides with the edge of the strap on the wrong side.
- Check the symmetry of the parts. Iron.
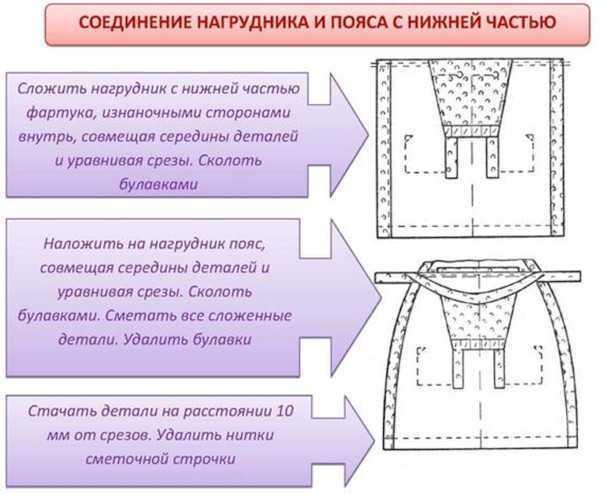
Connecting the top of the apron and the bottom edges of the bib:
- Match the waistband with the apron. Sew with a blind stitch. Iron.
- Do the same operation with the belt and bib.
To make a bow tie, follow these steps:
- Fold the strip of fabric in the middle several times. Iron.
- Secure the ends with machine stitching.
How to iron a finished apron:
- Set the iron to a temperature no higher than 150°C or set it to the synthetic fabric setting.
- Lay the guipure on a flat surface and iron from the inside out. Use steam to soften the fabric and prevent it from deforming. Gradually move to the front side, turning the material over. The straight iron on the front side should be short to avoid stretching. It is recommended to use a thin cotton fabric or gauze to protect the material from damage.
- Do not touch sharp corners and edges with the iron - this can ruin the fabric. If necessary, press a damp cloth and hold for a few minutes. Iron the corner.
- The ends of the threads can be folded inward and smoothed. Do not leave creases on the fabric.
You can sew an apron by taking into account the following tips:
- At all stages, narrow the seams on the front side of the product.
- Use high-quality threads that match the color and texture of the base material and trim elements.
- Do not overtighten the thread when sewing, but do not make the seams weak either.
- The item should cool down after ironing before being rolled up and stored. It is best to hang it on a hanger. Guipure items require particularly careful handling.
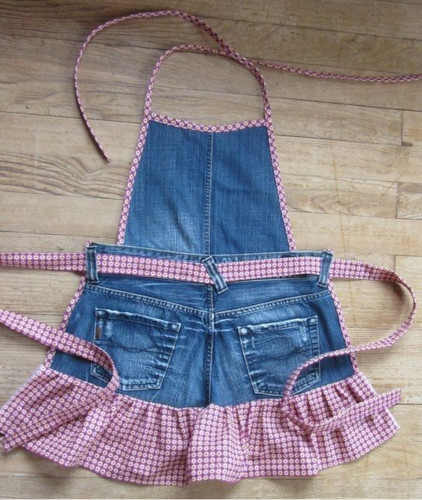
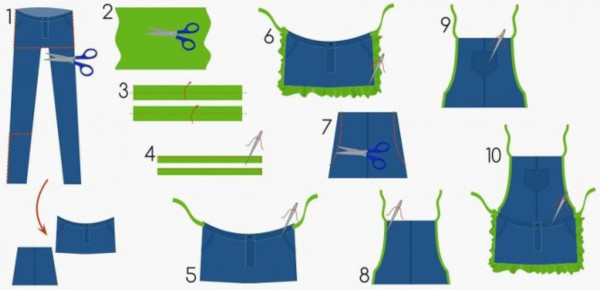
From old jeans with frill, ties and separate belt
This option does not require a preliminary pattern on paper. The easiest way is to make a rectangular apron. You can create an original model with an asymmetrical bottom or with inserts - this is more difficult, but will allow you to show your individuality.
Pattern creation process:
- Prepare jeans: wash, dry and iron.
- Cut off all unnecessary elements. Pockets and belt should be left.
- Cut off the pieces that will be the bases. For the apron, this is the back part with pockets. For the bib, this is part of the trouser leg. You can use a piece with a seam in the middle if you need a wider bib. If you plan to use a trouser leg without seams, they must be cut off on both sides.
- Determine the length of the future product. Measure the distance from the waist to the hips or the desired lower edge of the apron. Add about 5 cm to the resulting value.
- Measure the length of the back of the jeans that is set aside for the apron. Calculate how much is missing to the desired figure. Cut a rectangle out of the fabric, taking into account seam allowances and gathering.
- From the same fabric make 4 more rectangles:
- 1 for the belt (approximately 100x10 cm);
- 1 for processing the upper part of the bib (with a width of 3-4 cm it should be 2-3 cm longer than this part);
- 2 for processing the sides of the bib and ties (width 3-4 cm, length is made up of the length of the sides and the desired length for the ties).
The process of sewing bias tape to the sides of the apron:
- Fold the strip inwards twice and iron.
- Place it on the apron.
- Secure with pins.
- Stitch using strong thread to ensure the binding is securely fastened. Press.
Sewing the frill to the bottom of the apron:
- To loosen the thread, reduce the pressure on the tension regulator.
- Increasing the stitch width will make it looser and create space for further assembly. This is done using the stitch regulator on the machine.
- Sew 2 parallel lines at a distance that corresponds to the desired width of the gathers. They will serve as the basis for future gathering. It is important to be careful and precise when performing 2 lines.
- Pull both ends of the threads coming out of the fabric on one side. By pulling them carefully, you can create the desired gathering. Make sure the gathering is uniform and neat.
- Align the frill to the width of the bottom of the apron.
- Sew the pieces together. Iron.
Advice: A loose stitch can leave marks on the fabric, so it is important to choose high-quality sewing threads that will not cause the fabric to tear or stretch in the assembly areas.
Sew the bias binding to the top of the bib:
- Fold the short strip in half and iron.
- Fold on both sides so that the ends of the strip are inside. Carefully iron along the entire length.
- Baste or pin in place.
- Sew with a straight stitch.
- Remove temporary seams. Iron.

At the stage of sewing the bias tape onto the bib, you need to place it along the edge of the piece so that it can serve as ties:
- Fold the strip of fabric in half with the wrong side facing in. The resulting fold should be facing downwards.
- Iron the fold.
- Unfold the piece. Bend the edges so that they are directed towards the fold that has already been made.
- Iron again.
- Repeat steps 2-4, securing the fold and cuts. You will get a bias tape blank with 2 folds along the edges.
- Fold the fabric in half again and iron, carefully stretching it to avoid distortion.
- Baste the bias tape to the bib or pin it in place.
- Form ties along the edges of the bias tape. The ends of the bias tape for the ties should be the same length.
- Stitch and secure. Iron.
How to connect the apron and bib:
- Fold the bottom edge of the bib and iron it.
- Place the apron face down.
- Align the edges with the bib and attach so that the ends of the bib are hidden in the seam. It is important to place the pieces symmetrically.
- Sew with a double stitch. Press.
How to sew a belt:
- Fold the belt in half with the right sides facing inward, matching the raw edges. Iron.
- Fold the raw edge inward by 1 cm and iron. In this way, process all 4 sides of the belt.
- Place the processed sides on top of each other and sew. The seam step should be about 0.7–0.8 mm to ensure a strong fixation. Iron.
The apron can be decorated with additional elements such as buckles, buttons or tassels. This will complicate the sewing process, but the product will become more attractive.
Rules for ironing, which must be done at the end of the work:
- It is not advisable to treat damp denim as it may become deformed.
- Using the wrong iron temperature may cause discoloration or iron marks on the fabric.
- You can prepare gauze or thin cotton fabric for ironing.
- If your jeans have become smaller, you can restore them by steaming. Lightly dampen the fabric in the problem area, iron it several times in the steaming mode, stretching the item in the desired direction with your hands.
- Stains may remain on the fabric after ironing.
- Iron on reverse side.
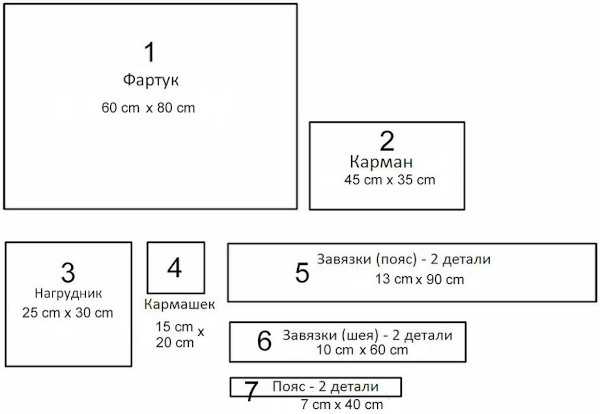
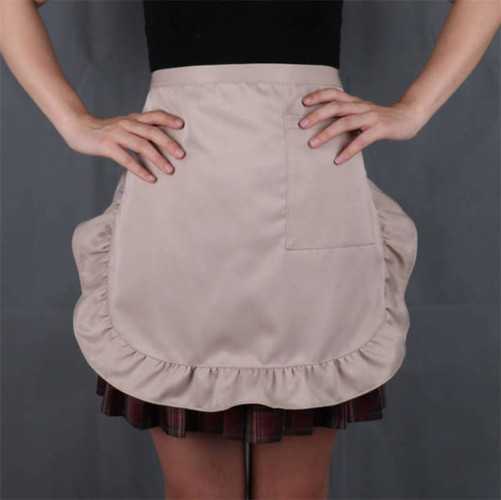
Women's without bib with pocket
The optimal solution in terms of performance characteristics for this pattern would be materials such as cotton with the addition of polyester or viscose, blended linen or thick calico.
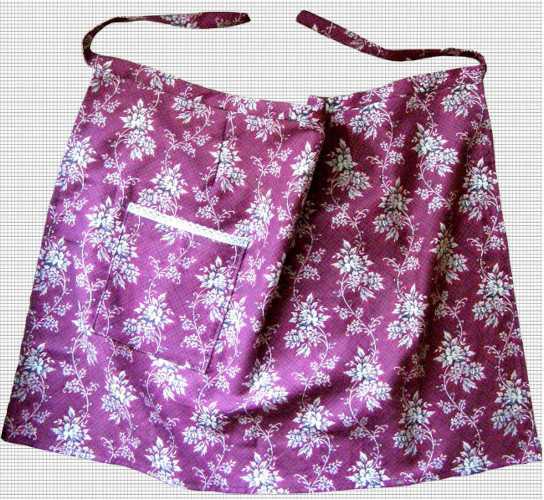
The fabric consumption depends on the size of the workpiece. The diagram uses 42x62 cm. For convenience, it is better to make the product slightly larger than the hips and waist - then the apron will be provided with the necessary freedom of movement.
For decatizing, the fabric should be soaked in water at room temperature for about 3 hours, then ironed with steam and dried naturally. This will prevent shrinkage of the fabric after washing the finished product.
For the subsequent stages, prepare the cut out pieces, having first adjusted them to your parameters and having made sure that the measurements were taken correctly.
You can sew an apron by cutting out the following pieces:
- main part (rectangle) 42x62 cm with darts (width 5 cm, depth 15 cm);
- pocket (square) 14x14 cm;
- belt (long strip) 100x10 cm.
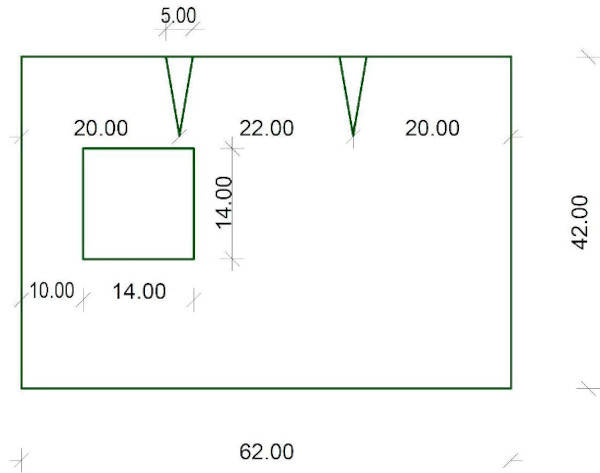
The pattern already takes into account seam allowances and is designed for sizes 44-46. For cutting, carefully cut out all the details with scissors.
To create continuous darts, follow these steps:
- Align the fabric so that the marked edges of the dart match exactly.
- Baste or pin in place.
- Sew with straight stitches to secure the dart along the edge of the piece.
- Repeat the securing stitches along the entire edge of the dart 3 times.
- Remove temporary stitches.
- Iron the top of the dart towards the center of the apron.
There are different methods you can use to finish the edges of the apron:
| Method name | Steps to follow |
| Hemming |
|
| Edge stitching | If the base fabric is dense and stiff, and the cut is very long, you can secure it:
|
Processing the edges of the pocket on the machine:
- Choose the length and width of the binding, taking into account the dimensions of the pocket and fabric. It is usually approximately 3–4 mm longer than the edges being processed and 3 mm wider.
- Set the sewing machine to a zigzag stitch.
- Place the bias tape along the top edge of the pocket so that the end is roughly aligned with the finished edge. Pin the tape in place.
- Place the fabric between the bias binding and the pocket edge so that it touches the binding. Overcast the edge.
- Trim off excess fabric and piping (approximately 5–6 mm at each corner). Iron.

Sewing on the pocket:
- Place the pocket on the front of the apron so that the open edge faces the front.
- Sew the pocket to the apron.
- Machine stitch exactly along the line.
- Check the quality of the stitching and iron it from the wrong side. Press.
Belt preparation:
- Determine the required length of the belt by folding the fabric in half and securing the corners.
- Fold in half lengthwise again.
- Iron the fold.
- Sew both open edges of the belt. Press.
Sewing the belt to the apron:
- Place the apron on the table with the front facing the seamstress and position the waistband as you want it to look after sewing.
- Secure the belt with paper pins or temporary stitching, leaving about 0.5 cm from the edge.
- Sew around the perimeter (along the front side of the apron).
- Trim the seam allowances. Leave 2 mm from each allowance.
Iron the apron thoroughly. It is important to move the iron from the edges to the middle in one direction to prevent uneven stretching of the fabric.
Ironing rules for cotton fabric:
- If there is carbon deposits on the soleplate of the iron, it can ruin the fabric.
- Iron cotton when slightly damp.
- Use high temperature mode.
- If the fabric is very wrinkled, it should be moistened and left for a while so that it becomes evenly damp.
- Turn the product inside out.
For synthetic fabric:
- Synthetic fabrics are ironed at a lower temperature than cotton.
- Moisturising can cause streaks, so iron synthetics dry.
- To avoid overheating, use gauze.
For blended fabrics:
- Before ironing, study the manufacturer's recommendations. They will tell you at what temperature you can iron the fabric. If there is no such information, then start ironing with a small area of the fabric to make sure that the iron will not spoil the material.
- Do not press hard on the iron.
- If the fabric needs to be pressed hard, use a damp cloth or gauze. This will help avoid overheating the material.
- If you need to iron the fabric from the wrong side, place a damp cloth or gauze on the right side.
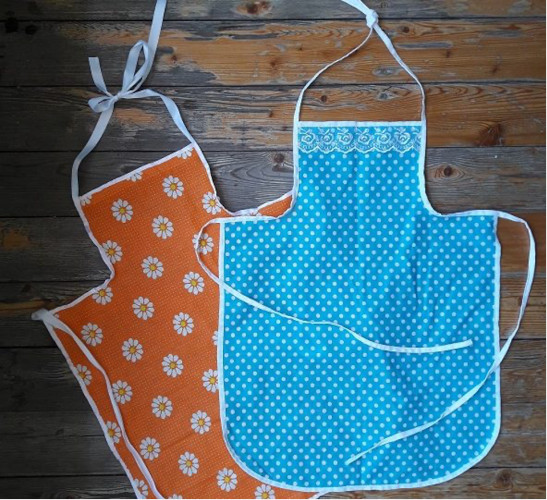
Children's one-piece, finished with ready-made bias binding
You can sew an apron by following the step-by-step instructions:
- Decating is carried out similarly to the master class on sewing an apron without a bib with a pocket.
- Cut the bias tape into 4 pieces:
- 1 for the top of the bib;
- 1 for the sides and bottom of the apron;
- 2 solid for the waistband, top of the apron, sides of the bib and ties.
- Cut out the base. The presented pattern does not take into account seam allowances and is designed for a girl of 8-10 years old.
- Fold the bias tape in half and iron. Fix it along the top of the bib, sew with a straight stitch, and iron.
- Repeat step 5 for the binding used for the sides and bottom of the apron.
- 2 bindings for the top of the apron and the sides of the bib are sewn on in the same way. Keep in mind that the bias binding goes into the belt and ties, i.e. leave the free ends long enough.
- Iron according to the rules presented in the master class on sewing an apron without a bib with a pocket.
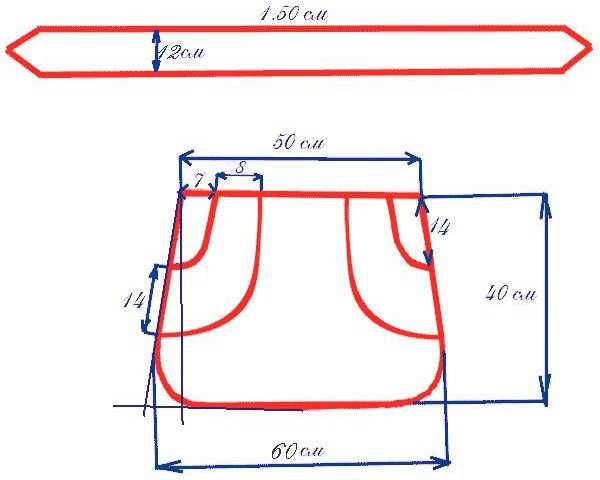
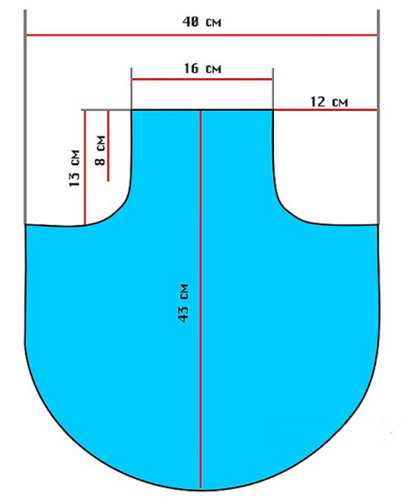
Women's one-piece with 2 pockets and bias binding that turns into ties and a belt
Preparation for sewing:
- Decate according to the pattern presented in the master class on sewing an apron without a bib with a pocket.
- Make a pattern. The pattern presented in this section does not take into account seam allowances and is designed for sizes 44-46.
- Cut 4 strips for bias binding, 4-6 cm wide:
- 1 for the top of the bib;
- 1 for the sides and bottom of the apron;
- 2 solid for the waistband, top of the apron, sides of the bib and ties.
The piping can be contrasting in color, but more often it matches the main material. Its shape resembles the Latin letter S.
Binding with bias tape:
- The strip is folded with the right side inward and pinned.
- The joint is ground, leaving a seam allowance of 0.7–1.0 cm at one end and 0.3–0.5 cm at the other.
- The seam is ironed in the direction from the narrow end to the wide end.
- The ends of the finished piping are folded to the wrong side and tacked by hand.
- Apply it to the cut and sew, observing the direction of the grain line of the piping fabric and the main thread.
In the indicated manner, the piping is sewn on in the following order:
- For the top of the bib.
- For the sides and bottom of the apron.
- For the belt, apron top, bib sides and ties.
Finally, iron according to the diagram presented in the master class on sewing an apron without a bib with a pocket.
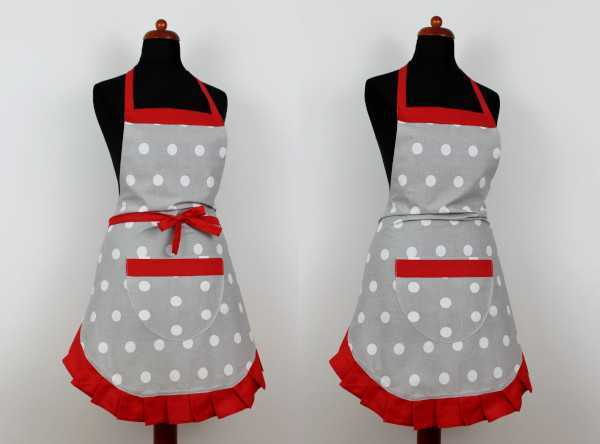
The apron is still a functional accessory. It protects clothes from contamination during cooking and allows you to create stylish looks. You can add decorations to it: pockets, folds, ribbons.
After completing all the sewing stages, you need to check how comfortable the apron fits, whether all the requirements for convenience and safety are met. If necessary, make adjustments and correct errors.
Video about DIY apron
How to sew a vintage apron from natural fabric: