The bell dress is back in fashion. Magazines have already featured many photos of celebrities wearing this style, including Carolina Herrera, Anastasia Korfiati and Irina Bakhraush.
Women's models, presented in the spring and summer seasons, can be fitted and with long sleeves.
Necessary tools and materials
To sew a bell-style dress, you need to select fabric for a specific style:
| Dress and shirt fabric group | They have moderate density and do not have stretch along the grain line. Hygroscopic and soft fabrics are suitable for the pattern of sleeves and skirts. Non-stretchable and low-stretch models are convenient for designing top patterns up to the cut-off line at the waist. |
| Silk, cotton, linen | Summer fabrics are suitable for sewing a dress without sleeves or with ¾-length sleeves. |
| Wool | Opaque wool with a fine woven pile is suitable for spring dress models. |
| Viscose and artificial fabrics | Can only be used with lining for spring looks. |
| Blended fabrics | Cotton + silk, low-stretch linen, cotton + viscose and cotton + polyester in fiber composition are suitable for cutting a dress for the cold summer season with moderate sleeve length. |
| Synthetic fabrics | Polyester, polyester with elastane similar to cotton, stretch cotton, satin, pastel viscose and gabardine are not suitable for this style. Can be replaced with dress denim. |
A bell dress (the photos of the presented patterns can be changed according to your parameters) is convenient to sew from light, dense materials that have little elasticity or do not stretch at all.
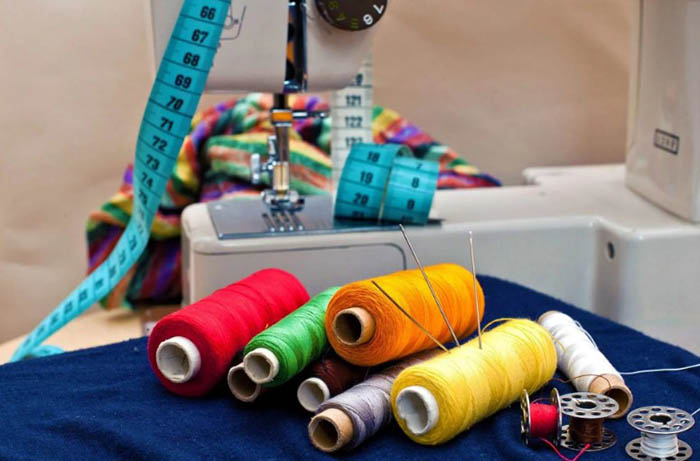
To work with such fabrics you will need basic tools and equipment:
- Universal sewing machine - several seam models, buttonhole overcasting function. You can use a coverlock or overlock with an edge overcasting function.
- Hidden zipper or a regular one will be needed to insert the clasp.
- Machine needles No. 80-90, overcasting and stitching feet. Universal feet are suitable for basic seams - straight and zigzag.
- Ironing table needed to work with an iron.
- Iron with a steaming function or a steam generator - help to steam the seams and give the finished product a marketable appearance.
- Hand needle will be needed for basting seams.
- White and black threads are needed to sew black and white dresses. It is enough to buy 1 spool of each type of cotton or synthetic thread.
- Threads in color The main material may differ in tone. For seams and trim, you can take 4 spools of thread.
- Button or it's better to have a spare hook.
- Rubber for a loop when using a hook - 3-5 cm.
Additionally, you may need scissors, a thimble, and a foam pad for ironing seams.
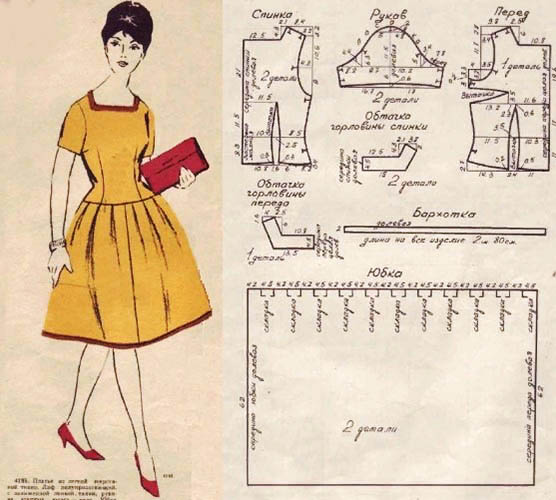
Schemes with description of works for beginners
The style of this dress has a fitted silhouette, which has a cut-off line at the waist. The symmetrical top can be decorated with pleats on the shoulder seams. A hidden fastener is placed in the side seam, sometimes it can be moved to the central part of the back.
The set-in sleeve can be short, ¾ or long. The back bodice sometimes has a center or full seam, and the neck area may have fasteners in the form of a sewn-on hook and loop.
The skirt is usually conical in shape, like a small bell. The length can be adjusted as desired. In this regard, the sizes of the patterns can be edited from 34 to 62 sizes.
Four ranges of patterns allow you to adjust the pattern to the height of the model for an improved fit. It is best to use blended fabrics, where the percentage of cotton is at least 85%.
Bell dress (photos of patterns are presented further in the article) can be made in different sizes, but the patterns and diagrams do not provide an exact description of the allowances for fit:
- Allowance is not a constant value and each time you need to consider where exactly the model wants to make the seam allowance.
- A fitted dress does not imply a tight fit in any part of the dress.
- The loose cut allows for an increase in the skirt cut and below.
- The semi-fitted cut allows for an increase in side seams.
All constructive allowances characterize the degree of freedom of the dress on the model according to her figure. The value can be included in the diagram.
Otherwise, the design is edited according to the figure, taking into account the silhouette form:
- Constructive increase to the chest circumference of up to 4 cm – semi-fitted silhouette.
- Constructive increase to the waist up to 5 cm – loose fit.
- Allowances are not included in the seam allowances.
- Allowances are already included in the pattern diagram.
- The allowance for connecting seams is up to 10 mm.
- Allowances for overcasting sleeves below shoulder level – up to 30 mm.
- Allowance for the bottom of the dress – up to 15 mm.
If allowances are already included in the pattern, then the allowances do not take these values into account. When working with a double contour, you need to take into account the size of folds and creases. When cutting out parts along the inner contour, you need to add allowances at the time of cutting the parts, if desired.
For ease of perception of information on working with diagrams and patterns It will be useful for beginning seamstresses to know the symbols:
| DI | Total length of the product – depends on the desired length of the skirt. Measured using a centimeter: one edge should be attached to the back (at the level of the 7th vertebra), the second should be lowered to the level of length that the product will be. |
| chipboard | Front length – needed if the skirt is not sewn along a straight cutting line. |
| DSB | Side length - measurement starts from the point at waist level to the point at the length of the skirt. |
| DSS | The length at the back is from the waist to the protruding part of the buttocks, provided that the cut is from a single piece of fabric without cutting. |
| DTK | Knee length - the centimeter should be lowered to the middle of the knee. Usually the measurement is done together with the DSB. |
| DS | Step length – the measurement is taken along the inner thigh from the groin to the desired length. |
| DST or DS | Back length to waist - a centimeter should be applied along the spine. |
| DPT or DP | Front length to waist - from the base of the neck at shoulder level to the cut line. |
| DP | Shoulder length – measurement from the neck to the beginning of the arm. |
| DR | Sleeve length – from the shoulder seam to the wrist with the arm bent at the elbow on the outside. |
| DRL | A ¾ sleeve is measured to the elbow. |
| VG | Chest height – from the neck to the protruding point at chest level. |
| VP or VPP | Front shoulder height – from the shoulder seam to the protruding part of the chest. |
| Military-industrial complex | The height of the back shoulder along the bias is from the shoulder seam to the middle of the back along the cut line at the waist. |
| GP or GPR | Armhole depth or height – measured using a wide piece of paper. It needs to be clamped under the arms and measured to the bottom of the dress. |
| VB | Hip height - from the waist to the protruding part of the hips on the side. |
| VS | Seat height - from waist to seat in sitting position. |
| SHS | The width of the back is at the level of the shoulder blades, without extending a centimeter into the armpits. |
| SP | Points from one shoulder to the other on each side. |
| SHG or CG | Center or chest width - the points of distance between the protruding areas of the chest. |
| OBH or POBH | Girth (half-girth) or circumference (half-circumference) – these measurements are needed for half or full size. Sometimes you can find "PO" in an abbreviated version. |
| OG | Chest circumference – the measurement is taken along the protruding parts of the chest. OG2 is the second measurement designation. |
| OG1 and OG3 | Circumference under and above the chest. |
| FROM | Waist circumference – measured at the navel level. |
| ABOUT | The hip circumference is measured at the most protruding parts. To take into account the fullness of the abdomen, you need to apply a ruler vertically to it, and use a tape measure to encircle it without pressing it to the abdomen. |
| DINNER | Hip circumference is measured at the widest point of the hips in the gluteal fold area. |
| OSH | Neck circumference is measured at the 7th vertebra and the jugular notch. |
| OZ | Wrist circumference – the measurement is taken at the base of the hand. |
| OP | Shoulder circumference – along the line of the widest part of the arm without bending at the elbow. |
A bell dress (the photos of the outfits may show different styles, but they are sewn according to the same pattern) can be sewn in different colors with different skirt hem widths and garment lengths. The model with sleeves can be a summer option made of linen or cotton fabric. At the same time, stretchy fabric will have a lower consumption. This should be taken into account when calculating material consumption.
By share
Fabrics that stretch but are based on cotton or linen are suitable for this pattern.

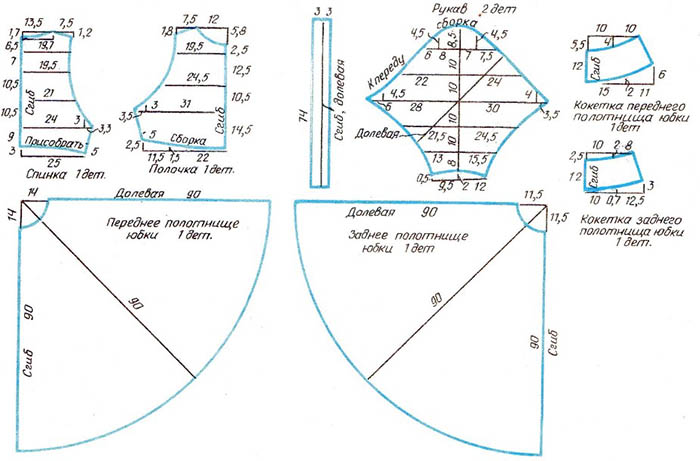
The layout of the fabric into different sizes will consist of several parts:
- Neckline facing from the back – 2 pieces.
- Facing at the front of the neckline – 1 piece.
- The back is made up of 2 pieces, cut identically and symmetrically.
- Right and left parts of the front of the dress – 1 piece each.
- Belt - two pieces, front and back.
- Sleeve – 1 piece for cutting out two parts.
- Bow – can be added to a white dress if desired, according to the pattern in 2 parts.
- Skirt – 2 pieces, can be cut in full size or by folding the fabric in half.
A beautiful long bell-shaped dress with sleeves and a bow decoration can be made from white fabric.
- All dimensions must be written down and transferred to the pattern diagram.
- The pieces need to be cut out and swept together according to the pattern.
- First, you need to transfer the control lines to the front according to the diagram.
- To create a bow, you need to align the cuts and pin the pieces on the sides.
- Next, you should stitch the edges and iron them.
- You can straighten the bow along the seam using an iron, and also stitch the dart on the left side.
- The front pieces need to be folded with the right sides facing inward.
- The cuts need to be leveled and swept.
- With a seam width of 1 cm, you need to stitch the edges and overcast the cuts.
- The opposite folds need to be aligned and folded.
- The middle folds should be stitched between the opposite folds.
- The dart at the waist level needs to be stitched along the back pieces.
- The back needs to be folded in the same way, with the right sides facing inward, aligned along the seams and stitched, leaving a seam width of 1 cm.
- All side cuts must be overcast.
- Next, you need to fold the front and back parts of the product with the right sides together to sew them together.
- The skirt pieces should also be folded with the right sides together to stitch the edges.
- All edges should be overcast and stitched.
- The sleeves need to be folded face to face, and the elbow cuts should be aligned with the front ones.
- The sleeves should be placed into the armholes, aligning the connecting edges.
- All details can be stitched and ironed.
- The bodice must be connected to the skirt and aligned with the belt detail.
- The hidden zipper needs to be stitched down, and the neck facing needs to be glued with an adhesive backing.
- After turning, you need to distribute the edges, seams and strengthen the allowances along the adhesive edge.
- The facing along the shoulder allowances should be attached for the final finish.
- The temporary threads must be removed.
Next, you need to put the dress on again and check all the seams. After that, you can start wet-steam cleaning and ironing the seams. You can use an iron or a steam generator for this. White dress fabric should be cleaned mechanically without dry cleaning.
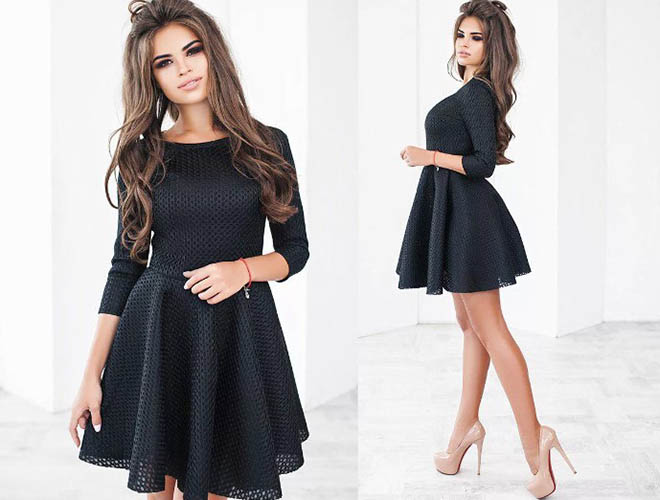
Black in a silhouette style
A bell-shaped dress in a silhouette style will suit girls with a slender figure. In many photographs, the model is presented in black, as it is noble and elegant. The silhouette skirt fits tightly, the length is below the knees. The cut-off dress in the waist area emphasizes the advantages, and the upper front part is made with relief seams.
The sleeves of the black dress are made of one-piece fabric with shelves and backs. There is a decorative insert along the seam, and the lower edge is finished with sewn-on decorative cuffs with trim.
For sewing, you should choose a black fabric with a sheen, silk or satin will do:
- The consumption will depend on the width of the style, the pattern height. The minimum consumption is 2 m, the maximum is 4 m with a width of at least 140 cm along the shared line.
- Plain black material can be cut lengthwise and crosswise, as long as the woven guides are not visible. Checkered material will not work for this style.
- The fabric with the pattern will have to be matched at the joints. It is better to abandon it so that the matching is as convenient as possible.
- It is worth remembering that the fabric may shrink, so you need a stock of at least 10% of the fabric.
Constructive allowances can be included in the pattern diagram:
- OG – increase 8 cm for size 52+;
- OG – increase 10 cm for sizes 54-58;
- OG – increase 12+ cm for sizes 60+;
- OT – increase from 3 to 5 cm in sizes from 52 to 60;
- OB – you need to add 3 to 5 cm to the hip circumference in sizes 52 to 60+.
You will also need:
- Black fabric 2.3-2.5 m, and companion fabric (similar in characteristics) – additional 1.2 m with a width of 150 cm.
- Adhesive lining material about 20 cm with a width of 90 cm.
- Binding or piping tape for the neckline and buttonholes.
- Lightning length not less than 50 cm.
- Buttons – about 20 pcs.
To sew a dress, you need to make a blank of the parts and connect them together:
- The cuffs are prepared by gluing them with interlining material.
- The loops need to be prepared using the lining technology and then stitched onto the cuffs from the front side.
- The skirt is cut in parts, so the front part needs to be folded and the tucks stitched.
- You need to glue the lining material onto the allowance and process the middle of the front part.
- The darts on the skirt need to be basted and stitched. The slits should also be glued with lining material.
- The edges of the skirt need to be overcast on all sides and the seam allowance for the slit lines needs to be stitched.
- Both parts of the skirt need to be folded with the right sides facing each other and make ledges for the slits to align.
- The right side of the skirt needs to be stitched, marking the point for attaching the zipper. From the point, you need to step back 1 cm to cut the vent.
- The seam allowance should be notched so that the seams are pressed apart.
- The middle seam with allowances needs to be ironed and folded so that a continuation of the seam appears.
- The corners of the skirts need to be trimmed to reduce the thickness. It can also be cut with scissors so that the cut processing does not exceed 1 cm.
- The finishing line should also be overcast so that the front side forms a 45 degree angle to the center seam.
- All cuts need to be swept and the pieces swept together.
- The top of the dress needs to be basted and stitched, and the inserts need to be basted to the front parts of the sleeves.
- One-piece sleeves should have shelves along the side seams.
- In the center of the shelves with relief cuts, you need to baste the sleeves and baste them along the entire length of the cut.
- The cuffs should be sewn to the sleeves and the seam should be ironed.
- Next, you need to connect all the parts, and then sew the zipper into the back seam.
- The neckline should be finished with edging tape, creating a hanging loop on the right.
- The button needs to be sewn to the back and cuffs.
- The seam allowances for processing the edges of the dress should be stitched with a blind stitch and ironed.
The bell dress, a photo of which is presented in many fashion magazines, can be sewn according to this pattern of any size. Taking into account the allowances for volume and length of the product, you can adjust the length of the skirt. Sleeves for this model are presented only in full size, they cannot be shortened to ¾ of the part, but can be made short if desired.
Secrets for Beginners
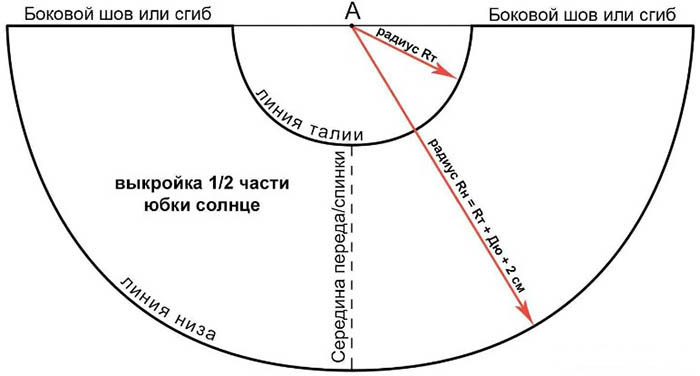
The most difficult process in creating a dress according to patterns is considered to be sewing a skirt. Many people incorrectly determine and perform the cutting, wanting to achieve the desired sweep of the hem.
To simplify these moments, there are some little tricks that professional tailors and seamstresses resort to:
- To sew a skirt with a pattern, you need to choose symmetrical figures. For cutting, you should fold the fabric at least 6 times so that the edges are not stretched and the pattern is not distorted. For stretching, you can pin a separate piece of fabric with weights. Unevenness is leveled after several fittings.
- A half-sun or a flared sun can be sewn with an allowance for fasteners. It is acceptable to immediately put the edge under to form a fastener from the inside.
- A bell with a single seam can be sewn from a checkered fabric or with a pattern. In this case, the material consumption doubles. In length, all parts of the skirt should be gathered to the waistline.
- To sew a bell in the form of a six-panel, you need to calculate the volumes and fabric consumption: OT = 76, OB = 104, of which (OB + 5) / 6 = 109/6. In this case, (OT + 3) / 6 = 13.
- The skirt according to the "Godet" pattern is cut without allowances. You can take into account the consumption only according to the parameters of the size range.
A cut-off dress is easier to cut and minimizes fabric consumption. However, a one-piece model is easier to sew, since there are fewer parts.
The bell-shaped dress suits girls of different ages due to its non-standard cut. You can choose sewing patterns for beginners and experienced people who already know the amount of work for such an outfit.
A black dress in this cut will look good for evening meetings, and in white - for everyday walks. There are many photos in the public domain that combine long dresses with and without sleeves.
Video about sewing a dress
Master class: designer dress with a bell skirt: