A few years ago wrap dress used only for modeling home clothes. The model's pattern is characterized by simplicity and convenience, it allows to hide imperfections of the figure and provides freedom of movement. Currently, many beauties have this style in their wardrobe.
Features of the style
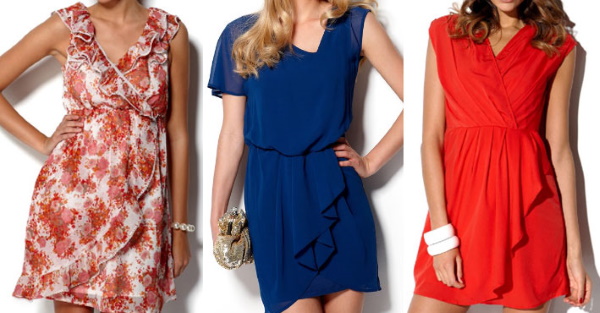
In such a dress, the front panel consists of two separate parts, one of which is wrapped over the other, thus forming a V-shaped neckline. To fix the product on the figure, ties, fittings or a zipper are used.
The location and cut of the smell has different options:
- Diagonal - visually crosses the figure diagonally. In this case, the wrap-over hem is fixed at the waist with a tied knot, belt, and also a clasp in the form of a hairpin or brooch.
- Vertical – the entry is located from top to bottom in a straight line in the middle of the figure.
- With imitation– the real gender of the product is formed by means of color contrast and texture of the material.
- Partial – the wrap element can only be located in the upper part of the garment, while the skirt remains whole.
The smell can be located in the following places:
- at the top of the bodice, where one shelf overlaps the other. The top part can be tight-fitting, loose, or of a complex cut;
- in the lower half of the product. The shape of the fold can be expanded, forming folds, rectangular or petal-shaped;
- starts from the high waist, chest level or from the yoke;
- A one-piece classic entry is used to sew a robe dress. The inside halves are secured with buttons or special ties, and the outside - with decorative fittings.
The length of the product can be floor-length, midi or short.
How to take measurements
A wrap dress is sewn based on a pattern.
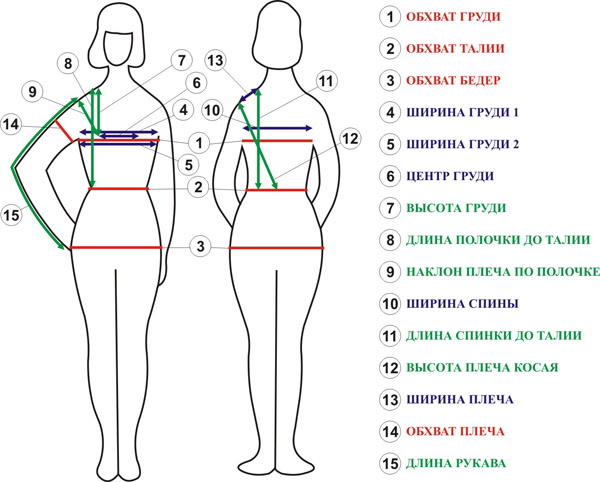
To construct it, it is necessary to take measurements:
| Parameter | Abbreviated name | How to shoot |
| Chest circumference | Og | Through the convex chest points and marks on the shoulder blades, capturing the upper corner of the armpits. |
| Waist circumference | From | The tape is placed horizontally over the tied elastic tape. |
| Back length | Ds | The distance from the mark on the back to the waist line, including the bulges of the shoulder blades. |
| Chest width | Shg | The section above the chest begins and ends at the armpits. |
| Arm circumference | Or | Wrap a tape measure around your biceps at its widest point. |
| Front length | Dp | The distance from the base of the neck to the waist, passes through the center of the chest. |
| Sleeve length | Dr. | Bend your arm slightly and measure the distance from the shoulder joint at the top to the chosen level at the bottom, running the tape measure along the bend of the elbow. |
| Back width | Shs | The horizontal line passes through the middle of the shoulder blades between the back corners of the armpits. |
| Arm circumference | Or | The size of the hand below the wrist joint. |
| Length of product | Di | The distance from the top point on the back, running along the spine through the waist down to the desired length. |
| Shoulder width | Shp | The measurement runs from the base of the neck to the shoulder point. |
To accurately measure parameters, it is recommended to adhere to the following conditions:
- The person being measured must stand in front of the mirror in a straight and free position, without changing their natural posture;
- The measurements are taken on a naked body. The individual whose volumes are being measured should wear only underwear;
- An elastic band must be tied at the waist;
- The centimeter during measurements should fit snugly to the body without adding any looseness. When constructing the pattern, allowances for looseness will be included.
Next, it is recommended to mark key points on the figure:
- Use a pencil to mark the shoulder direction and a mark on the shoulder;
- on the back, mark the location of the cervical base (7th vertebra) and the most prominent places of the shoulder blades (located at the same level as the upper axillary angles).
Popular models
A wrap dress (the pattern is available for both experienced and novice needlewomen) is sewn for everyday wear and as an evening dress.
Dressing gown
A wrap dress (the pattern is quite simple) is sewn in the form of a robe. For an elementary model, with a material width of 1.5 m, you will need 1 length of the product + 15 cm for processing the seams. If the size is larger than 54, then the fabric consumption is 2 lengths. First, you should take the necessary measurements, simultaneously allowing for an increase in freedom of fit.
Construction method:
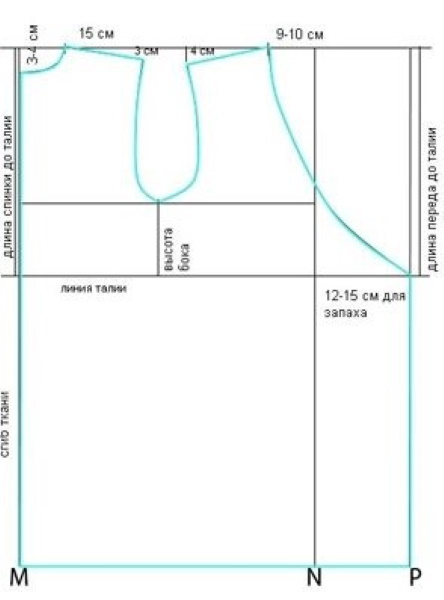
- On a large sheet of paper, you need to draw a rectangle. Parallel MN is the size of the hip circumference /2+8-10, and line NP is the entrance of the smell. Its depth can be designed at your discretion.
- Draw the neckline border on the back to the right. From the upper left mark, measure 3-4 cm down, and ¼ of the neck circumference to the right. Connect the dots with a rounded line. Measure the length of the shoulder from the upper edge of the neck.
- From the vertical coming out of point N, also mark ¼ of the neck circumference measurement. From this place, you need to depict the shoulder length and draw a smooth line to create the wrap.
- From the waist level, set aside a parallel line, taking into account the measurement from the bottom of the armhole to the waist.
- Use a pattern to create a smooth outline of the armhole.
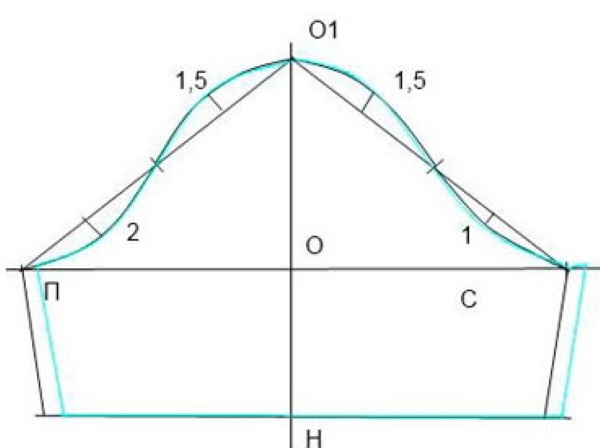
- To create a sleeve template, you will need the sleeve length (O1-H), shoulder circumference (S-C) and armhole length (A-O1-C). Connect the dots with a smooth line, outline the armhole border.
Sewing technology
- To cut, pre-wash and iron the fabric, fold it face inward. Then apply the pattern so that the center line of the back lies on the fold of the material. Outline the piece with chalk, leave a 2 cm seam allowance at the edges and 6 cm at the bottom. Outline and cut out.
- For the facing, you need to measure the distance of the pattern, starting from the bottom, then through the neck and 2 shelves + 3 cm. The width of the part together with allowances is 8 cm. The workpiece can be sewn from 2 parts.
- For the belt, cut out a piece of fabric measuring 150 x 8 cm.
- Finish all edges of the item with a zigzag stitch or overlock.
- Sew the shoulder seams together, then iron them apart.
- Fold the sleeves down by 1 cm, then baste, fold them up by another 1.5 cm, baste and sew a stitch on the machine. Iron.
- Sew the sleeves along the side seams, then sew them into the garment. Stitch along the armhole with the maximum stitch length, leaving 5 cm of thread edges on both sides. Insert the piece into the armhole, then pull it together to the required length along the armhole. Distribute the gathering evenly and sew the sleeve. Iron the cut onto the main piece.
- Fold the facing lengthwise, with the right sides together. Make a machine stitch along the short edges on both sides at a distance of 1.5 cm from the edge. Turn the workpiece inside out, fold it in half along the long side, with the right side facing out. Then pin it together, baste it and iron it.
- Attach the facing to the neckline and 2 fronts. Pin and baste. Sew, stepping back 1.5 cm from the edge, simultaneously capturing 2 layers of the facing and 1 tier of the main panel. Iron the cut to the front parts.
- Fold the belt inside out lengthwise. Sew the short edges and turn them right side out, then iron them. Fold the long free edges inward by 0.5-0.7 cm, secure with pins and baste. Then stitch at a distance of 0.2-0.3 cm from the cut.
Evening
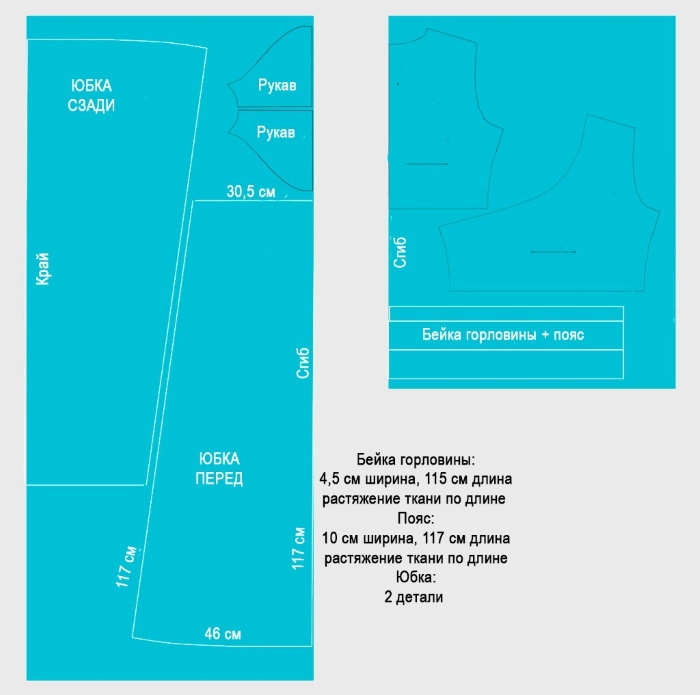
For a special occasion, it is recommended to sew an evening dress. The model, cut at the waist, is constructed on the basis of the basic dress pattern. The product (size 42-44) will require 2.2 m of velvet, for the lining - 1.7 m of satin stretch.
The item consists of the following parts:
| Part of the clothing | Quantity | What fabric is it made of? |
| Front of the bodice | 2 | Lining and main fabric |
| Back panel of the bodice | 2 | |
| Right and left skirt blanks | By 1 | |
| Central back segment of the skirt | 2 | |
| The main fabric of the belt | 1 | Velvet |
| Belt ties | 2 | |
| Sleeve | 2 |
For a uniform shade, when cutting, it is advisable to lay out all the pieces on the velvet fabric in one direction. It is also necessary to take into account the seam allowances.
Step-by-step description of sewing the model:
- Pin the shoulder and side edges of the bodice together, then stitch.
- Next, sew the sleeves and process the seam allowances with an overlock.
- Sweep and stitch the lining pieces of the bodice along the sides and shoulders.
- Combine the velvet and satin top halves of the dress along the front edges and roll-out.
- Attach the sleeve to the armhole, gathering it slightly at the top, then sew it in.
- Process the cuts on an overlock. You will get 2 upper halves.
- On the back pieces of the skirt, stitch the middle seam, then machine stitch the front pieces to the panel along the side edges.
- Sew the lining in a similar manner.
- Connect the velvet and satin bottom panels on the sides, and iron the edges onto the lining fabric.
- Sew a zipper into the back of the bodice and stitch the edges using an overlock machine.
- Sweep the lining and main parts of the dress. Insert the edges of the zipper into the seam and hand sew to the dress. Sew the skirt, then iron the allowances.

- Place the bodice on top of the skirt, aligning the edges, then baste and sew.
- The joining seam should be finished with an overlock stitch.
- Sew the zipper into the bottom of the garment.
- Pin the main part with the lining. Insert the ends of the zipper into the seam and sew them to the dress by hand. Sew the lower segment of the central back edge of the skirt and iron the seam allowances.
- Overcast the bottom of the product, capturing 2 layers at once.
- Turn the bottom edge up and machine stitch.
Made of silk
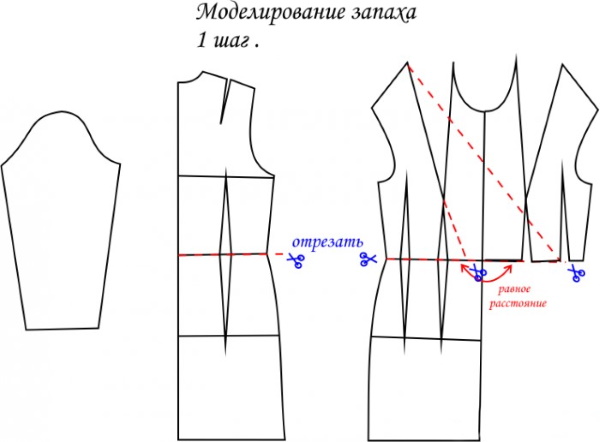
A wrap dress (the pattern is created on a ready-made template or based on your own measurements) is sewn from silk fabric. To make the material lay down in folds well, the chest opening is twisted or laid out in flounces.
Step-by-step modeling of the style:
- On the finished base, auxiliary contours are first marked with a contrasting color.
- The chest is wrapped in a wrap-around design, and the waistline is cut off.
- The workpiece is cut out along the red contours.
- The bodice should be rounded at the waist.
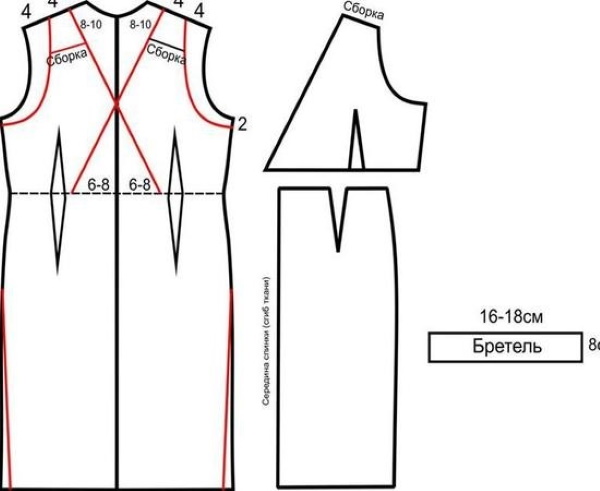
- When cutting out the back panel, the base pattern is reproduced completely up to the waist.
- The shoulder line is shortened by 4 cm and the outline of the neckline is drawn out, emphasizing it with color and making it 1 cm deeper.
- The sleeve is transferred as is. As a rule, a narrow pattern is used.
- To construct a skirt, it is advisable to know its length and waist circumference.
- It is also recommended to add fabric for pleats.
- For seam allowances at the bottom, you should leave 2 cm, and at the edges 1.5 cm.
- For the dress, cut out 2 pieces of the front panel, skirt and sleeve, as well as 1 piece of the back with a fold.
Features of sewing the model:
- when stitching, the workpieces are folded face inward, and fastenings are made at the beginning and at the end;
- seam allowances are processed with a zigzag or overlock stitch, and the edges of the upper section of the product are stitched. The fold and neck are trimmed with bias binding;
- to make the front entry of the fabric, both halves are combined;
- the skirt parts are sewn together using machine stitching;
- then folds are formed on the lower part of the product and it is combined with the upper part;
- The sleeves are sewn along the side cut, then sewn into the formed armholes. The lower edge line is folded and overcast.
Rules for working with silk fabrics:
- To prevent the material from slipping, a thin cotton blanket is placed under the silk when cutting;
- It is recommended to cut the material with sharp scissors. To avoid shifting the paper patterns, heavy objects should be placed on top;
- It is advisable to pin the silk fabric with the thinnest pins, sticking them behind the contours of the blanks so that no holes remain;
- baste the silk details with the finest needle using thin threads;
- If the fabric slides too much when sewing the panels, you need to place a strip of tear-away stabilizing material underneath it;
- Seam allowances are processed using an overlock or French stitches.
With sequins
It is recommended to construct a pattern for a dress with sequins based on the sheath dress model. In this case, the front panel is divided into 2 halves, because the garment consists of 3 parts. When forming the details, it is necessary to immediately take into account the seam allowances.
On the shelf, you should mark the place of the neck of the desired depth. To do this, draw a diagonal segment from the cut on the left part. To make both halves equal in length, the line is made with a slight slope. The right part is placed on top.
From the neckline, draw a diagonal to the waist level. The lower diagonal axis is drawn in the opposite direction. As a result, when forming the right part, a triangle will come out. The existing patterns from the dress will be suitable for the sleeves and the back panel.
Sewing technique:
- Finish all edges with a zigzag stitch or overlock.
- Sew shoulder seams.
- Next, sew the side seams of the sleeves and sew them into the armhole.
- Sew the side lines of the product.
- Hem the bottom line by hand.
- Decorate the belt.
Features of working with fabric with sequins:
- First, it is recommended to sew a trial copy of the style from a simple material in order to make the necessary corrections on it. After that, the pattern is laid out on the sequin material.
- If sequins make up a pattern, it is advisable to place them on the front surface to see all the elements. Then, all the outlines of the pattern are transferred to the fabric using contrasting thin threads and a very thin needle.
- Before cutting out, remove the sequins from the allowances and seam lines. The thread ends should be fixed so that the remaining sequins remain in place. The remaining scales should not be thrown away; they are used to fill the resulting voids on the finished product.
- Sequin fabric is sewn on a sewing machine, the needles should be selected to match the base fabric. It is not recommended to stitch on sequins, because they can bend and the needle can break.
- If the scales are glued on and cannot be removed, then you need to stitch between the shiny stickers on the base material.
- To prevent sharp sequins from scratching your legs or tights, the bottom edge of the product should be finished with tape or facing.
Long to the floor
The wrap dress (pattern included) can be sewn from elastic fabric of maxi length. The floor-length model involves gathering at the waist and a belt. For size 48, you will need 3 m of knitted fabric, the width of which is 140-150 cm.
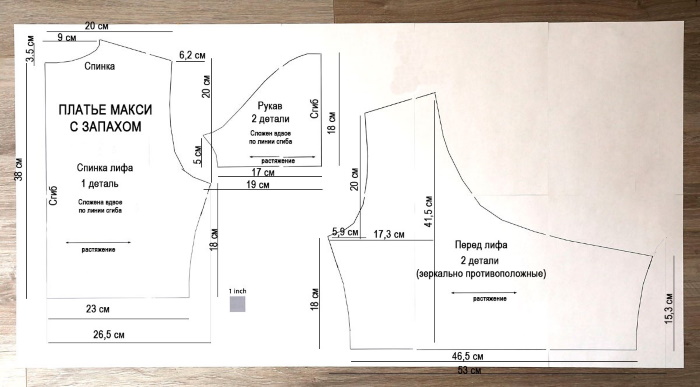
According to the presented pattern, it is necessary to cut out 1 back with a fold, 2 shelves in mirror image and 2 sleeves. Next, cut out the piping for the neckline, 2 pieces of the belt and skirt. It is necessary to leave 1.5 cm seam allowances along the edges.
Sewing technology:
- Sew the skirt. To do this, fold the back halves face to face and stitch on the machine, then stitch the side cuts.
- Place the back panel on the table with the front surface facing up. Place one front half on top of the back face down, match the shoulders and sew them together. Sew the other part in the same way.
- Turn the shoulder sections inside out and lay them out on the table.
- Pin the sleeves to the armhole and sew it in.
- To process the neckline, you need to take the piping, fold it in half, right side out, and then iron it.
- Pin the piping to the neckline, pulling it slightly. Then stitch it, turn the seam down and iron it.
- On each part of the bodice, assemble and sew with 2 rows of straight stitch on both halves.
- Fold the bodice, turning it inside out, matching the side cuts. Sew the sides, starting from the sleeve.
- Next, hold the top part of the garment with the front facing out, and insert the inside-out skirt into it. Combine the side cuts and pin them together. Connect both parts with pins, distributing the material evenly.
- Sew the pieces together using a knit stitch, and sew a 0.5 or 1 cm wide elastic band on top of the seam allowance.
- The dress is finished by hemming the sleeves and bottom with a knitted stitch.
- Sew the belt from the inside with an elastic seam, leaving an opening for turning. Then turn it inside out and sew up the opening.
For the full
Constructing a pattern for overweight women involves the following steps:
- For the back, you need to draw a rectangular figure on a large piece of Whatman paper.
- Next, the marks are marked, the distance between them corresponds to the width of the shoulders. When shaping the neckline, the line is slightly rounded.
- From the designated points, draw a horizontal line of the intended length downwards and depict the lower border.
- An armhole for the sleeve is added on the sides.
- When constructing, take the semicircle of the width and draw the height.
- To create the shelves, marks are placed on the shoulder locations.
- Next, on the 1st side, the sleeve sections are constructed, taking into account the size of the armhole. From the point, ½ the width of the shoulder should be set aside and the 2nd mark should be placed. The neckline begins at this point. Its depth is determined by personal preferences.
- When designing the left shelf, draw a vertical line from the waist down and create a bottom line.
- The size of the smell is chosen at your discretion. The optimal variation is 12-15 cm.
- The belt and sleeve are also cut out according to individual requirements.
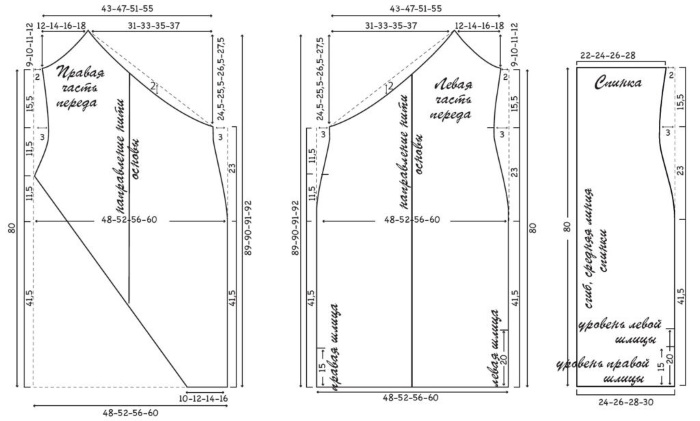
For the dress you will need 1 back with a fold, left and right front, belt and 2 sleeves. Leave 1.5 cm for seam allowances, and 2 cm at the bottom.
Manufacturing method:
- Place the paper pattern on the fabric and cut out the pieces.
- Fold the front and back panels together, then sew them together.
- Sew in the sleeve.
- Treat the fold with bias binding.
- Hem the bottom of the dress and sleeves with hand stitches.
- Decorate the belt.
A beautiful wrap dress is one of the simplest and most comfortable variations of women's clothing. Even novice dressmakers can make a pattern. This model is indispensable in any woman's wardrobe because it combines femininity.
Video on making a wrap dress without a pattern
How to sew a wrap dress in 3 hours: