Anyone can learn beading. Beginners wonder how to master the basics and start making high-quality and complex products. Having mastered several basic weaving techniques, you can create a variety of complex motifs for yourself and for sale.
This article provides step-by-step instructions with photos of the main techniques and master classes of elementary products for mastering basic beading skills.
How to choose beads for weaving
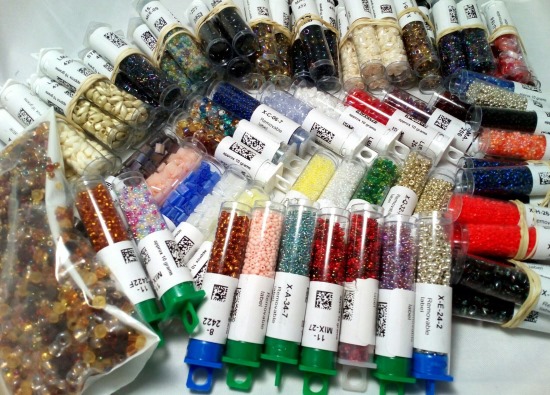
When choosing beads to create a product, it is necessary to understand what the craftsman is going to make from it. To create jewelry, flowers or crochet, different beads are needed.
The assortment has variations by manufacturer, shape, composition and size. Glass beads are considered the most durable, Japanese beads are more even, and petrol color is the most durable. But even low-quality beads can be useful in weaving, for example, in coral.
Bead size
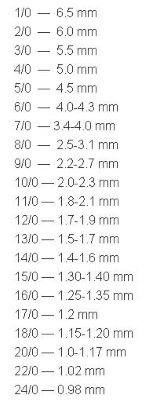 To determine the size of beads, use the standard table shown in the photo.
It indicates the diameter of the beads from 1 to 24 mm. The first number is the approximate number of beads that fit in 1 inch.
If you lay beads in a row with the holes facing up on an inch ruler, you can determine what size the beads are by how many pieces fit into 1 inch.
For example, size 24 is approximately 24 pieces with a diameter of 0.98 mm.
The exact size of the beads cannot be determined because the production of such a small material does not allow for precise marking down to a hundredth of a millimeter.
Therefore, there will always be a slight error in the dimensions in the measurements.
Types of beads
In addition to the size of beads, they can also be classified by manufacturer and shape.
Beads are:
- round (with rounded walls);
- hexagonal;
- cylindrical;
- donut-shaped;
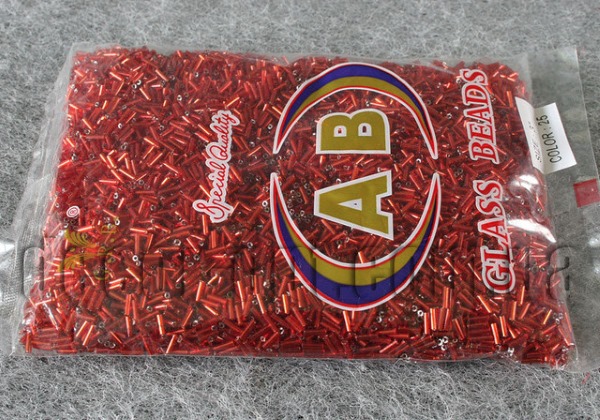
- long bugle;
- glass wheelhouse;
- sand.
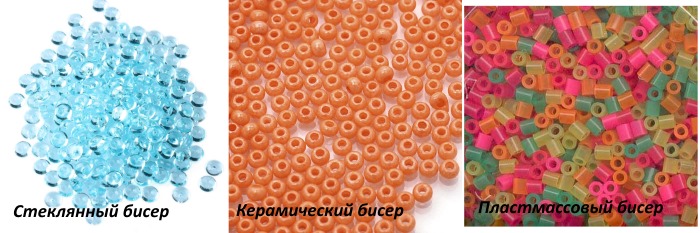
Depending on the material, beads can be:
- glass;
- ceramic;
- plastic.
Main manufacturers of beads:
- China;
- Czech Republic;
- Japan.
Chinese beads are the cheapest of all and the most uneven. India and Taiwan produce approximately the same. They are sold in large packages of 50 g.
It can be used to create precise jewelry, such as cords, woven eggs, but you will have to calibrate it very carefully, selecting beads of similar size. It is best suited for creating trees, necklaces in the "Spiderweb" technique and other types of weaving where perfect calibration is not needed.
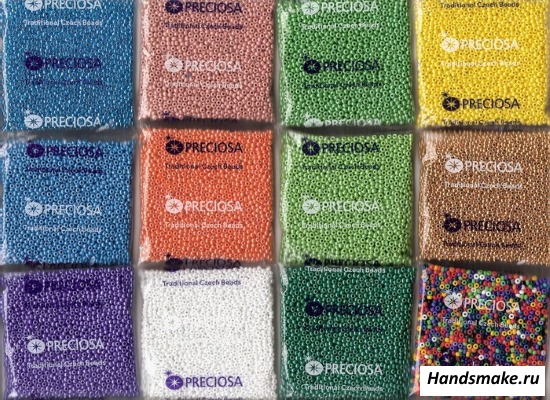
Czech beads are smoother and have a high-quality color. They do not rub off in your hands, and they convey shine well. You can weave any jewelry from them, the errors in size are so insignificant that you cannot determine them with the naked eye.
Japanese beads are the most precise of all. They are created using the most modern technologies, calibrating each bead with computer precision. They are best suited for mosaic weaving, creating thick colored cords, weaving eggs and other items that require maximum bead identity.
In addition, Japanese beads have a wider hole than others, which allows you to thread or line through them several times without fear of the bead breaking.
Glass beads are the strongest and most durable. But when choosing a glass bead, it is necessary to consider that there is a risk of cutting the working thread with the uncut edges of the beads. Plastic beads are usually large in size and are suitable for creating inexpensive jewelry and products, since plastic itself looks cheap. The paint on it, as a rule, does not last long.
Calibration
If finances do not allow you to buy expensive calibrated beads, there are several ways to calibrate Chinese beads. One of them is to string as many beads as possible on a long needle and sort out the appropriate size specimens by eye. This same option can be placed on a ruler and see the correspondence more accurately.
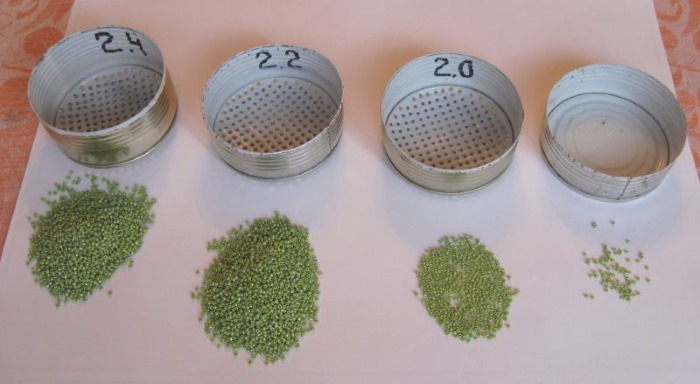
Some craftsmen invent ingenious strainers from tin cans, making holes with an awl of the required diameter. Using this method, you can calibrate large and small beads from a common package of Chinese beads.
Tools and needles for beading
In order to obtain a durable product, in addition to choosing beautiful beads, you need to take care of high-quality tools. The most important tool is the needle. Its size should correspond to the diameter of the bead. The larger the needle number, the thinner it is.
Most often, #10-16 are used, the thinner the needle, the more fragile its eye. It is recommended to buy a set of needles of English, Australian and Indian production, their steel is the strongest.
Japanese and Chinese games are cheaper, but they are more fragile. In addition to the diameter of the needle, its length is also distinguished. There are 5 cm and 10 cm needles, the latter are convenient to use when stringing beads, for example, for a tourniquet, where there is a long preliminary stringing of beads.
The second important tool is a fishing line or thread. Popular sizes of fishing line are 0.2-0.5 mm, but you can use any suitable one. In addition to fishing line, you can use monofilament. It is made of polyester and has properties similar to fishing line, with one difference: it can be used for sewing on a sewing machine.
However, both of these materials are not suitable for working with glass beads and cutting, since glass easily cuts fishing line and monofilament. As an alternative, you can use silk or nylon thread. For the manufacture of durable products such as toys, use wire of 0.2-1 mm in size.
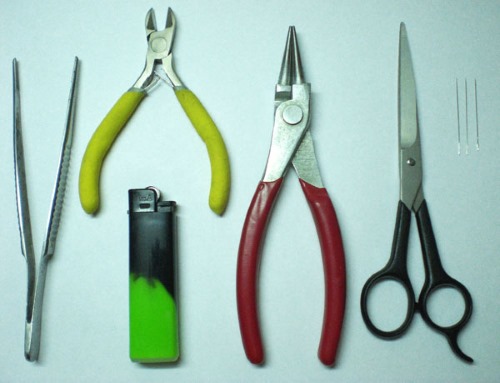
Other beading tools:
- sewing scissors;
- wire cutters;
- tweezers;
- pin round nose pliers;
- fittings (pins, locks, sockets).
Basic bead weaving techniques with diagrams
Beading for beginners (step by step, photos, diagrams - further in the article) includes the study of basic weaving techniques, using which, you can master even the most complex instructions.
Some types are made exclusively with wire of different thickness, and some only with thread or fishing line. The instructions describe types of weaving for those who have never dealt with beads before.
The table shows which weave is suitable for different products:
| Types of weaving | Products |
| Mosaic |
|
| Brick |
|
| Circular | flowers |
| Parallel |
|
Even and odd mosaic weaving
The main type of bead weaving, mosaic, allows you to make almost any product (braiding something, flat bracelets, flower petals, cords, etc.).
There are two techniques of mosaic weaving, even and odd. The fundamental difference is that in even weaving in 1 column there is always an even number of beads, and in odd weaving - an odd number.
Even mosaic weaving technique:
- Pick up 1 bead, which will be a blocking bead. After finishing the 3rd row, it is removed. It is necessary to pass the working thread through it 2 or 3 times, but do not secure it with a knot.
- String an even number of beads, for example, 10, these are the first two rows.
- Pick up 11 beads and pass the needle over the 9th bead.
- Thread bead 12 into 7, 13 into 5, 14 into 3, 15 into 1.
- Remove the blocking bead and tie a knot between the working thread and the starting thread.
- String 1 bead and pass it through 15, continue the row to the end.

Odd mosaic weaving technique:
- Also pick up and secure a blocking bead.
- Pick up 10 beads and do everything the same way as with even weaving.
- Having reached the end of the 3rd row, to the blocking bead, also tie the threads.
- Now, pick up not 1 but 2 beads and thread them through 15, thus creating an additional, odd row.
- This method can be used to increase the number of rows to any number.
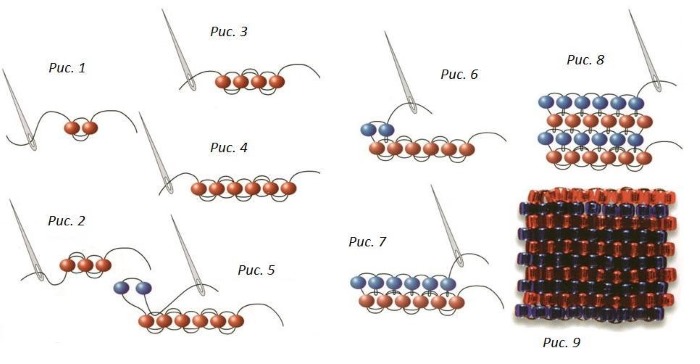
Brick
Beading for beginners (step-by-step with a photo description of the scheme will be presented in this chapter) includes one of the main sections - brick weaving. It looks like mosaic, only denser. It can be done with a fishing line, a thread with a needle or wire. In the latter version, the product will be stationary. The first row is set in two ways.
The first method is using a needle and thread:
- String 2 beads.
- After 2 beads, thread the thread through the 1st one so that the 2 beads form a circle.
- Pick up the 3rd and thread it through the side of the 2nd from the opposite side relative to the thread coming out of it.
- Thus, collect 10 pieces.
The second method of typing is done manually, without a needle. The idea is to have both ends free. This can be done with needles, but it's easier by hand and the thread doesn't get tangled as much as with needles at both ends.
How to perform:
- Pick up 1 bead and place it in the center of the line. Both ends of the line are free.
- Pick up 1 piece from both ends, they should also be in the center of the thread, that is, already 3 beads in the center.
- Pick up 1 piece on any end and thread the opposite end of the line through the hole of this bead on the side from which the first end comes out.
- So, collect 10 pieces, make a knot, cut one end of the fishing line and thread the other into the needle.
Brick weaving:
- In front of us are 10 beads, intertwined crosswise, with the working thread drawn from the last one.
- String 2 pieces and pass the needle through the line connecting the 9th and 10th bead on one side. The entire weave will "grow" from this side.
- Next, thread the needle through the 2nd strung bead from the side where the working thread came out.
- String the 3rd piece and pass the needle through the fishing line connecting the 9th and 8th bead from the same side as the previous 2.
- Continue to the end of the row.
Circular (French) technique
This weaving is done using wire. This is how petals and leaves are created for beaded flowers.
The technique of circular weaving is as follows:
- Take 50 cm of wire and use round-nose pliers to form a locking loop on one end.
- String approximately 10 beads, leaving 5 cm free before the loop.
- The free end of the wire is bent in half, making a loop the size of 3-4 fingers of the hand and twisted by 2 cm. That is, between the strung beads and the loop there should be 2 cm of twist. The working end is directed at the strung beads.
- String 12-13 beads or enough to fit snugly against the first row, forming a semi-oval.
- Secure the working end under the 1st row.
- In the 3rd row, collect the same number of pieces as in the 2nd.
- Make a semi-oval on the other side of the 1st row and secure with a 2 cm twist.
- Wrap the working end on the side of the large loop to a size equal to the thickness of the bead, approximately 0.5 cm.
- String 2 more pieces than in the 3rd row and also make a semi-oval along the 2nd row.
- Roll the “petal” to the desired size.
Parallel technology
This technique is used to make simple three-dimensional toys, keychains, earrings. The only materials needed are wire and beads.
The weaving technique is as follows:
- String 3 beads onto the wire, they should be in the center of the working wire. 1 bead – 1 row, 2 others – 2 row.
- Thread the beads of the 2nd row into 1 bead of the first row so that you get a triangle and two working edges come out from the sides of the 2nd row.
- On one of the working edges, no matter which one, pick up 3 pieces, thread the free edge on top of 3 beads. This is the 3rd row. You get a larger triangle.
In this way, you can regulate the number of beads in the rows; they will fold like an accordion, creating a flat piece with a wall of 0.5 cm.
Step-by-step master classes on bead weaving for beginners
Beading for beginners step by step, with photos provided in each instruction, offers to get acquainted with master classes of the simplest products that even a child can do.
Bracelet
A simple bracelet is made using the “Parallel” technique.
The tools you will need are:
- fishing line 0.5 mm;
- beads of any color;
- beads 3 times larger than beads of the same color;
- fittings in the form of a lock and an eyelet.
Progress of work:
- Cut a 1 m long line.
- Tie 1 part of the clasp, a lock or a ring, it doesn’t matter, so that it is in the center of the fishing line.
- String 2 large beads and move them to the center of the line.
- Close with the 3rd bead using the parallel weaving principle.
- String 3 beads onto both free edges and close with a bead.
- Next, string 1 bead on each end of the fishing line, close with 1 bead.
- Repeat until the bracelet reaches the desired length, alternating beads with beads.
- At the end of the work, tie a knot on the working parts of the fishing line, leaving 10 cm on each end.
- Tie the second part of the clasp.
- To hide the remaining ends of the fishing line, it is not enough to simply tie them. The fishing line is a slippery material, and it comes undone. The remaining parts must be threaded into the work as much as possible, through the beads and seed beads. Trim the protruding ends.
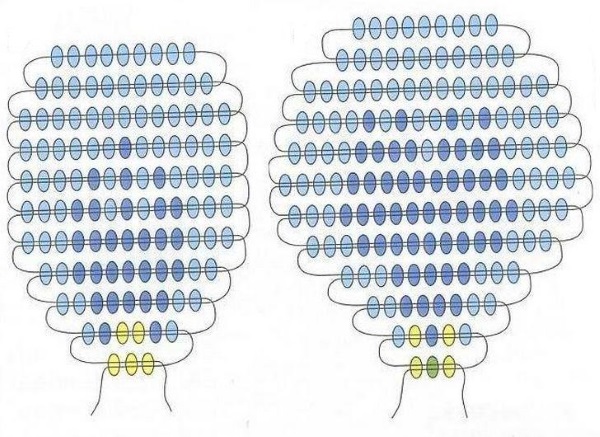
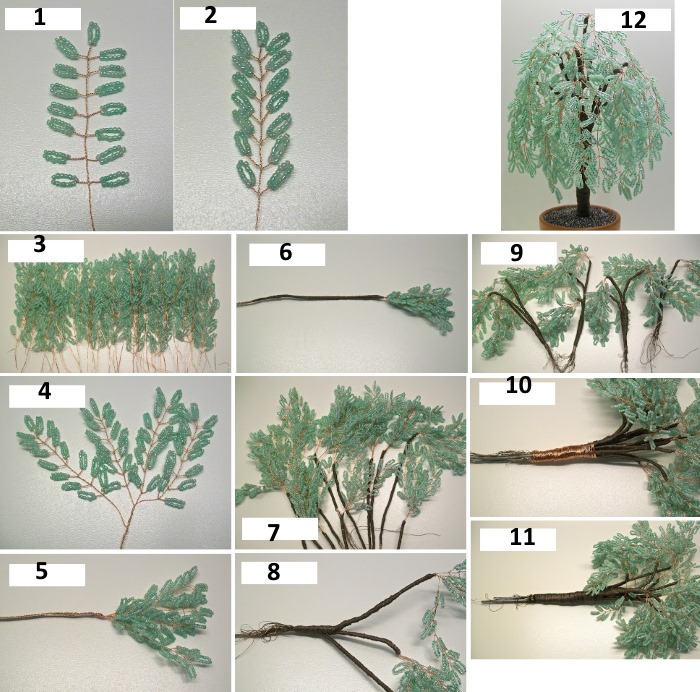
Tree
Beading for beginners (step-by-step with photos below are explanations of the work process) often begins with making flowers and trees. Creating a tree is always a creative process that does not have a universal pattern, they are always arbitrary.
To create the simplest tree you will need:
- green beads of any shape and size;
- wire, as thick as possible, but so that it fits through the bead once;
- insulating tape, preferably the color of the wood, green or brown, even black will do;
- pencil;
- a solid base for the branches, for example an old insulated wire from electrical appliances with an aluminum base inside (the main thing is that the base bends but is stable);
- modeling clay, plaster or flour;
- green and brown paint and a brush;
- fishing line nippers;
- stand for a tree, you can use a plastic lid from a jar or from a plastic container.
Manufacturing:
- String any number of beads onto the wire to get a total length of 50 cm.
- Take a pencil and wind the wire with beads onto it, make 6 turns and close the “antennae” of the wire on both sides into one, twisting several times.
- Cut the piece, leaving 5 cm of wire. You will get a spring made of beads on a leg.
- Make 13 of these springs.
- Divide the old double wire from electrical appliances into two parts and cut into small sticks no more than 10 cm in size.
- Take 3 springs and wrap their legs with electrical tape together, along with one of the sticks. Make 3 of these "flowers".
- From the remaining ones make 2 more "flowers" with 2 springs each. These will be branches.
- Take all the branches and connect them together in the middle with electrical tape. You will get a trunk and branches that can be bent in any direction you like.
- Pour clay, viscous flour or gypsum onto the lid and glue the tree, grinding the substance to half the trunk.
- When everything is dry, paint the wood with paints.
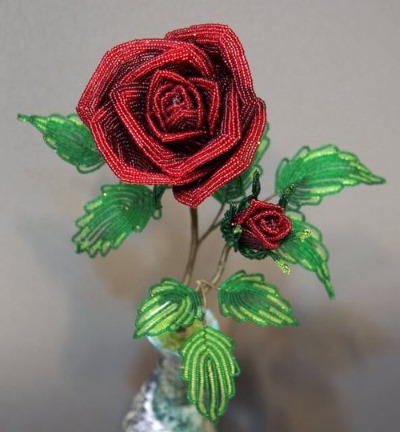
Rose
The rose is made using French weaving in a circle. For the petals, you can choose any color: red, blue, yellow, black or pink. The leaves can also be any shade of green.
Material for weaving:
- beads red, green and gold;
- wire 0.3-0.4 mm;
- wire cutters;
- thick wire made of copper or aluminum;
- green electrical tape or florist tape.
Manufacturing:
- String 1 m of red beads onto a thin wire without cutting them off from the main spool.
- Cut 10 cm of thin wire and string 10 red beads. Hold one side with your fingers so that the beads do not fall out. Use your fingers to protect 4-5 cm of free wire for the stem of the petal.
- Attach the wire from the common spool of beads to the cut piece on the finger side, wrapping it around several times.
- Start braiding the base with arcs using the circular technique. This will be a rose petal.
- Make 5 arcs on both sides.
- Measure the length of the wire equal to the full circle of the petal plus 2-3 cm, cut off the wire.
- String golden beads onto this piece and make a border for the petal, secure the end of the wire.
- Bend the free edge of the base and bite off.
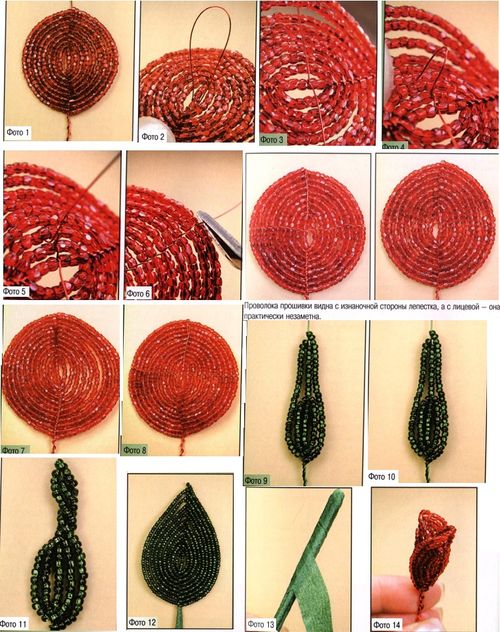
- Make 3 such petals.
- Next, make 3 more petals in the same way, but with 6 arcs, 4 pieces with 7 arcs and 4 pieces with 8 arcs.
- Weave 5 sepals for the bud in the same way, only at the base add 3-5 more beads than on the petals so that the sepals are oblong and have 4 arcs on the sides.
- Make the leaves in the same way, only 5 beads longer at the base than the sepals, 2 pieces.
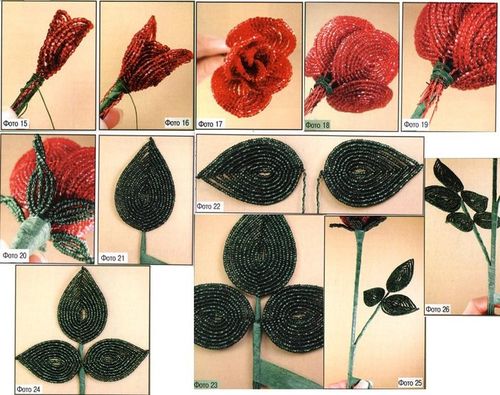
- Give the petals the shape of a boat by bending them slightly.
- Start weaving the petals together, large ones at the bottom, small ones at the top, forming a bud.
- Attach the bud to a thick wire.
- Weave the sepals into one trunk.
- Start wrapping the rose stem with green electrical tape or florist tape.
- Once you reach the middle, add petals on both sides and continue braiding the trunk.
- The rose is ready. Carefully bend the leaves, giving the rose a natural shape.
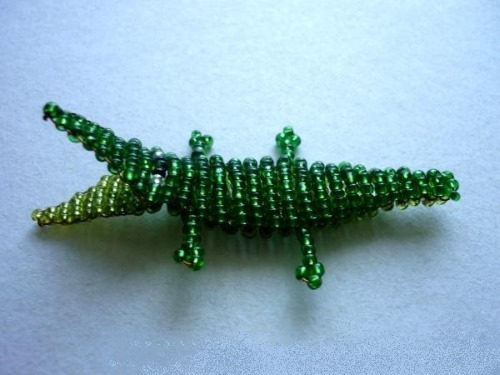
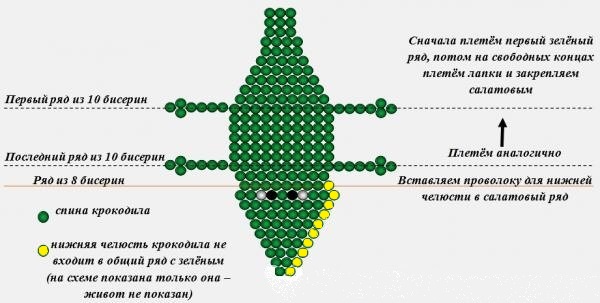
Crocodile beading
A crocodile for a keychain or as a toy for a flower is made using parallel weaving. It is necessary to follow the diagram in the photo below, so as not to make a mistake in the number of beads collected.
Instructions for use:
- Cut off half a meter of 0.3 wire, you can cut off more, the main thing is that it does not interfere with the work.
- Start weaving a row from the tail. Pick up the first number of beads and place them in the center of the wire.
- String beads from the second row, holding the work in your left hand.
- Pass the end of the wire from your right hand through all the beads of the 2nd row so that you get a ring of all the beads.
- String the 3rd row and also thread the second end of the wire.
- Continue until the end of the pattern.
- The work will begin to take the form of an accordion, you need to thread a pencil inside the accordion and make the crocodile voluminous. The side with a small amount of beads is the belly, with a large amount is the back.
- Having finished weaving according to the pattern, hide the “whiskers” of the remaining wire.
- Weave the lower jaw, collecting the same number of beads as on the crocodile's muzzle and attach it to the muzzle, threading the ends of the wire into one of the lower rows of the toy.
- To weave the paws, you need to cut 10 cm from the wire.
- String 7 beads.
- Pass one end of the wire through 4-1 beads from above, you will get a paw with 3 fingers.
- Attach the paw to the crocodile's body, with one end of the wire through the bottom row, the other through the top row. Hide the ends, make the other 3 paws in the same way.
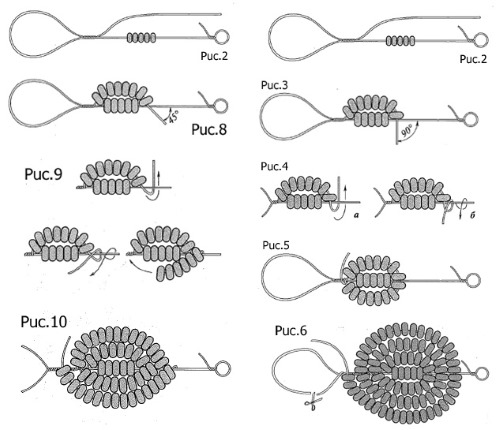
Beaded chain
A simple chain of two rows is made using a needle and silk or thin nylon thread; silver or gold beads are also needed.
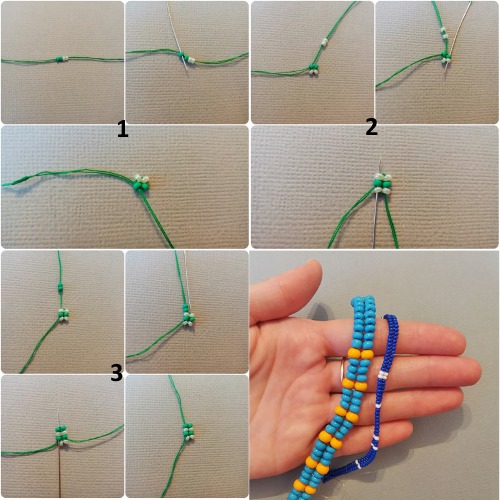
Instructions for use:
- String 2 beads and tie the ends of the thread into a knot. The beads will stand like 2 cylinders with the holes facing up.
- Hold the beads with the holes facing down and up.
- Pass the working needle through the bottom of the left bead. The working thread will begin to emerge from the top hole of the left bead.
- String 2 pieces and pass the needle through the top of the right bead, through the bottom of the left bead and the bottom of the 3rd bead, we get a square of 4 beads.
- Next, pick up 2 more beads and thread them through the top of the 4th bead and the bottom of the 3rd bead.
- Continue until the end of the work.
- Attach clasps or sew the chain into 1 continuous piece, connecting to the opposite end.
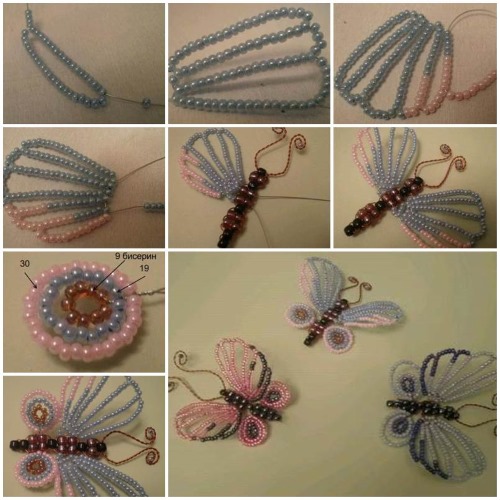
Butterfly from beads
The butterfly is made according to the diagram in the photo, starting with the wings, using the odd mosaic weaving technique. The tools you will need are a needle, monofilament or 0.3 fishing line, wire for the body and antennae, and multi-colored beads.
Progress of work:
- Cast on the 1st and 2nd rows as if they were drawn in 1 line.
- In the 3rd row, pick up 2 beads and thread them into the penultimate bead of the 2nd row. In this way, increase the wing where necessary.
- Continue weaving according to the pattern using the mosaic principle.
- To reduce the number of beads in a row, you just need to thread an empty thread without beads into the penultimate bead of the previous row and then follow the pattern.
- To make the butterfly's body, you need to string 5 beads onto the wire and tie the working wire into a ring to make a chamomile.
- Pass the working end through the next bead from either side.
- String 1 piece and pass through 1 bead of the 1st row.
- Thus, thread the strung beads in a circle into every 2nd bead. In the 1st row there will be 3 pieces, in the other 2. You will get a voluminous tube.
- Having completed 2 cm in this way, you should begin to increase the tube in volume.
- To do this, instead of 1 piece, string 2 pieces and thread them into 1 next bead of the previous row.
- Continue for another 2 cm. Start decreasing the volume of the body by skipping 1 bead in the row and inserting the next one through 1 bead in the working circle.
- At the end, weave in the eyes of the butterfly using a different color of beads, hide the working end.
- Attach wings to the body.
- To make antennae for a butterfly, you need to thread a wire through the area of its head so that both ends are the same length. 10 cm on each side is enough.
- Pick up 13 beads on 1 tendril and pass the end back through the 12th and to the 1st. The 13th bead will be the blocking bead. Make the second tendril in the same way. Hide the extra ends in the work.
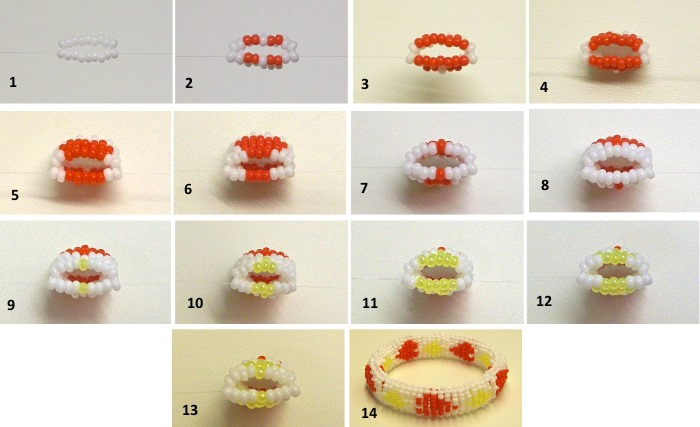
Beaded Keychain
The keychain "Watermelon" is made using the parallel technique. You need to take beads of 3 colors: red, black and green, preferably matte. The base will be wire.
Progress of work:
- Cast on 1 red, 1 black and 2 red. These are two rows, in the 1st row 1 piece, in the 2nd – 3 pieces. Close the wire so that the work resembles a circle.
- In the 3rd row, cast on 5 pieces - 3 red, 1 black, 1 red. This arc will be above the 2nd row.
- In the 4th row there are 7 pieces – 1 red, 1 black, 5 red.
- In the 5th row 9 pieces - 1 black, 3 red, 1 black, 3 red, 1 black, place above the 4th row.
- In the 6th row there are 11 pieces – 3 red, 1 black, 4 red, 1 black, 2 red.
- The last row has all green beads, 13 in number.
- Hide the loose ends in the work, attach the keychain fittings.
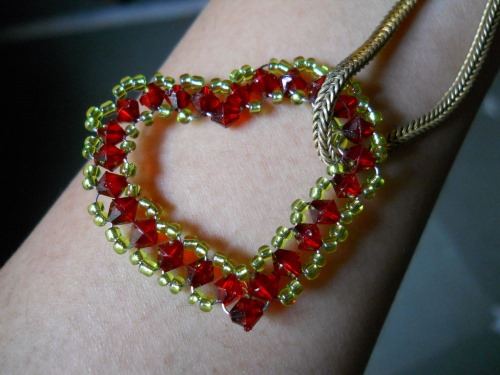
Heart of beads
A flat heart, also for a keychain, is made using the brick technique. You will need wire or thick fishing line and pink beads.
Instructions:
- String 2 beads and tie both ends of the fishing line into a knot.
- Thread the working line through the second bead from the bottom.
- String 1 bead, pass the working end under the bottom of the 2nd bead and the top of the 3rd.
- Make a chain of 9 pieces. This is the base and the central row.
- The second row is woven using the brick method according to the diagram in the photo.
- Each "wing" of the heart should have 6 rows, not counting the central one.
- Once finished, attach the chain with the keychain.
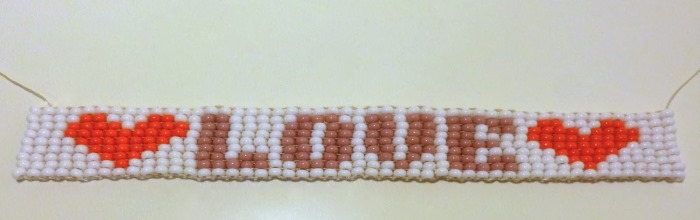
Bracelet with inscription
A bracelet with any inscription or picture is made using the even mosaic technique, only for work you will need a pattern with a picture, thread, needle, beads of working colors.
Progress of work:
- Pick up 1 bead, make it a blocking bead by passing the thread through it 3 times without tying a knot.
- 1st and 2nd rows are cast on according to the color scheme in one chain.
- Row 2: Weave using the mosaic technique, passing the working thread with beads through 1 bead of rows 1 and 2.
- At the end of the 2nd row, tie the ends of the thread, remove the blocking bead.
- Thread the needle through the last bead of the 3rd row and begin weaving in the beads of the 4th row, following the color scheme.
- At the end of the work, connect the last and first rows like a puzzle. The bracelet will become solid and will stretch over the hand.
- It can be made with locks and fittings for ease of putting on.
Step-by-step instructions with photos will help you master the basics of beading for beginners. In the future, each of the presented techniques can be improved, and you can begin to complicate the products by combining techniques with each other.
Having gained experience, you can make your own patterns based on these basics. Each master began his journey by studying the basic techniques, without which it is very difficult to comprehend this creativity independently.
Article formatting:Natalie Podolskaya
Video about beading
Beading for beginners step by step - photos and videos of making bracelets:
great selection of products, thank you
Very instructive. The material is presented in an accessible way, the products are interesting. Thank you.
Thank you, accessible article and video ?
Is beading for beginners? "Pick up 1 bead, which will be a blocking bead. After finishing the 3rd row, it is removed..." How is that? How, where, on what to pick up? How to make 3 rows. What is a blocking bead. In general, it is not clear
if you have one chromosome then everything is unclear
Thank you, we'll keep that in mind!
This description is suitable for those who already know something. And for beginners, it is necessary to show a video with a detailed explanation. Beginners are of different ages.
I have been weaving from beads for 2 years now and I needed this
very useful article, I'll take note
I don't understand anything, the instructions are stupid.
Eh...I'll go to Brawl Stars to donate again yyyy)))((((
++++ I support
It is clear that nothing is clear. A beginner will not understand anything at all!!! They write more stories, and describe diagrams in words, and that's where it all ends. First row, second row. Yeah...YouTube will help you, you'll understand faster there.
well, a fool can put one bead on a fishing line, but what then? either make a detailed video or don't teach what you don't know
thank you very much, it's beautiful and good
thank you very much very beautiful and good selection excellent