Different types of sleeves can transform the same model of dress, jacket or coat. Depending on its cut You can classify an outfit into one type or another - evening, casual, elegant or for a special occasion.
Almost every woman has that little black dress. But its specialty is not the neckline, stitching, or trim. If you need to complement or transform an outfit, just create a pattern and update even the most boring outfit.
Raglan sleeve pattern
Patterns for sleeves of different types began to appear in the Middle Ages. When outfits were created independently, there was no choice of the design of a piece of clothing. Later, women sewed dresses from hand-made fabrics.

Then the fashion for unusual outfits appeared, which differed in styles and decor. Later, during the heyday of the fashion industry, one could see only a few models of dresses, which differed in different types of sleeves.
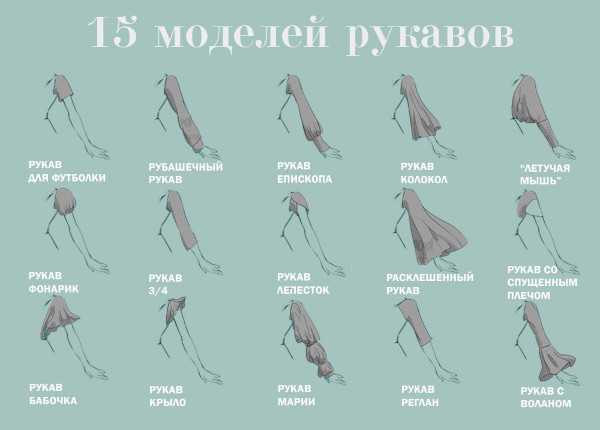
| Sleeve with frill | The chiffon and crepe fabric construction gives the dress a playful feel. |
| Set-in | The most recognizable type of sleeve, used in all shoulder garments. Can be made from available fabric. |
| Raglan sleeve | It was popular in sports knitwear. It was usually used in sewing jackets, dresses and autumn coats. The sleeve was soft, rounded, emphasizing the shoulder line. |
| Saddle sleeve | A variation of the raglan, but with a distinct square shape. Often found in knitted tracksuits. |
| Drop shoulder | Can be sewn from any fabric, but only in a loose cut. Used for sewing thick jackets, blazers and autumn coats. |
| With cut out shoulder | An elegant sleeve that frames the shoulder line. Can be sewn from non-elastic fabric. |
| Sleeve "Episcon" | A type of set-in sleeve that has the peculiarity of widening towards the bottom along the entire length of the garment. At the cut, it is gathered into a cuff. |
| Doloman sleeve | A variation of the "bat", it came into the world of fashion from the Hungarian peasant style of clothing. It has distinctive features in a wide armhole and a narrow bodice, separated by a cuff (a cuff with a turn-up at the bottom of the sleeve or its lower part). |
| Double sleeve | Typically used in elegant styles of dresses and blouses, the top is tapered with piping and falls down to the forearm. |
| "Bell" | The sleeve has been popular since the 19th century. The armhole is widened as for a set-in sleeve, the bottom is cut straight. |
| "Wings" | Thematic for summer clothes, sewn with a small head. |
| With a slit | An alternative to the "bell" with the same extension at the bottom. Its popularity passed after the 70s. |
| "Sheep's Leg" | A famous sleeve that appeared in the early 1800s. It was cut so that the head remained full due to gathering, and the bottom was narrowed without creasing. |
| "Kimono" | Traditionally, the one-piece sleeve remains an ideological product of the Japanese people. Now you can find a wide sleeve without gathers in some types of dresses. |
Another popular sleeve is the adjustable one - its length can be changed using a special loop. But its cut, like all the listed types of sleeves, is based on a simple design - raglan.
This is a convenient and common option for sewing shoulder garments. It is based on a one-seam sleeve pattern. It can be used in dresses, blouses, jackets, coats, blazers and outerwear.
The cutting technology is determined by the chest circumference. In order for the raglan sleeve to sit well on the shoulder, it is necessary to make increases or decreases depending on the fit of the shoulder garment.
For each silhouette, fitted, straight or semi-fitted, there is Features in the laying of the shoulder bend and the width of the sleeve during the design process:
| Shoulder circumference gradation | Increase (cm) |
| tight fitting | 2-3 |
| adjoined | 4-5 |
| semi-adjacent | 5-7 |
| extended | 8-9 |
| free | 10-11 |
| very free | 13-14 |
At the same time, constant values remain for many size series:
- armhole depth - up to 20 cm;
- upper arm circumference - 28-29 cm;
- sleeve length - 60-62 cm;
- wrist circumference - 15.6-16.2 cm.
Patterns for sleeves of different types can be cut using the basic pattern of a one-seam sleeve, where no other inserts or gathers are assumed. This design is considered universal for many shoulder garments.
They are used in sewing coats, dresses of different silhouettes, suits and jackets with different sleeve lengths. If the sleeve differs in cut and method of sewing parts, you will have to separately lay out all the measurements and design patterns.
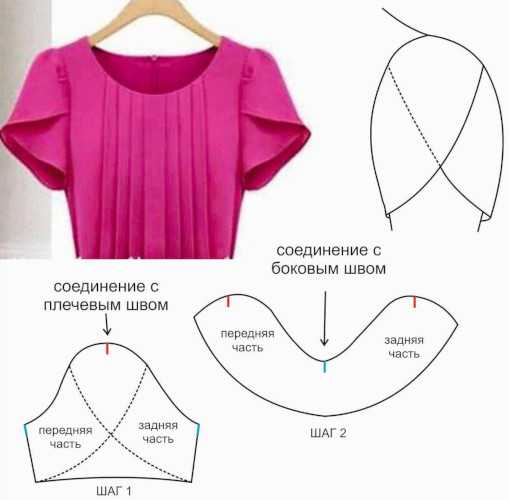
With assembly on the rim
An elegant and beautiful sleeve is suitable for sewing a light blouse or dress. Usually, a weightless fabric is used, which will beautifully emphasize all the subtleties of the falling sleeve. As a basis, you need to take the basic pattern of a one-seam sleeve, which is described below.
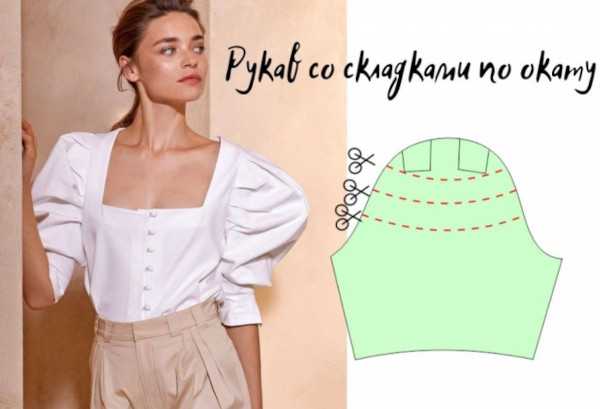
For modeling:
- The pattern for a one-seam sleeve should not have any tapered parts in the cuff area.
- Next, you should plot all the dimensions on the pattern, and then cut the sleeve along the vertical axis into 2 equal parts.
- Relative to the armhole, it should be spread by 5-6 cm on both sides.
- The cuff width remains 6-7 cm unless narrowing or widening is expected.
- The sleeve length can be reduced by 2-3 cm or ½ of the cuff width.
This shoulder garment can be supplemented with an outer seam along the armhole after assembly.
Narrow one-seam sleeve
A narrow one-seam sleeve is used in sewing blouses, jumpers and jackets. It is rarely used in elegant dresses, as the length of the product can interfere with comfortable arm movement.

To narrow the sleeve, you need to construct the pattern as follows:
- From the one-seam sleeve design, you need to create 2 sections by dividing the pattern in half.
- Next, you need to narrow the width at the bottom, based on the parameters of the model.
- The cut area should be divided into 4 parts, and the seams should be placed towards the main seam in the direction of the back.
- The length of the incision can vary within 10 cm.
- You need to build a rectangle AB and DC along the width of the sleeve.
- AB and DC remain equal to 30 cm in shoulder circumference relative to the measurements.
- Next, you should make an allowance and take into account the freedom of the garment’s fit.
- From the table (above) you need to find the value of the increase and add it to the structure.
- Size 1:30 and an increase of 4 cm will allow the sleeve to be loose.
- The length along the sides AB and DC must be determined to 62 cm.
- Next, you should draw a line for the sleeve cap using the formula: AB from ¼ of the armhole depth (excluding the dart).
- According to the formula 20:4*3 = 15 cm for the intersection of the cutouts. Let this be point P1.
- Next, you need to draw a ¼ part from segment AB to the middle division point - point O.
- The separation areas on either side will be defined as O1 and O2.
- From them you need to lower the lines to the segment DC, and add points H, H1, H2.
- Points O and P will serve as lines for constructing the armhole. At points P1 and O, dotted lines must be drawn so that the verticals are perpendicular to them.
- Each line leading to new points must be divided into 4 equal parts.
- From point PO3, you need to lay a 5 mm slope, and from O3O, lay a 2 cm long line.
- Point O5 will be new, so we need to draw equal segments from it to P, P1 and O2.
- For a shoulder garment, points should be drawn from segments D and C along the bottom edge.
- To create the height for the fastener, you need to lay 12 cm from point H.
The cut line for the sleeve is ready. All seam lines should be sewn with a zigzag or straight stitch.
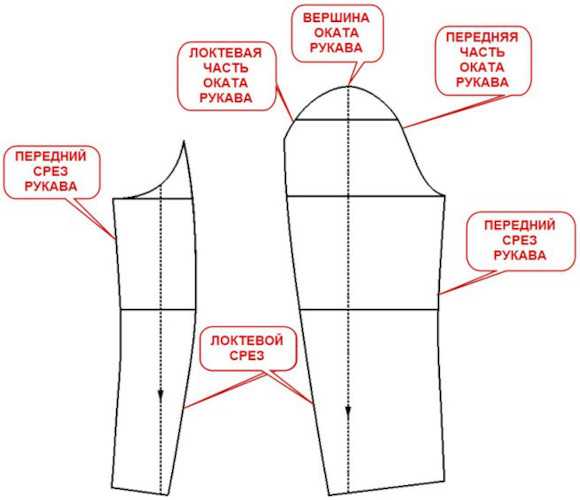
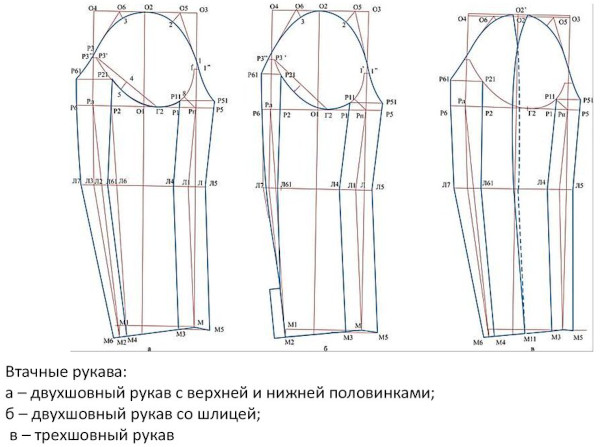
Two-seam sleeve with slit
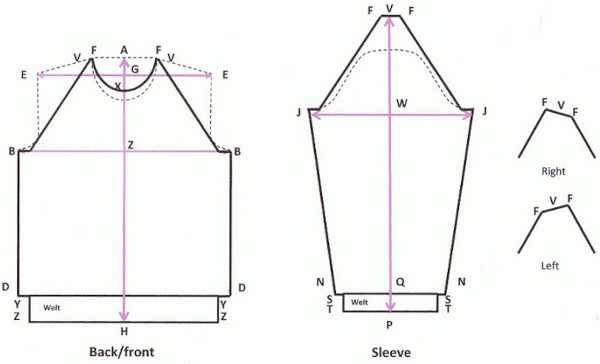
The pattern of a two-seam sleeve with a slit will be correct if you understand that the shoulder garment consists of two halves - upper and lower. Depending on the different types of construction, there may be several drawings. In this case, one drawing will be used for all parts, so as not to retake measurements and not cut both halves of the sleeve separately.
When creating a 2-seam sleeve design, you need to use the same measurements as in other cases.
To do this you need to know:
- height of the OR - is determined by the sides of the armhole: AP = (P2G2 + P3G3) * 0.5 + 0.4;
- armhole depth - VОк = ⅓ of PОG = 39/3;
- BY chest - DPr = PОG according to measurement parameters +3 cm;
- width of ½ sleeve from the top - Shruk = ⅓ of the bust according to the measurement and +3 cm for sizes 38/3.
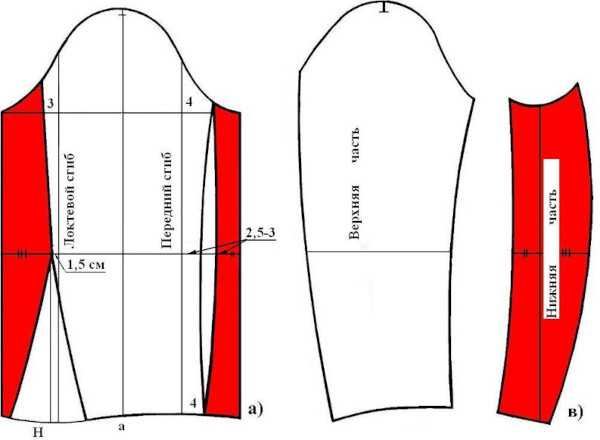
Knowing these parameters, you can begin to construct the pattern:
- The pattern consists of 2 parts, but first you need to line up the top cut.
- From point A, you need to draw the dimension OR and mark point P.
- Next, set the sleeve length from the front seam, indicating the segment AD. From this length, subtract 1 cm to get the arm length along the front seam.
- From the elbow level at point AL, you need to calculate PС/2, and then create point L taking into account the subtracted 1 cm.
- From points D, L and P, lines need to be drawn to the right horizontally.
- In terms of width, you need to set aside an indent from points A and D of segments AB and DC up to 12 cm (the calculation of the parameters of the width of ½ of the sleeve in the upper part must be taken from the table and calculations must be made with individual measurements).
- At the intersection of the segments, you need to put points P1 and L1.
- Having connected C and B, it is necessary to indicate the intersections for constructing the future sleeve cut of the purl seam. From point P and D it is necessary to lay 3 cm, from point L — 2.5 cm.
- To construct the sleeve cap line, segment AB must be divided into 2 equal parts, and then a line must be drawn upward from the resulting point O.
- From segment AP, you need to draw a connecting line to point O, dividing the segment into 3 equal parts.
- From AP, you need to draw a schematic dotted line from the center of the segment at a distance of 1.5 cm at an angle.
- The segment BP1 should also be divided into 3 sections, moving from the top value down to 1.2 cm.
- Points O and dotted line No. 1 need to be connected.
- From the center at 90 degrees you need to draw a line 1.3 cm up.
- Next, you need to lay the elbow seam from point C down 6 cm.
- The lower half is connected through point D (2-3 cm).
- To create a cut in the fold part, you need to draw a dotted line to points P1 and D to also mark half of the sleeve.
- For the slit, you need to take a 5 cm piece from the edge of the sleeve, lifting it up.
- Next, you need to divide the resulting segment and mark the height of the spline with point O1.
- The loops should be located 4 cm above the edge of the sleeve, and the buttons should be 1 cm from the edge of the slit.
Along the elbow seam line, the sleeve can be narrowed to the seam of the front part of the sleeve. After sewing the parts, you need to pull the sleeve and iron it.
Three-seam sleeve
This sleeve model is found in Chanel style jackets, when the sleeve is sewn from 3 parts. It can be supplemented with reliefs and figured seams. In the classic design, the parts may be missing.
The pattern is based on a standard sketch of a three-seam sleeve. It is important to consider that the middle line of the sleeve should repeat the bend line of the shoulder garment. To do this, the sleeve cap is calculated, and then darts with a depth of 3-4 cm are calculated.
The dart allows you to reduce the fit of the cap on the shoulder, and the sleeve will be easier to sew into the armhole. To do this, you can also raise the sleeve on the head by as many cm as the shoulder of the shelf and back will be shortened.
If you allow 1 cm for reduction, then the same length should be presented in the pattern on the shelf. In order for the fastener pattern to remain without displacement, you need to transfer all the dimensions to tracing paper and step back 5 cm from the side cuts.
The patterns of different types of sleeves are given in standard form, so they can be adjusted depending on the size and type of figure. For ties, you need to retreat 7 cm from the side cuts, taking into account the allowances. For them, it is permissible to set aside 4-5 cm. The distance between the seam lines in a three-seam sleeve can reach 2-3 cm.
In a three-seam sleeve, you can use the basic raglan pattern as a basis:
- Based on the two-seam sleeve, you need to construct non-sew darts along the armhole.
- The width of the armhole should be at the level of the armhole.
- Add 2 cm to the width of the armhole for seam allowances.
- With a sleeve length of 22 cm, the fit standard will be 0.07-0.08.
- If the sleeve fits poorly after trying it on, the cap can be increased by 0.5-1.0 cm.
- Before constructing the seams, you need to find the point of the central dart along the armhole - on both sides, you should mark off the dart: ras. ot. = Ppos. rasch.
- The calculated dart size cannot exceed 4 cm with a solution width of 2.5 cm.
- From the junction point of the lines, you need to lay 1 cm for expansion.
- The top edge should be sewn to fit without any additional darts.
- At the junction of the parts, you need to make 3 notches - on the armhole, armhole and elbow line.
After transferring all the pattern parameters, you can begin cutting the fabric.
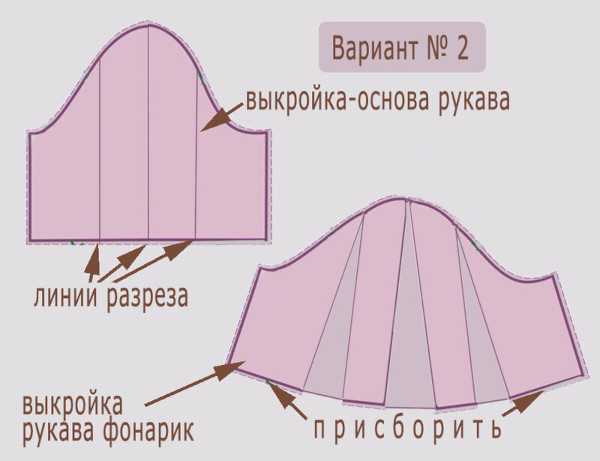
Lantern sleeve
This sleeve model adds romance and some sophistication to women's outfits. It is most often used in sewing blouses, dresses, jackets and coats. Modeling the pattern will require knowledge of the construction of a one-seam sleeve.
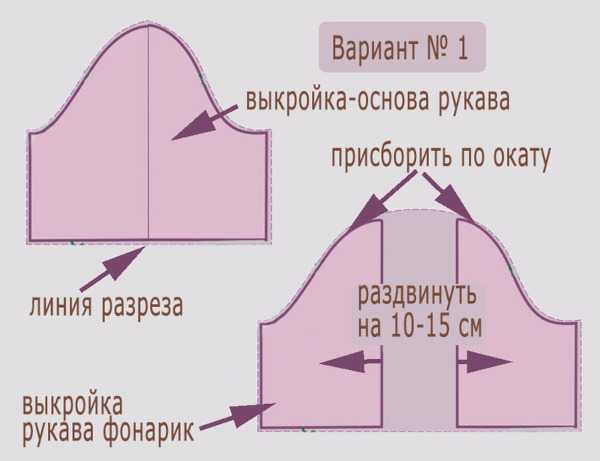
The lantern sleeve can be of any width. It is important to observe the proportions and sizes relative to the parameters of the model's measurements. The gathers can be weak or pronounced at the bottom. The more of them, the more significantly the sleeve length is reduced.
To model a lantern sleeve, you need to create a primary pattern for a one-seam sleeve.
Next, you should perform the following steps:
- According to the pattern, you need to mark off the required length along the bottom in the area of the sleeve cap point.
- Next, you need to draw a line along the cut.
- The sleeve needs to be divided into two equal parts, and then the center should be set aside along the armhole at the highest point.
- The sleeve must be spread by 16-17 cm and set aside for assembly.
- Next, you should lift the armhole by 3 cm, and then draw a line by hand along the armhole along the previous one.
- According to the pattern, you also need to make a bottom line, laying it at an angle. Its arc should be curved from below.
- Excess fabric should be gathered into folds.
Then you can sew the parts and assemble them. If the model is assembled correctly, sewing will be easier. You should not make too large gathers, as the fit of the shoulder garment may shift.
Short sleeve
The cutting plan for a short sleeve can be modeled on the basis of the basic design of a one-seam sleeve.
To do this, you need to lay out the pattern and shorten the shoulder piece:
- To shorten the sleeve, measure the desired length from the cap point at the sewing level.
- From the estimated bottom, you also need to measure 1 cm upwards to lay out an auxiliary line for finishing.
- The horizontal line should be of a width that is suitable for sewing on the piping (a strip of lace, for example).
- Next, you need to sew the sleeve pieces together as shown for the one-seam shoulder garment pattern.
The finished sleeve can be sewn into the main product.
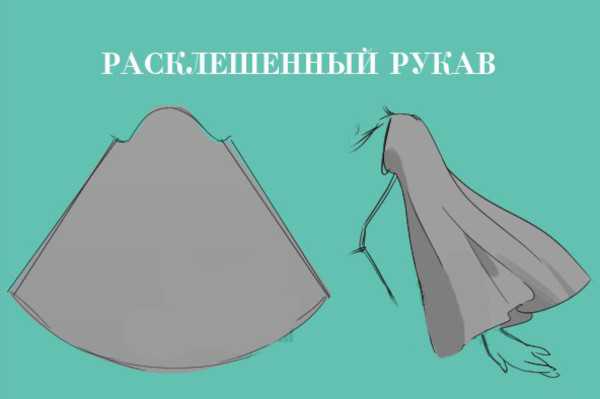
Flared
A sleeve that flares out toward the bottom is called an extended loose sleeve. The finished product, as a rule, has a loose length - it can be short or long.
The flare at the bottom gives the sleeve lightness, so this style is suitable for sewing a blouse, a dress with a sleeve, and more. A spring look will look good with a long flare model, and summer outfits - with a shortened one.
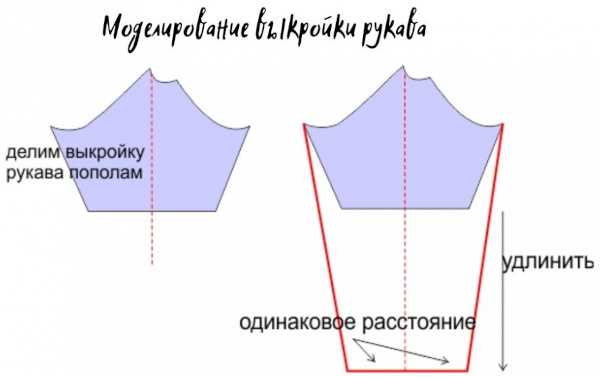
The pattern is based on a simple one-seam sleeve:
- Based on the pattern, you need to measure the desired length. As a rule, a point is set aside 12 cm above the bottom line of the pattern.
- Then it is necessary to determine where exactly the expansion will begin. The road zone should be increased minimally, continuing the expansion downwards.
- The degree of flare increase should always correspond to the bottom line relative to the expansion of the entire model as a whole. Therefore, the bottom line along the side cuts should be set aside 3-4 cm in the opposite direction. The greater this value, the more pronounced the degree of flare.
- For example, segment P1P needs to be divided into two equal parts.
- From the main division point, an indent of 1-3 cm should be made upwards.
- The indentation line should be marked PP2.
- From the obtained point, you need to again step back 1 cm to the cutting line.
- The cut should be designed as a beautiful arc, smoothly covering the edge.
A sleeve like this will differ from the classic one. In a half-sun sleeve, the flounces fall in soft waves. The classic model is also constructed on the basis of a one-seam sleeve, but without laying out the indents and cutting lines.
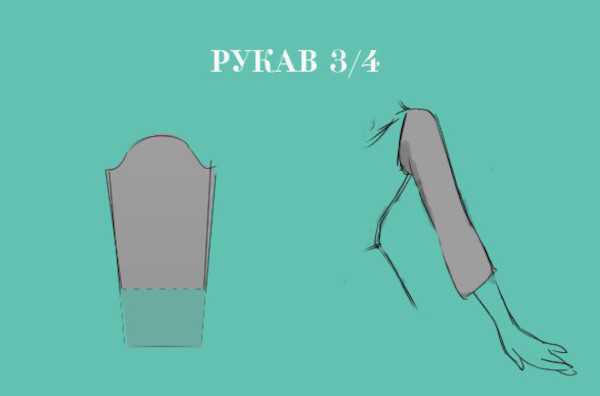
Three quarter sleeve
Unlike other models, this sleeve is constructed on the basis of a tapered sleeve pattern. Depending on the style, a one-seam sleeve model can be used. Most often, the shoulder product is used in sewing women's formal suits, business blouses, jackets.
To sew, you need to create a pattern and additionally draw several lines:
- The straight line OH should be drawn along the central part of the pattern.
- The resulting pieces should be divided into two again. You will get four pieces to form the sleeve.
- The bottom line should be constructed as follows: from the highest point of the sleeve cap, you need to draw line T1T2 to the junction with the side lines.
- The resulting segments T1T and T2T should be divided into two equal parts from the point where the line between the top and bottom passes.
- From the obtained points, you need to measure 2 cm upwards.
- New points need to be connected with a smooth arc.
The pattern model is ready. It is similar to a pagoda sleeve, but from different angles the armhole can be increased or decreased. There is no specific stitching point at which you can tighten it. Therefore, the sleeve has very individual characteristics, which is suitable for non-standard clothing models.
Tapered at the bottom
Patterns of sleeves of different types are built on the model of a one-seam sleeve in most cases. In the case of constructing a tapered shoulder garment, you can use the construction of a straight sleeve, where the shaped lines will be tapered to the central mark of the garment along the horizontal hem line.
- On the pattern, it is necessary to construct side lines to reflect the style as a guide.
- The lines should be tapered towards the middle of the sleeve along the bottom cut. To do this, make a 3 cm indent from points C and D.
- The sleeve model that needs to be narrowed should be transferred to tracing paper and shaped changes should be made to suit the individual size.
- Points C and D must connect inclined lines with new points P and P1.
- P and P1 are located on the armhole line in the sleeve descent section.
- When creating the side lines, their point of intersection at the elbow level is usually designated L and L1.
- From point L you need to make an indentation to the left by 2 cm, and from point L1 - to the right by 1 cm.
- A cutting line must be drawn through the formed points.
- The left cut needs to be made differently, connecting points D and P.
- The right cut should be made with a concave line, connecting points P1C.
- To make the sleeve cut line look nice, you need to make an upward curved arc along the bottom line, 2 cm from point D to point H.
The grain of the fabric should be vertical relative to the center line of the pattern, and also parallel to the segment OH. For convenience, you can add side allowances along the bottom line up to 3 cm and along the cap of the shoulder garment up to 2 cm.
Different types of sleeves give the product a unique style, which can complement an elegant dress, a demi-season coat and an evening outfit. Patterns for many types of shoulder products are based on single-seam sleeves, which can be changed relative to the parameters of individual measurements. This allows you to modify the width of the sleeve, the height of the cap and the level of the fit.
Video about different types of sleeves
Modeling of various sleeve models: