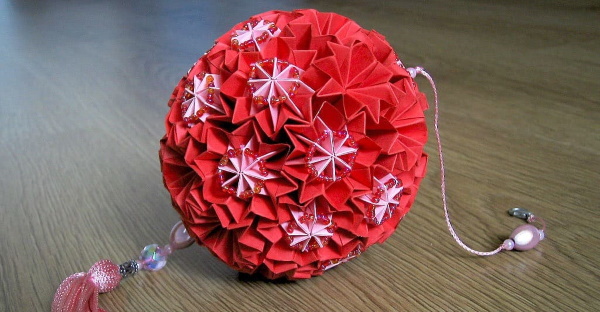
Items completed in the kusudama technique can be a good decoration for a room or a gift for relatives and friends. Often such paper balls are used as New Year's decorations.
General information
Kusudama paper balls have a positive effect on the nervous system. Such figures help to relax after a working day.
The process of their production has a beneficial effect on a person:
- develops creative abilities;
- teaches attentiveness;
- allows adults and children to have a good time.
Even the very first crafts will look beautiful.
In the Land of the Rising Sun, where kusudama was first made, such paper products are considered magical. The Japanese believe that they bring health and wealth. A multi-colored paper ball with medicinal herbs was often hung near the bed of a sick person, which contributed to his quick recovery.
To make kusudama balls you will need a minimum of tools:
- scissors;
- paper;
- double-sided tape for better connection of modules.
A module is one paper unit that is required to assemble a figure. Any color paper can be used to make a kusudama figure. You can assemble modules alone or together with someone, for example, the whole family.
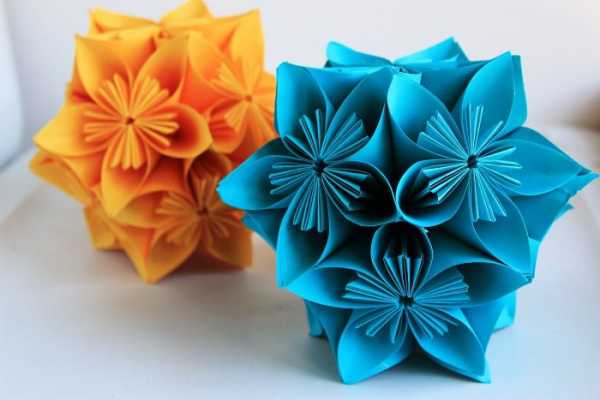
There are a huge number of varieties of kusudama figures. They can have not only different colors, but also different shapes. The modules can be assembled into different flowers. The Japanese most often make kusudama in the form of sakura and lily.
There are the following types of kusudami balls:
| Option | Description |
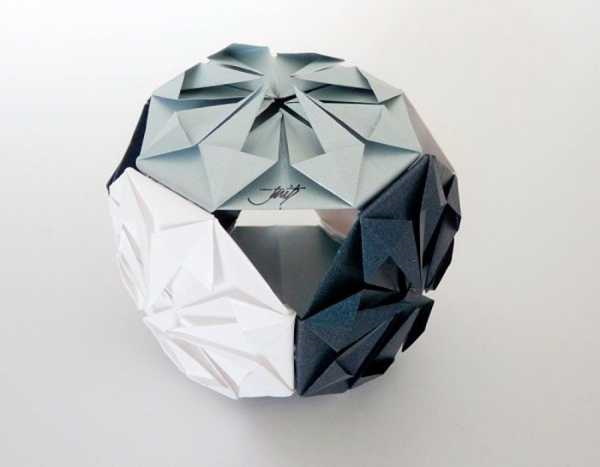
| Classic Kusudama | It is based on modules represented by triangles. A ball is formed from such modules. The scheme of the figure is simple, even someone who has decided to get acquainted with the basics of oriental art can make it. |
| Model in the form of sakura | The product only visually seems difficult to make, but in reality it is accessible to beginners. Kusudama sakura is voluminous and looks beautiful. |
| Modular flower | It consists of 10 small flowers. In this case, glue is used to connect the modules. The main difference between this kusudama and classic products is that it uses 60 modules. It takes a long time to collect the flower kusudama. |
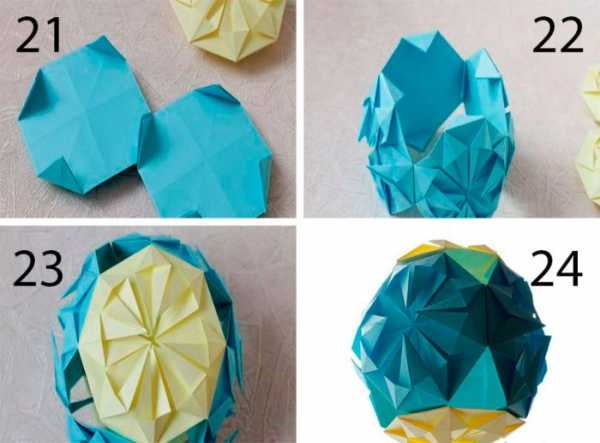
Classic version of the product
Kusudama paper balls are easy to make and require a small amount of raw materials.
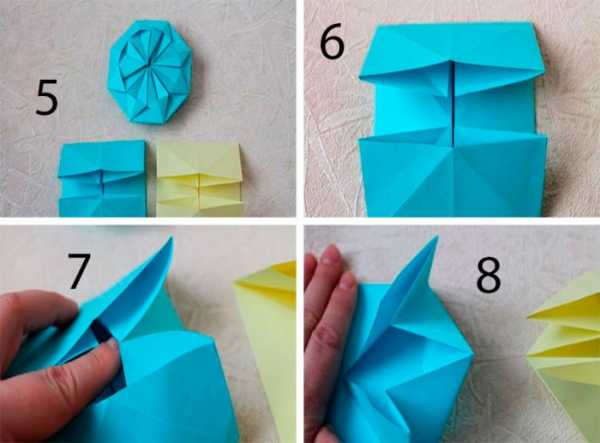
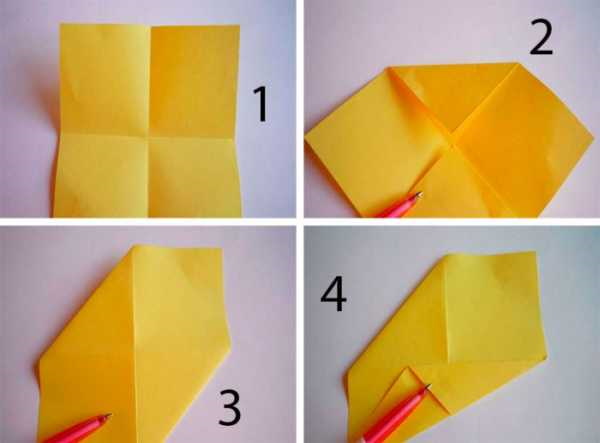
The production of a classic product takes place in the following 12 stages:
- Cut out squares. The sizes of the cut out figures may vary, usually 6 or 9 squares are formed from an A4 sheet. The exact number depends on what size figure the manufacturer wants to obtain. If you want to make a classic kusudama, you should take 6 squares.
- Fold the squares. Each of the 6 (9) prepared figures should be folded diagonally on 2 sides, marking the central point of the square. The result will be 4 triangles that form a square of paper.
- Pull the corners towards the center. This will create a kind of envelope.
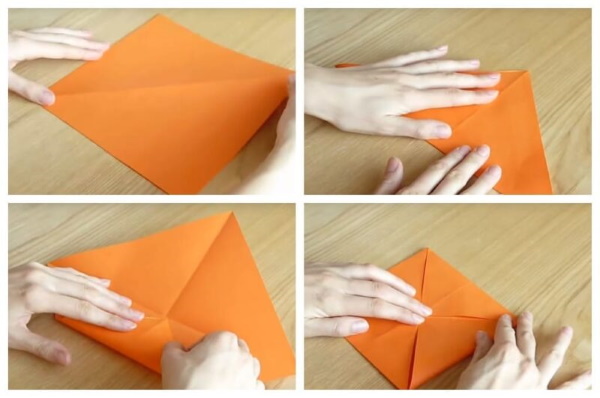
- Unfold all the sheets, returning them to their original state. The remaining marked lines will be needed in further work.
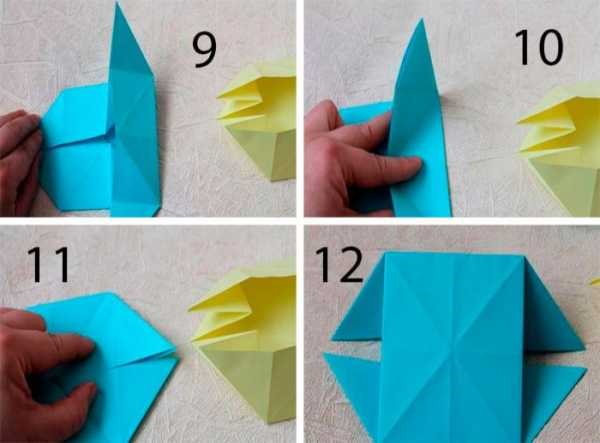
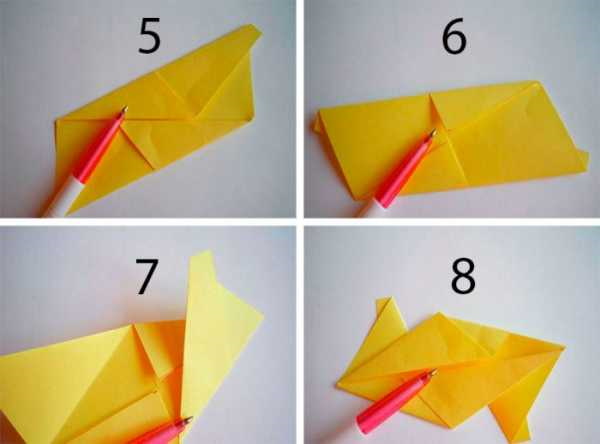
- Fold each square in half.
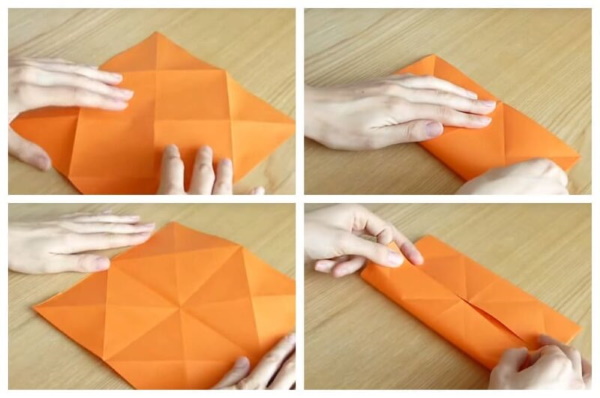
- The resulting rectangles from folding in the previous step are folded in half. This should be done inward so that the upper and lower parts are connected.
- Pull out the hidden pocket from the module, which is located in the middle. At the same time, you should hold the left half of the module, thereby allowing the pocket to come out more easily. Unfold the right part into a trapezoid, similar to an origami-style ship.
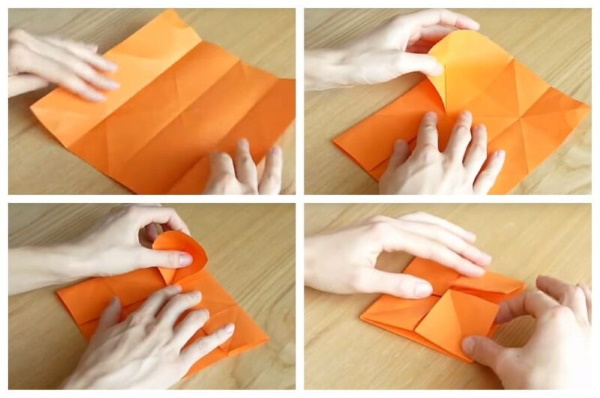
- Using the lines that were marked in the early stages, remake the resulting trapezoid so that a pair of triangles with pockets are formed. To do this, place your finger in the middle, and then bend the upper and lower parts toward the center.
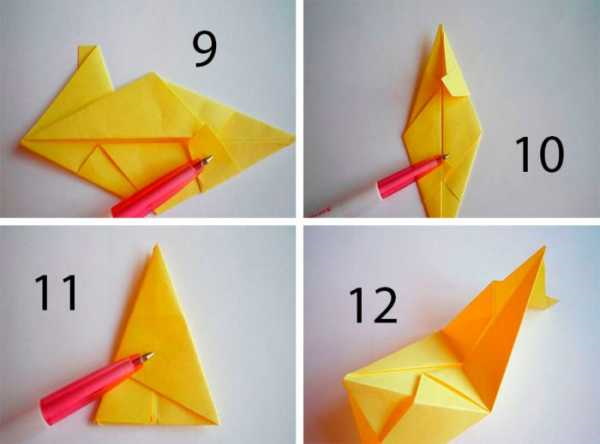
- Use your finger to open the pockets, which will result in squares being formed from the paper. This must be done with each of the 4 pockets.
- Fold each of the 2 sides of each of the small squares to the center. This will form a pair of triangles. When all 4 squares are folded, you will get 8 triangles.
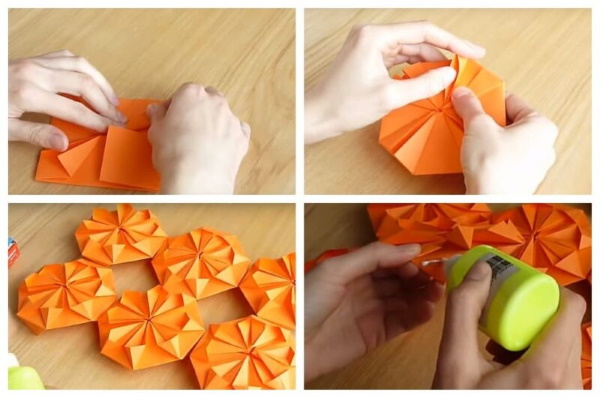
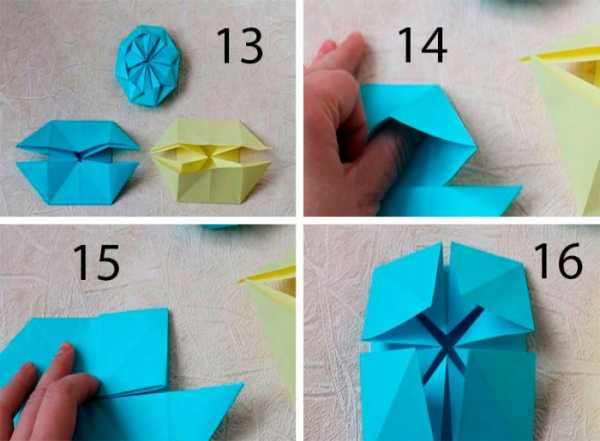
- Lift and straighten each of the 8 triangles, and make another small triangle on top.
- Straighten and fold the corners that protrude beyond the main body. The result should be an octagon, not a triangle.
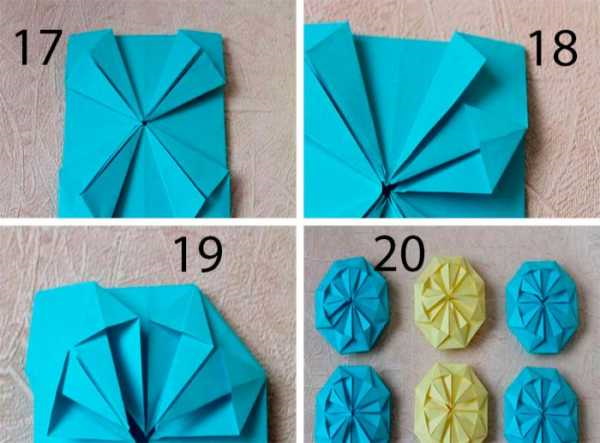
This completes the process of making the 1st module for the classic kusudama. Now you need to make 5 more of the same modules in the same way. Small pieces of double-sided tape are used to connect the modules. You can also use glue for this purpose. As a result, a beautiful modular ball is formed.
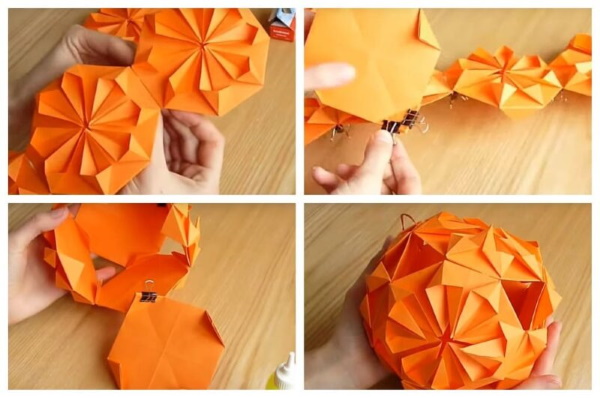
Such a product will in many ways resemble a cube, because 6 faces will be clearly visible on it - 4 side, 1 top, 1 bottom.
You can do nothing else with this ball and admire what you have created, or decorate it further by filling it with herbs or attaching woolen threads or floss to the bottom edge. You can also use rhinestones and artificial flowers.
Butterfly Ball
Kusudama paper balls in the shape of butterflies will look beautiful, for example, above the bed. Making a paper butterfly is not difficult. It is best to use a sheet in the shape of a rectangle with a side ratio of 2:3.
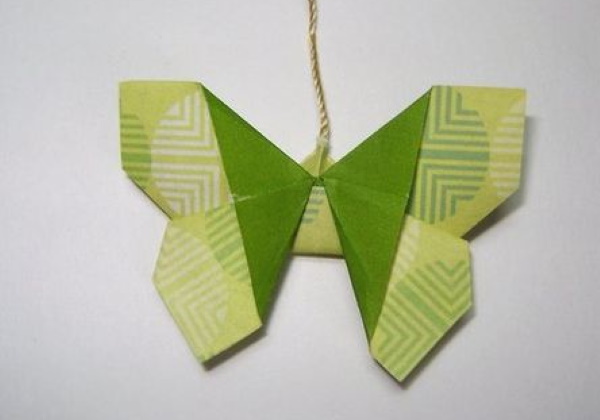
The steps to create a butterfly are as follows:
- Fold the sheet in half.
- Fold the sheet in half again.
- Flatten the pocket.
- Turn over and do the same on the reverse side.
- After folding the halves, bend the corners and tuck them inside.
- Raise the tips, directing them to the top of the triangle. The length of the wings depends on the distance to the top.
- Similarly, you need to bend the corners, turning the almost finished butterfly over to the other side.
- Attach the hanging thread with glue.
Bells
The "bells" model will require 60 small modules. 1 flower will be made from 5 such modules. There will be 12 flowers in total.
The creation of a flower consists of the following stages:
- Fold a sheet measuring 9 x 9 cm diagonally.
- Lower both upper corners of the resulting triangle to the lower one.
- Bend the ends of the triangle one by one to form a figure resembling a tulip.
- Open the small triangles along the height, then carefully iron the folds.
- Fold the protruding ends of the triangles on both sides.
- Fold the triangles inward along the existing fold lines.
- Glue the finished module along the inside.
- Having made 4 more of the same modules, connect them into a flower.
- Make 11 more of the same flowers and glue them together.
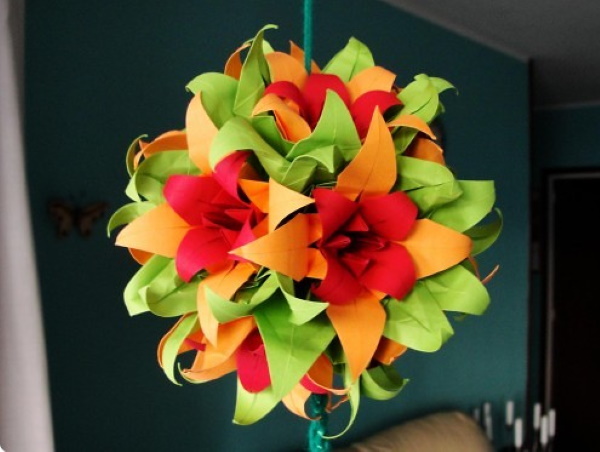
Kusudama lily
Kuskudama lily balls can be of one color, but it is better to use paper of different colors.
Additionally, you can use:
- threads;
- needles;
- ribbons;
- beads.
To make it you need:
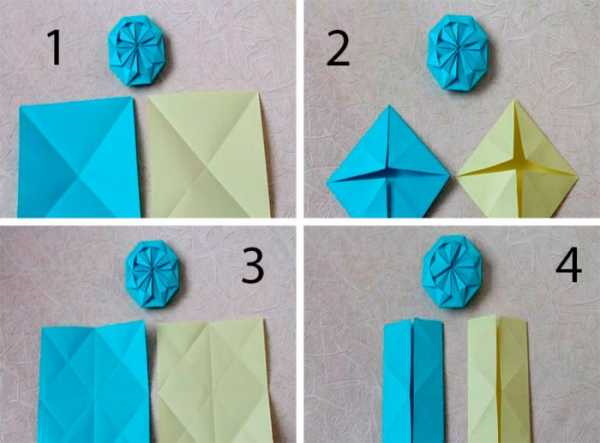
- Take a square sheet of paper and fold it in half lengthwise.
- Fold the sheet diagonally.
- Fold again lengthwise and diagonally.
- Press the center of the paper blank and fold it to form a double square.
- Straighten and iron each edge.
- Bend the corners towards the center of the resulting figure.
- Straighten the pocket by folding its lower part upwards. This should be repeated four times.
- Bend the “tail” that forms on the unfolded figure upwards.
- Turn the module over with the flat side up and fold the corners towards the center.
- Straighten the petals, bend each of them down and curl them using scissors.

These are the stages of making the 1st line, for a complete product you will need 36 of them. First, using a thread and a needle, you need to connect 3 lilies, then 3 more, and so on up to 36. All 12 groups, consisting of 3 flowers, must be connected to each other.
Creative Ball
To make a creative ball you will need:
- paper clips;
- double-sided colored paper measuring 10 x 10 cm;
- ruler;
- glue.
The work takes place in the following stages:
- Fold a square of colored paper in half diagonally.
- Fold the edges of the resulting triangle upward to form a rhombus.
- Apply glue to the edges of the blanks.
- Connect the pieces to form a petal.
- When 5 petals are made, assemble them into a flower. For this, also use glue. In total, 12 flowers should be made.
- Start assembling the ball. To do this, apply glue to the middle fold of any of the flower petals. Attach another flower to the place where the glue was applied. Glue alone is not enough: use paper clips to secure it.
- After applying glue to the petals of the 2 connected flowers, attach the 3rd flower to this flower pair. As a result, a triangle is formed.
- For more secure fixation, use paper clips when attaching the 3rd flower. It is better to take 2 at once.
- Attach the 4th and 5th flowers in the same way.
- After applying another 1 portion of glue to the petals of 3 flowers located next to each other, you need to glue the 6th flower to this composition, and use 3 paper clips to secure it securely.
- Make the other half of the figure from 6 flowers.
- When both halves are ready, glue them together and connect them with paper clips.
- When the glue is completely dry, remove the staples.
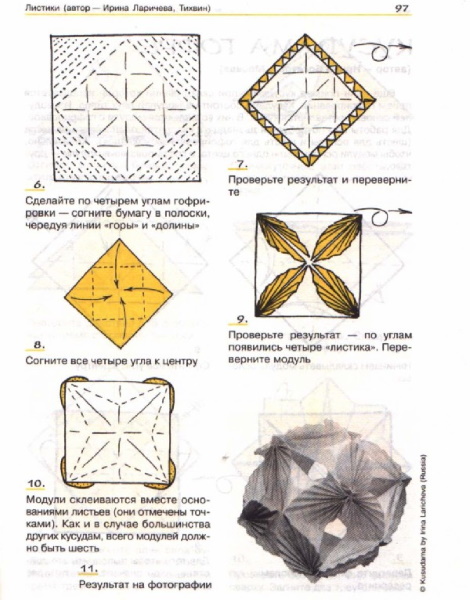
Diamond
A beautiful diamond ball can be made from 6 sheets of A4 size double-sided colored paper. To connect them you will need glue, and to cut them you will need scissors.
The production of a diamond ball takes place in 16 stages:
- Turn sheets into squares.
- Bend the resulting squares diagonally on both sides.
- Bend each corner to the center. Then straighten the sheets.
- Fold the sides of the square pieces towards the center.
- Fold the top and bottom sides towards the center as well.
- Place your palm on the center and pull out the hidden edge of the paper on the right.
- Lay out part of the workpiece.
- Place 1 finger in the middle of the top of the workpiece and place 2 fingers under the paper at the top and bottom.
- Removing your finger from the top of the workpiece, press both sides with 2 other fingers. The same must be done on the other side.
- Using your finger, open each corner.
- Make a square. To do this, fold the corners to the center.
- Fold the sides of each square towards the center.
- Raise and straighten all sides.
- Fold the 4 protruding corners to form a figure with 8 corners.
- Make 6 blanks using the principle described above.
- Glue the modules together. First, connect the 4 side elements with corners. Then attach the bottom and the lid.
Star ball
Kusudama paper balls in the shape of a star look very beautiful.
To make them you will need:
- scissors;
- ruler;
- 10 x 10 cm squares made of double-sided colored paper.
The work takes place in 15 steps:
- Fold the square in half, then straighten it out.
- Fold 2 corners towards the center.
- Turn the workpiece over.
- Fold 2 opposite edges towards the middle.
- Turn the workpiece over again.
- Fold the right corner up and the left corner down.
- Turn the workpiece over again.
- Fold the corners along the fold lines.
- Having placed the workpiece vertically, connect its vertices.
- Open up the outer folds slightly.
- Make 30 modules using the diagram described above.
- Fasten 2 modules together. Insert the edge of 1 of them into the flap of the 2nd.
- After attaching a couple more modules, form a pyramid.
- Forming the 5th ray, close the circle.
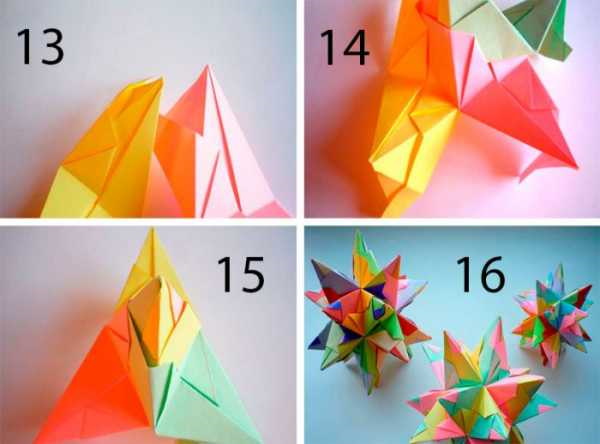
- One beam must consist of 3 modules – the circle must be closed by 5 beams.
Openwork ball
Anyone who wants to know how to make a simple kusudama ball is recommended to familiarize themselves with the openwork craft. Such a product will be a good decoration for a living room or office space. This ball can be placed in any corner, and on the eve of the New Year holidays it can be hung on a branch of a coniferous tree.
To work you will need:
- scissors;
- glue;
- 30 paper strips of 2 different colors;
- knitting thread.
The manufacturing process takes place in 7 stages:
- Take the strip and fold it in half from left to right. Then straighten the paper. This will create a bend.
- Fold the top corner to the center. Do the same with the right corner. Pull the left corner down, and the right corner to the point of contact with the center of the paper strip. Repeat the steps described above.
- Fold the resulting figure in half and then straighten it out.
- Take a strip of a different color, bend it, stepping down a little and fold it like an accordion so that the area where the last fold should be remains even. The second half is processed in the same way. Fold both lower corners.
- Place the first strip in the center of the second and fold everything along the existing fold lines, and glue the resulting figure together.
All the above steps must be repeated again for each of the prepared paper strips. - When all the blanks are made, start assembling the ball. Take one of the blanks and apply glue to the surface near the accordion. Glue the 2nd blank to this same area treated with glue. This is how 5 modules should be connected. They form a circle that will be the basis of the figure.
- Attach the remaining modules to the base until a ball is formed.
Using glue, you need to attach a thread to the resulting openwork figure. Then you just have to wait for the adhesive to dry, and the ball will be completely ready to serve as a decoration for the room.
Sonobe ball
Sonobe is a simple scheme for making paper balls. It is well suited for those who do not yet have any experience in the art of kusudama. The work is simple, so you can involve small children in it.
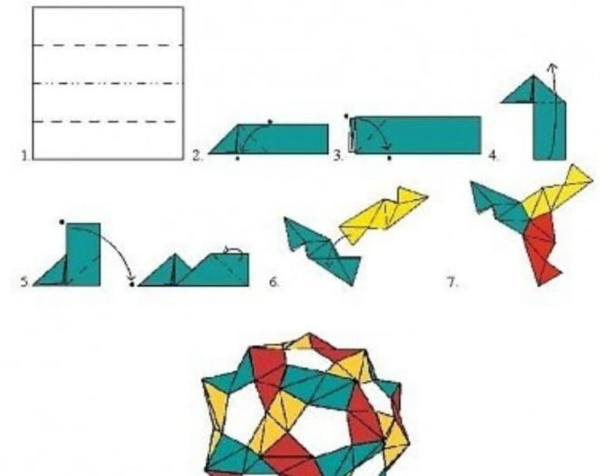
To do this you will need:
- approximately 30 square sheets of paper;
- PVA glue;
- ribbon.
The process of making a ball according to the sonobe scheme takes place in the following 6 stages:
- Make modules. Take a sheet, bend it, then unfold and smooth it out. Both edges must be pressed to the resulting line.
- Fold the top corner so that it touches the fold line. Do the same with the second corner. Fold the resulting triangles again.
- Press the edges to the center, and then make additional folds. Do the same for the other end.
- Fold one side and insert the corner into it. The result is a rhombus. It needs to be folded in half.
- Take a triangle from the blank and attach it to the center. The same must be done with the opposite edge. All the actions described above must be performed with each of the 30 square paper sheets prepared for this craft.
- Assemble the figure. The corner part of one module should be inserted into the pocket of another. Then you can take the 3rd element and add it to the first 2. The result will be something similar to a pyramid.
The remaining modules must be attached using a similar scheme. Glue is used for connection.
When the figure is ready, you can attach a ribbon to it and hang it in any place that you want to decorate. It is not difficult to make a kusudama ball, which will become a great interior decoration. All you need is paper, scissors, a desire to create, as well as a little free time and imagination.
Video on making kusudama balls from paper
Kusudama paper ball without glue, step by step:
I liked everything, thanks for the useful master classes with photos!