Origami is the making of paper crafts. Origami develops children's creative abilities and artistic taste. To make origami with your own hands, you should fold paper according to specially developed patterns, step by step.
Materials and tools for work
Classic origami was originally made from a square sheet of paper without the use of scissors.
Modern techniques allow the use of various types of materials and tools:
- Paper – you should choose a sufficiently dense one
- matte, so that the folds bend easily and at the same time hold their shape.
- Glue It will be needed for small parts and for securing the product if it is intended to be kept as an exhibit.
- Dye – to give the desired color. It is more convenient to use paint in the form of a spray.
- Scissors – it is advisable to have several sharp scissors of different sizes with ends of different shapes (straight, rounded). You can also use a cutter.
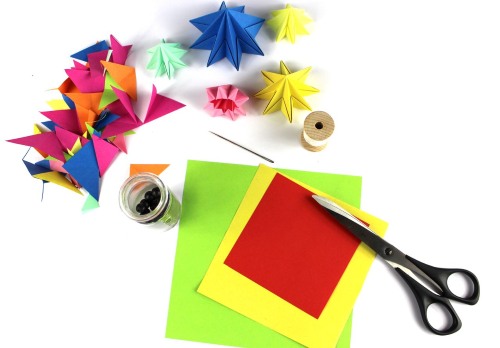
- For marking you will need a simple pencil and simple drawing tools - a ruler for drawing a diagram, a triangle, a protractor for folding paper at a certain angle.
- Needle and thread — sometimes, to secure the parts, you need to stitch them.
- To decorate the product, you can use any materials at hand: buttons, beads, rhinestones, beads, scraps of fabric, etc.
How to choose paper
To make origami, you need paper that holds its shape well, that is, of sufficient density. This can be Xerox paper, white or colored, ready-made sets of colored paper for children. You can use matte wrapping paper, corrugated and different types of embossed paper look good. There are also sets of special origami paper on sale - "kami".
To make this craft you may need thin paper, but it does not hold folds well.
In this case, you can make a so-called sandwich, that is, place thin foil between the sheets - the product will hold up perfectly.
If the child is interested in this type of creativity and already has certain skills, it is recommended to purchase special Japanese paper called washi or washi - this is a soft, hand-made material that is sold in specialized stores and will ensure high quality products.
Types of origami
Origami elements can be introduced to small children, however, it is recommended to involve older preschool children in classes on making products using this technique, as they already have skills in working with paper, scissors, and glue. Classic origami is suitable for beginners, as the simplest method of execution with a minimum number of folds.
One of the varieties of simple origami is kirigami, which allows cutting with scissors.
A more complex type of origami is modular. This technique follows the classic canon: products are made without scissors or glue. The peculiarity of modular origami is the use of many identical parts - modules, from which the whole is assembled. The elements are inserted into each other in a certain way.
You can create original origami products with your own hands from modules using diagrams and step-by-step instructions, i.e. step by step.
The next level of complexity is an origami pattern or unfolding. This type involves creating a complex diagram on which each fold of the sheet is indicated. There are implicit and explicit patterns: in the implicit one, all lines are indicated in the same way, while the explicit one shows them differently - different thickness, different colors, solid line/dotted line. There is even a figurative name for these lines: mountains and valleys.
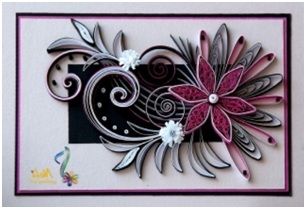
Some applied arts masters also classify quilling as origami. The essence of this technique is cutting and twisting long strips of paper. Using so-called "contour" quilling (twisted strips are placed on edge), you can create complex, colorful compositions.

If you need to soften sharp edges or corners, "wet folding" is used. For this type of work, thick, dense paper is used. The places that form the main shape are alternately wetted with water and rounded. An important detail: each such element must dry before the work continues. This technique is complex and requires certain skills to give the product smooth lines.
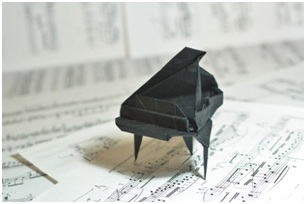
Children are especially interested in making movable and inflatable origami figures, because it turns out not only a craft, but also a toy. A spinner, a fluttering butterfly, a moving dragon, a transforming pyramid, an inflatable frog - many simple origami, made with your own hands, according to simple schemes, step by step, will bring true pleasure to the child.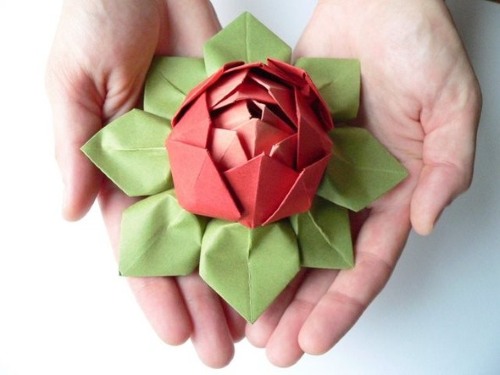
Examples and photos of origami made by hand, diagrams, step by step can be seen below.
Rose
An origami rose can be made using techniques of varying complexity. A simple model is created from corrugated paper.
When making step by step you should:
- Fold the paper into several layers.
- Cut off the corners on one side (to give it a petal shape).
- Screw onto the rod and secure.
Another simple option is performed according to the following scheme:
- A square sheet of paper is folded in half, then in half.
- Fold the top corner on both sides to form a triangle.
- The bottom corners are folded towards the center and opened to form a square.
- Repeat the same action on the other side.
- The upper corners are straightened by bending them downwards.

The rose pattern is made using a ready-made scheme, which needs to be printed or redrawn:
- You need to fold the diagram, fixing the lines, and then unfold it.
- Along the resulting lines, fold the triangles inward.
- Then you need to fold the triangles inward along the dotted lines.
- Then the triangles are collected into rows along the auxiliary lines.
- Carefully open the triangles.
Tulip
Even a beginner can make an origami tulip with his own hands if he follows the diagram and acts step by step:
- Fold the square sheet diagonally so that the fold lines form a cross.
- Fold the sheet to form a horizontal line.
- Fold the triangle so that the folds are on the inside (along the longitudinal lines).
- Bend the bottom corners towards the top on both sides.
- Bend the right corner to form a rhombus. Do the same on the back side.
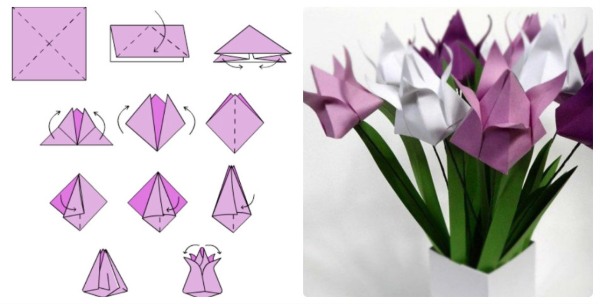
- Fold the right corner towards the center, the left corner should completely cover it (on both sides).
- Tuck the corners into each other.
- Inflate the flower through the hole at the bottom.
- Bend back the petals.
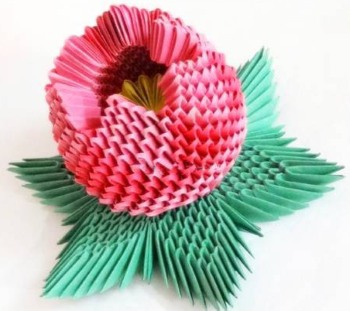
Water lily (lotus)
Making a water lily or lotus will also be feasible for children at the initial stage of acquaintance with origami. This flower can be made using different folding techniques with gradual complication.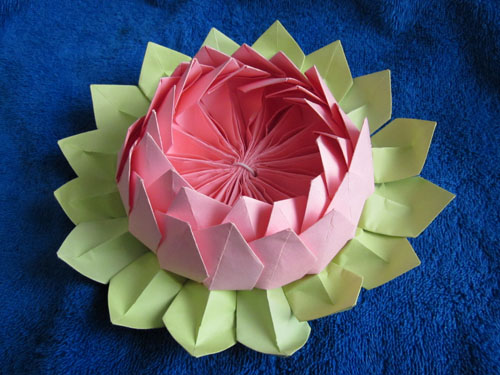
Step-by-step production of a simple model:
- Mark the fold lines by folding the square sheet diagonally twice.
- Fold the corners towards the center.
- Repeat the action two more times (each time decreasing the square).
- Turn the workpiece over and fold the corners towards the center again.
- The protruding corners are slightly bent.
- Turn over, bending back the first row of petals, then the 2nd and 3rd.
Butterfly
A child can make an origami butterfly with his own hands, using diagrams, step by step, even without preparation, since this is one of the easiest tasks, if follow the step-by-step instructions:
- Fold the paper square horizontally and vertically, then diagonally.
- Form a double triangle by folding the edges of the horizontal fold down to the bottom of the vertical fold.
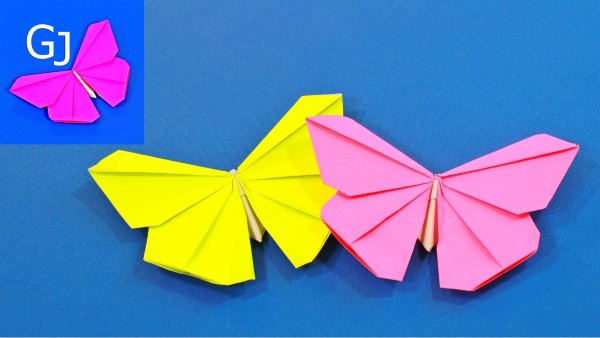
- Bend the edges of the upper triangle towards the top.
- Turn over to the other side with the top down.
- Extend the top of the triangle slightly beyond the base, bend it and attach it to the back side.
- Fold the workpiece in half.
- Turn the product over and bend the wings.
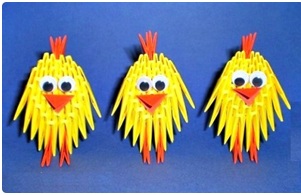
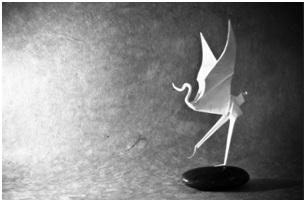
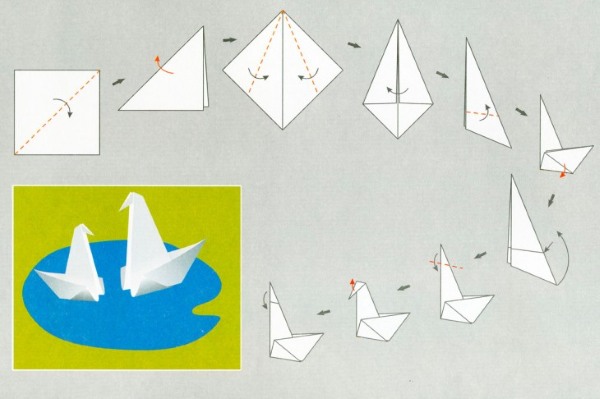
Birdie
Making a bird is also not a difficult task. Most often, figures of a crane or a swan are made. This is explained by the fact that the patterns of these birds are the simplest. If the child already has skills in the origami technique, you can offer him to make any bird.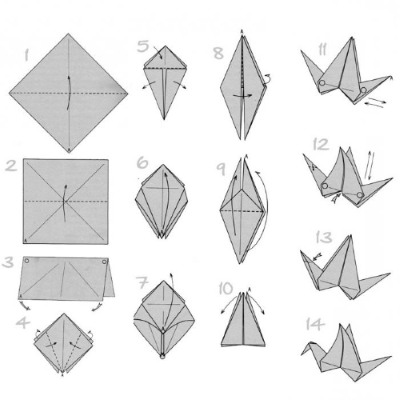
Making a bird step by step:
- On a square sheet of paper, mark the center line.
- Match the side corners to the intended line (elongated rhombus).
- In the long part of the rhombus, straighten the corners from the inside.
- Fold in half along the vertical axis.
- Bend the corner perpendicular to the base, bend the tip outward.
- The tail can be folded like an accordion, if desired.
Vase
To make an origami vase, you can use different folding techniques. For beginners, this is a simple method from one sheet, the sides of which are different colors.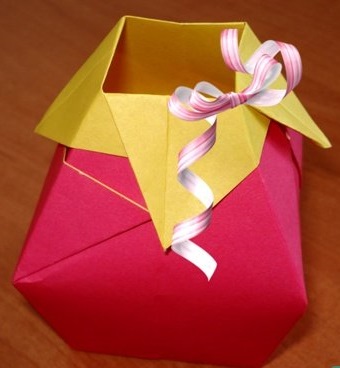
Instructions:
- A colored sheet of paper is folded diagonally and unfolded.
- Turn the workpiece over, fold it horizontally and vertically, and unfold it.
- Fold in the shape of a diamond, bending the corners towards the center.
- Turn it over and fold the corners again.
- The upper left corner is folded towards the center and folded back, forming a fold.
- The top corner is folded down.
- Turn it over, repeat the same steps and turn it over again.
- Bend the top corner again and pull the right corner towards the center.
- Turn the pages over and fold the left corner towards the center.
- Fold the left corner and turn from left to right.
- Lift the top corner, tuck the left corner into it, and secure the folds.
- The bottom corner is folded upwards, unfolded, and the workpiece is turned over.
- Fold the bottom corner back again and inflate the vase through the hole at the bottom.
Box
Making a paper box is a simple and interesting activity for children. It can be made in the form of a chest of drawers, a valentine, and other shapes.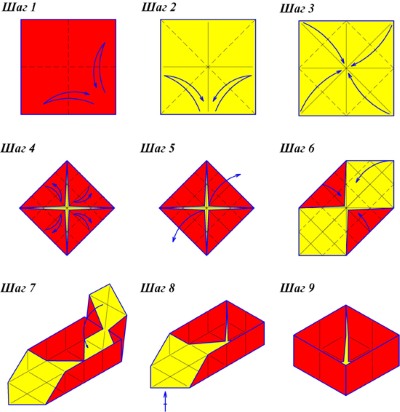
To make a simple box with a lid you need:
- Fold the sheet in half in different directions, bend the corners to the center.
- Fold the edges in half, straighten them out, and fold the sides towards the middle.
- Make side folds again, gather the long sides.
- Fold over the remaining edge.
The lid is made in a similar way.
Bookmark
A bookmark is a simple craft that has practical application. Bookmarks woven from strips of colored paper are convenient and beautiful, and pencil-shaped ones are original.
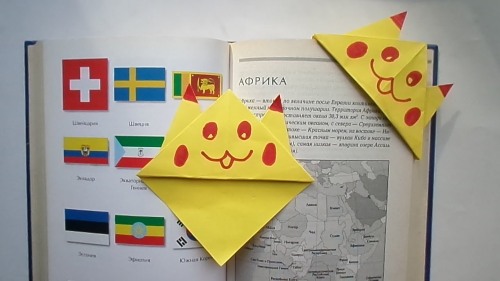
The bookmark "corner" can not only mark a page, but also highlight the desired section of text.
A pencil bookmark is made like this:
- A rectangle is cut out from a sheet of paper, painted on one side.
- Turn it over to the white side and fold over a small strip.
- Mark the central line.
- On the colored side, fold the corners towards the center.
- Fold the triangles again.
- Turn over and fold the workpiece upwards.
- Turn over again and fold both sides towards the center.
- Place the strip in the pocket and lightly secure the top with glue.
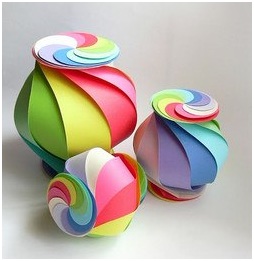
Ball
Paper balls are made using different origami techniques, from simple to the most intricate and complex. Their purpose is also varied: you can simply play with inflatable paper balls, you can make decorations, for example, for a Christmas tree, or you can create a magical, magic ball that miraculously changes its shape.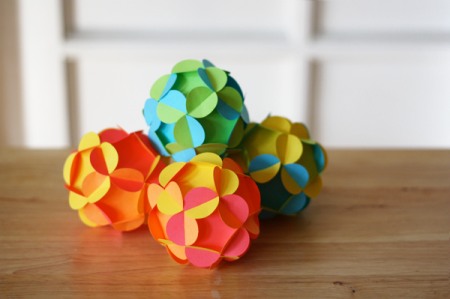

A 3D ball, made from fragments, similar in technique to modular origami, is easy to make but very beautiful.
To create a New Year's ball you need:
- Make 12 circles of three colors.
- Fold the circles in half and fold them, combining the colors symmetrically.
- Fasten with a stapler or stitch along the fold line.
- Apply markings (additional template) to a sheet of paper: divide the semicircle into three parts, mark the gluing locations.
- Apply glue in dots to the top mark.
- Turn the “page”, repeat the same action with the bottom point, etc.
- Unfold the craft into a ball and glue the last surface.
Modular origami - swan
Modular origami is the most striking variety of this art. The connection of many fragments (modules) creates the impression of volume and color of the product. The most popular object in this type of creativity is a swan, especially a double one. The master class will help in the step-by-step manufacture of an origami swan with your own hands according to the scheme.
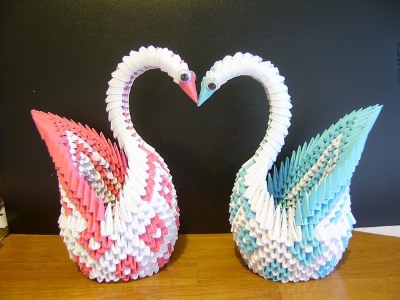
According to the instructions, you should:
- Make modules in the form of folding triangles (you can experiment with color). You will need more than 1500 parts.
- By inserting modules into each other, connect them in the form of a double circle (60 pcs.).
- Add circles up to 10.
- Bend the workpiece slightly inward to form a bowl.
- Add 5 more rows, bending and stretching.
Do-it-yourself paper origami in the shape of a swan is easy to make, following the step-by-step execution scheme. - Make a neck from modules of a different color (cone-shaped upwards).
- Collect the tail in the same way.
- Assemble the wings: 1st row – 10 modules. From the tail side, insert the parts in a certain way.
- In the same way, make 10 rows of wings.
- Next, in each row, use 1 module less (up to one).
- Make a stand from 2 glued rows.
- The inner wings are made similarly from 20 modules.
- Make 7 rows, pulling out the workpiece.
- Complete 3 rows of 10 modules.
- Raise by 3 more rows, then decrease by 1 module in each row.
- The final insert is also made from 12 fragments: raise by 6 rows, then decrease.
- Put the pieces together.
- Make a neck from 3-4 modules.
Crane
It is not difficult to make this model, even beginners can handle it, thanks to the developed schemes and video tutorials.
Making a crane step by step:
- On the colored side of the square sheet, lines are marked horizontally, vertically and diagonally.
- Fold the sides inward, bringing the top points to the bottom corner.
- Fold the corners to the center and straighten them (the marked lines form a triangle).
- Open it, fold the sides inward, and bend back the top edge.
- The same is done on the other side.
- The right and left corners are folded towards the middle (on both sides).
- They mark the curves and fold them.
- They shape the head and fold the wings.
Easter Egg
The celebration of Easter is typical only for the Christian world, but the tradition of painting and decorating the symbol of Easter – the egg – has not bypassed origami.
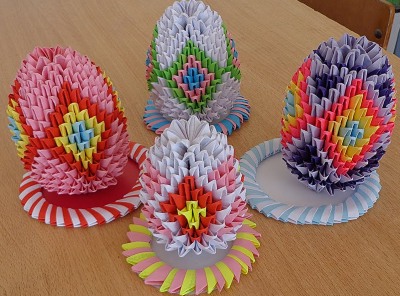
The product is manufactured using modular technology:
- It is required to make 990 triangular modules. The colors can be varied depending on the design.
- Connect the modules into a double ring of 8 in each row.
- The third row is laid out by combining colors.
- 4th row – in each gap add 2 modules in pairs.
- In the 5th and 6th rows, alternate colors.
- The modules are built up again, as in the 4th row.
- In the 7th row, modules are built up by 4 pieces.
- From the 8th row, the alternation of colors for the pattern is performed.
- From the 16th row the number of modules decreases: one and a half in one module, one in each of the remaining two.
- The rounding of the lower part is formed.
You can make a stand for the egg from 35 modules, assemble from the bottom up.
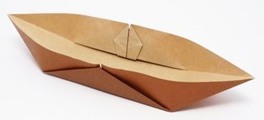
Origami boat
The paper boat is made using the simple origami technique and is accessible even to the smallest. There are many variations of this craft.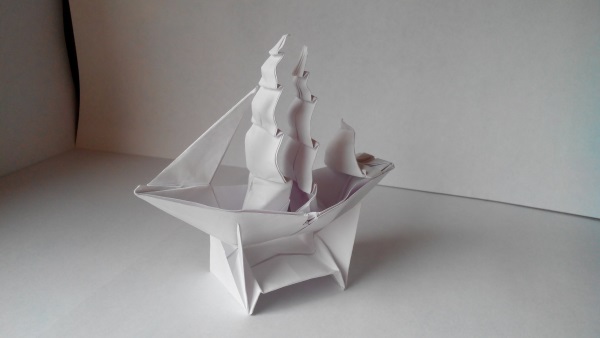
An example is a step-by-step description of one of the varieties - a boat with sails:
- The square sheet needs to be folded in the center and along the diagonals.
- Then the sheet is folded in the middle and the two edges are connected to the center (thus connecting all the corners).
- Turn the workpiece over and bend it diagonally.
- The remaining triangles on the right side are connected to each other - these will be the sails.
Cat
Making a cat is a fun and very simple activity to explain to children what origami is. Even the little ones will be able to fold a cat's face out of paper and draw whiskers, a mouth and eyes with a felt-tip pen.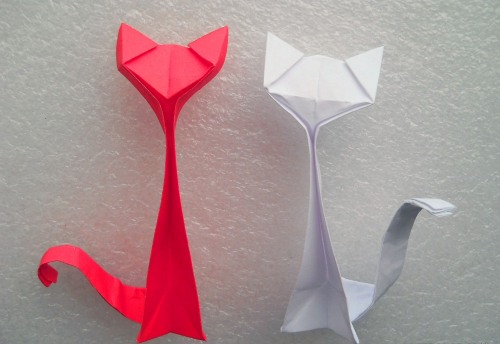
The actual cat figurine is also not difficult if you follow the diagram and step-by-step description:
- A sheet of colored paper is folded in half twice in one direction.
- One fold needs to be straightened out, the left corner needs to be folded to the right.
- Then you need to bend and unfold both corners again - this will form lines for the muzzle.
- The workpiece is folded along the resulting lines, and the folds are raised upwards.
- A triangle is squeezed out from the back side – the cat’s chin.
- A tail is made from strips of paper and rounded off.
Christmas tree
Among simple paper crafts, children's favorite activity is making a Christmas tree. An origami Christmas tree of any complexity can be made using different types of this art.
The origami tree should be made step by step as follows:
- On a green square sheet of paper, mark the fold lines (in the center and diagonals).
- Fold 4 times, mark the fold line of each wing.
- Align the resulting line with the central one.
- Bend the corners and tuck them into the resulting pocket.
- Each of the 8 faces is cut in several places.
- Fold the cuts outward, then tuck them inward.
- Make the leg in the same way.
Piggy
Beginners are offered fairly simple schemes, while more experienced ones are offered complex ones.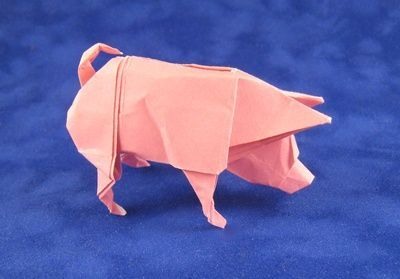
Approximate step-by-step description of making a pig:
- Fold the rectangular sheet in half.
- Fold the blank 3 times like an accordion to form lines, straighten it out.
- Fold the edges to form a rectangle with pointed edges.
- Turn over and fold lengthwise.
- Fold back the side triangle on both sides.
- Fold the right triangle and the tip of the left one inward.
- Draw the muzzle and straighten the blank.
Cow
For the little ones, a feasible task would be making a cow's head. Making a figurine is also a simple process, you just need to choose the paper by color or add appliques at the end of the work.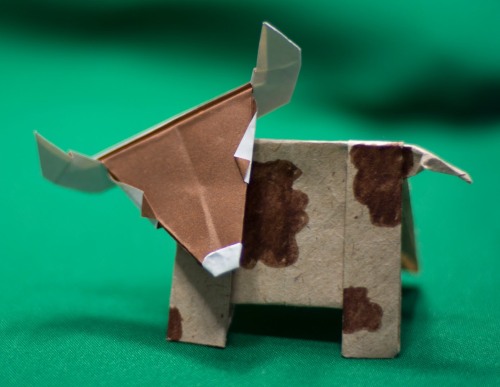
Cow's head - step by step description:
- Fold the square sheet in half, bend the corners towards the center line.
- Fold the protruding corners back.
- Draw the nose and eyes.
Star
You can make a wide variety of stars from paper - flat and three-dimensional, modular, woven, "lucky stars", ninja stars - shuriken, sea stars, using the kusudama technique and others.
You can make different versions of origami stars with your own hands using step-by-step diagrams, following the instructions and master classes developed by origami artists.
According to one of them, it is necessary:
- Fold the square sheet in half, unfold, and fold the sides inward.
- Fold the top part to the left, repeat the steps on the other side.
- Unfold the fold to form a diamond.
- Make 8 of these fragments.
- Assemble and secure if necessary.
Heart
Origami hearts, like other figures, can be both complex and very simple. From flat products you can create an original composition on the wall.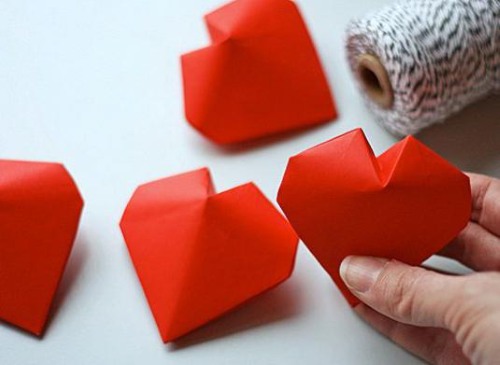
Children love to give voluminous (inflatable) hearts to their parents and friends; valentines represent sympathy and heartfelt affection.
An inflatable origami heart is made step by step as follows:
- The paper is folded in half, the lower corners are folded upwards.
- The sides of the resulting triangle are folded downwards to obtain the desired lines.
- The upper corners are folded downwards.
- The protruding parts are folded and tucked into the “pockets”.
- Inflate the heart through the hole at the bottom.
Kusudama
A separate type of origami, similar to modular, is kusudama. This art appeared earlier than modular and differs from it in that the fragments are not inserted into each other, but sewn or glued. There are many models of various shapes with a bizarre interweaving of modules.
Description of work in the kusudama (lily) technique:
- Fold a small square sheet lengthwise and diagonally. Repeat the action.
- Fold to form a double square.
- Bend the edges of the square and press.
- On each side, bend the corners to the center, the lower part of the resulting "pocket" - up. Straighten the "pocket".
- Bend the “tail” up and turn the workpiece over.
- Fold the corners towards the center and straighten the petals.
- Bend the petals down and curl them.
- In this way, make 36 flowers.
- Sew 3 lilies, then gather all the pieces together and secure.
Father Frost
Father Frost is a favorite character of the New Year holiday. Simple figures of Father Frost can be made by children using patterns with the help of adults. Older children will be interested in making this craft using the modular origami technique, optionally adding a bag of gifts, a sled or a Christmas tree.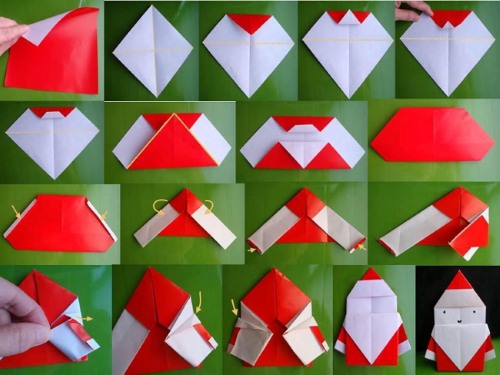
Making Santa Claus step by step:
- Cut out a square of the required size from colored paper - red, blue, light blue.
- Fold into a triangle, unfold, and turn into a diamond shape.
- Fold both sides of the rhombus towards the fold line.
- Turn over, align the bottom corner with the top one.
- Bend the wide part back, leaving a small gap.
- Make a hat lapel.
- Form a triangle by folding the protruding parts back.
- Draw the nose and eyes.
Flashlight
Paper lanterns are a traditional decoration for any holiday in China and Japan. This beautiful custom has spread to other countries. Simple paper lanterns are easy and quick to make. More complex options can be made using different techniques – modular and even kusudama.
To make the flashlight not just a toy, but to really glow, you need to use thin, translucent paper.
When inserting a thin vessel with a candle inside or placing an origami lampshade on a light bulb, you need to take the necessary precautions.

Traditional lanterns - step by step instructions:
- Fold the rectangular sheet lengthwise.
- Without reaching the edge, make cuts from the fold to the edge.
- Unfold, glue the edges, attach the handle.
Step-by-step production of a “good luck” lantern:
- Cut out 4 circles from red and gold paper.
- Fold the edges of each circle on three sides to form a triangle.
- Glue the wrapped parts together, attach a loop. You can attach a multi-colored tassel at the bottom.
Dog
Making an origami dog with your own hands is an activity that is feasible for preschoolers and schoolchildren, if you use diagrams and act step by step under the guidance of adults. At the initial stage, only the muzzle or the biting dog is folded, which is put on the fingers.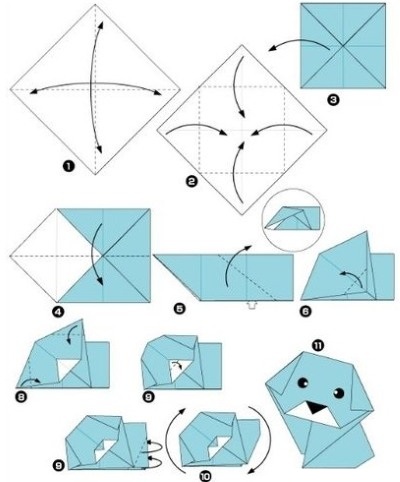
Older children make a whole figure, while those with skills in modular origami create three-dimensional products from prepared fragments.
Execution:
- The paper square needs to be folded along the diagonals – mark the lines.
- Then fold the corners towards the center.
- The left corner is folded inward, the right corner is folded to the side.
- The corners of the upper and lower sides are joined together.
- Fold the upper left corner to the lower right corner, iron the fold, and point the corner downwards.
- Turn the workpiece over and do the same actions in mirror image.
- Turn it upside down and straighten out the triangle-shaped face.
- They finish drawing the eyes and nose.
Origami, kirigami, kusudama develop spatial thinking, attention, memory, and artistic taste.
Video: DIY paper origami. Step-by-step diagrams
How to make a paper crane, watch the video:
Volumetric origami star: