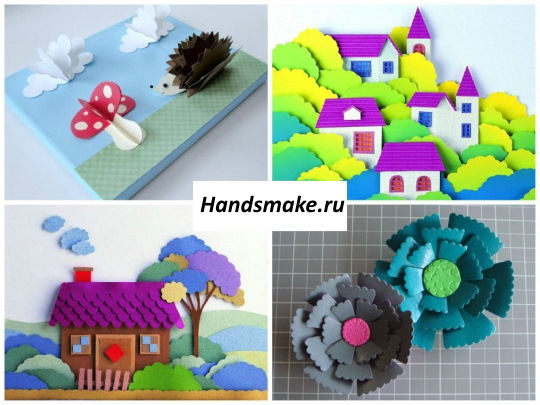
Hand-made crafts are an original gift, a memorable souvenir or simply an interior detail. Paper and cardboard are the most accessible and common materials from which you can quickly and easily create your own product.
What can be made from paper and cardboard
There are many types of crafts that are made from these materials:
- educational toys;
- postcards;
- decorations;
- interior design details;
- panel;
- applications;
- souvenirs and others.
Paper and cardboard products can be flat or three-dimensional, and a combination of both groups of parts is also possible.
Crafts can be made using any of the popular techniques for working with paper or cardboard:
- scrapbooking – design of postcards and photo albums using a variety of details of different textures and shades, as well as cut-out pictures;
- papercrafting – modeling of three-dimensional paper products based on the fastening of many parts into a single whole according to a special pattern;
- origami – folding figures, sculptures and paintings from paper without using scissors;
- kirigami – creation of three-dimensional figures, patterns, pictures from paper by cutting and folding it.
Benefits of Making Paper Crafts for Kids and Adults
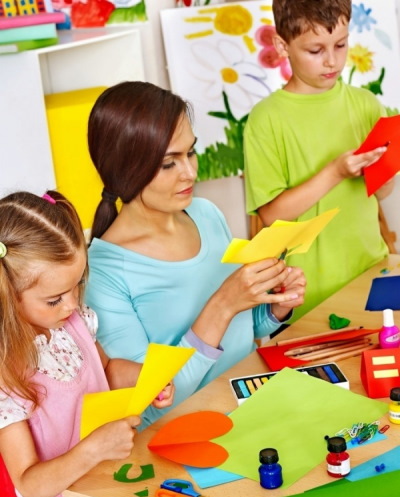
Crafts made of paper and cardboard are not only a way to save money on buying important little things and less important things, but also an option for a pleasant and useful pastime. In the process of creating products, creative processes are activated in children and adults.
For adults, creative activities involving imagination and fantasy help calm the nervous system, assert themselves, and increase self-esteem.
For children, this process is more important:
- it helps to manage their cognitive activity,
- direct energy in the right direction.
It was not for nothing that technology lessons (which were previously called labor) were introduced into school education.
The type of entertaining and recreational activity used in these lessons helps introduce schoolchildren to artistic culture, develop their aesthetic qualities and creative thinking, and also influences their mental development and allows you to develop certain personal qualities, such as:
- neatness;
- discipline;
- responsibility;
- hard work;
- independence;
- mutual assistance and others.
When making paper crafts with their own hands, the child folds, cuts, smooths and performs other actions that help develop fine motor skills.
The ability to perform precise movements with the hands and fingers, being embedded in the brain, influences the formation of clear coordination, which has a beneficial effect on thought processes and speech development.
Joint creativity of children and adults can strengthen their relationships and establish strong connections. In the process, all participants open up to each other from different sides, find new features in themselves and others.
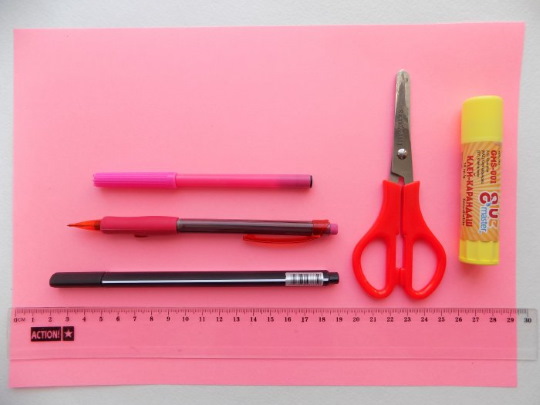
What tools and materials are useful for working with paper and cardboard
To make different types of crafts from paper or cardboard, certain materials and tools are required. The most common of them are presented in the table.
| Tool (material) | Feature of application |
| Scissors | are necessary for cutting a workpiece into pieces or cutting out parts along contours. |
| Scissors with shaped blades (teeth, waves and others) | are useful for creating decorative elements or finishing the edges of a workpiece. |
| Stationery knife | used to create slots inside the workpiece with strict adherence to the markings. |
| Glue | Each type of glue performs specific functions:
|
| Simple pencil | It is needed for applying markings, as well as for drawing details before cutting. |
| Ruler | necessary for drawing contour lines, as well as for evenly tearing off paper. |
| Stencil ruler | will be needed to make parts of different shapes intended for decorating crafts. |
| Decorative elements | They are useful for decorating products and can be of different types:
|
Cardboard crafts for kids 5-6 years old: step-by-step instructions, ideas
Crafts for children aged 5-6 years should be simple, with a minimum number of details. It is advisable for adults to prepare templates in advance for tracing or marking blanks for independent cutting (cutting) by preschoolers.
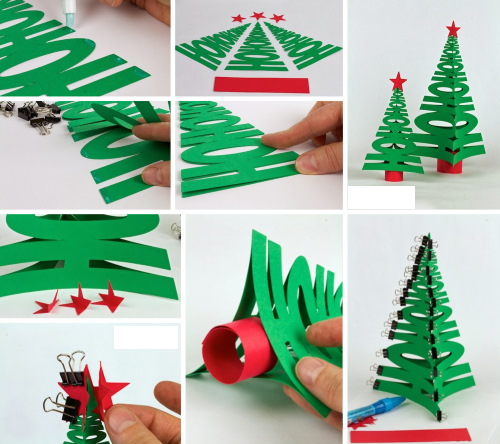
Volumetric Christmas tree
A Christmas tree made of thick cardboard can decorate a New Year's party in a kindergarten, create a festive mood at home or serve as a nice gift for a loved one.
To make it you will need:
- thick cardboard;
- template (Christmas tree drawing);
- scissors or a stationery knife;
- simple pencil;
- green gouache paints;
- large brush;
- decorative elements (buttons, beads);
- PVA glue.
Manufacturing process:
- First, you need to trace a template of the tree of the required size on a sheet of thick cardboard. The template should look like a tree consisting of three connected triangles: small, medium and large.
- Then you need to cut out 2 identical blanks, after which you need to make slits. On the first blank, the slit is made from the bottom and continues to the base of the second (middle) triangle of the tree. On the second blank, the slit is made from the top of the tree and ends at the top (upper part) of the lowest triangle.
- Next, you need to assemble the tree - connect both blanks, threading one into the other, after which you should start decorating: painting the tree green and decorating it with decorative elements. Beads and buttons are glued with PVA glue.
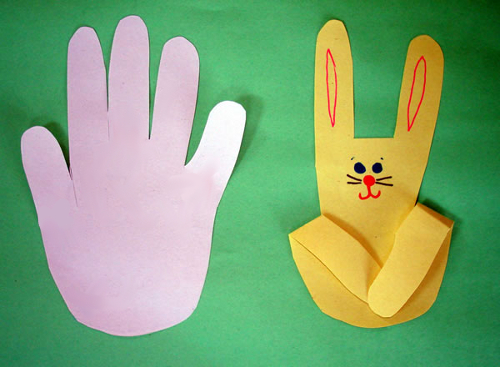
Little Bunny Palm
A simple craft - a flat cardboard bunny figurine - is not only a funny toy, but also a cute decoration for a festive event or photo shoot. Instead of cardboard, you can use double-sided colored paper.
Materials and tools:
- colored cardboard (it’s better to take double-sided);
- simple pencil;
- scissors;
- glue (PVA or glue stick);
- superglue or hot glue;
- felt-tip pens;
- long wooden skewer.
How to do:
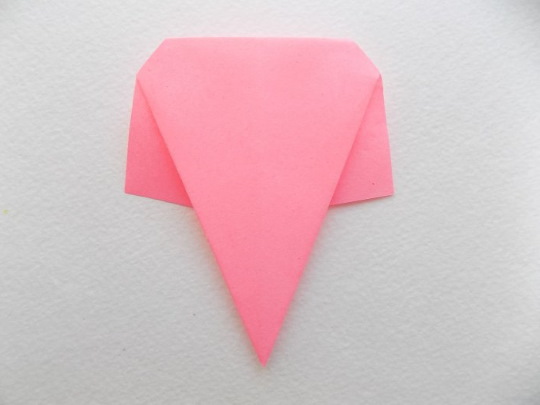
- To begin, you need to choose a sheet of cardboard of any color and trace the palm of any hand on it - left or right.
- Next, you need to cut out the palm and bend back the middle cardboard finger at its base. You need to glue it with PVA from behind.
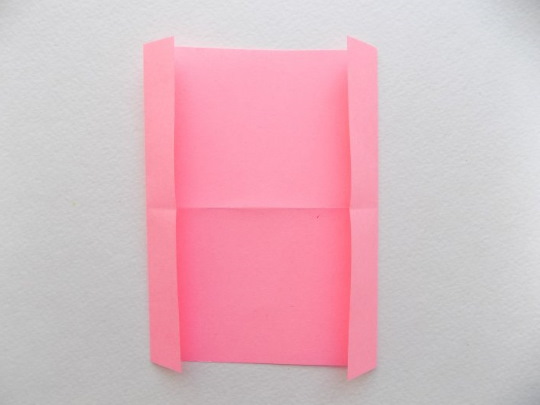
- Between the thumb and index finger, ring finger and little finger, make small slits with scissors. They should be approximately the same depth.
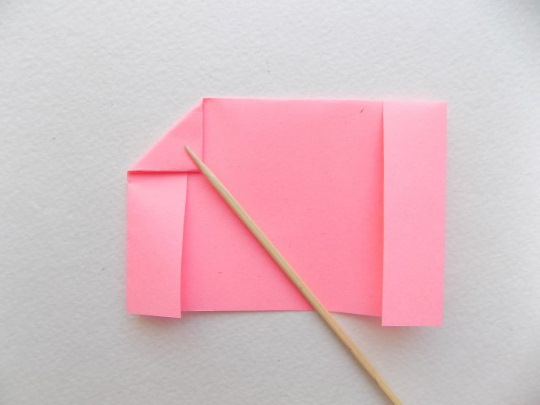
- Then you need to bend your thumb and little finger forward slightly diagonally, towards each other.
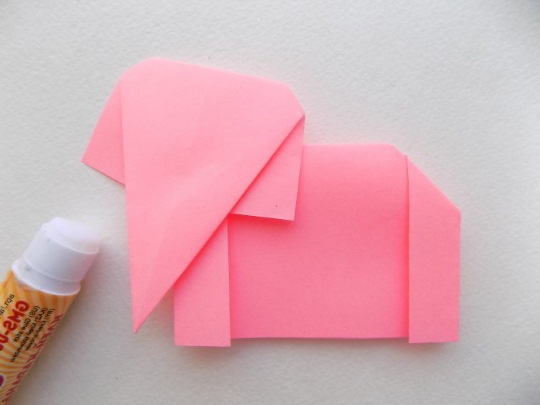
- Use colored markers to draw the bunny's face and ears. If you glue the bunny to a wooden skewer using superglue or hot glue, you'll get a decoration for a festive table or an attribute for a children's photo shoot.
Regular and voluminous postcards made of paper and cardboard
Crafts made from paper and cardboard can complement a birthday gift if they are made in the form of a greeting card.
On the opening of the postcard you can write warm words or simply leave your wish.
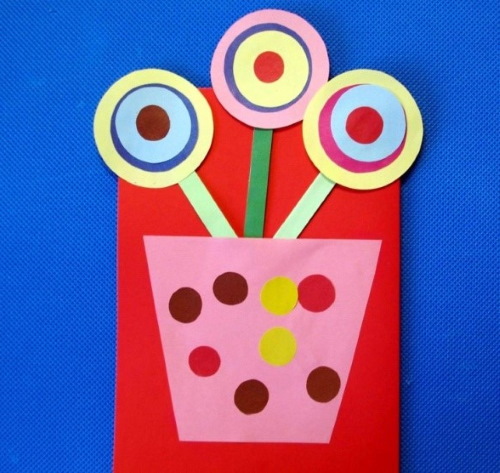
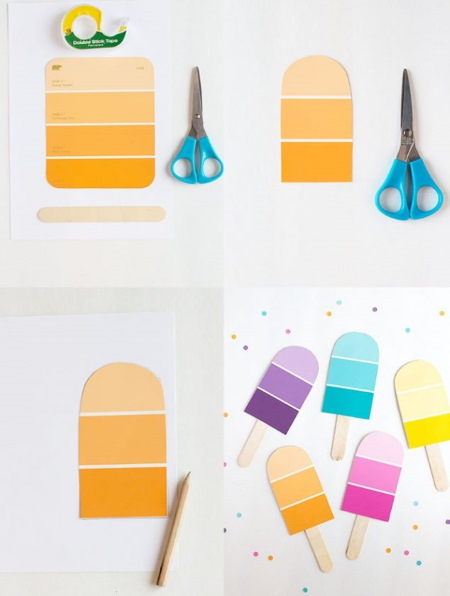
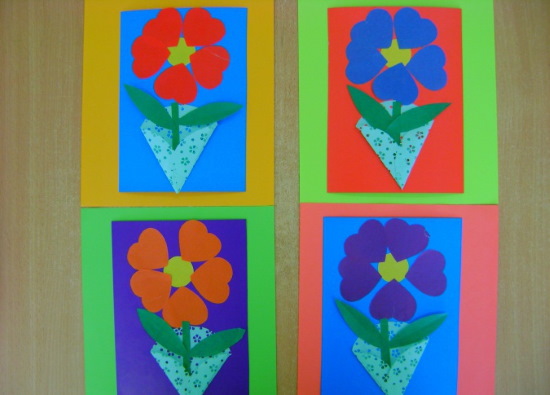
Postcard "Lollipops"
This card can be given to both a girl and a boy - the color of the base and the cup will depend on who it is intended for. If you cut out flowers instead of balls and ovals, you will get a "Bouquet of Flowers" card, which will be a nice gift for a mother, grandmother, or teacher.
What you need to prepare:
- a sheet of cardboard of the required color;
- colored paper one-sided;
- sheet of white paper
- scissors;
- simple pencil;
- PVA glue;
- ruler template.
The production of a postcard is as follows:
- The sheet of cardboard must be folded in half so that the colored side is on the outside.
- Then you should glue a sheet of white paper inside the blank to hide the back side of the cardboard.
- From a sheet of colored paper of any shade, you need to cut out a “glass” in the shape of a trapezoid with sides of 7.5 cm (top and sides) and 4.5 cm (bottom side).
- Next, you need to glue the “glass” to the front of the postcard, covering only the bottom and sides with glue.
- From green colored paper, you need to cut out 3 straws with sides of 8 mm (in width) and 9 cm (in height), which you need to coat with glue and glue the lower half under the “glass”, the upper half on the free part of the workpiece.
- From colored paper you need to cut out 8 large circles with a diameter of 4.5 - 6 cm and the same number of circles 1 cm smaller in diameter than the previous ones.
- Now you need to cut out 8 circles, the diameter of which is 0.5 cm smaller than the previous ones, and 16 - 20 small circles with a diameter of 1 - 1.5 cm.
- Large circles should be glued to the paper straws on the front side of the card, then the details of the remaining sizes in decreasing order. The same "lollipops", only without sticks, should be "collected" inside the card, on the right spread.
- The remaining small circles should be used to decorate the “glass” with lollipops.
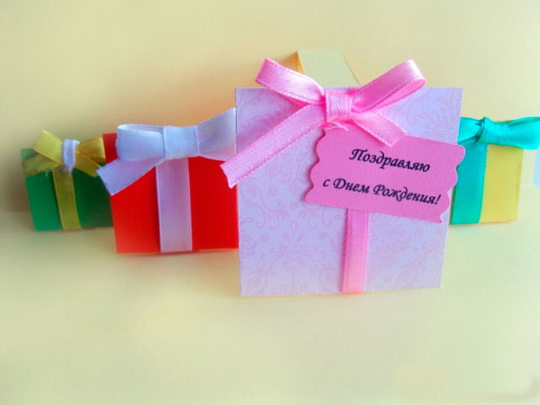
3D Birthday Card
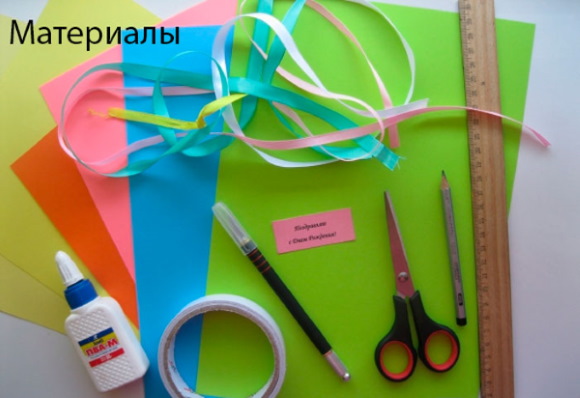
What you will need:
- colored paper is thick;
- regular and curly scissors;
- PVA glue;
- simple pencil;
- double sided tape;
- ruler;
- decorative elements (stripes and bows made of satin ribbons);
- inscription: "Happy Birthday!"
Making a postcard:
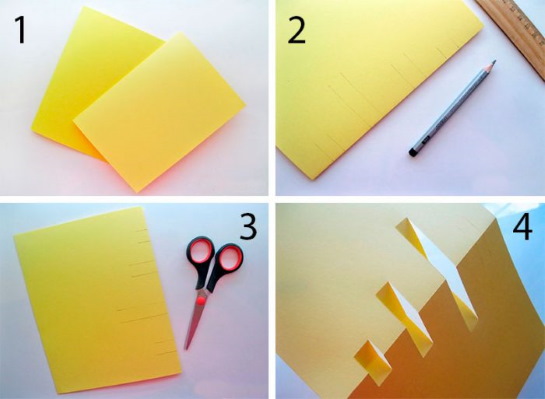
- First, you need to fold 2 sheets of thick A4 colored paper in half.
- After this, you need to place one blank in front of you with the fold facing down and mark 8 sections on it (point 2 on the diagram).
- Using scissors, you need to make cuts.
- Then you should bend the resulting sections in the direction opposite to the base of the workpiece (points 4 – 6 in the diagram).
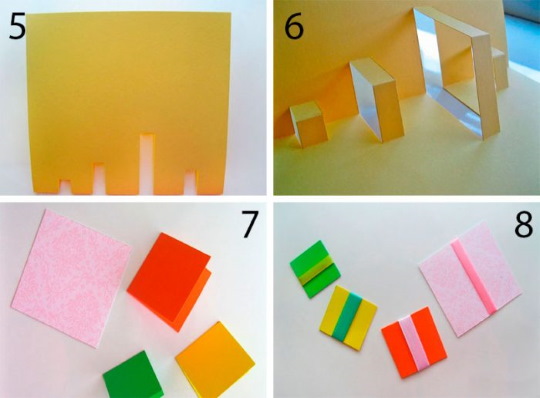
- Next, you need to cut out 4 rectangles of different sizes and colors from colored paper, each of which should be folded in half and coated with glue on the inside.
- To the resulting squares, you need to glue vertical strips of satin ribbons (point 8 in the diagram).
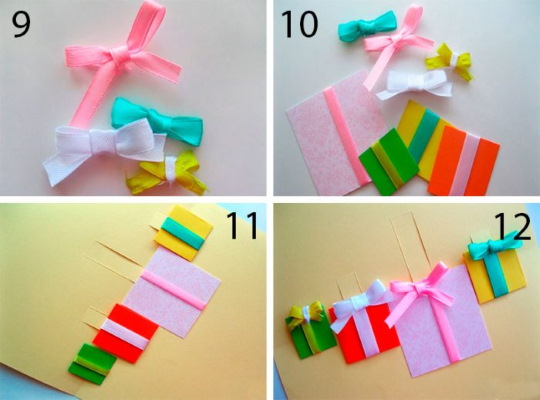
- For each of the “gifts” you need to tie 1 bow.
- The "gifts" need to be attached to the curved sections using double-sided tape.
- Bows are attached to each square at its top.
- The inscription must be cut out, then its edges must be made wavy using curly scissors.
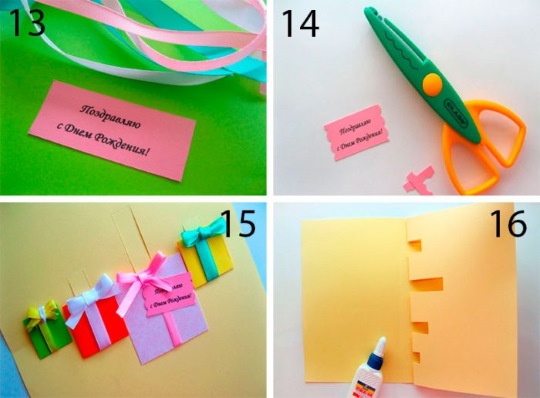
- After cutting off a piece of double-sided tape, you need to connect the largest “gift” and the inscription with it (point 15 in the diagram).
- The second A4 sheet folded in half should be glued to the base of the postcard (point 16 in the diagram).
- You can decorate the outside of the card to your taste, for example, by cutting out some “gifts” from cardboard, decorating them and gluing them on with double-sided tape.
Wall panels, paintings and appliques
Wall panels, paintings and appliques will effectively decorate the interior of any room in the house, be it a kitchen, a living room or a children's room. You can cut and glue the details together with your children.
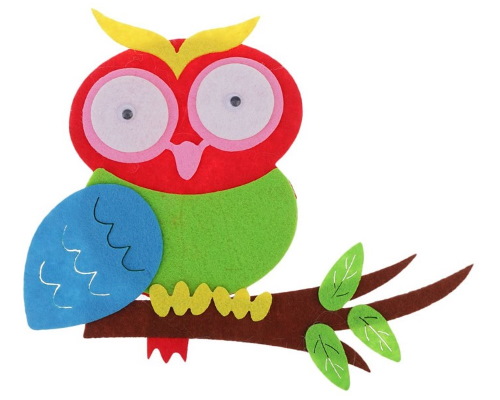
Wall applique "Owl"
To make the applique you will need:
- colored paper in rolls;
- "live" eyes of large size;
- simple pencil;
- PVA glue;
- superglue;
- scissors.
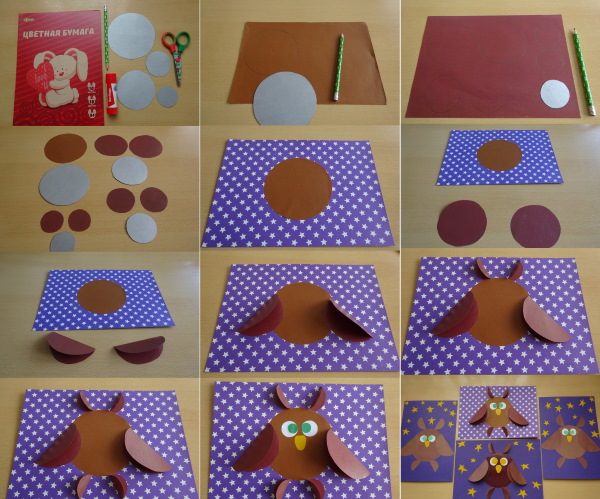
Manufacturing process:
- You need to trace the templates onto paper, and then cut out all the necessary parts of the desired size:
- large oval (head);
- large circle (torso);
- teardrop shape large (wing);
- 2 connected curved lines (eyebrows);
- 2 circles connected to a small oval (muzzle);
- 2 circles of smaller diameter (eyes);
- 6 small ovals connected by 3 (paws);
- a small rectangle with one wavy side (tail);
- 3-6 small teardrop-shaped forms (leaves);
- branch preparation.
- Using a stationery knife and scissors, you need to make patterned cutouts inside the wing and leaves.
- Now you can start gluing the applique to the wall: first the branch, then the body and the rest of the details.
- To attach the parts to the wall, use superglue; to glue the parts of the owl together, use PVA.
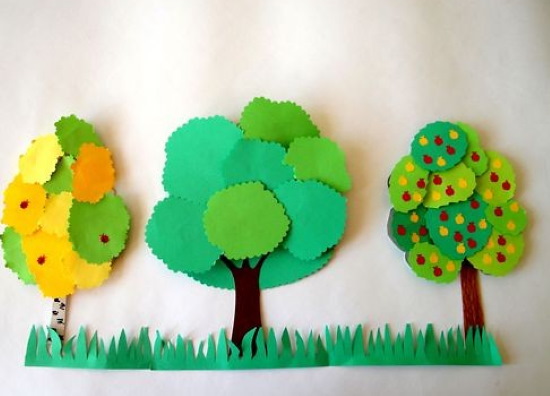
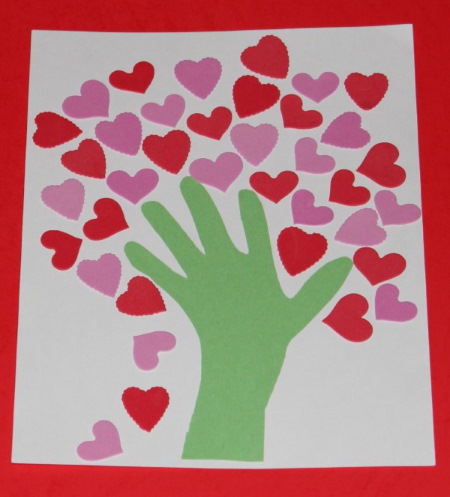
Wall painting "Tree"
Necessary materials and tools:
- the basis for the painting is a sheet of A4 corrugated cardboard;
- wrapping paper of a certain range of shades;
- PVA glue;
- scissors;
- simple pencil;
- leaf patterns.
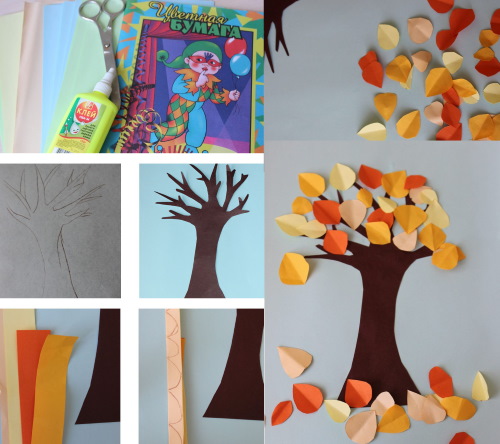
The process of making a painting:
- First, you need to prepare the base: glue a piece of wrapping paper of the appropriate size onto a sheet of corrugated cardboard.
- On a piece of wrapping paper of a different color, trace a hand and cut this detail out; it will serve as the trunk of the tree.
- Using templates of different shapes, you need to cut out leaves of several colors and glue them onto the base with an overlap to create a lush tree crown.
- You need to place the silhouette of a hand on top of the crown and glue it to the very bottom of the painting.
Panel "Hearts"
What you will need:
- a piece of Whatman paper of the required size;
- wooden frame;
- yellow double-sided and white paper;
- heart template;
- marker;
- simple pencil;
- PVA glue.
How to make a panel:
- You need to cut out 42 identical hearts: 39 yellow and 3 white.
- Next, you need to arrange the hearts in rows of 6 pieces and glue them to the base.
- Some of the hearts need to be folded in half to create an original pattern.
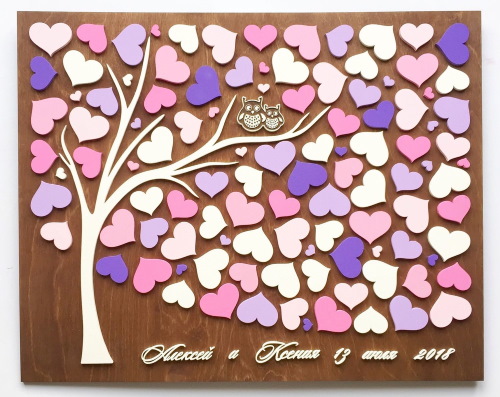
- Inside the white hearts, you need to write important dates or warm words with a marker.
- The panel of hearts can be framed and hung on the wall.
Ideas and step-by-step production of crafts for labor lessons for primary school students
Primary school students are capable of making more complex crafts than preschoolers. However, they also need templates to trace shapes and details, especially first and second graders.
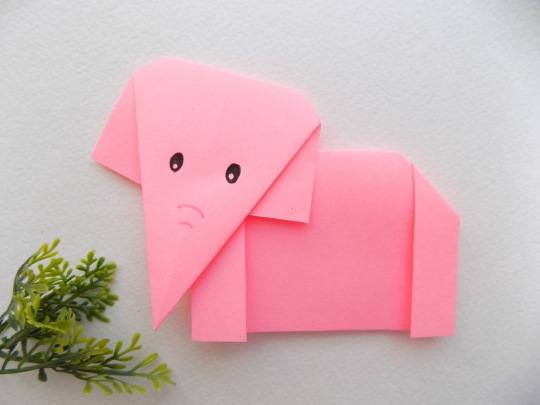
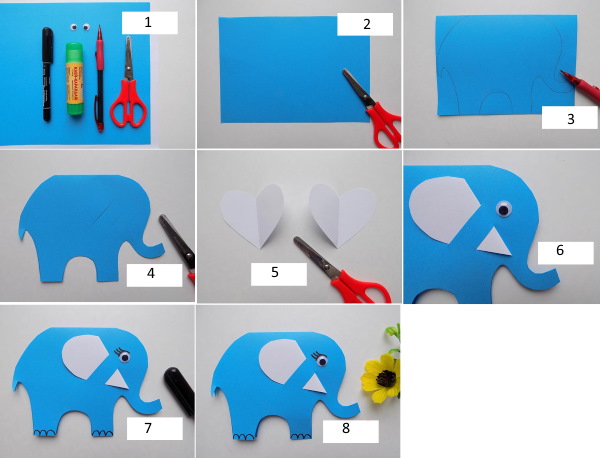
Elephant
Paper and cardboard crafts in the form of animals are most attractive to younger students. And this is not just because: you can play with the figures you make: ride them in a car or make up an interesting fairy tale with their participation.
To make an elephant, you will need the following materials and tools:
- colored paper or cardboard;
- marker;
- scissors;
- "live" eyes;
- glue stick.
The process of creating an elephant figurine:
- It is necessary to draw the following figures on a sheet of paper of one color:
- 5 rectangles with sides of 8 and 10 cm (legs and head);
- 1 rectangle measuring 1.5 and 9 cm (trunk);
- 2 circles with a diameter of 5 cm (ears);
- 6 small ovals measuring 1*2 cm (nails);
- 3 strips measuring 6 and 2 cm (connecting parts).
- Large rectangles should be rolled into cylinders, gluing their edges. There should be 5 such parts.
- Each oval needs to be cut in half to make 12 pieces.
- Now you need to take 2 cylinders, glue 3 semi-ovals to the base of each - you will get a pair of elephant legs. This pair should be connected to each other at the top using one of the strips and glue. The bottom also needs to be coated with glue, connecting the legs to each other. Do the same with the second pair of cylinders.
- The two pairs of elephant legs need to be connected with a third strip. To do this, it needs to be glued under the first and second strips that hold each pair of legs together. For better strength, the legs can be additionally secured with strips from below, gluing them inside the cylinder.
- You need to glue the elephant's head to the strip connecting the first pair of legs, after which you should attach the ears inside it on both sides, the trunk in the middle, and the eyes on the sides of it.
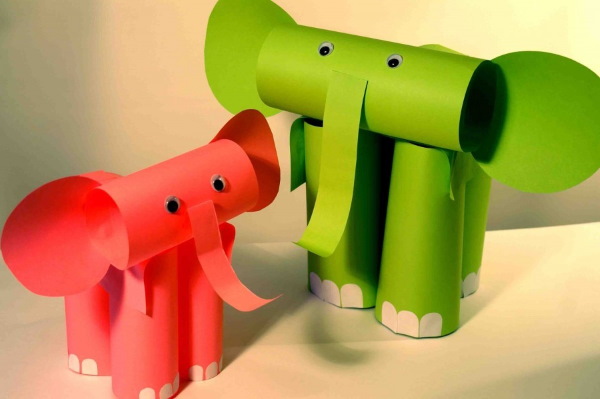
This is another example of an elephant made from paper rolls.
Crocodiles
Materials and tools:
- colored paper;
- scissors;
- black felt-tip marker;
- PVA glue.
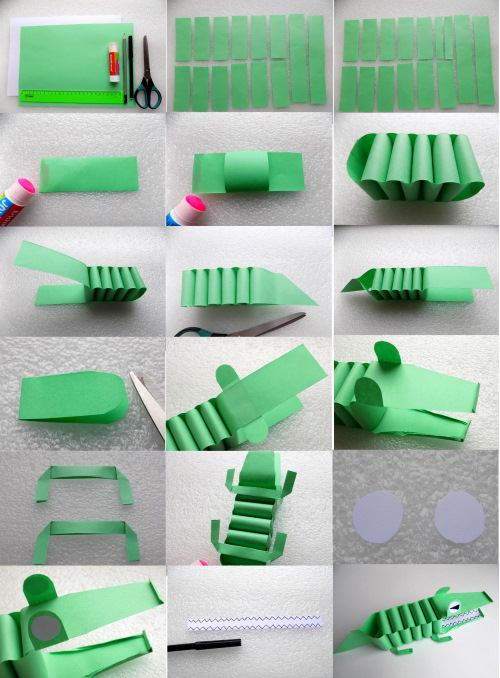
Manufacturing process:
- It is necessary to draw and cut out 4 strips according to the width of the ruler. The length of the strips should correspond to the length of the paper sheet. The color of the strips can be any.
- Next, you need to take 3 strips and cut them into 4 parts. The crocodile's body will be assembled from 10 of these parts.
- First, you need to roll one quarter of the strip into a ring and glue its edges. After that, you should push another piece of the strip inside the resulting ring and glue the edges. In this way, you need to use 10 quarters of paper strips.
- One whole strip should be cut into 3 parts, one of which should be folded in half and on one of the halves draw an elongated triangle, slightly stepping back from the fold line. The triangle should be cut out, leaving it folded and not touching the fold line - this will be the mouth of the crocodile.
- Next, you need to bend the crocodile's nose, stepping back a little from the top of the folded triangle-mouth. After that, you need to cut out 2 small white elongated triangles, which should then be glued inside the mouth. Using a felt-tip pen, draw fangs on the white parts.
- The crocodile's head with its mouth must be pushed through the outer ring of the body and glued with PVA.
- One of the strip pieces needs to be cut horizontally into 3 parts, making cuts every 1 cm. One of these thin strips should be rounded at the edges, pushed inside the triangle-head and glued underneath - this will make eyes, which need to be finished with a felt-tip pen.
- Other thin strips need to be turned into paws, which need to be attached with glue under the belly of the crocodile.
- Another piece of strip should be pushed through the ring at the end of the body, folded into a loop, glued together at the ends and cut out a corner on them - this will be a crocodile tail.
Food
Crafts made from paper and cardboard in the form of food are not only interesting toys, but also an original decoration for children's parties.
And what’s most valuable is that children can easily make such toys and decorations with their own hands.
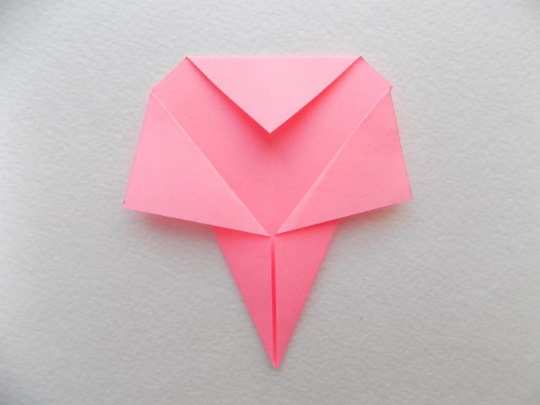
Ice cream
Materials and tools:
- thick colored paper;
- a cone template of the required size;
- PVA glue;
- hot melt glue;
- scissors;
- simple pencil.
 The sequence of actions for making paper ice cream:
- From paper of the required color, you need to cut out a cone of any size, then glue it together.
- On a sheet of paper of a different color, draw 8 circles, the diameter of which should be equal to the diameter of the cone, after which they need to be cut out.
- The circles need to be folded in half and glued together to form a ball.
- Now you need to put a circle of ice cream into the cone and add a drop of hot glue.
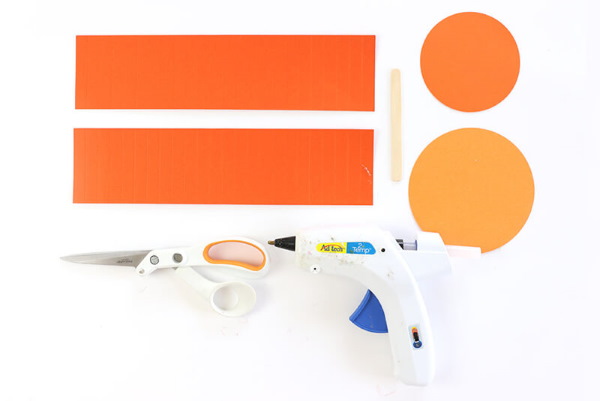
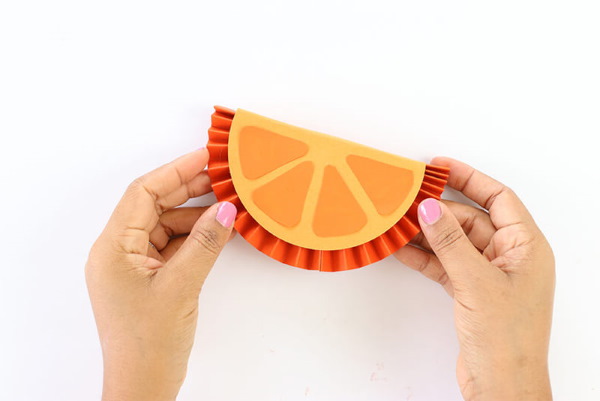
Orange
Using this pattern you can make an orange, lemon and tangerine.
What you will need to make it:
- double-sided colored paper;
- compass;
- scissors;
- PVA glue;
- Wooden ice cream stick.
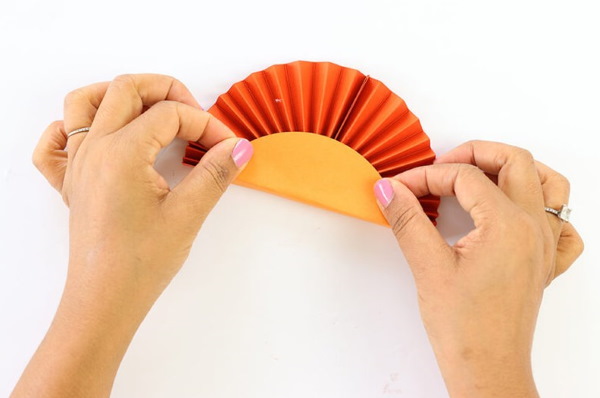
The process of making an orange:
- From orange paper of different shades you need to cut out:
- 2 wide strips, placing the sheet vertically (peel);
- 2 circles (pulp);
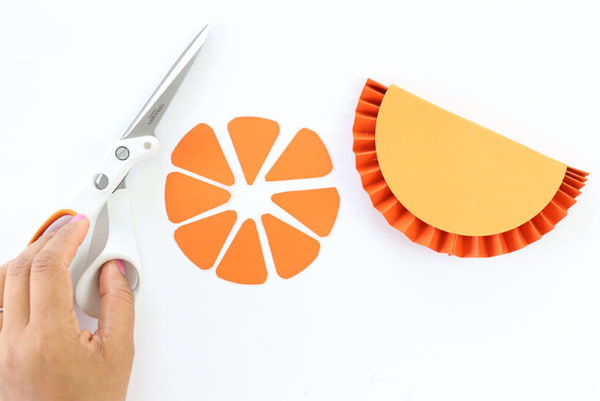
- 8 small triangles with rounded edges (slices).
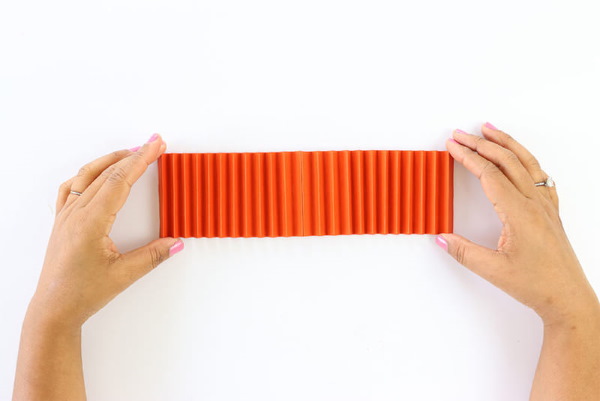
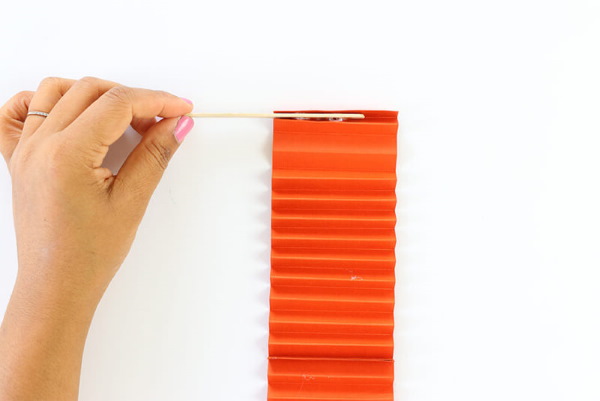
- The strips need to be carefully folded into 2 accordions, which are glued together, making a continuation of each other.
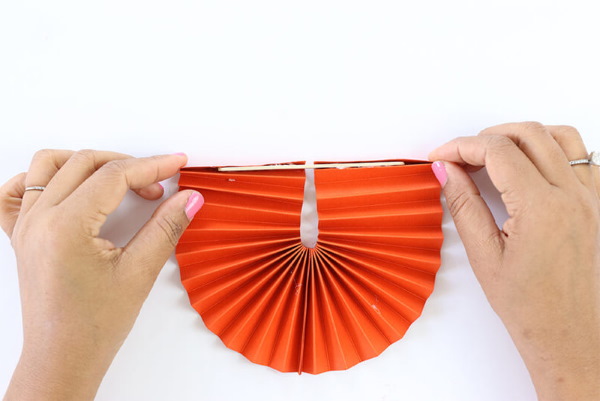
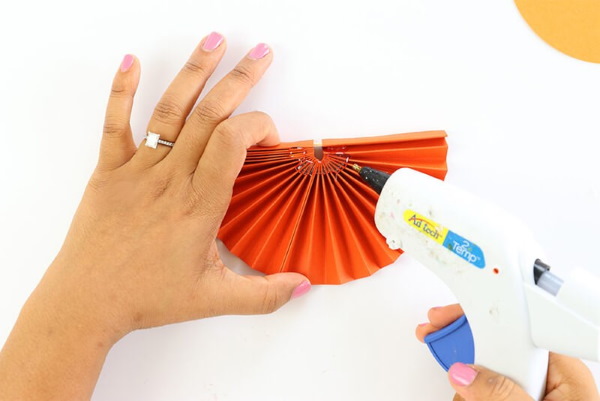
- Then you should bend the accordion into a rainbow and fix it in this position with the help of a wooden stick inserted into the first fold of the paper and glued into it.
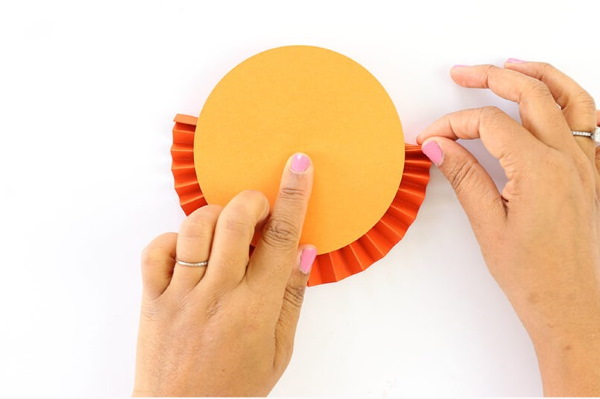
- Stepping back 1-2 cm from the edge of the “rainbow”, you need to glue a circle to it, which should be bent and brought out to the back side of the base.
- All that remains is to glue the triangular slices to the orange pulp, and the craft is ready.
Flowers
Younger schoolchildren can make paper flowers in their labor lessons as a gift for their mother on March 8 or Mother's Day.

More examples of colors below.
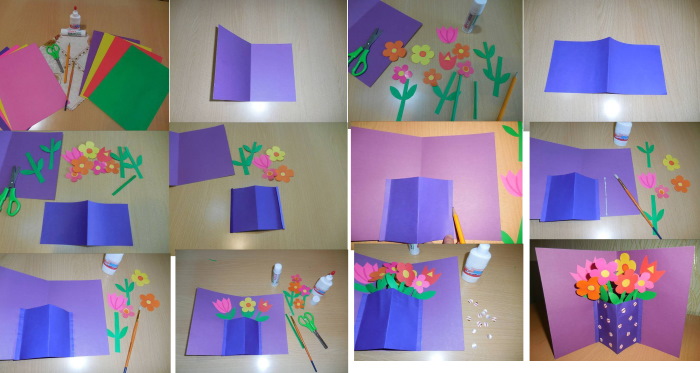
Spring bouquet
Materials and tools:
- colored paper;
- scissors;
- PVA glue;
- simple pencil.
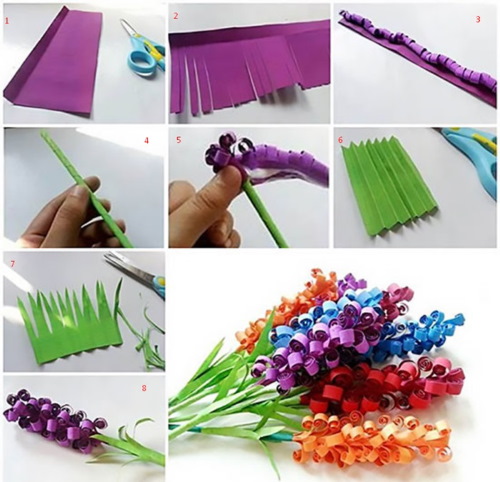
Manufacturing process:
- A sheet of green paper needs to be folded in half and the edges glued together.
- From the fold side, you need to make cuts that should end 3 cm from the glued edges.
- Next, you should roll the resulting base several times and secure it with glue, then straighten the blades of grass.
- From colored paper you need to cut out 7-9 flowers of any size, glue small circles-centers to them.
- Then the flowers need to be glued to the blades of grass to create a bouquet.
Flower of Hearts
Materials and tools:
- small heart template;
- bead;
- green and red double-sided paper;
- scissors;
- simple pencil.
How to make a flower from hearts:
- Draw and cut out 16 identical hearts from red paper, bend each one in the middle.
- Then you should coat each piece with glue on one side and form 4 petals, each of which should consist of 4 hearts.
- From paper of the same color you need to cut out a small circle, which needs to be coated with glue to glue the petals onto it.
- From green paper you need to cut out 3 leaves, bend them into an accordion and attach them to the flower.
- A bead should be glued into the center of the flower.
Hats made of paper and cardboard
You can make not only toys and interior decoration details from paper and cardboard. Crafts made in the form of headdresses will become an interesting attribute of a children's party or performance.
Hat with brim
To make it you will need:
- thick paper or cardboard;
- simple pencil;
- hat detail template;
- scissors;
- Moment glue;
- decorative elements.
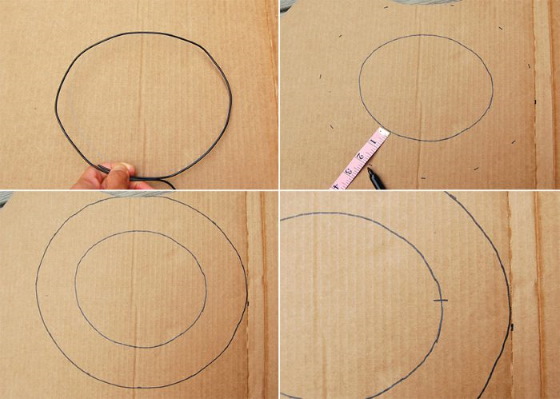
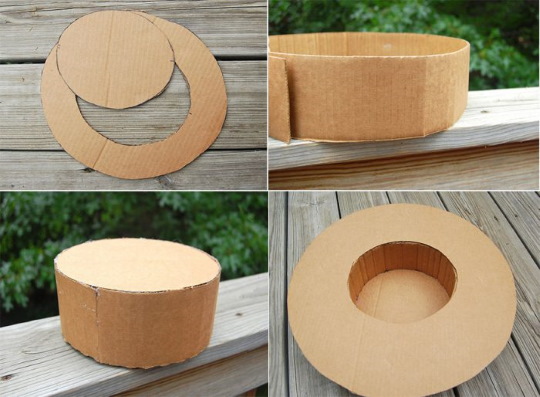

How to make a hat from paper or cardboard:
- First, you need to trace and cut out the template parts, then bend part 1 along the fold line, and bend back the teeth on parts 2 and 3.
- Then you need to assemble the hat: using rectangle 1, connect parts 2 and 3, gluing it to the teeth on one side and the other.
- After all this, you can decorate the hat in the desired style.
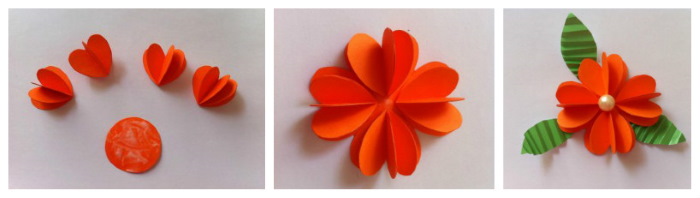
Flower hat
Materials and tools:
- colored paper;
- simple pencil;
- scissors;
- PVA glue.

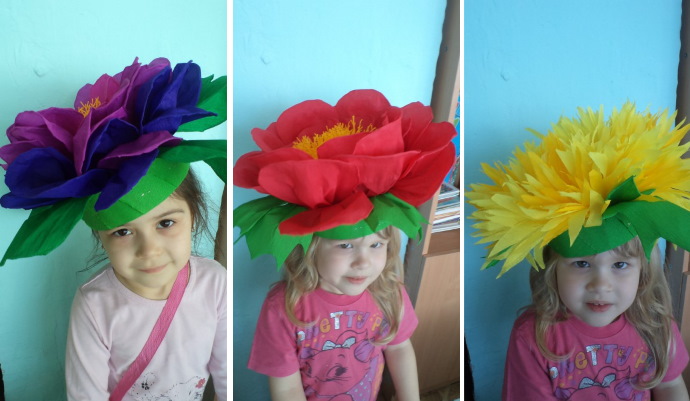
Manufacturing stages:
- You need to draw a petal on one sheet of paper of the desired color (A4 format), add 8 more sheets and put them in a stack.
- Then you should cut out the petal along the contour on the entire stack of sheets at once.
- From green paper you need to cut out a circle, the diameter of which is equal to ½ the length of the petal, and make one cut from the edge to the middle.
- From green paper you need to cut out 2 pieces for the stem and 2 pieces for the leaf, connect each pair together so that the stem is denser.
- At the end, you need to roll the circle into a shallow cone, grabbing the edge of the stem at the top, then the stem should be bent back.
Indian feathers
What you need to prepare:
- double-sided colored paper;
- colored cardboard;
- scissors;
- simple pencil;
- PVA glue.
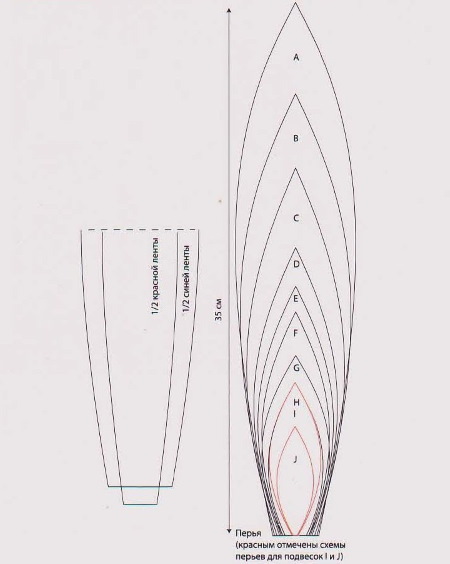
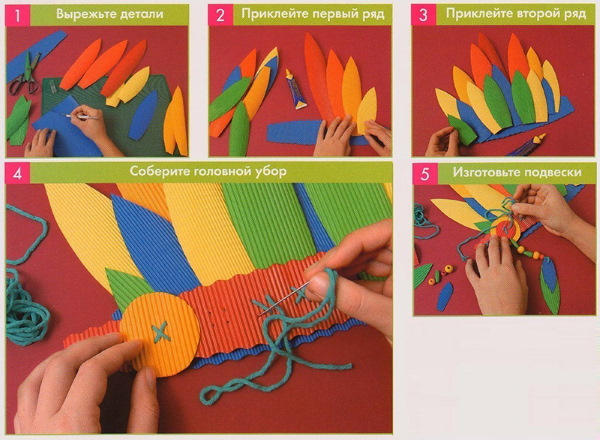
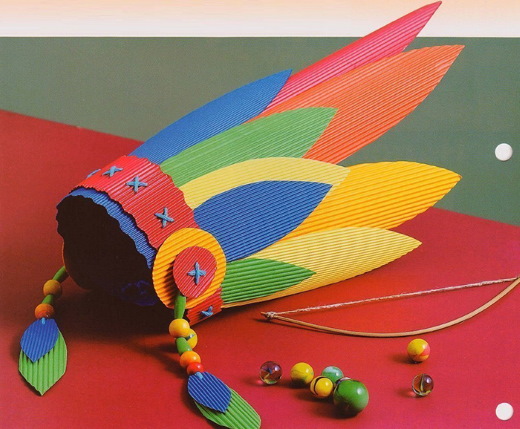
How to make an Indian headdress:
- A wide strip must be cut out of cardboard, the length of which must be equal to the circumference of the head. If the length of the cardboard sheet is too small, it can be increased by gluing a second similar strip.
- On one of the sheets of paper you need to draw a feather of the required length, then cut out 5 feathers at once along this outline.
- Next, you should cut the edges of the feathers and glue them to the base, then roll the strip into a ring and secure it with glue.
Crafts from corrugated paper
Corrugated paper is a popular material for making crafts yourself. Products made from it are unusually bright and festive.
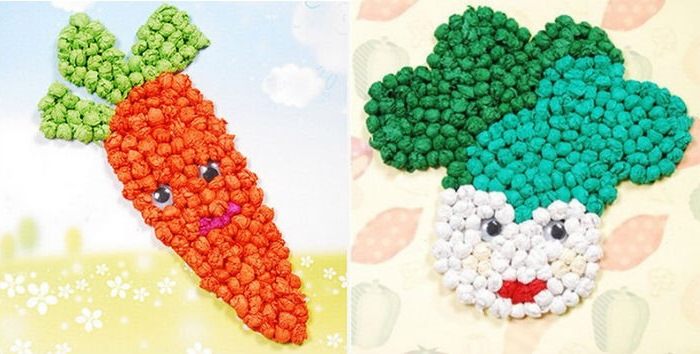
Picture-mosaic
It is very easy to make such a picture: it is enough to print a template of any drawing or take a regular coloring book for work. The paper colors can be any, at the discretion of the beginning master.
Materials and tools:
- template for the picture;
- sheet of cardboard;
- corrugated paper of the desired colors;
- scissors;
- PVA glue.
Making a picture:
- Paper of the required colors must be cut into squares. It is impossible to guess the exact number of parts in advance, so you will have to prepare them as you work on the craft.
- Now each square should be crumpled and then rolled into a ball. The size of the ball will depend on the size of the paper square: the larger it is, the larger the ball will be.
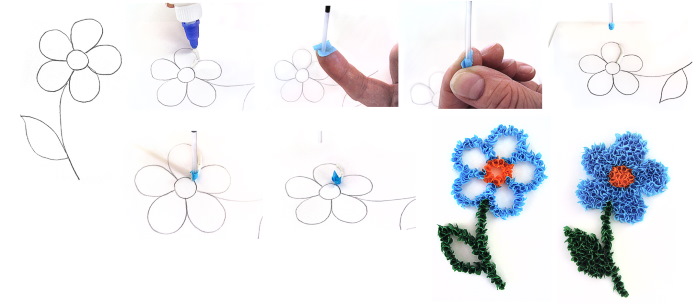
- The printed picture needs to be glued onto a sheet of cardboard to make the base of the craft stronger.
- Next, you need to coat part of the base with glue within the outline (without going beyond it). It is important to coat the paper with glue in parts because while one part of the picture is being glued, the rest of the glue can dry.
- To get a picture, you need to lay out balls of certain colors on the glue, following the outline of the picture, and lightly press each one to the base.
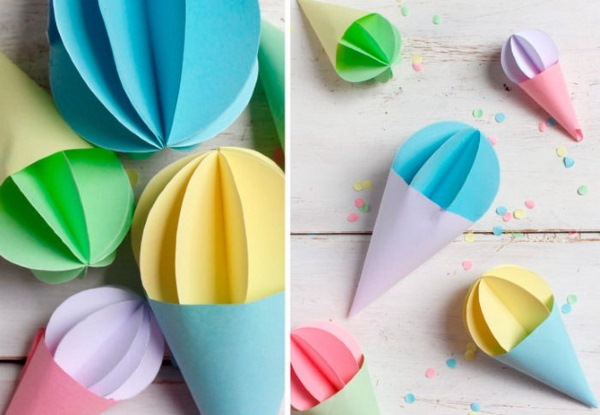
Pompom flower
What you will need:
- corrugated paper of the required colors;
- sewing threads;
- scissors;
- stapler.
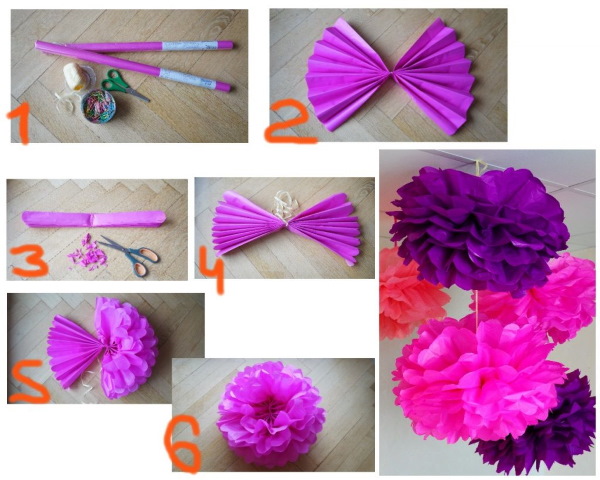
Flower creation process:
- You need to cut a large square out of a sheet of corrugated paper and fold it like an accordion.
- Next, you should tightly wrap the resulting blank with thread in its very center and tie the ends tightly into a knot.
- The corners of the workpiece need to be cut on both sides, giving the accordion the shape of a petal.
- Then you need to straighten the accordion, separate and stretch each petal a little, forming a lush flower. To prevent it from falling apart and to keep its shape well, you should connect the edges with a stapler.
- If you make another flower like this and attach them together using a stapler or hot glue, you will get a fluffy pompom.
Time spent creating crafts is pleasant and useful. Paper and cardboard are the most accessible materials for independent creativity, and products made from them have a wide range of applications.
Article formatting:Natalie Podolskaya
Video about making paper crafts
Crafts from paper and cardboard: