Autumn crafts from natural materials, tree leaves and paper are made both in kindergarten and at home. For children, creating such objects is a fascinating process. Thanks to it, creative talents are developed, perseverance increases, patience and diligence are developed in children.
Pumpkin
To make a pumpkin, you will need the following materials:
- Maple or chestnut leaves. You need to take the largest possible plates.
- Colored paper for decorating the pumpkin's eyes and mouth.
- Plasticine or glue with good adhesion.
- Scissors.
- The base for the pumpkin is a wooden stick. It should hold its balance well and not fall. The approximate shape is a block with rounded edges.
- Green glue to decorate the pumpkin tail.
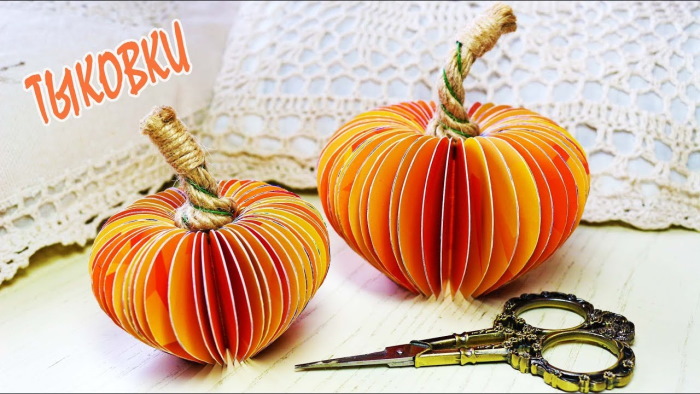
The sequence of actions is as follows:
- The leaves are cut into long strips.
- The strips are attached to the stick so that they form a bulge, characteristic of a pumpkin.
- Stick the strips, moving in a circle.
- The tail of the pumpkin is decorated with green plasticine.
- Eyes are made from paper. For this, 2 yellow circles are cut out.
- Cut out 2 circles of smaller diameter from black paper.
- Glue the black circles into the center of the yellow ones.
- The finished eyes are carefully glued onto the strips.
- A mouth for the pumpkin is cut out of red paper.
- The mouth is glued to the stripes under the eyes.
Autumn paper crafts (the creation process is especially important for children) can become a decoration for the holiday. For example, such a pumpkin made of leaves is suitable for decorating a room for Halloween.
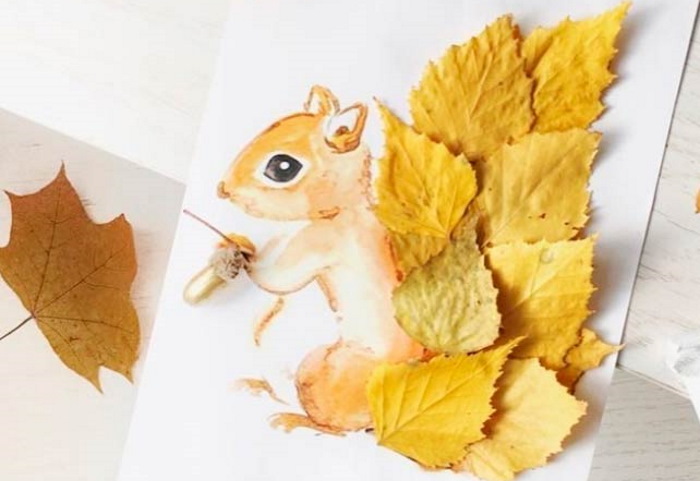
Squirrel
Materials:
- Sheets of white paper: for rough work and tests.
- Glue.
- A piece of black cardboard or paper.
- Leaves. They are selected to create a squirrel. If the required shape is not available, the leaf can be trimmed.
- Scissors.
Sequence of actions:
- On a rough sheet of paper, make a squirrel out of leaves. For the body, use a whole leaf of an elongated shape. The same is selected for the design of the fluffy tail. For the ears, choose small leaves with sharp tips.
- From the whole leaves, choose 1 suitable for decorating the head. It should have a sharp top, onto which the nose will then be glued.
- The paws are cut out from the leaves.
- The craft is made on a rough sheet. If everything looks harmonious, then they begin to transfer the details onto clean paper and fix them with glue.
- The body is glued in the middle of the sheet. The wide base is down and the sharp one is up.
- A sheet imitating a tail is glued at an angle behind the body.
- A head made from a leaf is glued to the body. The sharp top looks to the side.
- Leaves are glued to the head, and legs and paws to the body.
- Cut out 2 circles from black paper: glue one onto the sharp tip of the sheet, representing the squirrel’s head.
- The remaining circle is glued in the middle of the head. It should look like a squirrel from the side.
The craft can be carefully cut out along the outline of the leaf. Then it is glued to a hard base. A strip of cardboard is attached to the back, which will allow the squirrel to stand.
Firebird
Materials:
- 2 sheets of A3 format.
- A large number of autumn leaves. It is advisable to choose different colors: red, yellow, with burgundy stripes. The whole range of autumn colors will do.
- Glue.
- Scissors.
- Scotch tape, regular and double-sided.
- Brush.
- A glass of water.
- Colored paints or markers.
Sequence of actions:
- On the sheet, closer to one of its sides, draw the body of the firebird in profile. You can use the image of a peacock as a basis. There is no need to draw the tail.
- Cut out a bird template.
- Trying a sheet of paper on the bird's body, outline the outline of the tail. Make it lush. Draw it arbitrarily. The plumage in the form of leaves will fall off, so the paper is tried on the bird arbitrarily.
- Cut out a tail from paper.
- Using regular tape, attach the tail to the bird's body.
- The tail is decorated. To do this, take leaves, stick pieces of double-sided tape on them and attach them to the paper base of the tail. No need to stick tightly. It is enough to fix the leaf by its base. The bird will turn out much more beautiful if the tail is lush and uneven.
- Draw the outline of a wing on the body.
- Fill the wing with leaves, gluing them with tape.
- The bird is painted with yellow or any other color that matches the leaves. The white spaces on the tail and wing are filled.
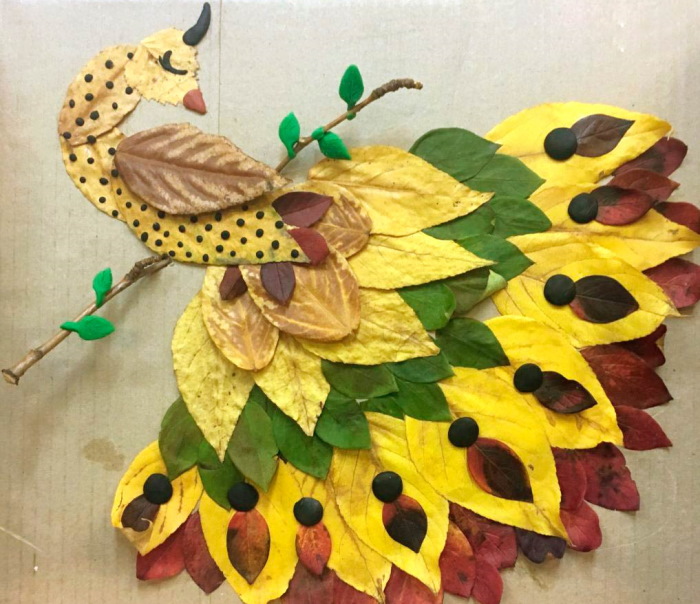
For beauty, you can make a crown on the bird's head. To do this, cut out a decoration from a whole leaf and glue it on.
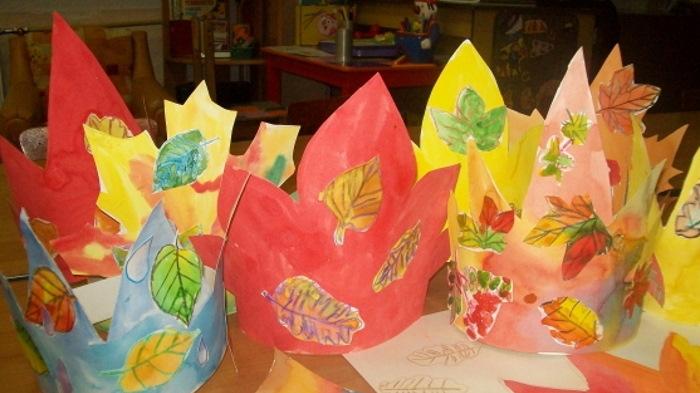
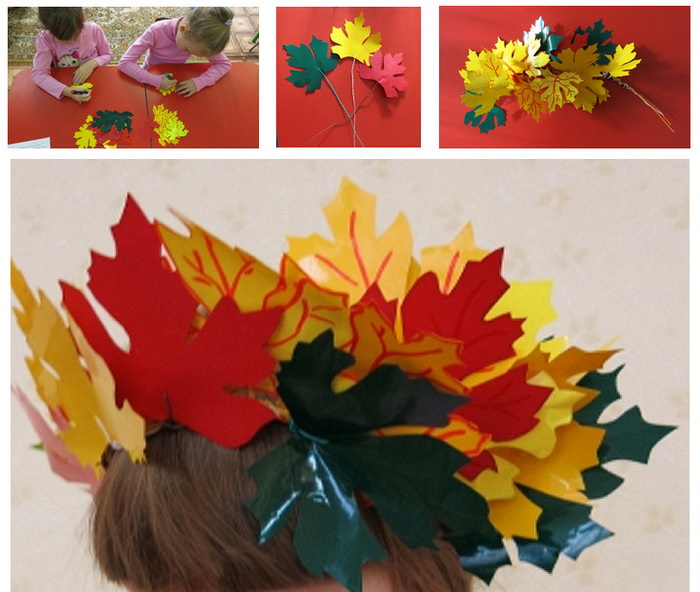
Autumn Crown
Autumn paper crafts for children are not only an opportunity to show imagination. When a child acts strictly according to the planned plan, he develops diligence. Children can be asked to independently think through the sequence of actions. Such a process has a positive effect on the development of thinking.
Materials:
- Thick paper.
- Scissors.
- Double-sided tape.
- Artificial rowan branches.
- Large red beads.
- Hot glue.
- Measuring tape.
Sequence of actions:
- The crown base is made from thick paper. To do this, measure the head circumference + add 3-5 cm to the result for the seam. Measure the result on thick paper. Cut out a strip of the required length, making it 12 cm thick.
- Close the strip, securing it with a piece of double-sided tape.
- Heat up the glue gun.
- The rowan branches are attached to the crown using glue.
- Glue the leaves to the crown with double-sided tape.
- Red beads are glued onto the leaves in random order.
If desired, you can use bows made of grosgrain ribbons as decoration.
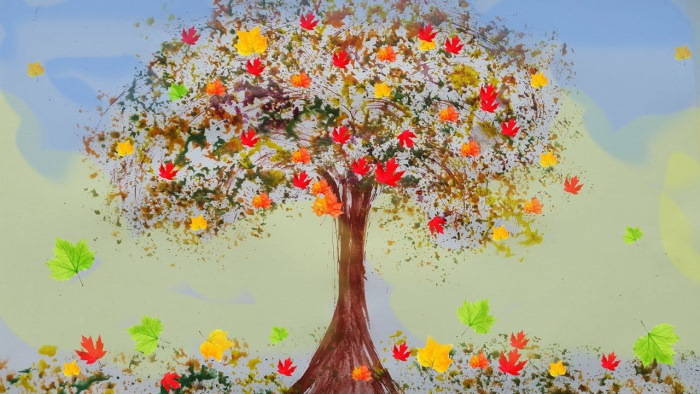
Autumn tree
Materials:
- Scissors.
- Thick paper (cardboard) of brown color.
- Autumn leaves.
- The glue is hot.
Additionally you need a template:
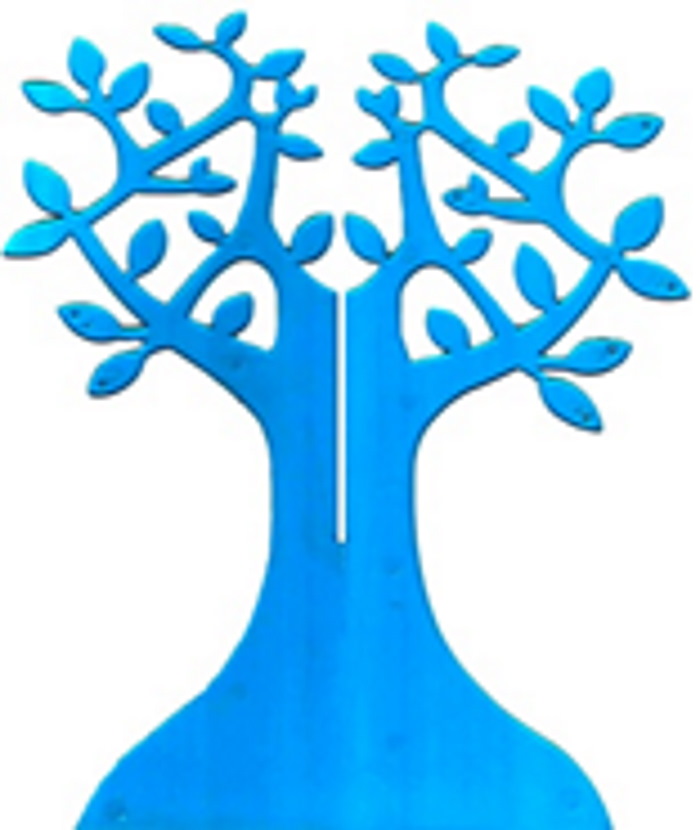
Sequence of actions.
- The template is applied to the paper and traced with a pencil. You will need 2 copies.
- One cut is made on each tree trunk: on top of one specimen, on the bottom of the other. The cutting line is visible on the template. But it only needs to be made on one trunk. On the second, the cut is made only at the bottom of the tree.
- Both tree trunks are connected to form a stable structure.
- Heat up the glue.
- Leaves are glued onto the tree branches.
This version of the craft can be complicated. Considering that the theme of the products is autumn, it is possible to create a full-fledged composition.
For this purpose, the following are additionally used:
- The base for the tree is thick cardboard.
- Moss.
- Acorns.
- A figurine of a boar.
Sequence of actions:
- An arbitrary shape is cut out of thick cardboard. It will be a clearing for the tree.
- Using glue, the finished tree is attached to the base.
- The clearing is covered with moss. Everything is fixed with glue.
- Acorns are glued to the moss under the tree.
- A figurine of a boar is placed under the tree.
This composition can be called "Autumn in the Forest". Children are explained that oaks bear fruit in the form of acorns. In autumn, they fall to the ground, and boars come to feast on them.
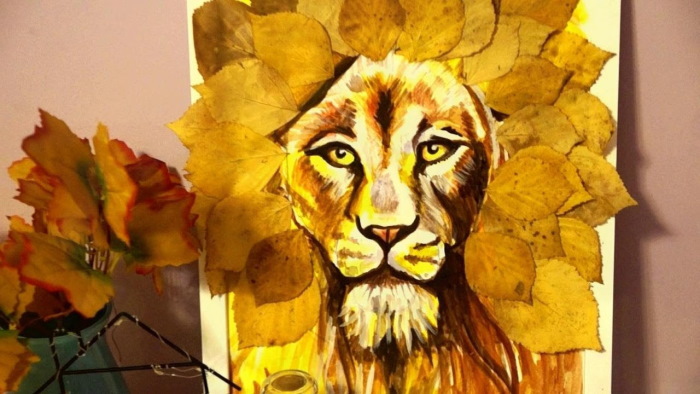
Lion
Autumn paper crafts for children are of great importance. In the process of making them, children's motor skills improve. This is especially important for preschoolers, since it affects speech development. Well-developed motor skills will allow the child to master writing in the future.
Materials:
- Hot glue or PVA.
- Paints.
- Brush.
- A4 sheet of paper.
- Autumn leaves.
Sequence of actions:
- In the middle of the sheet, draw the head of a lion without a mane.
- Let the paints dry.
- Using glue, attach leaves around the lion's head to imitate a mane.
If you can’t draw a lion, then do the following:
- Print out a drawing of a lion's head.
- Cut out the lion's head from paper, removing the mane.
- Place the lion's head on the paper and trace it with a pencil.
- Remove the lion head template from the paper.
- Leaves are glued around the outline of the lion's head to imitate a mane.
- They glue the drawing of the head.
This craft can be used in theatrical activities. To do this, remove excess paper around the lion's mane. Attach an elastic band to the sides of the craft.
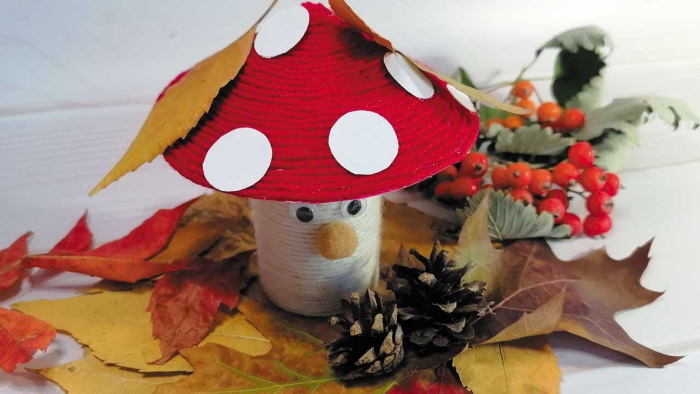
Fungus under a leaf
Materials:
- Toilet paper roll.
- Red cardboard.
- White paper.
- Moss.
- Plasticine.
- Autumn birch leaves or any other, but small in size.
- Glue.
- Scissors.
- Thick paper for the base of the craft.
Sequence of actions:
- An arbitrary shape is cut out from the material for the base of the craft - this will be a clearing.
- The paper roll is attached to the center of the craft base using plasticine.
- Cut a square out of red paper and roll it into a cone.
- Secure the cone with glue so that it retains its shape.
- Using glue, connect the cone to the sleeve.
- Small circles are cut out of white paper.
- Glue white circles onto the red cap of the mushroom - this will be a fly agaric.
- The base of the craft is decorated with moss, attaching it with glue.
- Autumn leaves are placed in random order on the mushroom cap and on the moss.
If you wish, you can decorate a whole mushroom meadow like this.
Autumn Wreath
Materials:
- Paints.
- Brush.
- Cones.
- Autumn leaves of different sizes.
- A glass of water.
- The cardboard is thick.
- Twine.
- Rowan twigs (artificial).
- Scissors.
- The glue is hot.
- Glitter yellow, golden.
- Grosgrain ribbon in the color of the leaves to match the craft.
- Hairspray.
Sequence of actions:
- A circle is cut out of thick paper. Its diameter is chosen at will. If the circle is made large, then a lot of natural material will be needed. This must be taken into account.
- The cones are painted in autumn colours: yellow, burgundy. You can mix shades and colours.
- The cones are left to dry.
- The paint is applied to the edges of the leaves. The color is chosen arbitrarily. Yellow leaves can be made more expressive with red. Do not use liquid paint. It is better to use a dense texture material. If you paint with liquid, the leaves will start to curl.
- Heat up the glue gun.
- Any bow can be made from grosgrain ribbon.
- A loop of twine is tied to a circle of thick paper.
- Glue the leaves on with hot glue. Move in a circle. You can glue them overlapping to create a lush composition.
- Cones are randomly glued between the leaves.
- Rowan branches are attached to a wreath covered with leaves and pine cones.
- A bow made of grosgrain ribbon is glued to the top of the wreath, where there is a loop of twine under the leaves.
- Spray the craft with hairspray.
- Sprinkle the wreath with glitter.
- Spray hairspray over the glitter to set it in place.
This wreath can be used as a door decoration. Paints can be replaced with dry pastel. It is applied to the leaves with a sponge. A regular foam sponge for washing dishes will do. It is rubbed with pastel, and then the leaves are tinted with a sponge.
Autumn vase
Autumn paper crafts do not require a large set of materials. You can organize a real expedition to collect natural components. For children, such a search process will become a real adventure. For example, you can go to the forest or park to collect cones and leaves.
Materials:
- Thick cardboard.
- The glue is hot.
- Dry reed.
- Autumn leaves.
- Pine cones.
- Paints.
- Brush.
- Scissors.
Sequence of actions:
- A cylinder is made from cardboard. The diameter is approximately 10 cm, the height is 20 cm.
- They make a cone out of cardboard.
- The top of the cone is cut off so that the cylinder fits tightly into the hole. Such a composite design will provide the future vase with better stability.
- The tips of the cones are painted, giving them a more expressive color.
- Heat up the hot glue gun.
- Leaves are glued onto a structure made from a cylinder and a cone.
- Cones are glued randomly between the leaves.
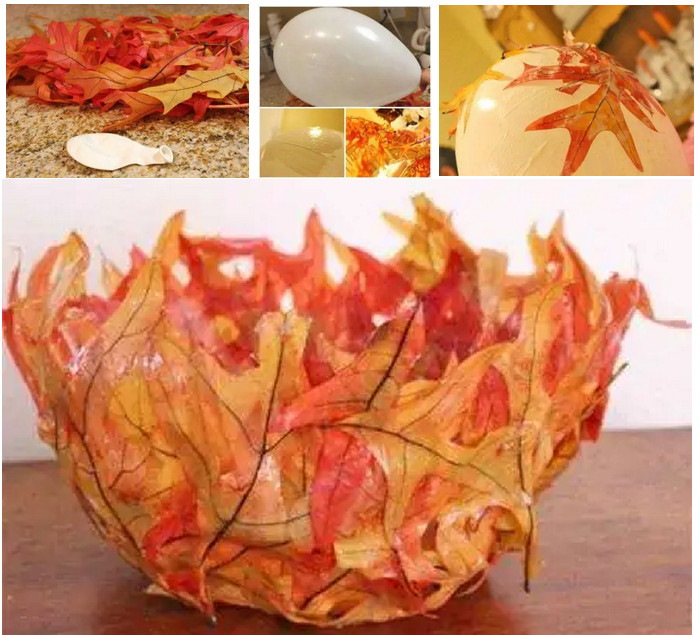
When the vase is completely decorated, the reed is inserted into it.
Autumn beauty
Materials:
- Straw hat.
- Paper is white, black, red, yellow.
- Leaves.
- Hot glue.
- Dried flowers.
- Scissors.
- Grosgrain ribbon.
- Little bump.
Sequence of actions:
- Place the hat on a flat surface.
- Cut out 2 circles from white paper – the basis for the eyes.
- Cut out 2 circles from black paper – pupils.
- Connect both elements and glue the eyes onto the hat. The face will be on the convex side of the headdress.
- The cone is glued below the eyes, between them - this will be the nose.
- Cut out a smile from red paper and stick it under the nose.
- A bow is made from grosgrain ribbon.
- Glue the bow to the bottom of the hat, under the face.
- A large number of thin strips are cut from colored red and yellow paper. They are twisted, giving them a wavy appearance.
- Paper strips are glued onto the hat so that they frame the face.
- Leaves and dried flowers are glued above the face, forming the image of a hat.
The paper in the craft can be replaced with thick colored threads.
Forest Menagerie
Materials:
- Thick paper is the basis for the craft.
- Autumn leaves are small in size (chestnut ones are not suitable).
- Cone.
- Plasticine black, brown.
- Acorns with and without caps.
- Paints.
- A glass of water.
- Toothpick.
- Sandpaper.
- Moss.
- Scissors.
Sequence of actions:
- Cut out any shape from paper for the clearing.
- A hedgehog is made from a pine cone. To do this, a sausage is rolled out of brown plasticine. Limbs are attached to it from the same material. A pine cone is attached to the plasticine blank. Eyes and a mouth are made of the hedgehog using a toothpick.
- A deer figurine is made from acorns. For this, the longest sample is chosen – this will be the body. Using plasticine, 4 acorns are attached to it – legs. The neck and head are also made from this natural material. Eyes, tail and ears are created from plasticine.
- They make hares. They take the largest acorns – 1 for one animal. They clean the surface with sandpaper. They paint a white oval on the resulting matte side. They let it dry. They paint the hare’s face on the white surface with a felt-tip pen. They make paws out of plasticine. They attach an acorn body to the lower limbs. All that’s left is to make ears out of plasticine and attach them to the upper part of the animal’s body.
- They make mushrooms. They make ovals from plasticine – legs. They put acorn caps on them.
- They decorate the meadow. They attach leaves and moss to it with glue.
The resulting animals are placed on the leaves in random order and then glued on.

Cobweb
Materials:
- 3 even branches.
- Thick threads.
- Leaves (1 large maple leaf is a must).
- Paper.
- Pencils.
- The glue is hot.
- Scissors.
Sequence of actions:
- The twigs are used to make a base for the web. To do this, they are folded into the shape of a snowflake and fixed with glue.
- The threads are woven around the branches, moving in a circle, imitating cobwebs.
- Draw 1-2 butterflies on paper with pencils.
- They cut out butterflies.
- They draw a spider on paper.
- They cut out the spider.
- Glue the spider into the center of the web.
- Butterflies are glued onto the web in random places.
- Place the craft on a large maple leaf and glue it to it.
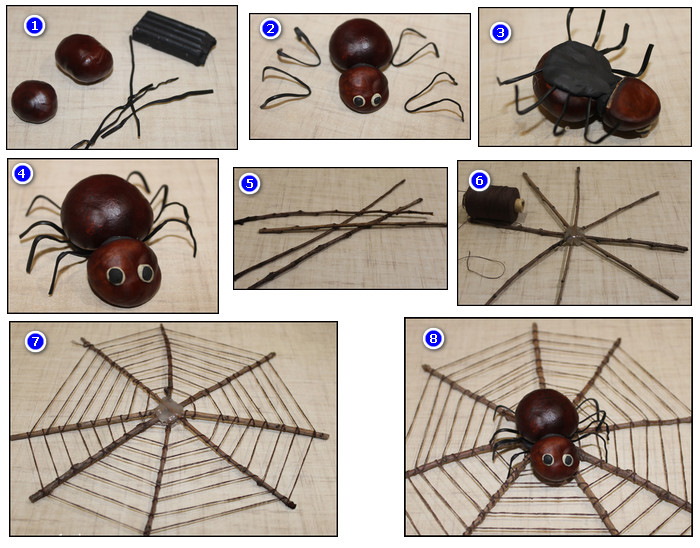
The web is decorated with small autumn leaves.
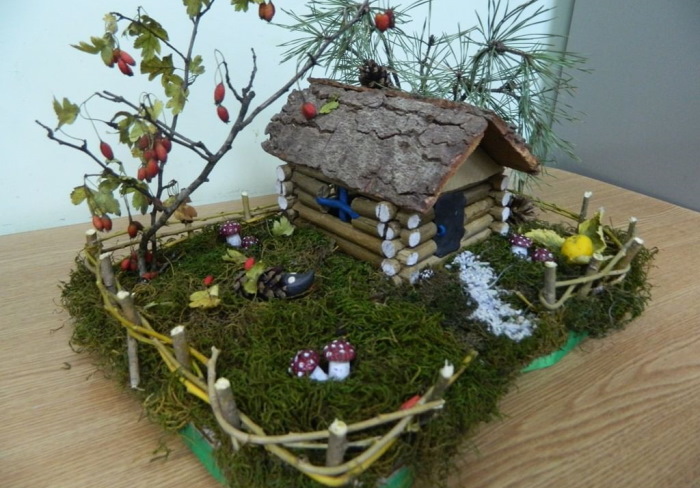
Volumetric craft "House in the autumn forest"
Autumn paper crafts (for children, the design process can be turned into a quest) are most often created for competitions and exhibitions in kindergartens and schools. But such activities are also an integral part of the educational process in a preschool institution.
Materials:
- The cardboard box is large enough to accommodate the craft.
- A small box for the base of the house.
- Glue.
- Scissors.
- Autumn leaves.
- Felt-tip pens or pencils.
- Cardboard.
Sequence of actions:
- The large box is turned on its side.
- Cut the cardboard to create a frame with a wall.
- They take a small box and cover it with white paper.
- Draw windows and doors on the base of the house. Color it if desired.
- A roof is made from cardboard and glued to the house.
- They insert the house into a frame made from a large box and secure it with glue.
- Leaves are glued in random order, imitating leaf fall. The bottom of the box is necessarily covered with fallen leaves.
You don't have to paint the house, you can print out a template. Stick it on the box.
Autumn Topiary
A small decorative tree made from scrap materials is called a topiary. It is very easy to make in autumn, since nature has almost all the materials suitable for creating a craft.
Materials:
- A pot made of any material.
- 2 balls of floral foam or polystyrene.
- Leaves.
- Moss or sisal.
- Glue gun.
- Small pebbles.
- Scissors.
- Newspapers.
- The branch is straight or slightly curved.
- Acrylic paints (optional) with brush.
Sequence of actions:
- A hole for the trunk is cut in the base ball.
- Heat up the glue.
- Place the base ball in a pot and drip glue into its hole.
- Insert a branch into the hole in the ball.
- The voids in the pot are filled with newspapers.
- Take a crown ball and cut a hole in it to put it on a branch.
- They drip glue onto the trunk and into the hole.
- They plant the crown on a branch.
- Leaves are selected to decorate the crown. Their petioles are cut off, leaving a length of 2-3 cm.
- They decorate the crown by sticking leaves into the ball.
- Moss is placed in a pot and pebbles are scattered on top of it.
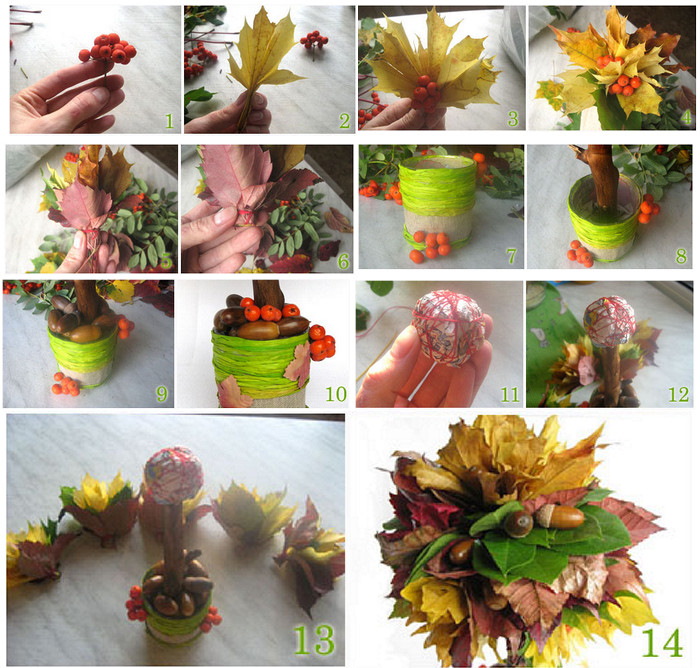
Using acrylic, paint the pot and trunk of the topiary if desired. The tree will look better if the crown is additionally decorated with rowan branches and cones.
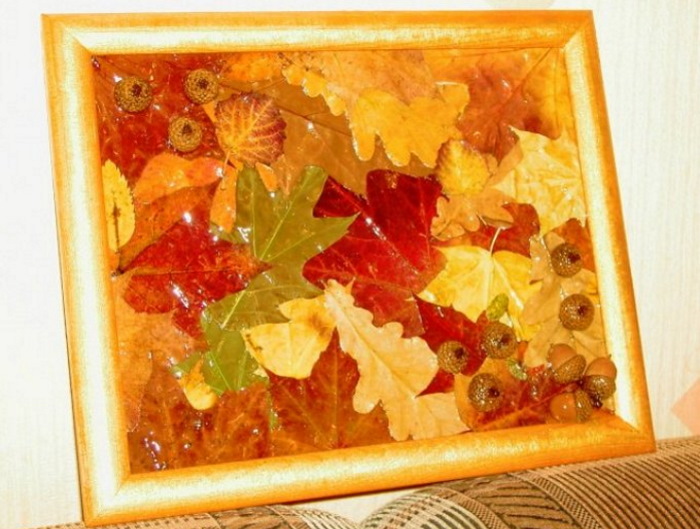
Panel of leaves
They can be used to decorate any autumn composition.
Materials:
- Large format paper.
- Dry leaves.
- The branch is thin.
- Glue.
- Marker.
- Dry pastel to create the background.
Sequence of actions:
- A large sheet of paper is painted with pastel. Its color is chosen based on the tone of the leaves. If they are bright, yellow, then the background is made dark. It is done differently when the leaves are brown.
- Draw the outline of a maple leaf on a piece of paper. This can be done by hand or using a template.
- The leaves are glued on like a fan. There is no need to attach them completely. It is enough to fix their middle. This will create additional terryness of the panel.
- Using scissors, trim the leaves near the outline so that the panel looks neat.
- A twig is glued to the base of the created leaf.
Leave the panel in a horizontal position for 15 minutes. Then it can be placed vertically or hung.
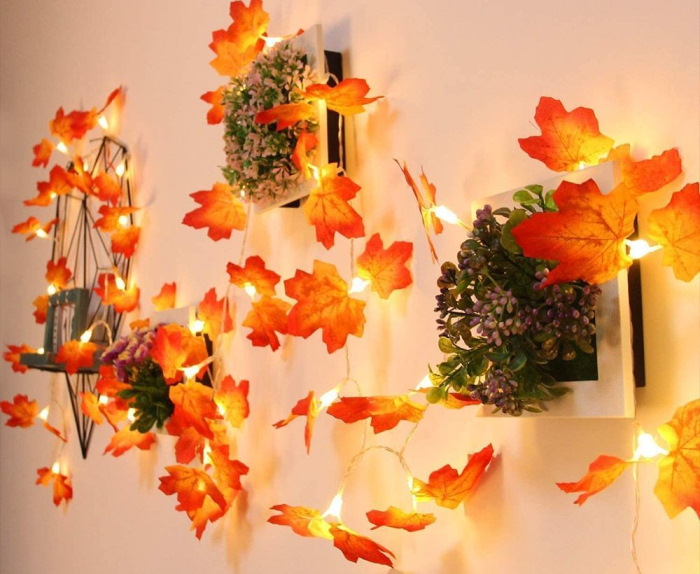
Garland of leaves and paper
Materials:
- Twine.
- Leaf patterns.
- Scissors.
- Pencils.
- Colored paper.
- Dry autumn leaves.
- The threads are thin.
Sequence of actions:
- The length of the string is any - it depends on the size of the future garland. Cut off the required amount of material.
- Redraw the leaf templates onto colored paper.
- Veins are drawn with pencils.
- Leaves are cut out of paper.
- Using threads, paper leaves are attached to twine, alternating them with natural material.
All that remains is to hang the garland.
Autumn paper crafts will be a good decoration for the room. This type of creativity is attractive for children. However, the complexity of the work is selected based on the age of the children. You can do it differently and create a craft together with the children.
Video on how to make autumn crafts from natural materials
7 DIY autumn themed craft ideas.