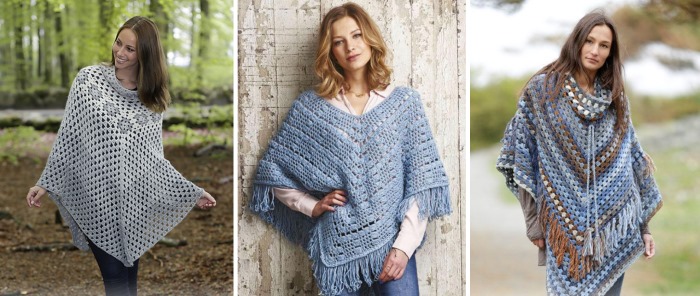
Particularly fashionable in the 70s and somewhat forgotten, ponchos have returned to the streets of cities. Such items are rarely available in stores. Any beginning craftswoman can crochet a beautiful poncho for herself or her little daughter.
What is a poncho? What to wear with this wardrobe item
A poncho is essentially a rectangle or square with a neckline cut out. Often, the sides at the bottom of the product are sewn, highlighting openings for the hands. The sleeves can be decorated with cuffs. Fashionable models are complemented by voluminous hoods.
The poncho is a very controversial item of clothing, there is an opinion that such a cape makes the figure look bulky. From another point of view, the poncho hides flaws advantageously.
For the indigenous population of South America, the poncho is part of the national costume. Here it is traditionally made of wool. Each region has its own pattern on the back and front of the poncho. In other countries, any fabric can be used for this purpose.
Poncho can be worn regardless of the season. For each season, designers offer models made from different materials and differing in style. The color scheme, pattern and fabric are chosen according to your own taste. The main thing is to maintain the main idea of this type of clothing, the rest does not matter. You need to know how to wear a poncho, it does not suit every outfit.
The voluminous top looks good:
- with tight-fitting semi-sporty cut trousers;
- jeans;
- short skirts.
The large mass of the upper body is perfectly balanced by the light bottom. Due to the free lines of the top, it is possible to correct the figure and hide its flaws. Knitted openwork summer ponchos - jackets and mantos are especially popular among plump women.
Don't try to combine a bulky top with:
- long and wide skirts;
- trousers cut like harem pants;
- classic skirts and trousers.
A combination of a voluminous cape and a long, bulky Tatyana skirt will look heavy on short, plump ladies. A poncho combined with a short flared skirt looks even more ridiculous.
Poncho is a popular type of clothing for pregnant women, as the voluminous, free-flowing folds help to hide the belly. Tall, slender girls look good in ponchos.
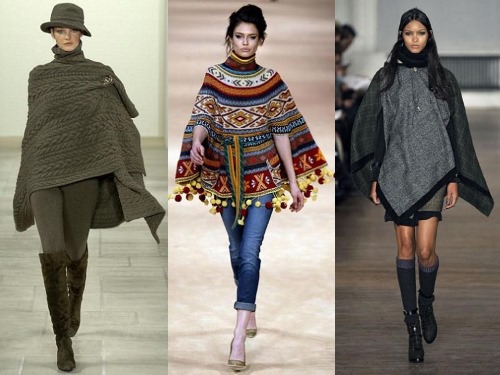
A fashionable poncho, depending on the style and material, can look like:
- blanket,
- raincoat,
- jacket,
- sheepskin coats,
- jumpers,
- down jacket,
- manto,
- blouses,
- dresses,
- fur coats,
- robe,
- shawls.
What is needed to crochet a poncho
You can make a crochet poncho for yourself, because there are a number of advantages to making something with your own hands.
Related clothes:
- it will cost less than something bought in a store;
- will bring his own artistic vision to life;
- will exist in a single copy.
For beginners, it is most advantageous to take on knitting a poncho in the form of a shawl. It can be knitted in segments, pattern details, or simply by picking up the fabric, gradually rising, row by row.
Selecting yarn
Before making any type of clothing, a sketch must be created. Then, based on the artistic concept and purpose of the item, the appropriate material is selected.
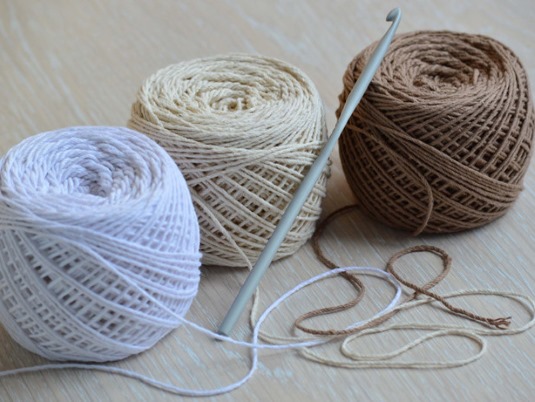
A summer cape can be openwork. A thin thread or yarn will do for it. Winter models should be not only beautiful, but also warm. Such a thing is knitted from thick woolen threads. A dense knitted cloth can replace a demi-season coat.
The yarn is selected based on:
- purpose of the model;
- fabric density;
- pattern and color of the future product.
Table. Approximate calculation of yarn for a poncho jumper.
| Product | Amount of yarn |
| children under 1 year | 200 g |
| children from 2 to 6 years old | 200-300 g |
| children from 6 to 12 years old | 300-400 g |
| women (size 40-46) | 500-600 g |
| women (size 46-56) | 600-1000 g |
Choosing a hook
The hook that will be used to knit the fabric should match the thickness of the yarn. Thin metal hooks, pointed at the tip, are intended for knitting summer models from "Iris". Such hooks are good for knitting individual lace segments of openwork items. A warm item made of thick woolen threads is knitted with hooks number 3.5 and larger.
The hook can be made from:
- bamboo,
- bones,
- plastics,
- aluminum.
- trees.
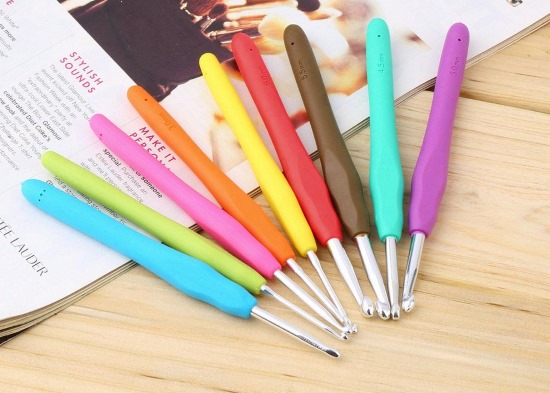
The material the hooks are made of does not affect the product in any way. Each knitter chooses the most pleasant and familiar tool for herself. The main thing is that the hook number corresponds to the thickness of the yarn.
Calculating the amount of yarn
Calculating the amount of yarn required for production is simple:
- one skein of the yarn you like is purchased;
- a hook suitable for this thread is selected;
- the first row is knitted according to the selected pattern to the required length;
- a turn is made and the second row is knitted according to the pattern;
- the length of the resulting double-row chain is measured again;
- if the chain corresponds to the required size, a mark is placed on the last loop of the second row;
- knitted lines unravel;
- a piece of thread from the beginning to the mark is measured with a centimeter;
- calculate the total number of rows in the pattern;
- The number of rows is divided by two and multiplied by the length of thread used to knit the first two rows.
- The length of the thread in 1 package is indicated on the skein of purchased yarn, all that remains is to divide the obtained result by this measure.
Some manufacturers indicate the yarn number and weight instead of the meterage of the thread on the skein. In this case, the consumption can only be calculated empirically. You can try to continue knitting the fabric until the purchased skein is completely used up, then measure the number of knitted rows and, based on the result, calculate how much yarn should be purchased.
This method allows you to calculate the consumption quite accurately. The only bad thing about it is that by the time the test skein runs out, the store may run out of the yarn you like.
In this case, it is worth asking the seller:
- is there any other yarn like this on sale and how often does it arrive in stores;
- Is there any information by chance about the number of meters of thread in a skein?
Types of crochet poncho patterns
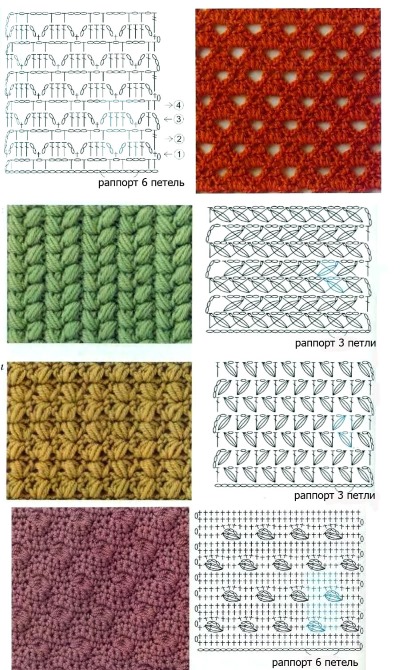
The pattern on knitted clothing can be any. Decorative trim and knitted ornament are selected depending on the purpose of the poncho and the taste of its owner.
Openwork items are woven using lace patterns and thin threads. Summer beach models can be knitted from floral motifs connected by airy chains. The details can have different colors. For example, leaves and stems are knitted with green threads, flowers with pink and peach, and the composition is connected with delicate airy chains of milky color.
Warm winter items that look like a demi-season coat or jumper can have several rows of voluminous braids on the front. Thick warm items are often made as a solid piece of fabric. The patterns on such items are knitted by changing the color of the yarn.
A dressing gown and dress in ethnic style will look great with a pattern of multi-colored stripes.
Lightweight ponchos can be decorated with patterns created by:
- knitting a pattern with one thread according to the diagram;
- embroidery with ribbons and woolen threads on knitted mesh;
- changing the color of the thread during the knitting process.
Step-by-step instructions for knitting a classic women's poncho with a simple pattern
A crochet poncho for home use in the form of a blanket is made in the shape of a rectangle.
The simplest patterns are knitted on a model intended for the cool season. Such a thing should keep its owner warm. Thick woolen threads and a suitable style are selected for it.
The choice of yarn requires great attention. It is not advisable to knit household items from white angora wool, they will quickly lose their appearance. Colored wool and acrylic threads are good choices.
Product drawing
The creation of any item begins with creating a sketch, drawing a drawing and taking measurements. For a poncho, only a few measurements are required. The length of the item is measured from the shoulder to the desired hem. The width of the item is measured from the right hand across both shoulders down to the left hand. The arms should be down when taking measurements.
For the drawing, take a sheet of thick film or paper of a suitable size. Many knitted patterns are created by pinning individual segments onto a pattern, which are then joined together with chain stitches. The pattern is life-size and may have marks on it indicating the location of individual pieces.
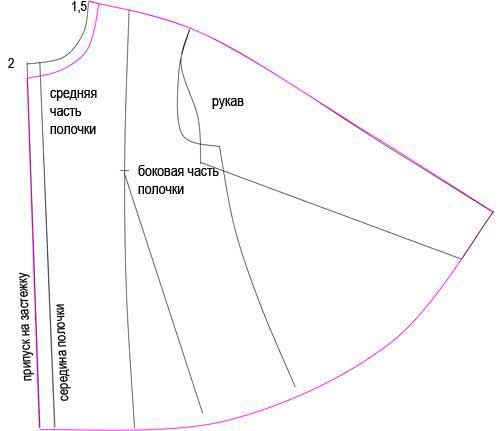
The drawing is constructed in stages:
- a segment AB equal to the width of the product is drawn on paper;
- the distance from point A to point B is divided in half and designated by point B;
- from point B perpendicular to line AB in both directions, a value equal to the length of the product is measured, the resulting points are designated G (along the front) and D (along the back);
- through points G and D, lines are drawn parallel to segment AB;
- From points A and B, perpendiculars are drawn along the back and front until they intersect with the lines drawn through G and D.
The result should be a large rectangle divided in the middle by line AB into two equal parts. It remains to mark the neckline. From point B, 15 cm are measured to the left and right (the neckline can be larger).
Back
Knitting:
- Step 1. The chain of the first row is collected with air loops. Its length should correspond to the segment of the drawing AB.
- Step 2. At the end of the chain, make three air loops for turning.
- Step 3. The first row is knitted. The calculation is as follows: three chain stitches, then a double crochet, six chain stitches and a double crochet again. The entire row is knitted like this until the very end.
- Step 4. Knit three air loops for lifting.
- Step 5. Knit three chain stitches, then a double crochet and three chain stitches again. Continue knitting the row with this alternation until the end.
- Step 6. The third row is knitted like the first.
- Step 7. The entire fabric is knitted according to the described pattern. The size of the finished fabric should be equal to half of the rectangle shown in the drawing.
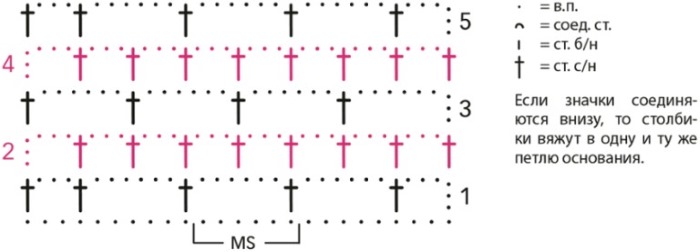
Fig. 1. Knitting pattern for a classic poncho.
Front part
The front part of the product is made in the same way as the back. There is no difference. The finished front of the poncho-shawl should be the same size as the back.
Assembling the product
Two rectangles are combined along the outermost upper rows. They are connected to each other by knitting a single crochet through every two loops of the last rows located opposite each other. The section allocated for the neck is left unconnected.
It is advisable to rinse the finished product in warm soapy water. Squeeze it into a towel and stretch it out to dry on any suitable surface (mattress, carpet). The edges of the knitted product should be fixed, otherwise it may deform during the drying process.
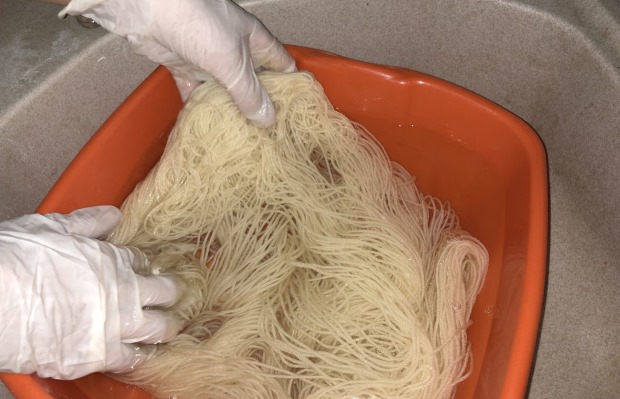
Important! To prevent the knitted product from shrinking after the first wash, yarn made from natural fibers (wool, cotton) is recommended to be decatized before working with them. To do this, the skein, without rewinding into a ball, is soaked in warm water and then dried on a hanger.
How to knit a smart poncho for a girl
Crochet poncho, knit for a little girl using the classic pattern, in the form of a rectangle or square, consisting of equal triangles. Mom's fashionista will be happy with a beautiful new thing.
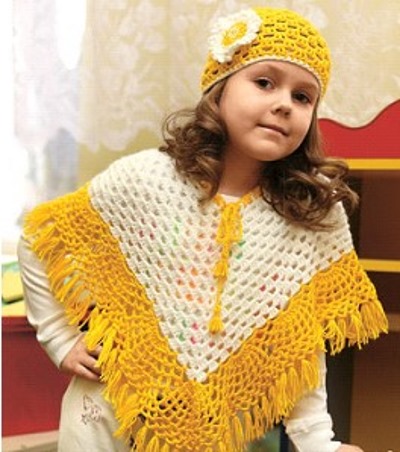
Fig. 2. Children's clothes should be bright; milky and bright yellow yarn are suitable for this model.
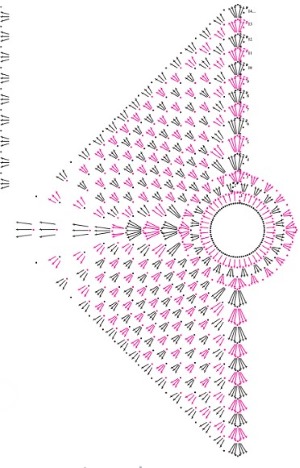
Fig. 3. Diagram of the central part of the product.
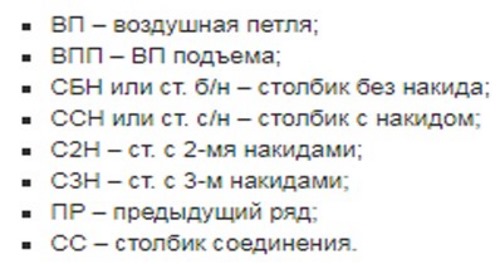
Fig. 4. Designation of circuit elements.
Knitting the main fabric of the product
The work is carried out in the following order:
- The chain is made from 80 VP with white yarn.
- The chain is closed with a CC loop.
- First row - knit 3 VP, then 40 CCH loops, close them into a ring 1 VP.
- The second row - 3 VP for turning and lifting, then through one arch from the VP of the previous row, 3 DC and 1 VP are knitted (a total of 20 rapports).
- Third row - 3 VP for lifting and turning, then we divide the previous row into 4 equal segments consisting of 5 rapports. We knit 5 times 3DCS in the VP arch of the previous row, in the last VP of the rapport we knit another 3DCS. The pattern is repeated 4 times.
- From the 4th to the 14th row, work is carried out according to the scheme of the third row. The expansion of the fabric is achieved by additional loops, which are knitted precisely one above the other. The displacement leads to a violation of the pattern.
The lacing of the required length is knitted from VP along the neck.
Decorative bottom of the product
The finished middle part of the product can be tied with lace created according to any of the favorite patterns. Large segments of flowers and leaves will look appropriate here. Openwork details are connected with chains of air loops.
The lower trim part of the poncho is knitted with bright sunny-colored yarn. For their fashionista, mothers can choose any other shade that will suit their daughter's face better.
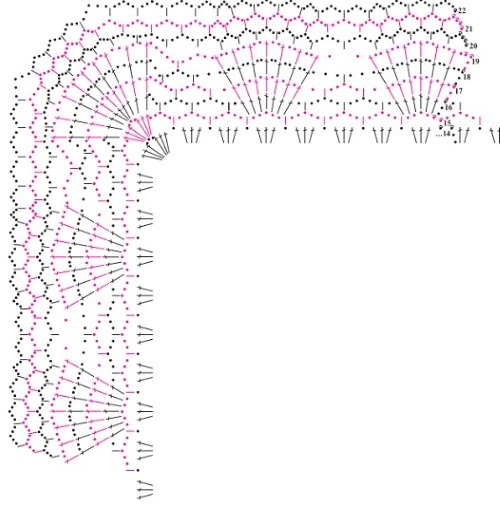
Fig. 5. Scheme of decorative bottom binding.
Interesting models of ponchos, their knitting patterns
The appearance of a knitted item depends on the taste, imagination and experience of the craftswoman. Only those who have been engaged in this hobby for many years can come up with a new pattern. For other lovers of home knitting, there are a large number of patterns of varying complexity.
Outfit for a summer evening
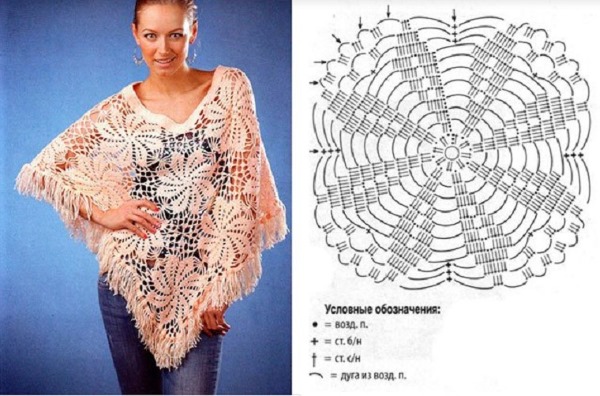
A crochet poncho for a summer evening will appeal to a woman of any age. To create such an openwork cape, you need to draw a drawing.
Further work is carried out as follows:
- The required number of segments is knitted according to the pattern. As they are made, all the parts are laid out on the drawing.
- When the motifs occupy the entire area of the drawing, you can begin assembling the product (the recommended number of motifs is 16 pieces).
Fig. 6.
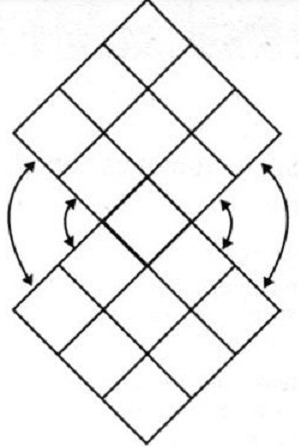
- The finished segments are connected according to the drawing in Figure No. 8 with chains of air loops.
Fig. 7.
To make 16 pieces with a diameter of 20 cm, you need 400 g of synthetic acrylic yarn in peach color. The medium-thickness thread is knitted with hook No. 2, 5.
The neck is knitted from the first to the second row with single crochets. Starting from the third to the fifth row, knit every 4th and 5th stitch together. In the next two rows, knit every 7th and 8th stitch together. The last row is knitted with single crochets.
With a classic pattern of square motifs
A crochet poncho for special occasions will be a spectacular addition to a little black dress and shoes with high square heels. The poncho cape is assembled from separate square pieces.
Each of the segments is assembled according to the following scheme:
- A chain of 6 VP is knitted, at the end they are connected into a ring S.S.
- The second row begins with 3 VP for lifting and turning, then 2 CCH, 2 VP, 3 CCH are knitted, the rapport is repeated.
- Row 3 is knitted like this: 3 VP, 2 CCH under the VP of the previous second row, 2 VP, 3 CCH again in the VP of the previous row.
- All other rows are knitted in this way.
A neat corner is made like this: 3 CCH, 2 VP, 3 CCH. The number of rows can be any. The recommended size of the segments is 20 by 20 cm. The finished parts are laid out on the product drawing. When the drawing field is filled, the parts can be sewn together or connected using CC.
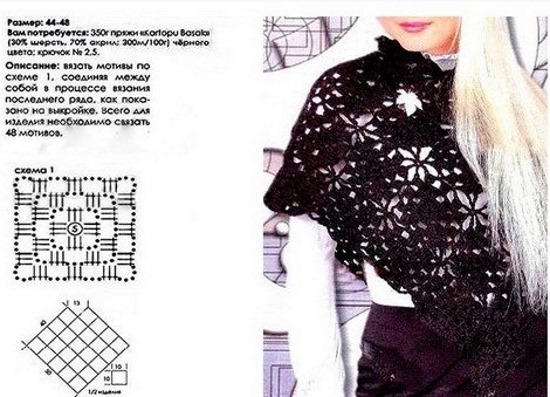
Fig. 8. Black cape made of squares.
Among lovers of home knitting, the pattern of the segment is called "Granny square". Based on such a motif, you can create your own unique product, such as in figure No. 9.
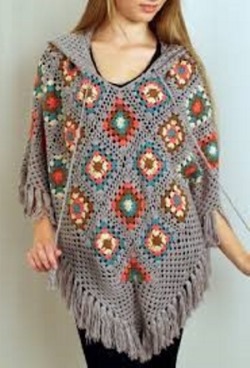
Fig. 9. Everyday item. This cape is made from square multi-colored pieces.
Lace Dresses for Special Occasions
Items created using Irish lace technique look especially beautiful. Such a product costs a lot of money, not everyone can afford to buy it. The work begins with creating a drawing and a sketch. Not only the dimensions of the future product are put on paper, but also an approximate drawing of the arrangement of the parts.
First of all, all segments are knitted one by one. Each created detail is pinned to the drawing. During the process, the product drawing is adjusted, and changes are made along the way.
The work requires a lot of patience, since the poncho is knitted from Iris threads, so the details take longer to collect than motifs made from thick acrylic or wool yarn.
Most often, the details have the form of stylized flowers and leaves of different sizes and colors. They can be located at some distance from each other or partially overlap in some places. The segments are connected to each other with a mesh knitted with air loops.
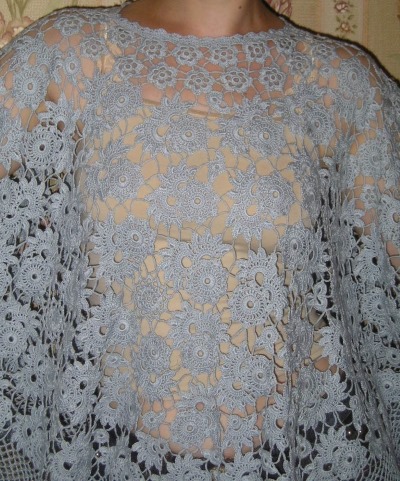
Fig. 10. White poncho knitted using Irish lace technique.This photo shows a product consisting of identical motifs.
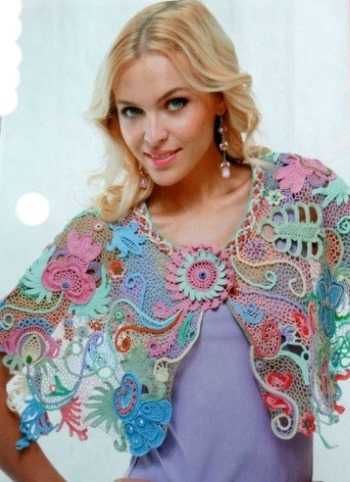
Fig. 11. Product parts may have different shapes, colors and sizes.Things look impressive where the yarn used for the details is slightly thicker, and the connecting mesh is knitted from threads one number thinner.
The most common details of Irish lace are the leaf and flower, knitted according to the patterns shown in Figures 12 and 13.
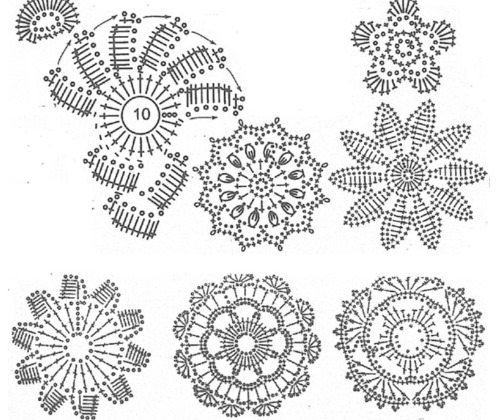
Fig. 12. Knitting pattern of flowers.
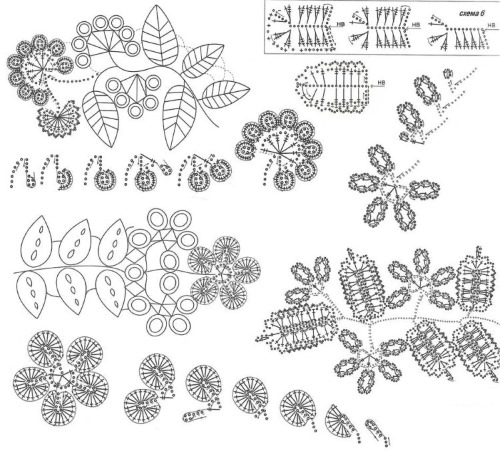
Fig. 13. Knitting pattern for leaves with flowers.
Making a crochet poncho with your own hands for going out or for home use requires the craftswoman to strictly follow all stages of the work. It is impossible to make something of high quality without precise calculations. It is imperative to create a sketch and drawing of the future product before starting work. Complex fragments are knitted before starting work.
Author: Kalugina Natalia
Article formatting:Natalie Podolskaya
Video about knitting a poncho
Crochet poncho - knitting in this video: