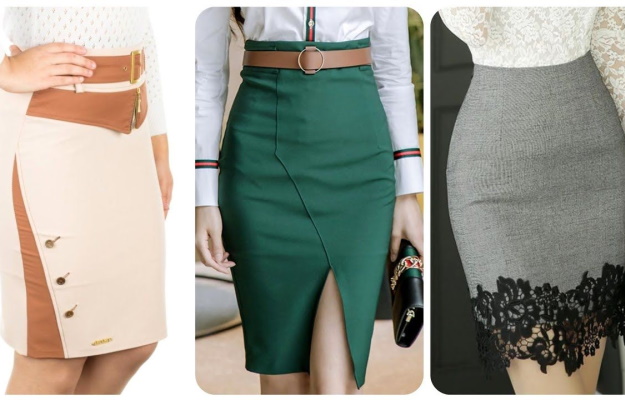
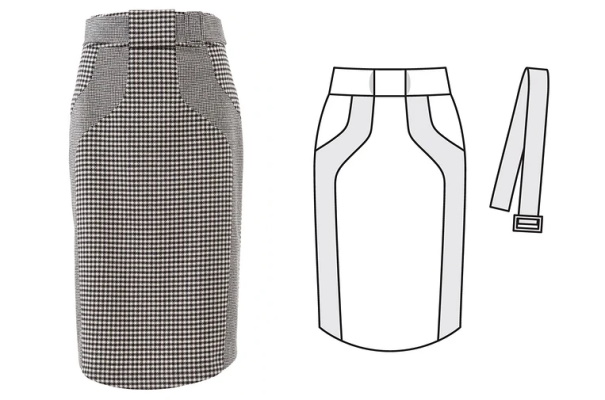
A pencil skirt is a universal item of a woman’s basic wardrobe that suits any body type.
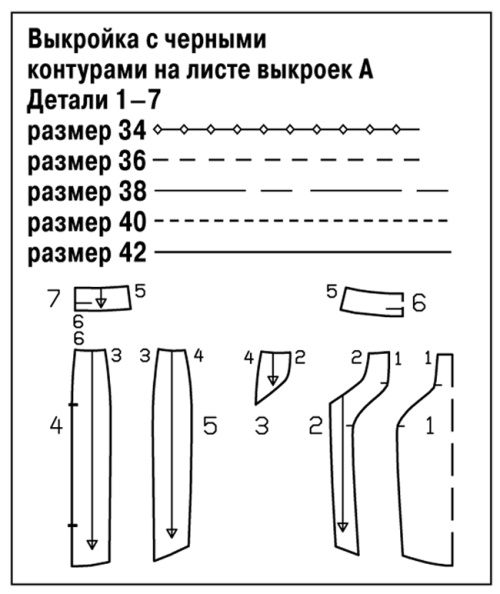
You can make such a model yourself, using a free basic pattern in full size as a basis and adjusting it depending on your own body parameters, which will allow you to correctly determine the type of product and the required fabric consumption.
Choosing fabric for a skirt
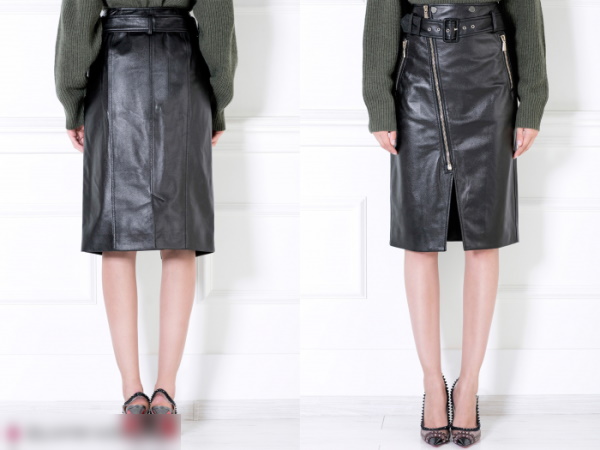
A high-waisted pencil skirt (the pattern for the item is given below in the article) fits perfectly into both everyday and office styles, pairing well with almost any top, classic pumps, sandals, boots or sneakers.
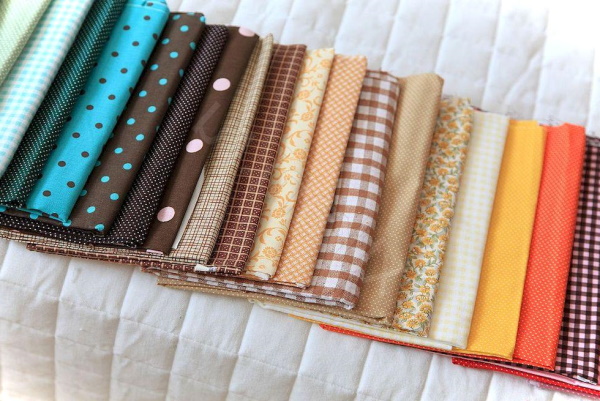
The main task of such a model is considered to be its ability to hide body flaws, while simultaneously emphasizing all the advantages of the figure. It should be sewn from dense fabric that holds its shape well, selected depending on the season.
So, for the warm season, light, well-ventilated, flowing fabrics are suitable. In winter, a dense, well-heat-retaining product will be most desirable.
| Time of year | What to sew from |
| Winter period | velvet; leatherette; tweed. |
| Spring period | cotton; jersey; gabardine. |
| Summer time of year | knitwear; linen; silk. |
| Autumn period | denim; eco-leather; jacquard. |
The main condition when choosing a fabric for sewing is its elasticity. A pencil skirt should hold its shape well and not restrict movement.
Professionals do not recommend making such a model from loose and very light fabrics. The former are quite difficult to work with. The latter wrinkle very quickly and easily lose their shape, and are also characterized by an increased tendency to snag.
The fabric decor is of particular importance when making a pencil skirt:
- A solid-color model in black or dark blue is suitable for office style.
- A bright or voluminous print will look good on a product made of light, flowing material, suitable for city walks.
- A pencil skirt for a holiday can be made of any bright material and decorated with shiny decor.
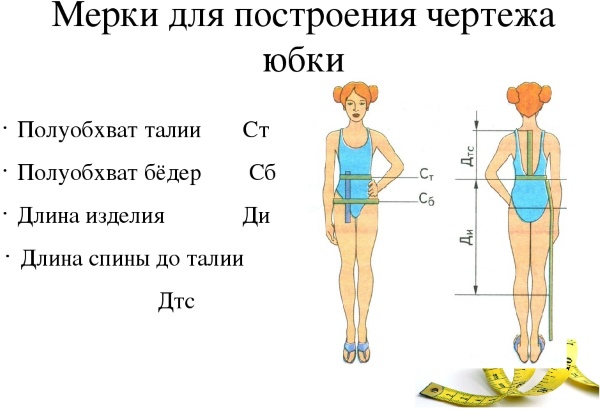
Taking measurements and determining fabric consumption
A high-waisted pencil skirt (the pattern for the item can be taken from the Burda magazine or the Internet) is considered one of the easiest items to make.
The calculation of the fabric required for sewing is determined depending on the girl's measurements with a mandatory allowance for seams:
- 1.5 cm - in the hip area for a loose fit;
- 2 cm to each side seam;
- 1.5 cm – for the back seam;
- 1 cm – for the seam in the waist area;
- 6.5-7 cm – to create a belt;
- 1.2-1.5 cm on each side of the belt where it connects to the main product;
- 4 cm – to correct the bottom of the model;
- 15 cm – allowance for fabric shrinkage.
You can take measurements for making the product yourself. But for convenience and accuracy of data, experts advise using outside help.
Measurements required to make the model:
| Name of measure | How to shoot |
| Product length (DL) | A classic pencil skirt should reach the knee. To take this measurement, place the tape measure at the waist and pull it down to the knee. In most cases, the length of a classic pencil skirt is about 60 cm. |
| Waist circumference (WC) | Measured around the circumference at the narrowest part of the figure. |
| Hip circumference (HC) | The measurement is taken along the protruding parts of the buttocks. If the girl has a protruding belly, the measurement of the circumference in its protruding part is recorded separately. When constructing a pattern, this value must be taken into account as an additional allowance, which will allow the skirt to fit the figure well. |
| Half waist circumference (Half waist circumference) | It is equal to 1/2 of the value of the full waist circumference, measured through the most depressed parts of the side walls of the torso. |
| Half hip circumference (PoB) | It is 1/2 the value of measurements taken at the most protruding points of the buttocks and hips (approximately 18-20 cm from the waistline). |
Having determined these values, you can calculate the amount of material needed to make the skirt. The standard fabric is 1.5 m wide. When folded – 0.75 m.
To calculate the material:
- 75 – PoB – value of allowances for side and back seams;
- DI + 2-3 cm.
The obtained results should be added up. For convenience, experts suggest rounding them to a whole value.
Necessary materials
Materials required to make the product:
- main fabric;
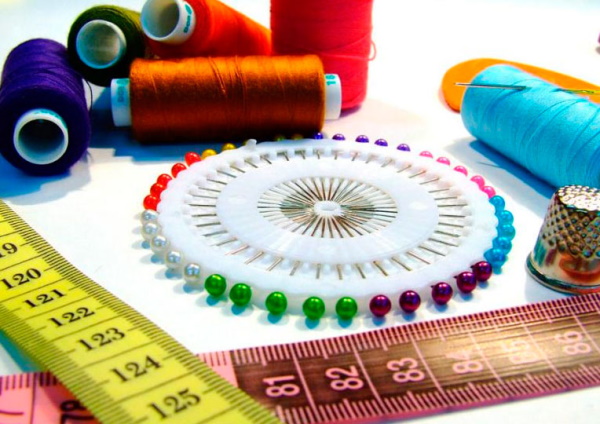
- sewing machine;
- scissors for cutting fabric;
- graph paper (or a ready-made template) and a wide ruler;
- tailor's pins;
- threads of a contrasting shade and matching the color of the fabric;
- needles;
- lining fabric;
- interlining and grain edge;
- tailor's chalk or soap.
Professionals advise novice seamstresses to first make a pattern on paper and then carefully transfer it to the fabric, which will help avoid possible flaws and correct errors in a timely manner.
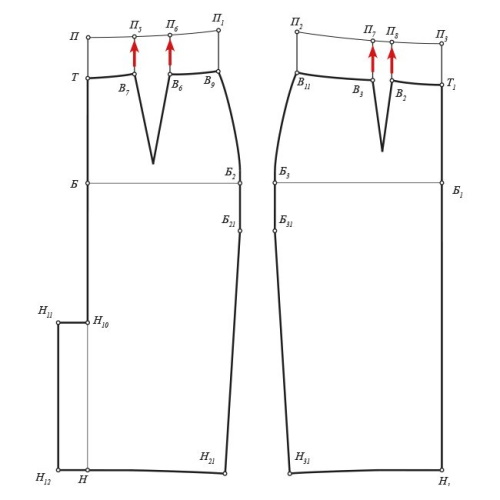
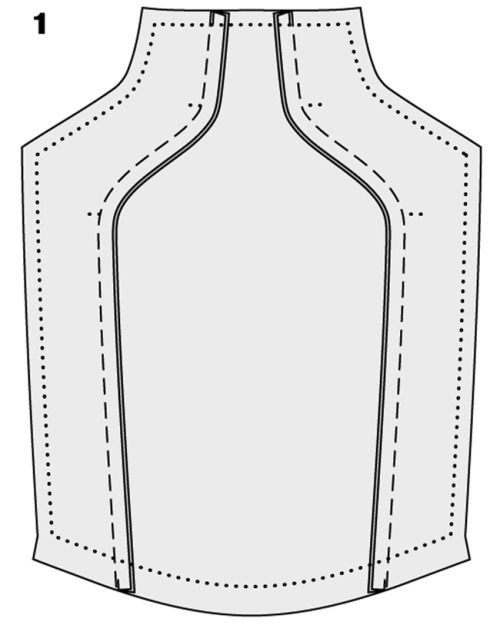
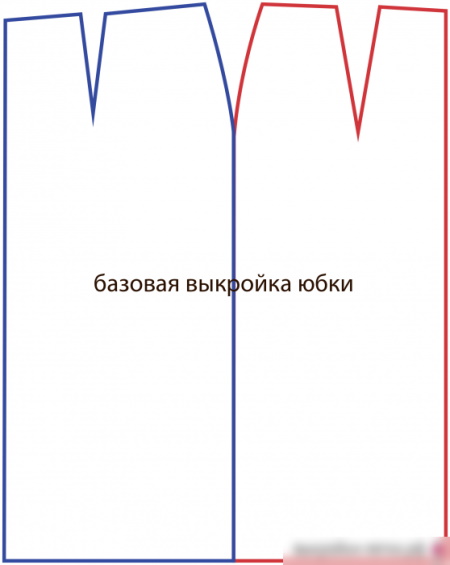
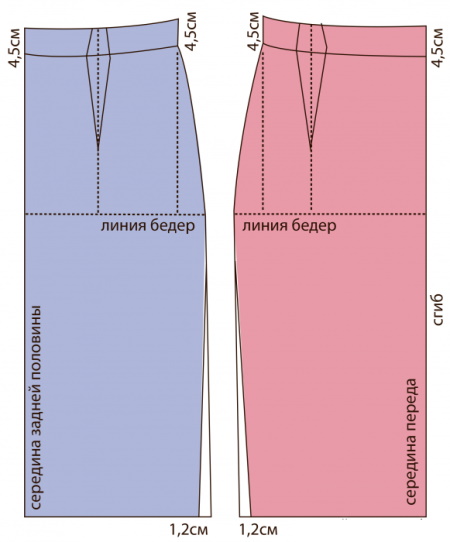
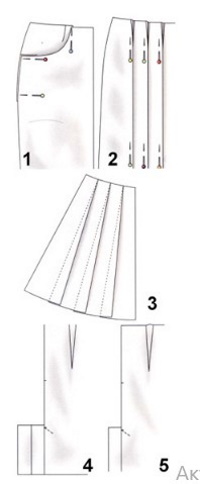
Construction of a skirt pattern
The pattern of a pencil skirt with a high waist is based on the pattern of a straight skirt, with an additional narrowing towards the bottom. With a narrow waist and wide hips, experts recommend making one additional dart on each panel, which will ensure a perfect fit of the model on the figure.
Stages of pattern construction:
- Draw rectangle ABCD.
- The width of the model will be the sides of the rectangle AB and DC, corresponding to the value of PoB +1 cm (necessary for seam allowance).
- The length of the skirt corresponds to the values AD and BC.
- To construct a lateral line to the right of point A, you need to set aside a distance equal to 1/2 of the value of AB. The point found is designated by the letter T. Moving down from it, you need to set aside a perpendicular line intersecting the segment DC.
- To construct the hip line, you need to set aside 20-22 cm of cuts from points A, T, B, which will allow you to find points L, L1 and L2. The cuts should be connected with a dotted line.

- The calculation of the depth of the darts located on the waist line is calculated by the difference between the values of PoB and PoT. 1 cm should be added to the resulting value. The side dart here will be equal to 1⁄2 of the resulting value, for example, 7 cm.
The remaining part should be allocated for the back and front darts, corresponding to approximately 4 and 3 cm.
- To construct a side dart, it is necessary to set aside segments extending from point T equal to 1/2 of the value intended for the side dart.
- Since it corresponds to 7 cm, then 1 cm should be set aside upwards, and the resulting point should be connected with a dotted line with the value of L1. The resulting segment is divided into 2 parts, with a distance of 0.5 cm set aside from the center on both sides. A line should be drawn to the left and right through points 1, 0.5 and L1.
 |  |
- The front dart of the product corresponds to 3 cm, and for its construction it requires setting aside 5-6 cm to the right of the side part and drawing a perpendicular line down, corresponding to 9-10 cm.
On both sides of the resulting perpendicular, you need to set aside segments of 1.5 cm (which corresponds to 1/2 of the dart depth), and its end needs to be moved toward the side seam by 0.5 cm.
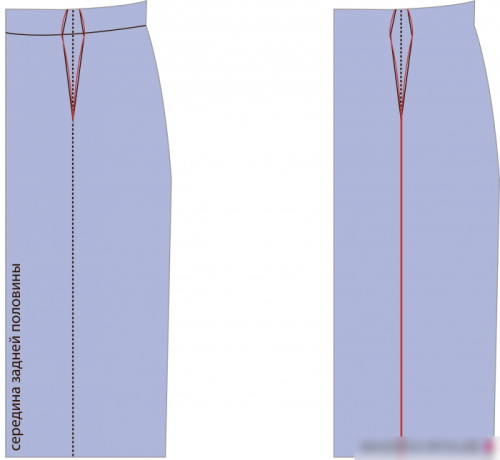
- The back dart of the skirt is 4 cm and is constructed along the line AT, divided in half into both parts of the division, which corresponds to segments of 2 cm. The length of the back dart should be 12-13 cm. The waistline on the back half of the skirt is constructed from point 1, connected to point 2.
In the same way, the waist line is drawn on the front half of the product, where you need to connect points 1 and 0.5.
- If the difference between the values of PoT and PoB exceeds 14 cm, additional darts are made on the back of the product.
When constructing a pattern, the final length of the model is determined. If its value is 60 cm, a line corresponding to 2-2.5 cm is drawn from the front and back to narrow the model. The hip lines should be left straight. A length of 40 cm requires an additional narrowing of the model by 1.5-2 cm along the side lines.
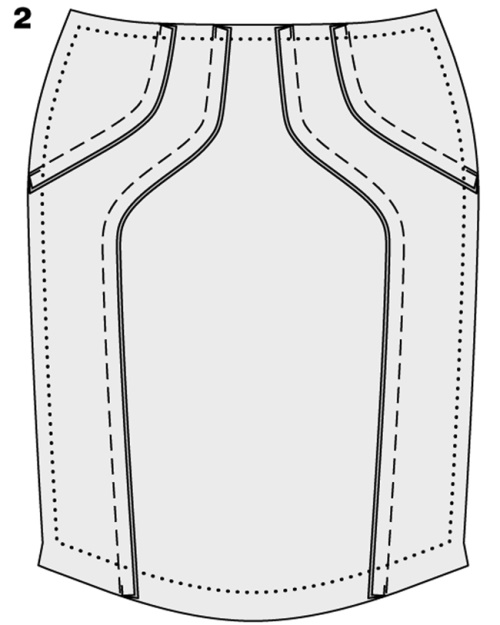
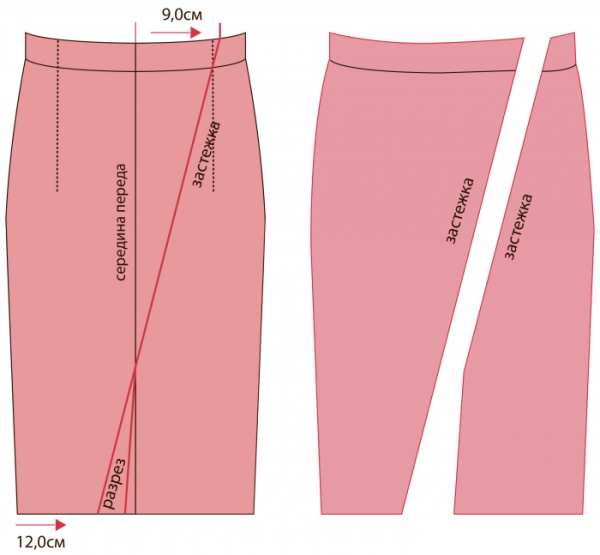
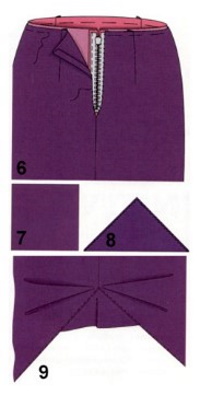
Creating a high waist
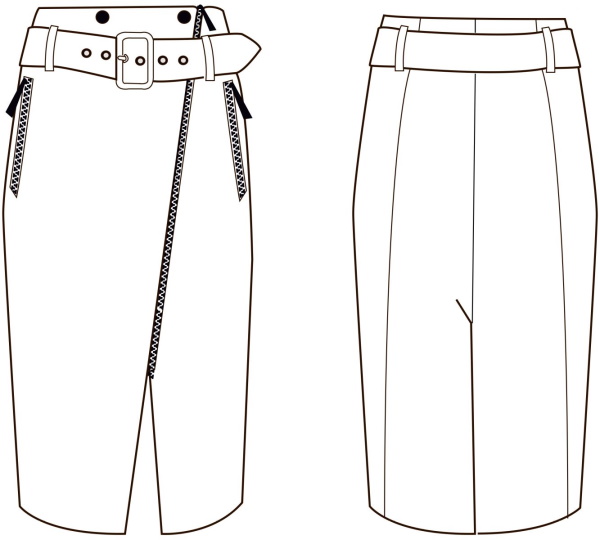
The high waist of the model is created on the finished pattern with an additional increase in the waist line (belt) by 7-10 cm.
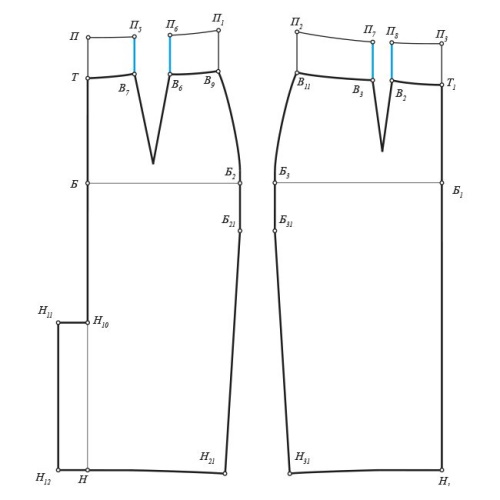
During the work:
- Moving upwards from points T and B9 (back panel) and B11 T1 (front panel), you need to draw vertical lines corresponding to 7 cm. Their ends should be marked with points P, P1 (back panel) and P2, P3 (front panel).
- Having drawn a smooth line parallel to the top edge of the skirt, the resulting points need to be connected.
- Using vertical lines running from points B6 and B7 (back panel) and points B3, B2 (front panel), connect the upper part of the pattern with line PP1 (back panel) and P2P3 (front panel), marking the found intersection points with the letters P5-P8.
- The resulting segments B6P6 and B7P5, B3P7 and B2P8 need to be aligned with each other.
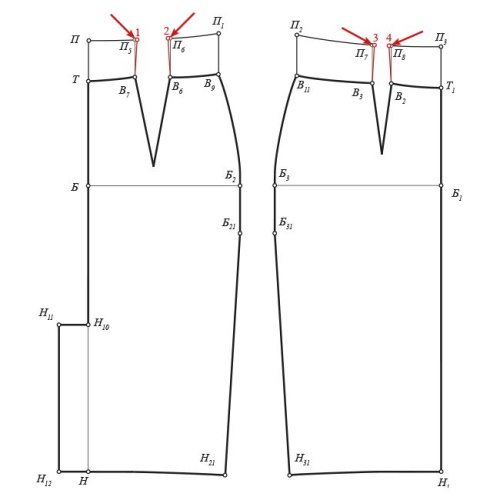
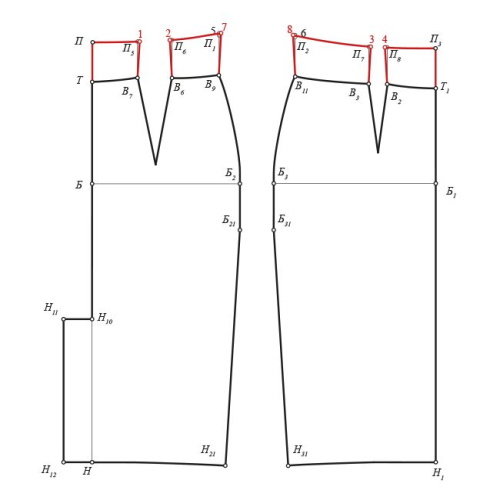
- On the back panel of the product, the dart solution along the upper edge on each panel must be reduced by 0.5-0.7 cm, for this purpose, setting aside the required length from points P5 and P6 to the middle of the dart (points 1 and 2) and connecting them with points B6 and B7, located on the waist line.
- The same actions should be done on the front panel, marking the found segments with points 3 and 4.
- Points P2 and P1, located on the upper line at the waistband of the side cut of the product, need to be raised higher by 0.5 cm, which will prevent the waistband from bending on the finished model. The values found need to be designated by numbers 5 and 6.
- Depending on the figure, the upper edge of the side line can be extended by 0.5 cm. To do this, a 0.5 cm segment should be set aside to the right of point 5 and to the left of point 6. The values found should be designated by the numbers 7 and 8 and connected to points B9, B11, 2 and 3.
- The top line of a one-piece belt should have smooth curves. To construct it, you should connect all parts of the belt along vertical lines.
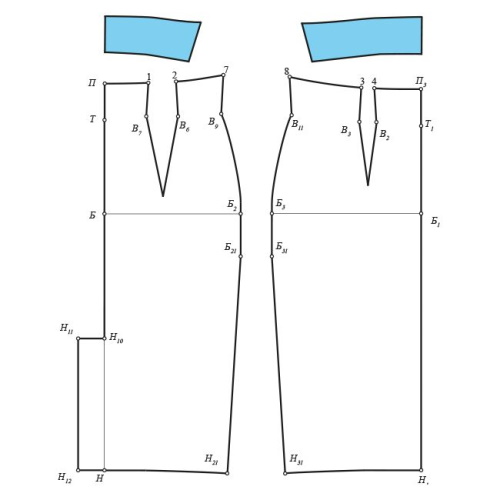
The processing of the upper part of the belt depends on its size. To create a facing, you need to copy the upper part of the skirt onto a separate sheet of paper, having previously aligned all the dart lines on it. When cutting, be sure to add seam allowances.
Based on this pattern, you can model any version of a high-waisted pencil skirt. Including those with a curly cut line.
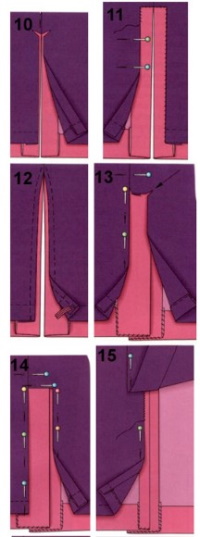
How to sew
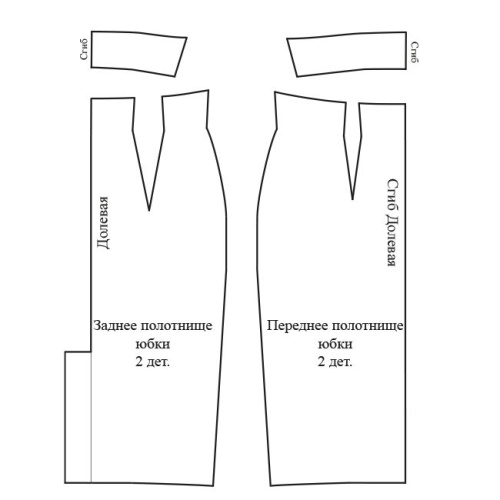
A high-waisted pencil skirt (the pattern of the model must be laid out on the fabric before cutting, taking into account the grain line) can be made from any elastic material.
Manufacturing of the product:
- Having laid out the finished pattern on the fabric, you first need to trace its outline and then cut it out into pieces.
- Darts and seams on the product should be basted.
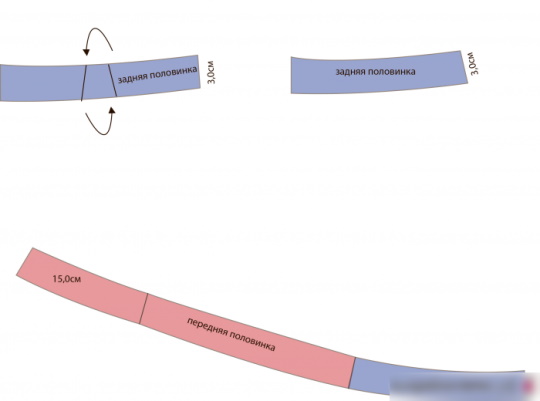
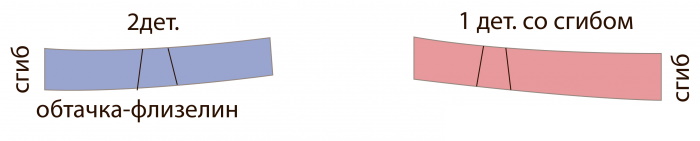
- All the belt pieces need to be cut out of fabric and put together.
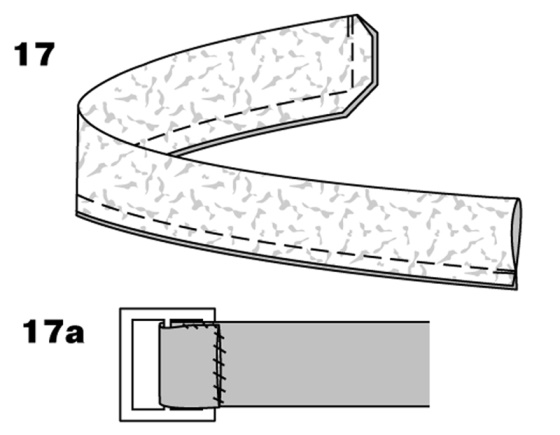
- Using a grain edge, you need to glue the upper edge on the belt parts so that you can later machine stitch it. This is done to strengthen the belt.
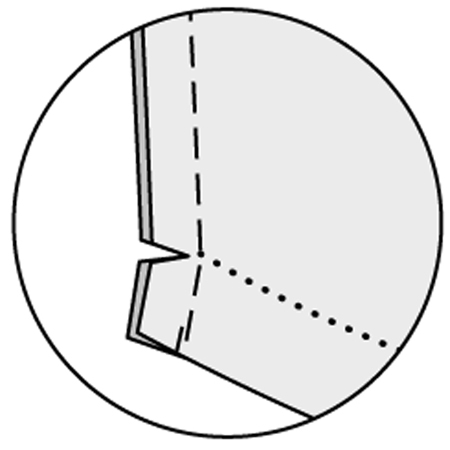
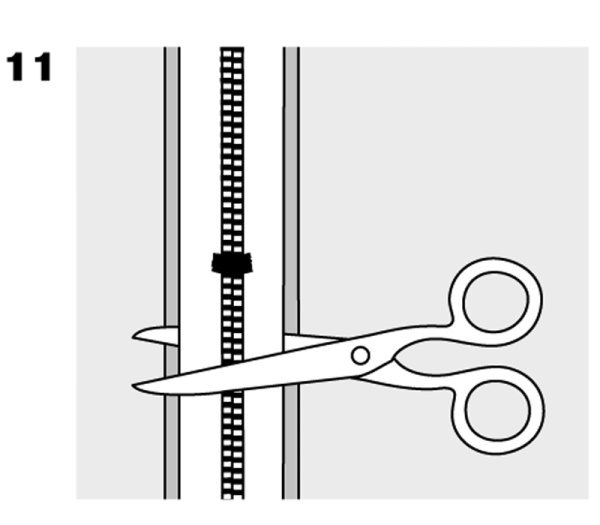
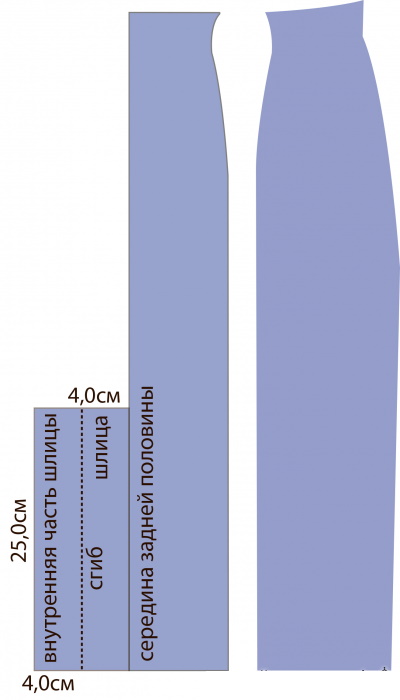
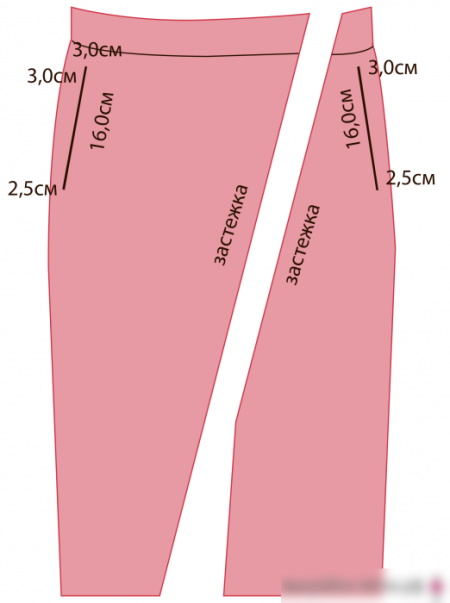
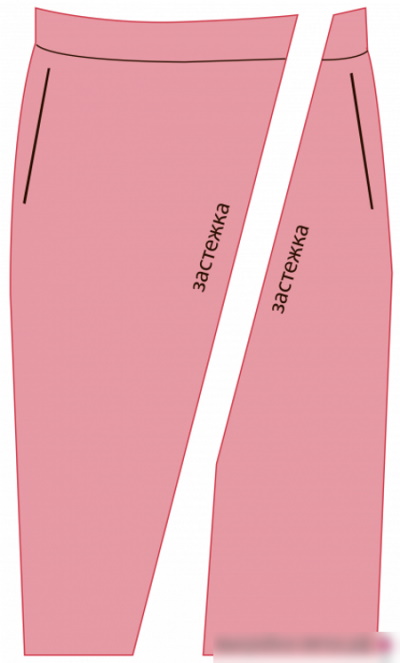
- The vent must first be completely swept so that later it will be possible to correct the narrowing on the sides. The vent parts must be glued with interlining.
- The bottom of the product must be folded over to the front side and, stepping back 3 mm from the edge, basted by hand.
 |  |  |
 |  |
 |  |
- The prepared skirt blank should be turned inside out and tried on, which will allow you to carefully adjust the narrowing of the model. The side seams of the product are located strictly vertically.
- Once the piece has been precisely adjusted to the figure, you can stitch the darts and then iron them towards the center.
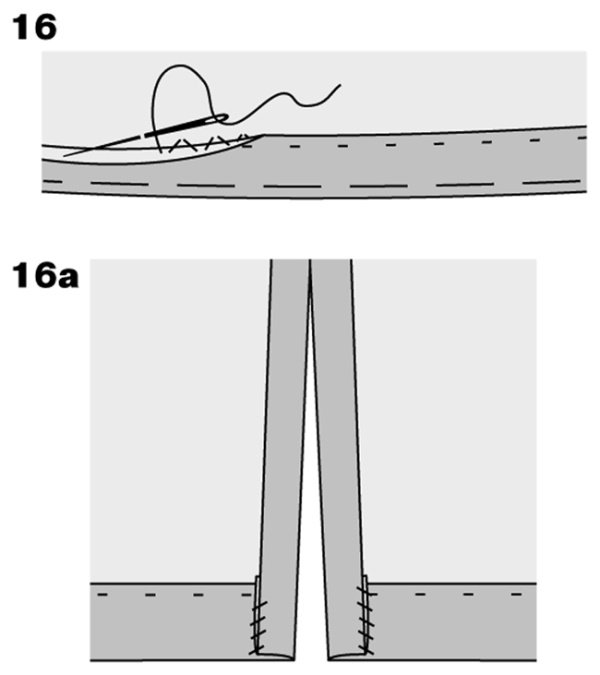
- On the side and central back seam, you need to lay a machine stitch, process the vent. All the resulting seams should be ironed and processed with an overlock.
- The bottom of the product must be hemmed with a circular stitch.
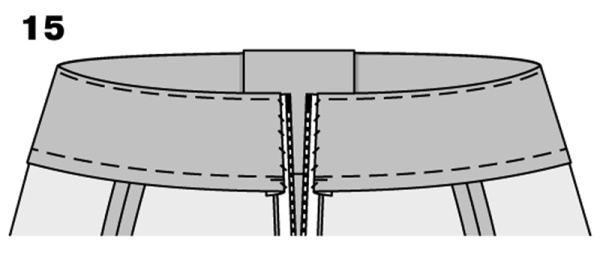
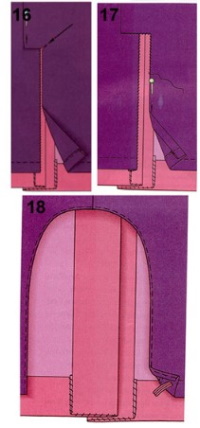
- A belt needs to be attached to the top edge of the skirt.
 |  |  |  |
 |  |  |  |
To do this:
- all belt parts need to be sewn together;
- both parts of the belt need to be sewn along the top edge, folding them with the front parts and sewing with a machine stitch, precisely hitting the shared edge;
— after turning the belt to the front side, it must be basted along the top edge in order to avoid possible folds, and then stitch both sides of the product, stepping back 2 mm from the edge;
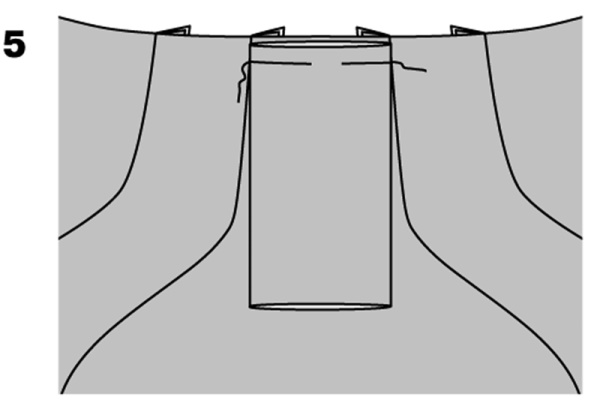
- 3 cm should be left untouched on both sides of the belt (the space needed to insert the zipper).
 |  |  |
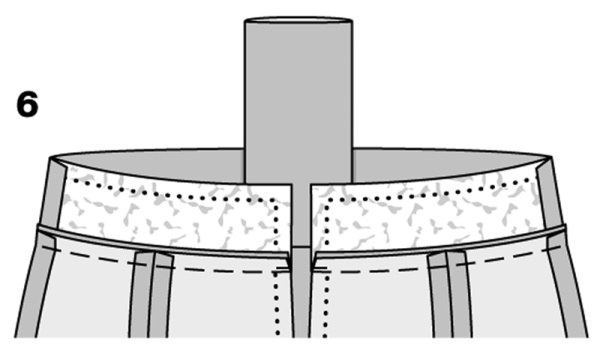
- The finished belt needs to be sewn to the skirt, placing the belt on it with the right side facing up.
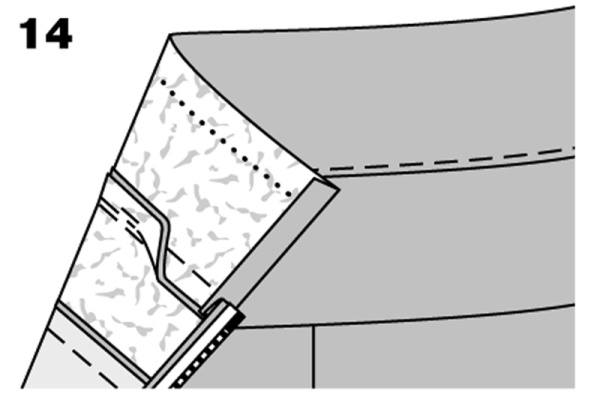
- Along the front side of the belt, you need to machine stitch and fix the belt allowances, having first folded them to the top edge of the skirt.
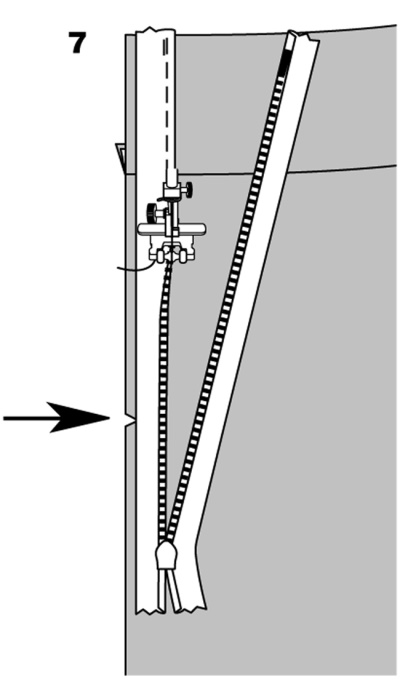
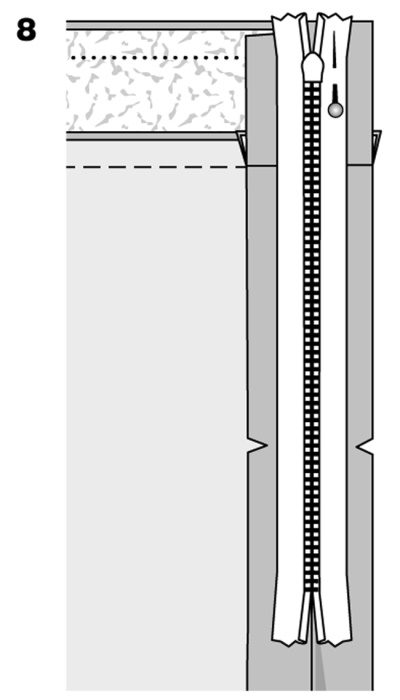
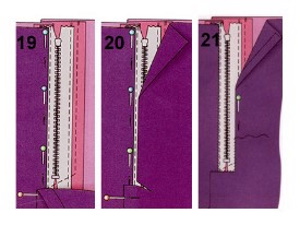
- A hidden zipper needs to be sewn into the space left in the back cut.
- The open areas on the waistband near the zipper should be folded inward and hand stitched.
Leather High Waist Pencil Skirt
A pencil skirt with a high waist (the pattern of the product should be adjusted depending on the parameters of the figure) can be made of artificial or eco-leather, which will allow you to purchase a universal, ultra-fashionable model for any woman's wardrobe.
To make the model you will need:
- leatherette fabric, 1.40 m wide;
- wide elastic band 1 m long;
- hidden zipper;
- dublerin;
- threads to match the color of the fabric.
Progress of work:
- Having laid out the pattern on the fabric taking into account the grain, it must be secured with pins and then traced with tailor's chalk (or pencil) with a mandatory seam allowance of 1.5 cm.
- All parts of the product, including the belt, must be cut out of fabric.
- After folding the front and back parts of the skirt with the right sides together, pin them together and then baste along the side seam.
- The resulting product should be tried on. If the skirt fits well, a machine stitch should be made at the basting point.
- The back part of the product (in the middle) needs to be cut in half so that you get 2 identical parts, and then sew them along the side parts to create a whole product.
- The shelf and the belt need to be pinned along the allowance and stitched. At a distance of 0.7 cm from the relief seam, it is necessary to perform a decorative hand stitch. For even stitches, you can use strips of mounting tape 0.7 cm wide.
Having marked them on divisions of 0.4 cm, they need to be glued next to the seam on the front side, and then a double thread to lay a line. After completing the line, the tape needs to be removed from the product. I do the same - I need to sew the belt to the back of the product.
- The left side seam needs to be processed and a hidden zipper needs to be sewn into it so that its ends extend beyond the top edge of the skirt. The side cut needs to be processed with an overlock and ironed.
- To process the waistband of the skirt, it must be folded inward from the stitching line by 5.5 cm, so that on the wrong side the edge of the waistband coincides with the stitching line. The allowance with the zipper must be folded to the corner and the fold line carefully fixed with staples.
On the reverse side, the allowance can be fixed with mounting tape. A decorative hand stitch should be placed along the edge of the belt.
 |  |
 |  |
 |  |
 |  |
 |  |
- To process the bottom line, you need to draw a line on the inside of the product, stepping back 6 cm from the edge. The material should be folded up to the drawn line and secured with pins.
- The seam allowance that appears on the wrong side must be folded in the middle, tucked inside, secured with pins and stitched with a blind stitch.
How to sew lining
A high-waisted pencil skirt (the pattern for the model can be made independently based on a rectangle drawn according to the measurements taken) can have a lining that prevents the product from deforming or showing through, and is also responsible for the evenness and rigidity of the model.
 |  |  |  |  |
To make the lining:
- Using the skirt pattern as a guide, you need to cut out the blanks from the lining fabric. There is no need to make darts here, as they can be replaced with folds.
- The length of the lining should be less than the length of the main product, which allows it to remain invisible.
- To sew the lining, it must be turned with the wrong side to the inside of the finished product, folding it along the main seam.
- If there is a slit, the lining must be laid strictly along its lines, so that it is placed inside the seam.
A pencil skirt is an important part of a woman's wardrobe, it can be combined with any top and is suitable for both business and informal styles.
Anyone can make such a model themselves, using free basic patterns in full size, slightly adjusting them depending on their own body parameters and the desired length of the model.
Video about skirts
High-waisted pencil skirt:
How good that I came across this article. I wanted to sew myself a pencil skirt for spring, but I had never done it before. And here is a whole instruction with recommendations. It helped a lot. Thank you