The crochet technique has a very attractive feature - with its help you can create not only beautiful, but also practical things. Even beginner knitters can make small accessories, interior crafts or gifts using simple crochet patterns.
Making a brooch
The advantage of small decorative crafts is their versatility. Depending on the color scheme and style, brooches are suitable for both adults and children.
General recommendations for making small accessories:
- choose thin yarn and a small hook;
- try to knit as tightly as possible;
- carefully hide the tails of the threads (so that they do not stick out or come out on the front side);
- carefully work the back side of the product;
- securely fasten the clasp so that the brooch is fixed on the pin without moving.

Despite the cheapness of acrylic yarn, you should not use it for knitting brooches. Accessories made of cotton, microfiber, polyamide or nylon look much better. If you need to make a brooch from fluffy yarn, you need to choose only high-quality material.
Soft kid mohair, angora, alpaca or mixed thread with no more than 50% acrylic or other artificial fiber will do. Decor made from hard, prickly yarn with an unpleasant to the touch pile will not have the best quality appearance.
There are several types of brooch fasteners, all of which are suitable for knitted accessories. If you choose a pin on a flat base (with holes for fastening), then you will need to sew it to the back of the brooch. If the knitter gets a pin attached to a convex metal bowl (without any holes), then you will have to connect the brooch and the fastener with hot glue.
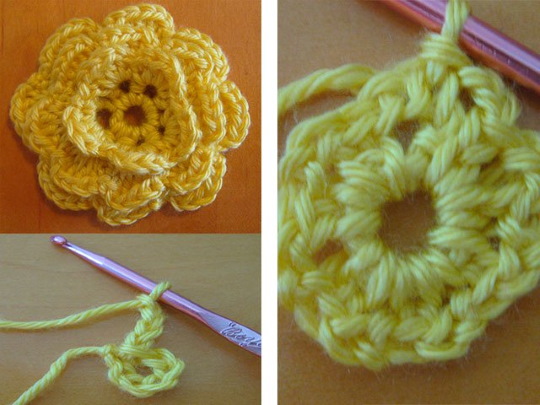

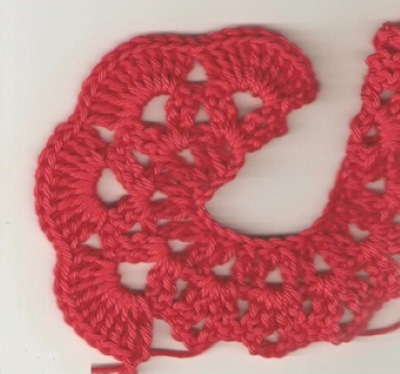
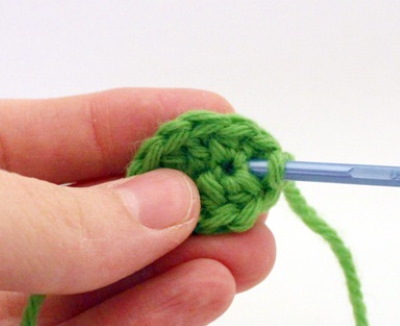
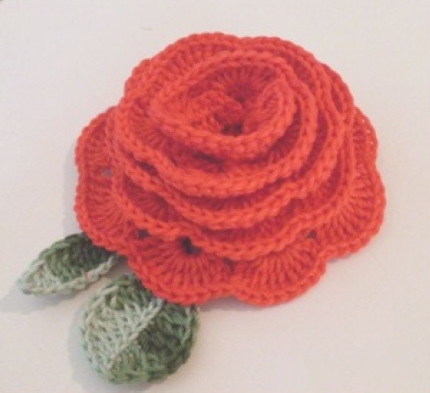
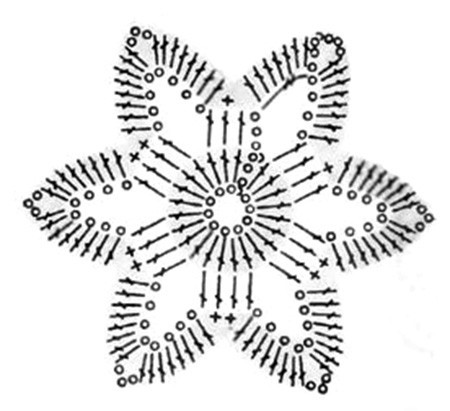
One of the easiest ways to create a brooch is to make a relief flower, for this you will need:
- 10-20 g of yarn (ideal footage 550-600 m/100 g);
- hook No. 1 or No. 1.2;
- sharp scissors;
- medium sized needle;
- and clasp.
In addition, to fix the clasp, you may need a glue gun and silicone glue. Sometimes the clasp is attached to a round fabric blank, previously glued to the back of the brooch. Such a circle can be cut out of fleece, velour or other fabric that does not crumble when cut.
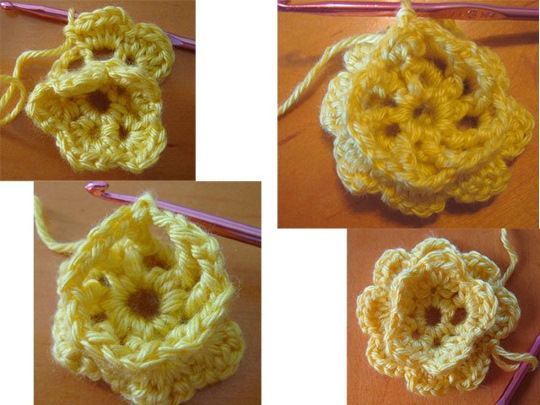
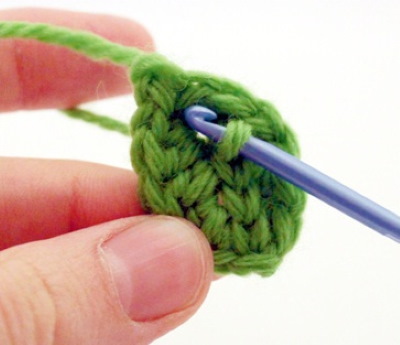
How to knit a volumetric flower:
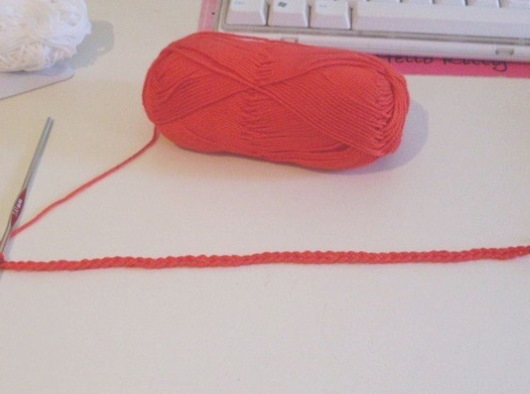
- Cast on a chain of air loops (CAL) at least 30 cm long. The longer it is, the more lush the flower will be.
- Knit 3 rows according to the pattern, trying not to stretch the stitches and loops.
- Cut the thread, tuck the tails of the threads at the beginning and end of the fabric.

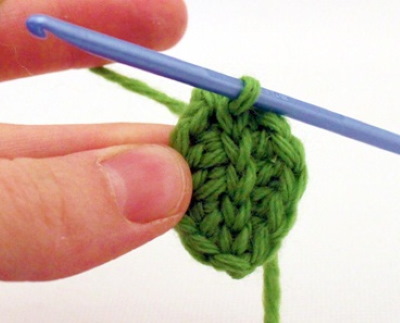
- Wash the workpiece, let it dry unfolded, steam it with an iron (do not place the iron on the fabric, just bring it as close as possible and spray it with steam).
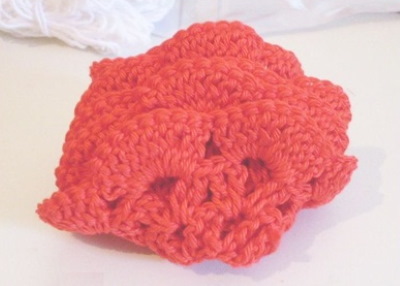
- Roll up a small section of the strip, make a few stitches with a needle so that the roll does not unroll. Then roll up the entire strip into a large roll in several approaches. Hem each stage.
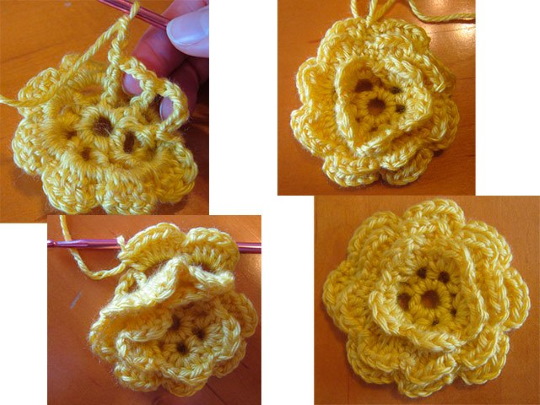
- At the end of the work, fold the edge of the fabric to the wrong side of the brooch and fix it in this position.
- If the back of the product is neat, you can simply sew or glue the clasp. In the case where the back of the brooch needs to be covered, fleece or other thick fabric will come in handy.
A circle must be cut out of the fabric (which will hide everything that the knitter does not want to show to others) and glued or sewn to the back of the brooch. Then attach the clasp to this circle.
It should be noted that the circle can be crocheted from the same yarn as the entire brooch. If the finished product is too soft and does not hold its shape, it can be dipped in a gelatin solution. Then the brooch should be squeezed out well and dried, giving it the desired shape.
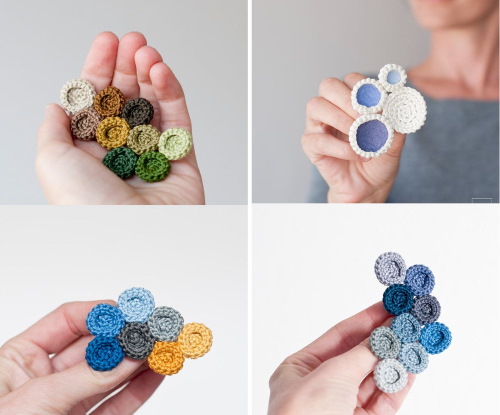
Another way to knit a brooch is to make an asymmetrical piece without a specific shape.This could be a set of knitted circles of the same size, complemented with beads and sequins.
One large element in combination with small ones also looks good. To connect the parts, you can use a thick fabric backing or simply sew all the parts together and attach a clasp on the inside.
Crochet patterns for beginners will help you knit the simplest circle with single crochets (SC). Small pieces of yarn will come in handy for such decoration, so making brooches will help you utilize unnecessary scraps.
Potholders
More mundane, but no less interesting and useful is the idea of knitting kitchen potholders. These items can be quite simple or decorated with additional decor.
Only natural yarn is suitable for making potholders, preferably cotton or linen. This is because acrylic and other synthetic fibers can melt or burn when in contact with hot cookware.
Unlike small accessories, potholders will be conveniently knitted from thick yarn (with a footage of 200-250 m/100 g). To work with such yarn, you should prepare a hook No. 3 or No. 4. If the craftswoman knits very tightly, then she may even need a hook No. 5.
This set of tools and materials may be enough to create simple single-layer potholders, but for a more complex model you will also need a needle and thick fabric.
How to knit a potholder:
- Choose any solid pattern without large holes and dial the number of stitches for a fabric 15-20 cm wide. The number of stitches in the chain is determined after knitting a control sample or calculated approximately.
- Knit the fabric evenly to a height of 15-20 cm from the cast-on chain. You can add stripes of a different color or pattern.

- Perform the finishing binding, process all edges of the square with SC. At the corners, it is necessary to perform 3 SC from one base loop.
- At the last corner, make a loop: knit 30-40 VP, then attach the last VP to the first. To make the loop stronger, you can tie it with single crochets (in each VP, make one SC).
- Cut the thread, tuck in the ends, wash and dry the item.
The simplest potholder is knitted this way. To get a denser product, you can knit 2 such parts and sew them together, inserting a square of fabric (fleece, flannel or other material) between them. In this case, the loop for hanging the potholder should be on only one part.
Following simple patterns consisting of air loops, double and single crochets, you can knit a hexagon-shaped item.You can also use leftover yarn for potholders., which helps to get rid of unnecessary small balls. If you want to decorate the product, you can use appliques or do embroidery.
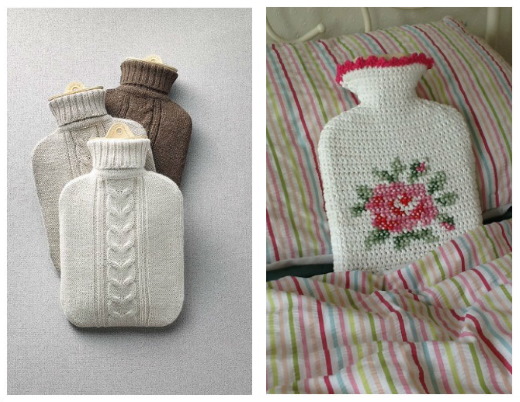
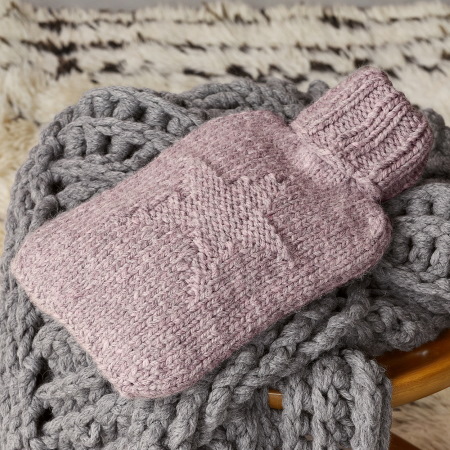
Cover for a heating pad
With even basic crochet skills, it's easy to make a durable cover for a rubber hot water bottle. Covers make hot water bottles softer, retain heat longer, and protect your skin from contact with the rubber that's too hot.
Crochet patterns for beginners will help make the warmer more interesting and beautiful. Any patterns are suitable for such a product: from regular columns (with or without yarn) to various openwork.
You can use absolutely any yarn for the cover. Since the fabric will not come into contact with fire or very hot objects, even completely synthetic materials will do. The main criterion in choosing yarn should be its appearance and the tactile sensations of the craftswoman.
Hot water bottles can be applied to exposed parts of the body, so it is better that the cover is soft and does not prick. The thickness of the thread can be any, but it is worth understanding that the product will be knitted much faster from thick yarn.
In order to insert a hot water bottle into the cover, one of its edges must be open (bottom or top). If the knitter chooses the first option, she must leave the bottom edge of the fabric open (do not sew it). Then, when making the binding, you need to knit a picot of 5-6 loops on one side, and sew buttons on the other.
Alternatively, you can use Velcro or buttons. The second option is simpler - just knit a rectangular piece of fabric to a height that exceeds the size of the hot water bottle by 10-15 cm. Sew the bottom edge. After the hot water bottle is inserted into the cover, the knitted fabric is gathered around the neck of the hot water bottle and pulled together with a cord or ribbon.
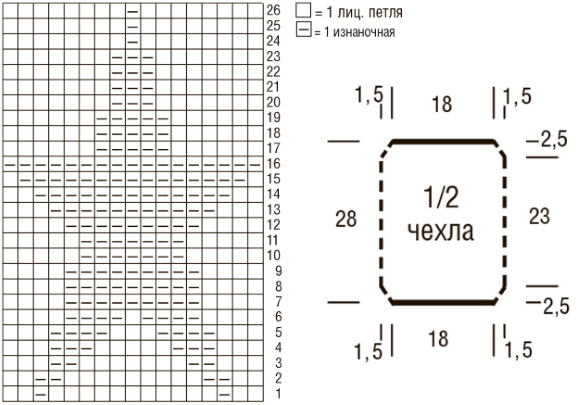
The cover can be knitted in 1 or 2 pieces, in the first case the knitting will be done in circular rows (fastener at the bottom):
- It is necessary to dial the CVPt, which in length corresponds to the girth of the heating pad.
- Knit the 1st row with the chosen pattern. At the end of each circular row there should be a connecting column. To start a new row, it is worth making lifting loops (depending on the pattern, these can be 2, 3 or 4 VP).
- Next, knit a flat section of the fabric.
- To narrow the fabric, it is necessary to shorten the columns in each row at two points at an equal distance from each other.
- Then you need to add loops again, making sure that the contours of the cover match the outlines of the heating pad.
- Cut the thread, leaving a long tail, sew the edges of the fabric, hide the thread.
- Return to the bottom of the cover: tie one edge with single crochets, and form button loops on the other.
- Sew on buttons, tuck in tails.
In the case when the craftswoman finds it more convenient to work with straight and turning rows rather than circular ones, she will have to knit 2 separate parts. They can be sewn either on the wrong side or on the right side (to get a voluminous rib).
The finished cover should be washed and dried in an unfolded form. If the fabric is uneven and still does not look perfect after washing, you can steam it with an iron. Depending on the taste preferences of the person for whom the cover is being knitted, you can decorate the product with embroidery or appliques.
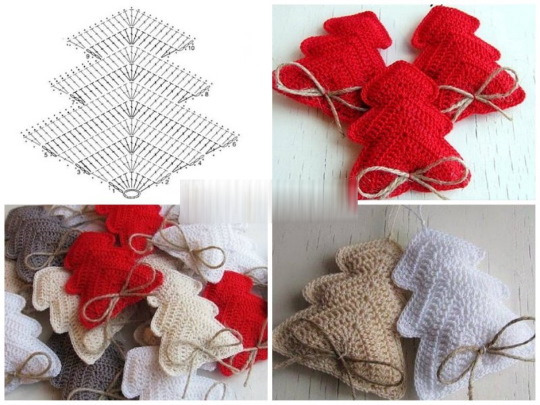
Toys for Beginners: Easy and Simple Toy Models
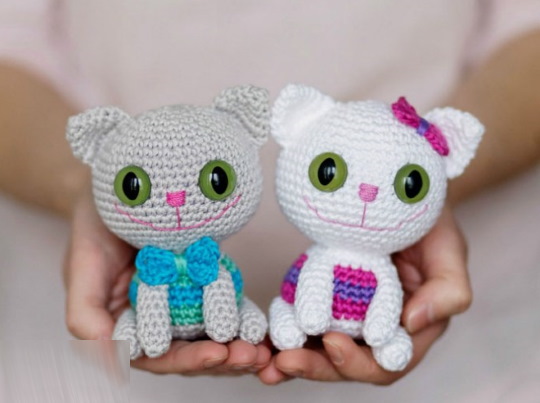
Knitters often take up the hook specifically for the purpose of creating toys. Today, this is an extremely popular trend; various patterns for creating amigurumi toys with a crochet hook allow even beginners to easily create a cute and attractive product on the first try.
The easiest to knit toys are those that resemble a ball. They can have completely different sizes and depict any animals: cats or dogs, bears, various birds.
For this work you will need:
- Yarn of different colors of medium thickness (cotton, wool or a mixture of these materials with acrylic). It is desirable that all colored yarn be of the same type.
- A hook of the appropriate size.
- Needle and sharp scissors.
- Synthetic fluff or other filler (never cotton wool).
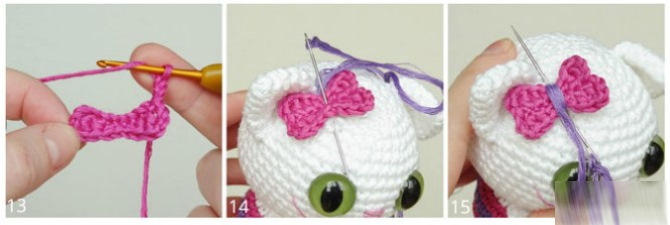
- Eyes and various decorations (beads, sequins, beads).
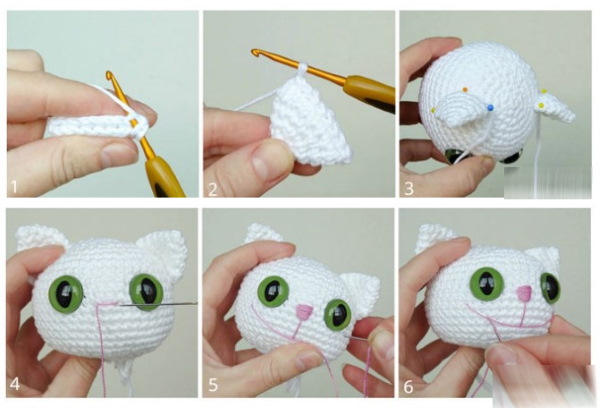
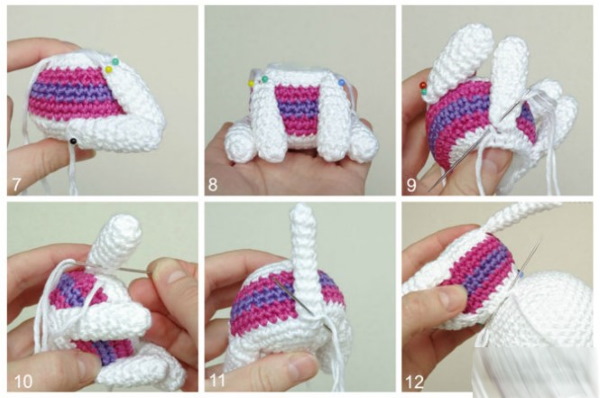
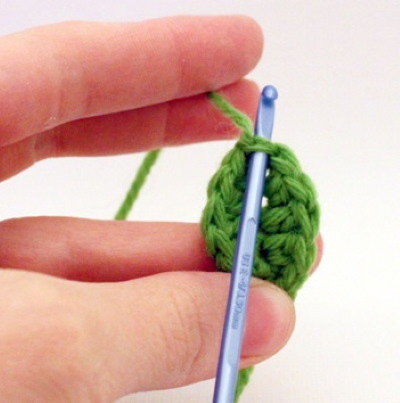
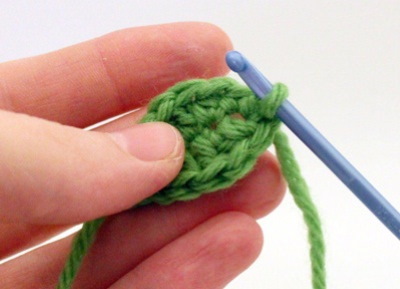
The body is almost always executed according to one algorithm:
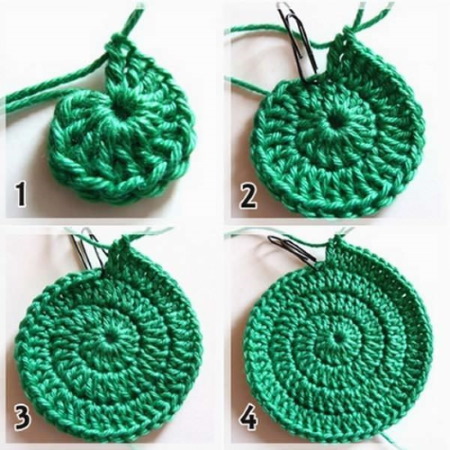
- A small flat circle (3-5 cm in diameter) is knitted with increases at 6 points in each row.
- Next, several increases are performed through the row (every 2nd).
- A certain number of rows are completed evenly (without increases).
- At this stage, stuffing is added inside the part. As you knit, more is added so that the toy is tightly stuffed.
- Then start reducing the loops at 6 points (first every other row, then in each row).
- When all the columns are closed, the thread is cut and the tail is hidden inside the toy.
To make the details of the toy, a circle knitting pattern is often used. It is suitable for making eyes, wings, a tummy, and ears.
Many children like to carry knitted toys with them to school, so it makes sense to attach a carabiner for keychains to the top of the product.
In this case, the fittings should be purchased in advance and care should be taken to ensure that they are firmly attached to the knitted fabric.
Simple knitted items
Knitted clothing is becoming more and more popular every year, so even the simplest items look fashionable and relevant.
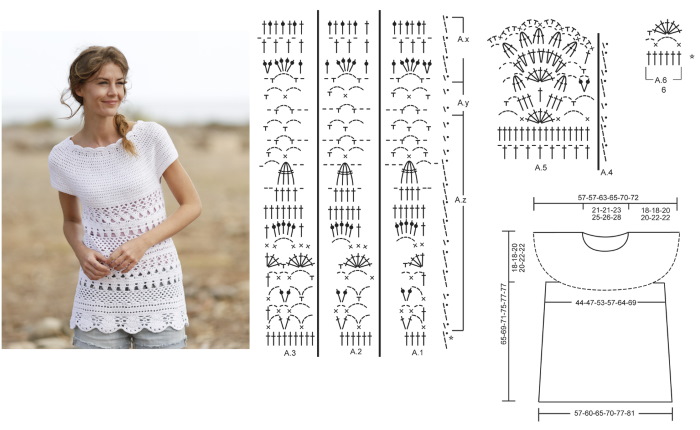
Crochet patterns for beginners allow them to independently make summer tops and beach tunics, blouses and dresses, warm pullovers and sweaters, cardigans and accessories. To begin with, you can practice on small-sized children's things, but if you want, you should immediately start making full-size adult clothing.
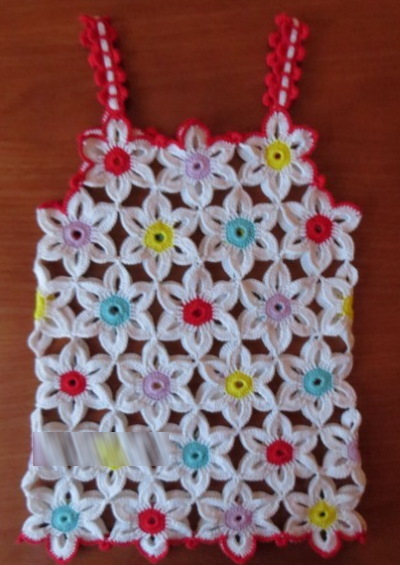
Summer tops are the easiest to knit, as they have neither a collar nor sleeves. Thanks to modern fashion, tops don't even have to be fitted. This simplifies the work as much as possible, since it is with adding and reducing stitches that beginner knitters have the most difficulties. However, lovers of fitted silhouettes can still emphasize the advantages of their figure.
A regular top may require 200-500 g of yarn. Consumption depends on the thickness of the thread and the size of the product. One of the most important stages of work is the calculation of columns and rows using a control sample. The selected hook should be used to knit a fabric about 10 cm wide and high. In doing so, it is essential to use the pattern that will then predominate in the product.

The resulting sample must be washed and dried (it must be washed in the same way as the top will be washed later). Now you can measure it and calculate how many columns there are per 10 cm in width and rows per 10 cm in height. For example, it turns out 15 St and 9 Rows, this is called knitting density.
Now you need to take measurements from the person who will wear the knitted top. You need to know the chest, hips and waist circumference, as well as determine the depth of the neck and armholes. If the top is even, then from the first 3 measurements you should choose the largest one and add 5-15 cm to it for ease of fit.
In case the product is fitted, you need to add additional centimeters to each measurement. Next, you need to build a pattern in natural size or at least draw a technical drawing in a notebook.
When crocheting, using a pattern is very convenient - you can do without detailed calculations, applying the fabric to the pattern, adding and reducing columns.
In this case, you only need to calculate the length of the cast-on edge. To do this, multiply the length of the piece in centimeters by the number of sts in 10 cm and divide it all by 10. For example, 36 cm x 15 sts / 10 = 54 sts. This means that with a knitting density of 15 sts per 10 cm and a piece width of 36 cm, to start knitting you need to cast on a chain of 54 VPt.
Crochet patterns for beginners are usually quite simple, so adding and decreasing stitches will not be difficult. To extend a row, you need to knit the first dc into the base of the lifting loops, and the last dc must be doubled (make 2 dc with one base). Reducing stitches is done in the same way (knit 2 dc with a common top).
Although many descriptions do not insist on finishing the garments, processing the open edges with stbn always gives the garment a finished look. Moreover, tightly tied columns allow you to hide any shortcomings made in the work.
For example, if the neckline or armholes are beveled and sharp steps are created, or the transition line between the color stripes is too clearly visible, then a single-color trim will smooth out this flaw.
If desired, you can even make several rows of binding to get a wide border around the neck. But in this case, you will have to adjust the number of columns in the last rows: they will need to be systematically reduced so that the border does not stick out.
Depending on the knitter's preferences, she can choose any pattern for crocheting a top. Beginners successfully cope with both dense and openwork items. Clothes knitted with a solid pattern are ready to wear after washing and drying.
In order to wear openwork items, you need to choose a bottom top (preferably a solid color) or sew a lining. The most versatile option is simple black and beige tops. You can buy them in many stores or sew them yourself and wear them with different knitted items.
Article formatting:Natalie Podolskaya
Knitting Videos for Beginners
Crochet patterns for beginners - how to read:
Firstly, I don’t understand anything, and secondly, I don’t know how to knit🤬