Crafts can be made with a child at home with your own hands, using improvised materials. For example, children aged 4-8 will be interested in creating a caterpillar from apples. The insect can be made on paper or a volumetric 3-D model can be constructed, which, if handled carefully, can even be used in ordinary games.
What crafts can you make with your child from ordinary apples
The apple craft “Caterpillar” (children should be taught to make things with their own hands as early as possible: this has a positive effect on the development of attentiveness and accuracy, fine and gross motor skills of the hands, which determine brain functioning) is not the only option for making crafts from scrap materials.
Apples can also be used to make:
- animals (for example, by attaching a snout molded from plasticine to the front side of the fruit, the child will get a piglet, and with the help of horns (flagellates rolled out of plasticine) it will be possible to make a deer or an elk);
- rooster (to do this, you first need to mold the bird’s comb, legs, beak and eyes from plasticine, and then attach the parts to the prepared surface of the fruit);
- people (due to their complexity, such crafts are suitable for children over 9 years old, since in addition to the fruit, in this case you need to use pre-sewn or glued wardrobe items: pants, a T-shirt or dresses, details of people's appearance: eyes, nose, mouth, hair, ears, and so on);
- bells (to make bells, you need to prepare a cover for the apple in advance, for which you can use thin strands of paper or plasticine, fastened together). A more complicated version involves using a knitted cover for the fruit.
Materials and tools
A craft made from apples (a caterpillar made by a child with his own hands can become a gift to one of the parents or grandparents for a family holiday) requires certain materials and tools for creation.
This:
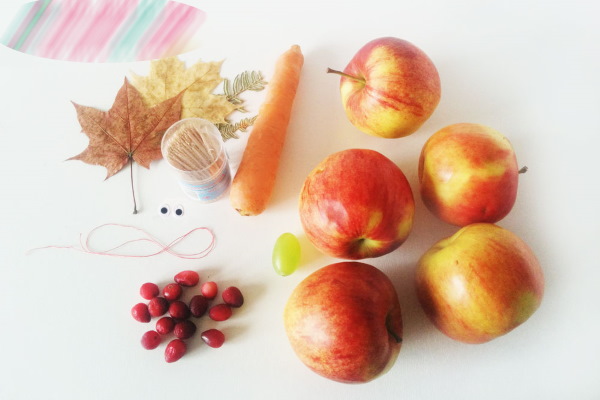
- apples medium or large size (only fruits with a perfectly smooth surface without visible damage and a uniform color are suitable for this craft);
- plasticine (with its help, the child will have to detail the appearance of the main object, for example, sculpt eyes, hair, mouth or nose, if it is a person, or horns, fur, fangs, if it is an animal);
- special knife or scissors for dividing the plasticine into pieces of the required size (these stationery items usually have blunt ends, thus minimizing the risk of injury to the child during the creative process);
- additional consumables (depending on the type of craft, these can be branches, threads, pieces of fabric, and so on);
- table pad (in order not to distract the child from maintaining cleanliness and order during the creative process, parents are advised to place a special pad on the child’s desk to prevent damage to the furniture surface);
- templates (with their help, the child will be able to cut out, for example, an even geometric figure, and achieving small goals helps to strengthen the child’s desire to engage in creativity).
Step-by-step instructions for making a caterpillar out of apples with your own hands
Despite the fact that the process of creating a caterpillar from apples looks simple, it is recommended to do it in strict accordance with the generally accepted algorithm.
Fastening the frame of the caterpillar from apples
To create a caterpillar from apples you need to use:
| Working material | The required amount |
| Apples of medium or large size | 5 pcs. approximately the same size |
| Carrot | 1 pc large |
| Toothpicks | Not less than 20 pcs. (if they are not available, it is permissible to use matches sharpened on 1 side) |
| Grapes (preferably green variety) | 1 berry without visible damage with uniform color |
| Black grapes | 50 g |
| A sharpened wooden stick or wire | 1 pc. |
| Cranberries (as an alternative, you can use lingonberries or other small, round berries) | 100 g |
| Thick thread | Length not less than 30 cm, color – any |
| Dark and light colored plasticine (for the insect's eyes) | 1 small piece each |
| Additional materials (to create unique features of the insect's appearance, such as hair) | Optional |
The process of creating the craft should look like this:
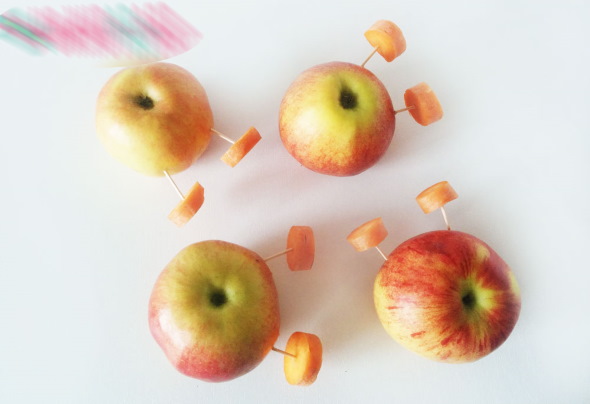
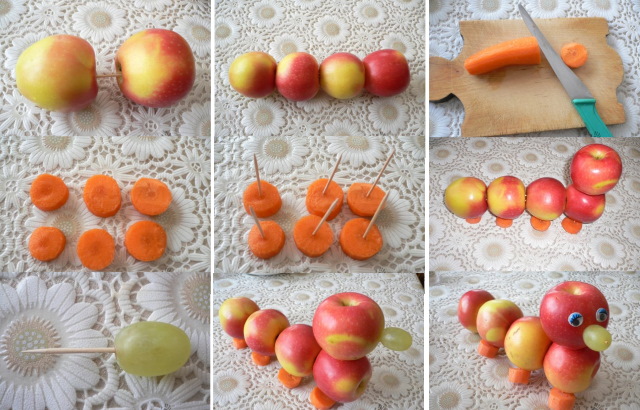
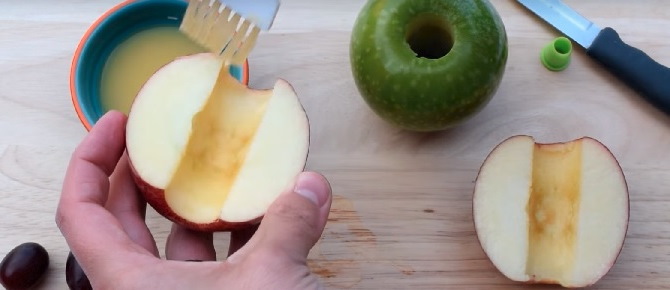
- First, the apples need to be washed, then dried and polished with a dry cloth (if an older child is working on the craft, you can rub the apple with wax, warning about the danger of its ingestion).
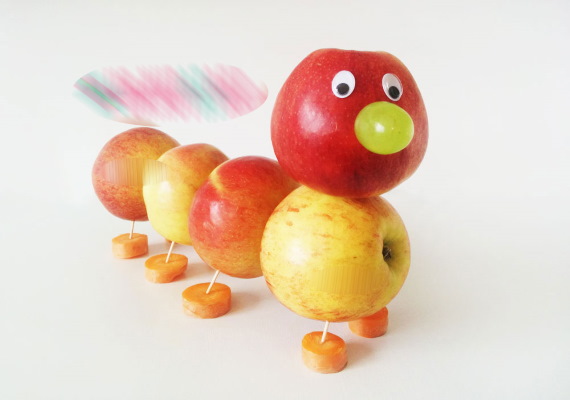
- Then you need to place all the apples on the base, and then pierce each of them with toothpicks in two places at a distance of 3-4 cm from each other (so that the places where the stalks were located are between the toothpicks).
- Once the toothpicks are securely in place, the fruits should be laid on their sides and then secured together by firmly inserting the skewers into the adjacent apple.
How to attach the legs
The apple craft "Caterpillar" (a child can make it with his own hands at 3-4 years old under the guidance of parents) does not require special skills, but it does require accuracy and attentiveness.
To attach the insect's legs to the previously made frame-body, you need to:
- Medium or large carrots should be washed thoroughly, then peeled and dried as much as possible. Just like with apples, the vegetable can be polished with wax to give the craft a more finished look.
- After this, the carrots need to be divided into several pieces of equal thickness and size. If you can't do this by eye, it is acceptable to use a ruler.
If the child does not know how to use this stationery, you can help him or offer to use a template. To make a template in this case, it is enough to simply cut out a rectangle corresponding to the size of the vegetable, and then draw vertical lines on it.
To use the template, the child will need to place this rectangle on the carrot and then make notches where the verticals are drawn. Once the notches are made, the carrot should be cut in any convenient way.
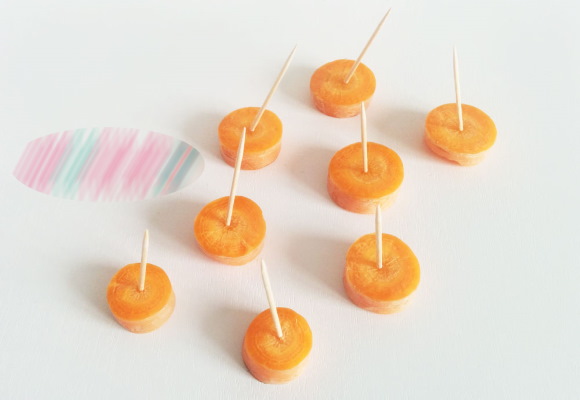
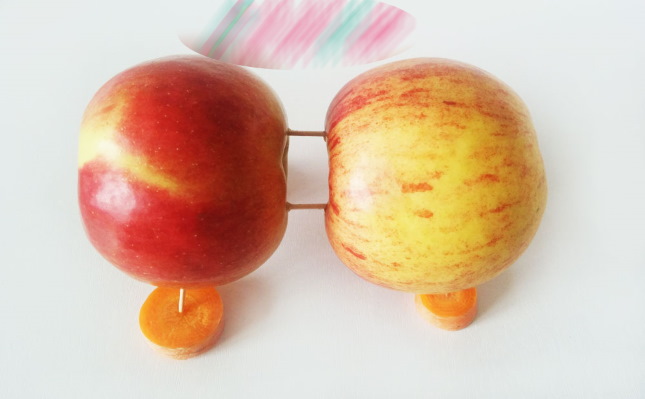
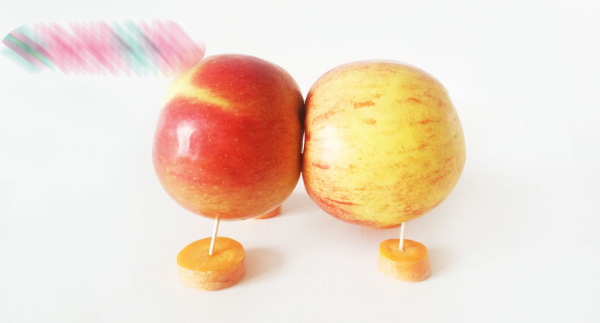
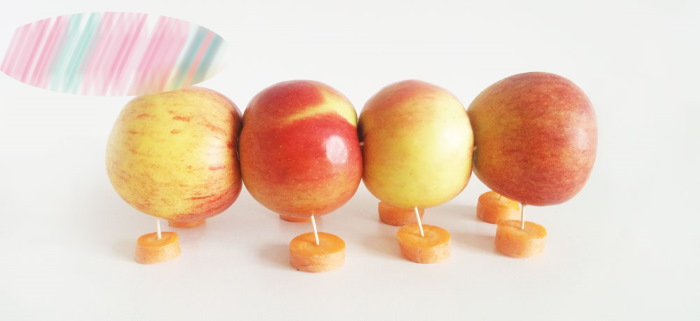
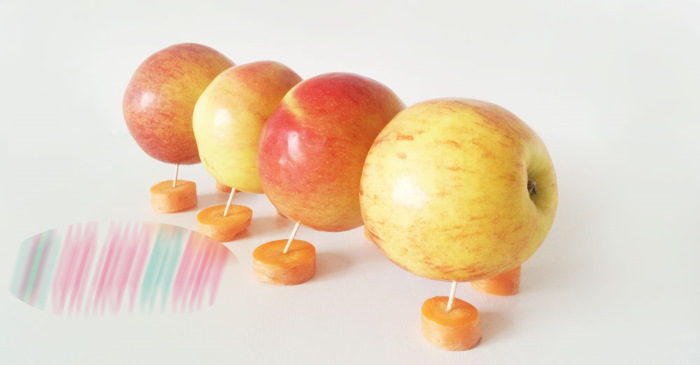
- Insert two toothpicks into each of the resulting carrot pieces at the same distance from each other (at least 2 cm).
- Having fixed the toothpicks with carrots at the base of the caterpillar’s body made earlier, you should attach the legs to it.
Caterpillar antennae
The caterpillar's antennae can be made using grapes and any base, which can be either a straight wooden skewer or a twisted wire.
The algorithm for creating this part of the craft should look like this:
- First, the black grapes need to be washed, then dried and checked for integrity. Otherwise, when creating tendrils, damaged grapes will be deformed, and the craft element will turn out implausible.
- The prepared grapes should be put on a skewer or wire, securely fixing the berries at the base of the future tendrils. It is recommended to place the berries close to each other. The lowest berry should be located at a distance of 3-4 cm from the beginning of the base.
- When the antennae are ready, they need to be fixed at the top of the apple, having first given them the desired direction. To create a believable image, the antennae need to be placed diagonally, pointing in opposite directions.
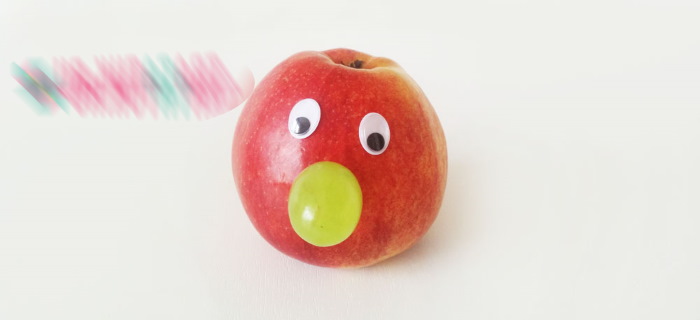
How and from what to make eyes and a face for a caterpillar
The easiest way to make eyes for a caterpillar is to attach special beads to an apple using glue. You can buy them at a craft store or take them from a book for kids.
If it is not possible to use this option, it is recommended to make eyes from plasticine:
- Take 2 small pieces of black plasticine and then crush them slightly, transforming them into circles of small diameter.
- Place small pieces of white plasticine in the middle of the black circles of plasticine, then press lightly, fixing them in the required place.
- The resulting eyes need to be placed on the front surface of the front apple, and then fixed with light pressure.
In addition to plasticine, eyes can also be made using beads, seed beads or buttons. They can be attached with glue or transparent or double-sided tape.
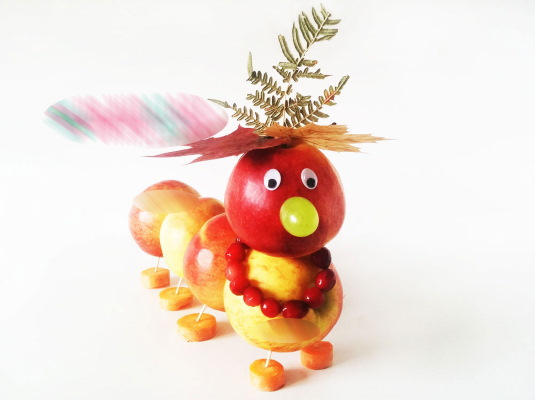
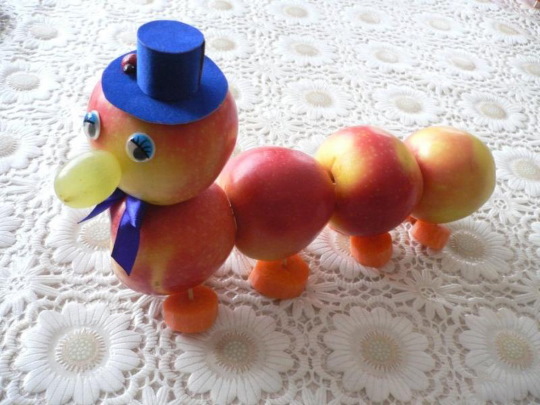
How to make a fancy caterpillar with a hat or bow
To make a smart caterpillar with a hat, you need:
- First, the apples need to be washed, then dried and polished with a dry cloth (if an older child is working on the craft, you can rub the apple with wax, warning about the danger of its ingestion).
- Then you need to place all the apples on the base, and then pierce each of them with toothpicks in two places at a distance of 3-4 cm from each other (so that the places where the stalks were located are between the toothpicks).
- Once the toothpicks are securely in place, the fruits should be laid on their sides and then secured together by firmly inserting the skewers into the adjacent apple.
- Medium or large carrots should be washed thoroughly, then peeled and dried as much as possible. Just like with apples, the vegetable can be polished with wax to give the craft a more finished look.
- After this, the carrots need to be divided into several pieces of equal thickness and size. If you can't do this by eye, it is acceptable to use a ruler.
If the child does not know how to use this stationery, you can help him or offer to use a template. To make a template in this case, it is enough to simply cut out a rectangle corresponding to the size of the vegetable, and then draw vertical lines on it.
To use the template, the child will need to place this rectangle on the carrot and then make notches where the verticals are drawn. Once the notches are made, the carrot should be cut in any convenient way.
- Insert two toothpicks into each of the resulting carrot pieces at the same distance from each other (at least 2 cm).
- Having fixed the toothpicks with carrots at the base of the caterpillar’s body made earlier, you should attach the legs to it.
- Make the caterpillar's face in any convenient way, and then secure the antennae.
- The hat can be glued together from colored cardboard using simple geometric shapes or sewn from fabric. The hat can also be pre-crocheted and then asked to attach it to the insect's head.
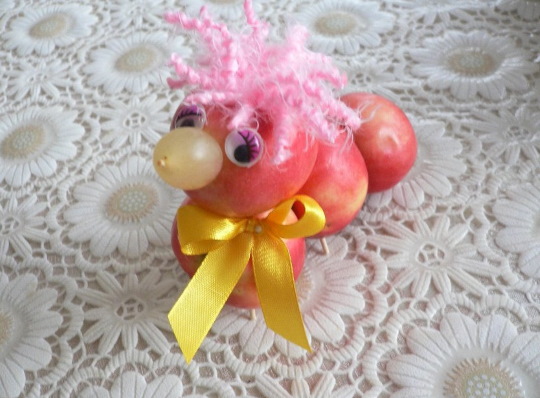
To make a caterpillar with a bow, you need to follow the algorithm below:
- First, the apples need to be washed, then dried and polished with a dry cloth (if an older child is working on the craft, you can rub the apple with wax, warning about the danger of its ingestion).
- Then you need to place all the apples on the base, and then pierce each of them with toothpicks in two places at a distance of 3-4 cm from each other (so that the places where the stalks were located are between the toothpicks).
- Once the toothpicks are securely in place, the fruits should be laid on their sides and then secured together by firmly inserting the skewers into the adjacent apple.
- Medium or large carrots should be washed thoroughly, then peeled and dried as much as possible. Just like with apples, the vegetable can be polished with wax to give the craft a more finished look.
- After this, the carrots need to be divided into several pieces of equal thickness and size. If you can't do this by eye, it is acceptable to use a ruler.
If the child does not know how to use this stationery, you can help him or offer to use a template. To make a template in this case, it is enough to simply cut out a rectangle corresponding to the size of the vegetable, and then draw vertical lines on it.
To use the template, the child will need to place this rectangle on the carrot and then make notches where the verticals are drawn. Once the notches are made, the carrot should be cut in any convenient way.
- Insert two toothpicks into each of the resulting carrot pieces at the same distance from each other (at least 2 cm).
- Having fixed the toothpicks with carrots at the base of the caterpillar’s body made earlier, you should attach the legs to it.
- Make the caterpillar's face in any convenient way, and then secure the antennae.
- Fix the bow on the caterpillar's head, having first made it from colored paper (cut out a small rectangle, then, having found the middle, tighten it by wrapping it with thread).
What else can be made from apples for kindergarten
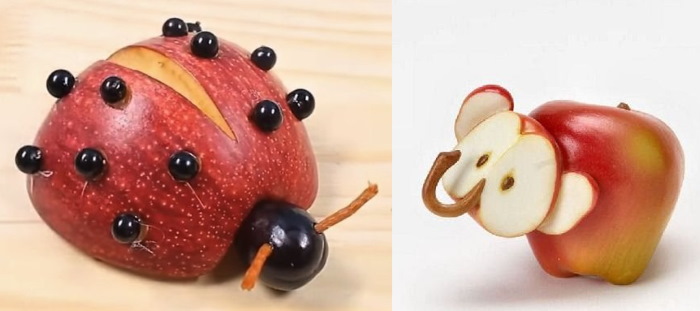
You can make crafts from apples with your own hands in the form of not only caterpillars, but also ladybugs, which the child can later take to kindergarten:
- Wash the apple, then dry it and make a small cut in the middle (wings).
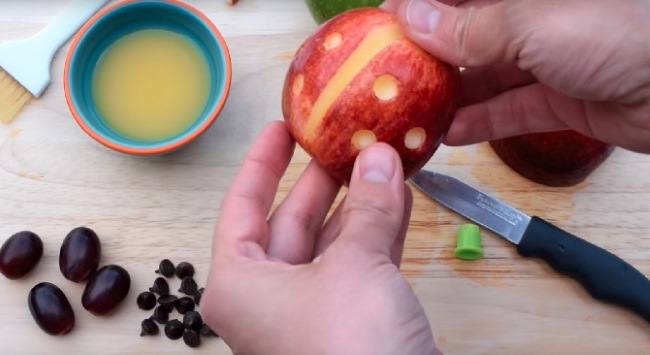
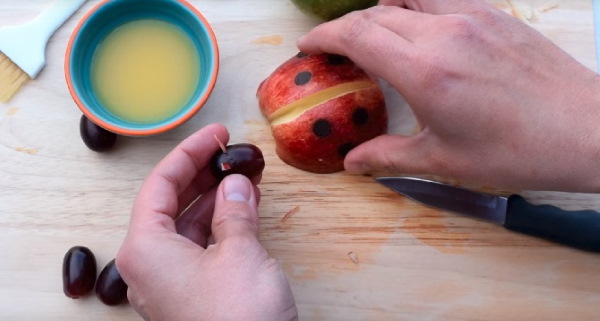
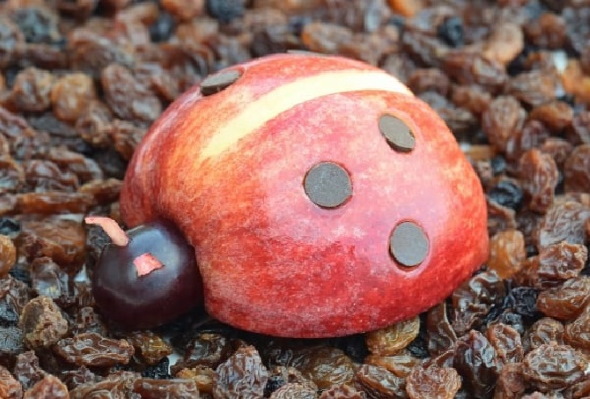
- Blackcurrant berries should be strung on toothpicks and then evenly distributed over the entire surface of the apple (dots on the wings of the insect).
- It is recommended to put black grapes on a toothpick and then fix it on the apple in front.
- If desired, you can add detail to the ladybug's face and attach apple stalks (whiskers) on top.
Any child over 4 years old can make a caterpillar from apples with their own hands. The process of creating this craft will not only develop the child's attentiveness, but also instill in him a love of creativity, revealing his potential at the same time.
Video about crafts
Craft made from apples - caterpillar: