To store jewelry and small accessories, it is not necessary to buy expensive boxes or organizers. It is enough to simply make a jewelry box from cardboard with your own hands. Most people have wrapping paper, small pieces of lace, beads or beads and other materials at home that can be used to create an original box.
Necessary materials and tools
Components for manufacturing:
- Cardboard with a density of 260-280 g/m3.
- Several pieces of different materials.
- Glue (the more the better).
- Lots of fleece.
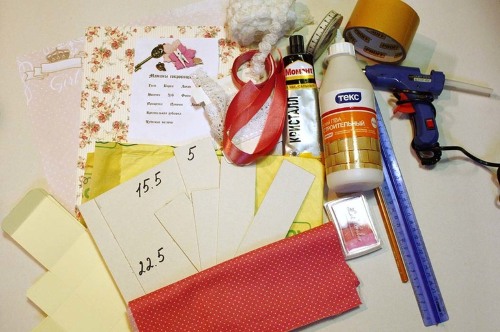
- Materials for decoration (beads, seed beads, etc.).
- Paper tape.
- Stationery tools.
Cardboard box shape
Simple rectangular or square
A DIY cardboard craft box is made from a box and paper tubes. First, you need to choose a suitable base for the box - for example, a shoe box. It is better to take a base for the bottom approximately the size of an A4 sheet or smaller, so it will be easier to go through the finishing process.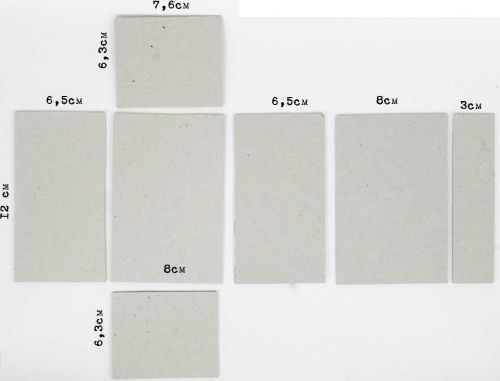
To form the tubes you will need glue and knitting needles. For weaving you can use tubes from regular printing paper, unnecessary press and magazines. The finished cardboard box can be painted with acrylic paints or left in its usual form.
It is advantageous to use colored printer paper: it has a wide range of colors.
The process of creating a cardboard box with your own hands will not take much time. First, you need to glue vertical tubes on the outside of the box, which serve as guides. You need to glue in the interval of 4-6 cm - it all depends on the size of the box. Then the tubes are bent to the side edges, and then inward.
A thick cardboard of suitable size is glued to the bottom, which will hide the place where the tubes are attached. Then the tubes are intertwined around the circumference of the base. The lid is folded in the same way.
Round box
For needlewomen, a round reel left over from scotch tape is an expensive material. This base can be used in different types of needlework: decoupage or scrapbooking, decorated with coffee beans, beads, beads, jewelry stones, glued leather or fabric. To make a box from round cardboard with your own hands, it is recommended to use interwoven cardboard.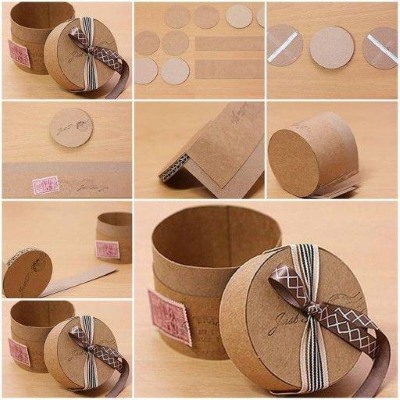
First, you need to attach the reel to the cardboard and draw three circles along the inner and two along the outer diameter. The circles with a smaller diameter are glued together, it is recommended to use Moment glue. The finished element is treated with sandpaper and glued to the circle of a larger diameter, placing it in the central part.
As a result, a lid will be formed that will hermetically close the box.
If necessary, sand the edges. The box layout is ready. It can be decorated to your taste with different beads and decorative stones in any handicraft technique. The lid can be made slightly protruding: you need to increase one of the circles with a larger diameter. This will make the box easier to open.
Heart shaped box
A heart-shaped box is a great wrapper for a Valentine's Day surprise. First, you need to cut out a heart-shaped element from cardboard - this is the bottom of the box, the dimensions of which will determine the parameters of the box as a whole. Then you need to cut out a wide strip of cardboard with teeth on one side. Glue the strip to the bottom. Assemble the other side in the same way.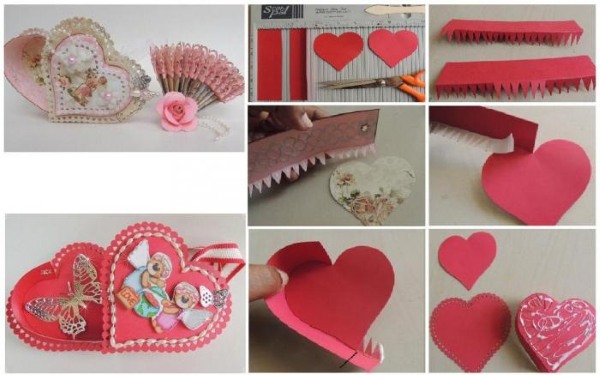
You need to glue the two halves of the walls and attach them with paper clips, wait until the glue dries. Decorate the box inside and outside with paper with different textures or patterns. Glue two pieces of fringe to the base - they will act as curtains on which the lid is held. Then cut out the second heart, this will be the top lid. It needs to be glued to the curtains.
Decorated paper should be glued in the same way. Then, to your taste, you need to decorate the cardboard box in the shape of a heart. As an option, you can glue lace along the contour. Decorate the top with flowers, beads, ribbons, etc.
How to make a lid for a box
Recommendations for making a lid for a box:
- Determine the dimensions of the lid. Lay the cardboard on a table or on the floor, measure a rectangle of the desired size in the center. To accurately draw the corners of the rectangle, you need to use a triangle or a ruler for drawings. This will be the bottom of the lid.
- Draw a straight line from one edge of the box. Height of the box lid— this is the length of the line. The height of the sides is much less than that of the box. It is necessary not to forget about the allowances in order to connect the sides of the lid. They should be 3-5 cm.
- On each of lid edges you need to connect the edges of the line in a straight line. These are the sides of the lid. You also need to draw allowances for other connections at an acute angle. It will be enough to make an increase on both sides.
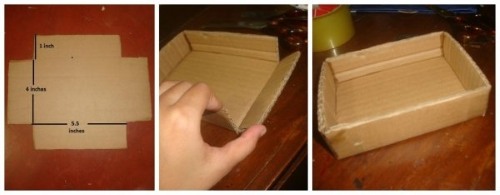
- Cut out the details using a stationery knife.
- Care must be taken bend cardboard along the contour of the folds.
- Carefully fold the edges of the box and stick with tape them along the length of the seams.
Decorating a box with fabric
To decorate a cardboard box with your own hands, you can use not only old press or wallpaper, but also decorate with fabric. Using upholstery, you can cover the box with fabric. Such a thing can serve as a separate gift, as well as an organizer for storing small household items, for example: toys for children, home decor items, sewing accessories.
Materials and accessories that are essential for covering the box with fabric:
- Box. When choosing, it is allowed to apply the rules described above for working with the press, magazines, wallpaper.
- The fabric itself that you will use to cover the box.
- Specialized glue, tape.
- Sharply sharpened scissors.
- You may need an awl for your work, as well as a strong cord (you need to choose one that matches the color of the fabric).
In order to do everything accurately and get an excellent result, you need to follow the recommendations:
- To make a pattern, you need to determine the dimensions of the sides, and also do not forget to leave allowances for the part that folds over to the other side.
- Glue the main part. It is recommended to choose a glue that does not soak the canvas, which will cause stains. You can use a suitable double-sided tape if it will glue the fabric to the cardboard well.
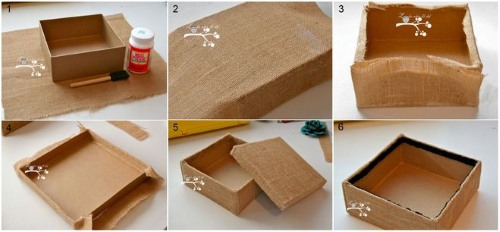
- The fabric should be pressed tightly against the cardboard. If necessary, remove excess material.
- Once you have finished decorating the outer sides, move on to decorating the inner sides.
Soft box made of cardboard and fabric
The box can be made with your own hands from thick cardboard and covered with fabric. The lid can be made with padding polyester - it will be soft. Such a box is perfect for storing jewelry, materials for handicrafts. The parameters of such a box are 18 cm by 9 cm. You can also enter your own size, based on what you will use it for.
To create you need:
- thick paper,
- matter,
- filler,
- glue,
- stationery,
- paper tape.
You need to draw a circle of the required diameter on thick paper and cut it out. Cut out rectangles for the sides.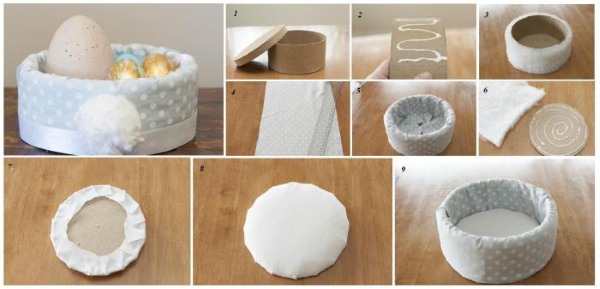
Instructions:
- Use tape and clamps to form a box.
- Cover the box.
- Cover the bottom of the box with fabric.
- To seal the side edges, cut a rectangle out of not very thick cardboard and cover it with fabric.
- Cut a lid out of cardboard and glue the edge. Put the padding polyester on the lid and cover it with fabric.
- Glue an additional piece of paper and fabric to the edge of the lid.
Pincushion box
To create a pincushion box you will need:
- White polka dot fabric.
- Satin ribbon.
- A roll of scotch tape.
- Thickened cardboard.
- Glue gun or regular quality glue.
- Scrapbooking paper.
- Stationery.
- Fillers.
Instructions for making a cardboard pincushion box with your own hands:
- On a sheet of cardboard, place a ribbon slightly wider than the bobbin.
- Use a pencil to trace the bobbin from the inside and outside.
- The result should be two identical strips and two circles of different diameters.
- Using a glue gun, glue one strip inside the bobbin (try to make the seam neatly).
- Use a stationery knife to remove excess edges. Hide the seam with tape (it is better to glue it with "moment").
- Glue a circle with a larger diameter to the spool.
- Glue the second ribbon to the outside of the box - cut off the excess borders.
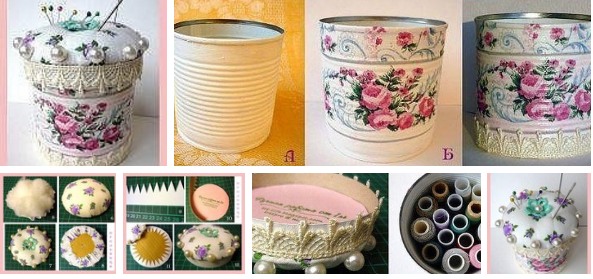
The pincushion box is almost ready - all that's left is to decorate it:
- Glue the red satin ribbon to the top, bottom and sides.
- Trace the spool onto white fabric with scarlet polka dots.
- Sew the fabric, leaving half unsewn.
- Cut the pieces so that the seam does not come apart.
- Turn right side out.
- Insert the cardboard circle into the fabric.
- Put some filling inside.
- Glue the bottom of the fabric to the cardboard.
- Add more filling, fold the top of the fabric, and glue it to the cardboard.
To decorate the lid of the pincushion, make a bow from the ribbon and glue it to the lid.
Master class on creating a box with drawers
An excellent box with drawers can be made with your own hands from available resources, such as cardboard or matchboxes. Ordinary matchboxes will only fit tiny rings, but if you buy tourist or fireplace matches, you can make a full-fledged box.
The required elements to create the box:
- thick cardboard - for the frame;
- matchboxes for boxes;
- decorative buttons for handles;
- for decoration, adhesive-based film, wallpaper or leftover leatherette.
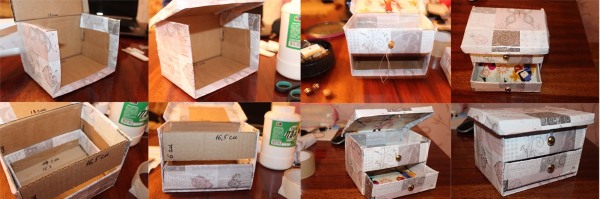
The formation will take very little time:
- matchboxes, without the sulfur layer, glued together;
- glue thick cardboard to the outside;
- surfaces that are visible should be decorated with wallpaper or film;
- Use an awl to attach decorative buttons to a fishing line or wire.
Decorate with beads, designs, and bows if desired.
A box in the shape of a doll's sofa
Instructions for making a box in the form of a doll's sofa:
- cut out the parts in the form of a parallelepiped approximately 7 by 15 cm;
- make an identical element 2-2.5 cm high;
- in a larger box, leave an open hole at the top, into which you can stuff the filler and compact it well;
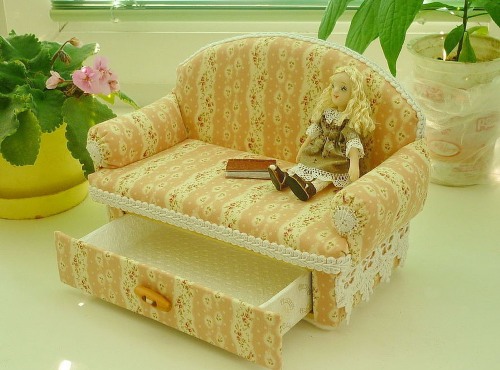
- assembly: place the smaller closed element on the end (this will be the back), and glue it to the soft seat from behind;
- form the upholstery with beautiful fabric. Cover the entire doll furniture and measure to make the cover;
- cut a piece of fabric and sew it, the seam should be at the bottom;
- For better fastening, you can make small holes at the bottom of the cardboard through which you can pass ties or staple the fabric.
Step by step instructions for the organizer box
To design an organizer box you need to have:
- untreated wooden box;
- velvet fabric;
- quality glue;
- tassels.
Tools needed to create an organizer box:
- drill and drill bits;
- screwdriver;
- pinking shears;
- sewing machine.
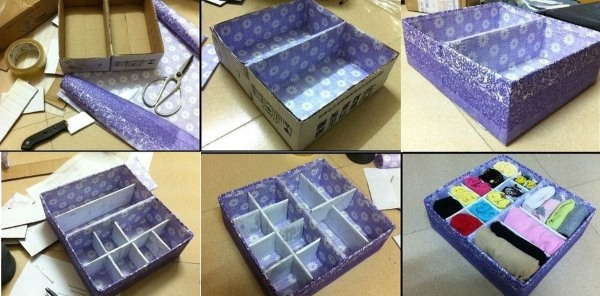
A cardboard box made by hand is very easy to make if you follow the step-by-step photo instructions.
Instructions:
- Apply stain to the wooden box, and wipe off any residue that is not absorbed with a rag.
- Using a drill, you need to drill a hole in the center to secure the handle.
- Cut two pieces of fabric slightly smaller than the bottom and lid of the box. Then you need to cut another piece half as big. Next, you need to lay the short piece of fabric on the long one, stitch it to make a pocket. Fix the velvet fabric and organizer inside the lid and at the bottom of the box.
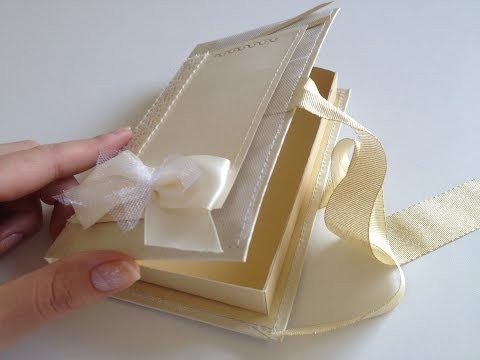
Book-shaped box with a secret compartment
Instructions for making a secret box:
- cut a 15 x 22 cm rectangle out of colored cardboard;
- mark out;
- bend and get a blank;
- for decoration you need to cut out four rectangles measuring 14.5 x 9.5 cm;
- cut two strips 14.5 x 2 cm;
- glue the parts, placing ribbons underneath for ties, for decoration inside;
- decorate the outside;
- get the blank;
- take two rectangles 12 by 14 cm and two 9 by 12 cm;
- all the blanks should be marked into strips 1 cm wide, they should also be folded like an accordion;
- Glue four parts together: insert the edges of one element into the edge of another;
- check the angles - they should be straight;
- glue the remaining accordions;
- glue the part inside;
- decorate a secret box.
Making a Shabby Chic Box
Components for making a box:
- candle;
- decoupage napkins;
- box;
- decoupage glue;
- white acrylic primer;
- acrylic varnish;
- acrylic paint;
- sandpaper;
- sponge.
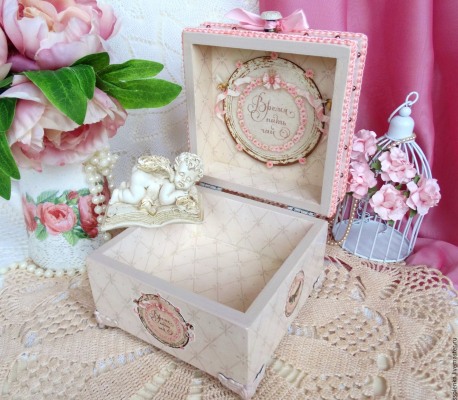
Cut out a pattern from a decoupage napkin, then separate it into layers. Cover the entire area of the pre-made cardboard box with paint. Dry with a hair dryer and leave until completely dry. Rub the box with a candle in places where there will be scuffs. It is imperative to rub the corners with a candle. Cover the box with white acrylic primer, dry.
Rub the box with sandpaper to create a worn effect. Attach the decoupage pattern to the box, apply glue on top. Let it dry, paint the edges of the pattern with a brush by hand. Dry and varnish.
DIY Box Decorating Ideas
A cardboard box made by hand can be easily decorated with anything, such as beads, old unnecessary jewelry, decorative stones, buttons, etc. Use your imagination, you can look at various decoration options online for inspiration. Don't be afraid to do something of your own, the main thing is that it is done from the heart.
There are many variations of creating a beautiful cardboard box at home. Have you decided to make something interesting with your own hands? Choose the option you like and go for it.
Video: DIY cardboard box
How to make a cardboard box with your own hands, watch the video:
Master class on how to make a cardboard box with your own hands: