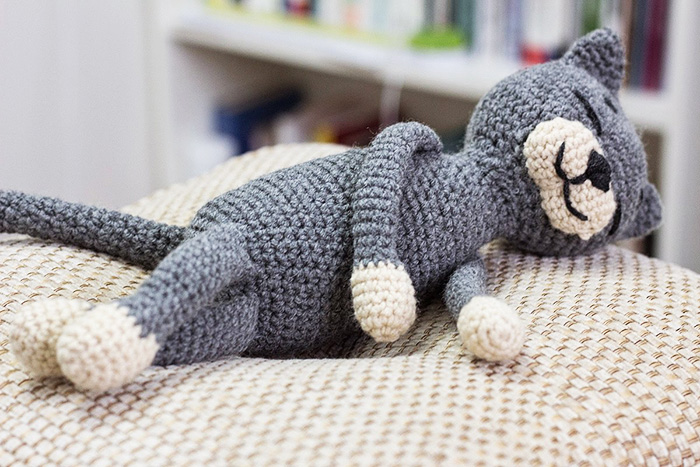
Recently, they have become widespread knitted toys, which attract with their originality and cute appearance. They are knitted from various yarns using a crochet hook (less often knitting needles). A crocheted cat looks very aesthetically pleasing and elegant against the background of the interior.
The diagram and description of step-by-step actions for knitting toys are given in many master classes dedicated to the unique Japanese art of amigurumi.
Yarn, hooks for knitting cats
To knit an amigurumi cat, you can use absolutely any yarn that is used for knitting clothes. Its choice depends on the design of the future toy, its size and purpose.
If the toy is created for decorative purposes to decorate the interior of the room, you can use wool yarn, which will make it as realistic as possible (the wool is combed and the toy looks like a real animal). Such a cat is not recommended for use as a children's toy, since its appearance may noticeably deteriorate.
If the cat is created for children's games, it is better to use acrylic or plush wool (possibly with the addition of cotton). In this case, the product will be very strong and dense, and the composition of the wool will allow it to remain in its original form for a long time.
A crochet cat, the pattern and description of which determines the choice of yarn and hook of the desired thickness, can be knitted in a few hours. The time it takes to create a toy depends on its size and type of yarn. For example, it is much more difficult to knit from plush yarn than from acrylic yarn, so more time will be spent on creating such a toy.
For medium-sized toys, yarn with a thickness of 2 to 3.5 mm is used. For small items - 1-1.5 mm. Widely used yarn brands are YarnArt JEANS (for medium-sized toys) and Vita cotton "IRIS" (for framed miniature toys).
The yarn packaging often indicates the hook size that should be used to work with it. To knit toys, you need to select a tool that is smaller (1-1.5 mm smaller) than the one indicated on the packaging. This is due to the fact that the manufacturer's indicators are calculated for knitting clothes, the fabric of which must be sufficiently flexible and elastic.
Toys require a denser knitting structure to eliminate the presence of holes in the fabric, through which the toy’s filling (synthetic padding) may begin to leak out over time.
For example, if the yarn package states that you need a 3.5 mm hook, you need to take a 2 mm tool. For knitting medium and large toys, use 1.5 - 2 mm hooks. For small amigurumi and decorative design of product parts, use smaller tools of 0.8 - 1 mm.
To create a cat of a specific model, it is necessary to select yarn according to its design and knitting pattern, as well as select hooks of the appropriate sizes. Various toys often have additional elements (clothes, various accessories, etc.) for which yarn and a hook of a thinner diameter are selected.
To select the correct hook size for the yarn size, you can use the following table:
| Yarn thickness | Number of turns in 2.5 cm | Number of meters in 100 g | Hook size, mm |
| Very thin | 18 | 600+ | 0.8 |
| Thin | 16 | 380-550 | 1-1.5 |
| Welterweight | 14 | 240-370 | 1.5-2 |
| Average | 12 | 200-240 | 2-2.5 |
| Semi-thick | 10 | 170-200 | 2.5-3 |
| Fat | 8 | 110-160 | 3-3.5 |
Master class on knitting simple amigurumi. Scheme, step-by-step description
A crochet cat, the diagram and description of which is attached to each master class on its creation, knitted using well-known standard knitting elements:
- single crochet (SC);
- single crochet increase (SCI);
- Decrease single crochet (decrease).
- amigurumi ring (KA);
- air loop (AL);
The amigurumi ring is the basis of almost all the details of the toy. Usually, knitting the head or body begins with this element. It is a ring of yarn around which single crochets are knitted.
To create an amigurumi ring you will need:
- Form a circle of yarn around the 2nd finger, press it with the 1st finger. Hold the long part of the thread (the working thread) between the 3rd and 4th fingers.
- Insert the hook under the ring, grab the yarn and pull it back (this will create a slip knot).
- Again, grab the yarn with the hook and pull it back (this will create a chain stitch).
- Remove the ring from the index finger and, while knitting, hold the resulting ring with the first and second fingers.
- Tie the required number of STBN stitches around the ring.
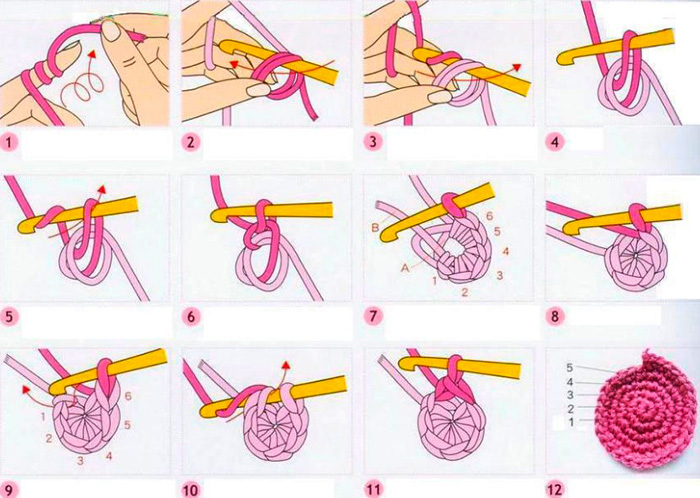
- Tighten the ring tightly by pulling on the short part of the thread.
- Insert the hook into the loop of the very first SC, grab the yarn and pull it back (you will get a slip stitch, which completes the creation of the amigurumi ring).
Single crochet stitches (SC) are knitted as follows:
- Insert the hook into the amigurumi ring (if you are knitting the first row) or into the nearest loop of the previous row (if you are knitting the second and subsequent rows).
- Grab the yarn and pull it back (this will leave two loops on the hook).
- Again, grab the working yarn and pull it back through the two loops on the hook (this will result in a SC, and one new loop will remain on the hook).
- The following STBN are knitted sequentially, each time inserting the hook into the ring (if the first row is knitted) or into the nearest loop of the previous row (if the second and subsequent rows are knitted).
Single crochet increase (SCI) is 2 regular SCs crocheted into the same stitch of the previous row (as a result, the number of stitches in the new row increases).
The increase is knitted as follows:
- Knit 1 SC into the nearest loop of the previous row.
- Knit another 1 SC into the same loop.
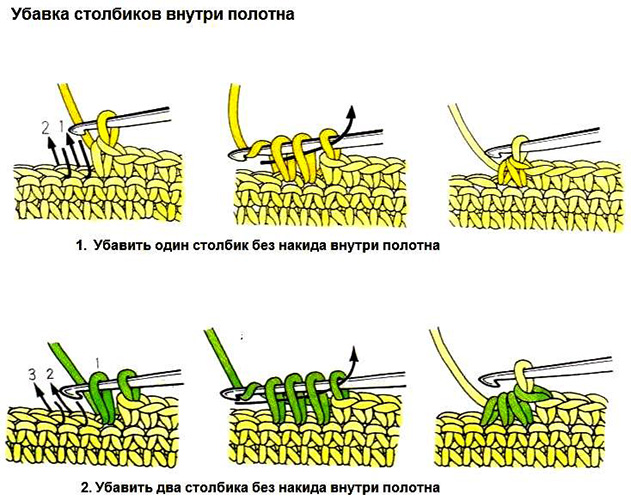
A single crochet decrease (SCD) is 1 SC, knitted into 2 loops of the previous row (as a result, the number of loops in the new row decreases).
The decrease is knitted as follows:
- The hook is inserted into the nearest loop of the previous row. Then the working thread is grabbed and pulled back.
- The hook is inserted into the next closest loop. Then the working thread is grabbed and also pulled back (as a result, 3 loops will be put on the hook).
- The hook grabs the working yarn and pulls it back through the 3 loops on the hook.
It is recommended to start knitting toys with simple and small models. In order to knit a simple cat, no more than 10 cm in height, you will need white yarn (it is recommended to use YarnArt JEANS, 3 mm), hook No. 2, synthetic padding (as a filler), two black beads for eyes and a thread with a needle.
The crochet cat, the diagram and description of which are given further in the article, is knitted in parts. Then all the parts are sewn together, and the body is filled with padding polyester.
The ears are knitted according to the following pattern:
- Make KA (2 STBN).
- Make 1 VP.
- Rotate the product around its axis by 360º (while the hook with the loop on it remains stationary).
- Make 2 STBN.
- Tighten the ring.
The body is knitted as follows:
- Make KA (6 SC) and tighten the ring.
- Row 2 (6 Inc).
- Row 3 (1 PR, 1 SC) - 6 times.
- Row 4 (1 PR, 2 SC) - 6 times.
- from 5 to 13 rows (24 STBN).
- Count the 6th row from the top and embroider a nose in the form of a dot (2 mm in diameter) with black thread.
- 1 row below, embroider a bird-shaped mouth with black thread (1 cm wide).
- Sew eyes to the right and left of the nose (you can use black beads with a diameter of 3 mm).
- Below the eyes, embroider 2 antennae on each side.
- Count the 3rd row from the top and sew the ears into this area (at eye level).
- Row 14 (1 dec, 1 sc) — 8 times.
- Fill the body with synthetic padding.
- Row 15 (8 DECREASE).
- Thread the thread through each loop of the last row and pull tightly.
- Secure the thread with a knot and hide it inside.
The tail is knitted according to the following pattern:
- Make KA (6 SC) and tighten the ring.
- 2nd row (1 INC, 2 SC) - 2 times.
- 3-4 rows (8 STBN).
- Row 5 (1 dec, 2 sc) - 2 times.
- 6-7 rows (6 STBN).
Next, you need to count the 3rd row from the center, from the bottom of the body, and sew on the tail.
The paws are knitted according to the following pattern:
- Make 3 VP.
- Knit 2 SC in a chain.
- Pull the thread tight.
Next, you need to count the 3rd row from the center of the bottom of the body, and sew the lower legs at the level of the ears.
The upper legs are sewn on 3 rows higher than the lower legs.
Next, you need to take a pink marker and color the inside of the ears, and also give the cat a blush in the whisker area.
Variants of cute crochet cats. Patterns and description
There are many different patterns and models for knitting amigurumi cats. To ensure that the product is of high quality, it is necessary to strictly follow the rules of the pattern.
Amigurumi cats
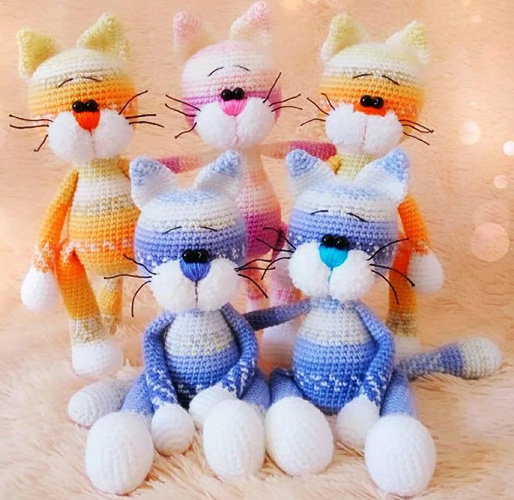
You can knit a company of several multi-colored cats. They are small (14 cm), have a gray muzzle, and have a spot on their eye. You can knit them from both regular and fluffy threads. The color of the wool for the body can be white, red or gray. The thickness of the yarn should be at least 3 mm. Each cat is knitted with a 2 mm wide hook.
Diagram and description of the production of the body, as well as the head:
- Make KA (6 STBN).
- 2nd row (6 inc)
- Row 3 (1 PR, 1 SC) - 6 times.
- Row 4 (1 PR, 2 SC) - 6 times.
- Row 5 (1 PR, 3 SC) - 6 times.
- Row 6 (1 PR, 4 SC) - 6 times.
- Row 7 (1 PR, 5 SC) - 6 times.
- 8-16 rows (48 STBN).
- Row 17 (1 dec, 6 sc) – 6 times.
- Rows 18-19 (42 STBN).
- Row 20 (1 dec, 12 sc) — 3 times.
- Row 21 (1 dec, 11 sc) — 3 times.
- Row 22 (1 dec, 10 sc) — 3 times.
- Row 23 (1 dec, 9 sc) - 3 times.
- 24-26 rows (30 STBN).
- Row 27 (1 dec, 8 sc) — 3 times.
- Row 28 (27 STBN).
- Row 29 (1 dec, 7 sc) — 3 times.
- Row 30 (24 SC).
- Fill with synthetic padding.
- Row 31 (1 dec, 2 sc) — 6 times.
- Row 32 (1 dec, 1 sc) — 6 times.
- Pass the thread through the loops of the last row and tighten.
The spot for the eye is knitted as follows:
- Make KA (6 STBN).
- Row 2 (6 Inc).
- Make a slip stitch.
The muzzle consists of two parts, each of which is knitted as follows:
- Make KA (6 STBN).
- Row 2 (6 Inc).
- 3-4 rows (12 STBN).
- Row 5 (2 SC, 1 DEC) – 3 times.
- Row 6 (1 SC, 1 dec) – 3 times.
Next, you need to sew the 2 parts of the muzzle along the line of their open sides.
The nose is knitted with black yarn as follows:
- Make 4 VP.
- In the 2nd loop from the hook make 3 SC.
- Make 1 decrease
You need to leave a little thread, sew the nose to the muzzle and use this thread to embroider the mouth on the muzzle.
The ears are knitted as follows:
- Make KA (4 STBN).
- 2nd row (1 SC, 1 INC) - 2 times.
- Row 3 (1 SC, 1 INC) – 3 times.
- Row 4 (2 SC, 1 INC) - 3 times.
- Row 5 (3 SC, 1 INC) - 3 times.
- Fold the last row in half and sew it (7 SC).
The tail is knitted like this:
- Make KA (6 STBN).
- Row 2 (1 SC, 1 PR) - 6 times.
- Row 3 (2 SC, 1 INC) - 3 times.
- 4-5 row (12 SC).
- Row 6 (2 SC, 1 dec) - 3 times.
- Set yarn to a different color.
- 7-31 rows (9 STBN).
- Fold the last row in half and sew it together (4 SC).
Next, you need to sew the tail, ears and muzzle to the body. You can use black beads as eyes. Before sewing on the eyes, you first need to sew on a spot. The tail needs to be wrapped around the body and secured.
Amigurumi cats
A set of 3 graceful medium-sized cats can decorate a room, and children can also play with them. To knit these cats, you will need orange, gray and white yarn. The hook size should be 5 mm. You can use plastic eyes and a nose.

The cats' tail will bend, for which it is necessary to prepare a small piece of wire. The size of the toy in height will be approximately 25 cm. The width of the cat's head is 12 cm.
Knitting pattern for the head:
- Make KA (10 SC). Connect. 1 VP.
- Row 2 (10 INC). Connect. 1 VP.
- Row 3 (20 SC).
- Row 4 (2 SC, 1 SC add) - 5 times. Connect. 1 VP.
- Row 5 (30 SC). Connect. 1 VP. Connect. 1 VP.
- Row 6 (2 SC, 1 SC add) - 10 times. Connect. 1 VP.
- Rows 7-13 (40 STBN).
- Row 14 (2 SC, 1 dec) - 10 times. Connect. 1 VP.
- Row 15 (30 SC). Fasten the thread.
Knitting pattern for the body:
- Make KA (10 SC). Connect. 1 VP.
- Row 2 (10 INC). Connect. 1 VP.
- Row 3 (20 SC).
- Row 4 (2 SC, 1 SC add) - 5 times. Connect. 1 VP.
- Row 5 (30 SC). Connect. 1 VP. Connect. 1 VP.
- Row 6 (2 SC, 1 SC add) - 10 times. Connect. 1 VP.
- 7-10 rows (40 STBN).
- Row 11 (2 SC, 1 dec) - 10 times. Connect. 1 VP.
- Rows 12-13 (30 SC). Connect. 1 VP.
- Row 14 (1 SC, 1 dec) - 10 times. Connect. 1 VP.
- Rows 15-25 (20 SC). Connect. 1 VP.
- Fasten off the thread and leave some thread to sew the body to the head.
Knitting pattern for ears:
- Make KA (4 STBN). Tighten the ring.
- Row 2 (4 SC).
- Row 3 (1 SC, 1 INC) - 2 times.
- Row 4 (6 SC).
- Row 5 (2 SC, 1 INC) - 2 times.
- Row 6 (8 SC).
- Fasten the thread and leave some thread to sew the ears to the head.
Knitting pattern for the tail:
- Make KA (5 SC). Tighten the ring.
- Knit 30 rows (5 SC).
- Insert wire into the tail and fill with synthetic padding.
After all the parts are ready, you need to sew on the tail, attach the eyes to the head at a distance of 9 rows from its bottom. The nose needs to be attached between the eyes a few rows lower. Next, you need to knit 2 more cats using the same pattern, but only using yarn of different colors.
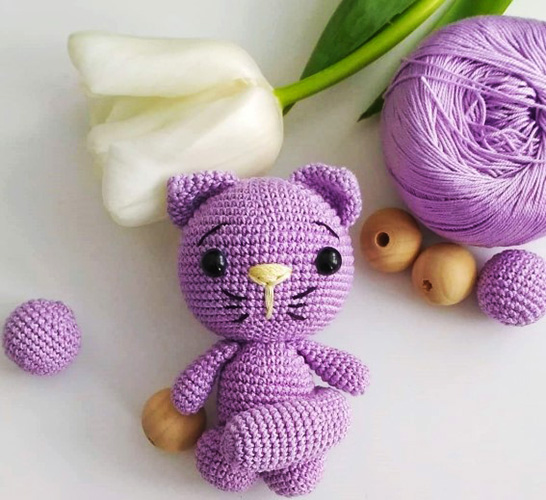
Amigurumi kittens
It is not difficult to knit kittens that can fit in the palm of your hand. You will need lilac yarn (for the body), some red and white threads, and plastic black eyes.
The head, neck and body are knitted continuously with one lilac thread:
- Make 10 VP. Then 1 VP lift.
- 1 row (9 SC, 3 SC in one loop, then in the other direction 8 SC, 2 SC in one loop). Then make a slip stitch.
- 2nd row (VP, 22 STBN).
- Row 3 (10 sc, 1 inc, 10 sc, 1 sc inc).
- Row 4 (3 SC, 1 PR) - 6 times.
- 5-9 rows (30 STBN).
- Row 10 (3 SC, 1 DEC) – 6 times.
- Row 11 (2 SC, 1 DEC) – 6 times.
- Row 12 (1 SC, 1 dec) – 6 times.
- The neck begins.
- Row 13 (2 SC, 1 INC) - 4 times.
- Row 14 (3 SC, 1 INC) - 4 times.
- It is necessary to fill the head with synthetic padding.
- The torso begins.
- Row 15 (20 SC).
- Row 16 (4 SC, 1 INC) – 4 times.
- Row 17 (6 SC, (5 SC, 1 INC) - 2 times, 6 SC).
- Row 18 (5 SC, 1 INC, (6 SC, 1 INC) - 2 times, 5 SC, 1 INC).
- Rows 19-21 (30 STBN).
- Row 22 (3 SC, 1 DEC) – 6 times.
- Row 23 (2 SC, 1 DEC) – 6 times.
- Row 24 (1 SC, 1 dec) – 6 times.
- It is necessary to fill the body with synthetic padding.
- Row 25 (6 DECREASE).
Next, you need to tighten the hole, and then tighten the ears with a thread.
The tail is knitted as follows:
- Make 13 VP.
- Insert the hook into the 2nd loop and crochet 12 SC.
Next, you need to sew the tail to the body. Sew plastic eyes to the head, and embroider the nose with white yarn. You can make a bow on the kitten's neck with red yarn.
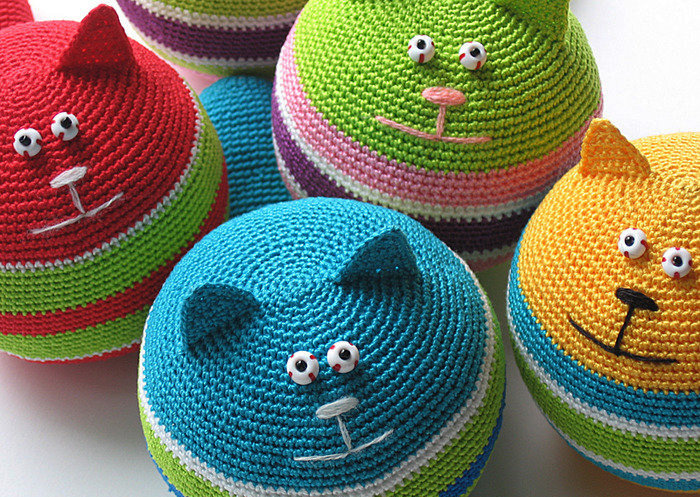
Round anti-stress cat
The crochet cat, the diagram and description of which are given further in the article, can be crocheted in just an hour. Such a toy can be a great gift for friends and family. It is so cute that it lifts your spirits when you look at it. To make it, you will need light pink and red cotton yarn, two blue plastic eyes and a plastic red nose.
First, knit the body with light pink yarn, and then change it to red yarn closer to the middle.
Knitting pattern for the body:
- Make KA (6 STBN).
- 2nd row (6 SC).
- Row 3 (6 inc).
- Row 4 (1 PR, 1 SC) - 6 times.
- Row 5 (1 PR, 2 SC) - 6 times.
- Row 6 (1 PR, 3 SC) - 6 times.
- Row 7 (1 PR, 4 SC) - 6 times.
- Row 8 (1 PR, 5 SC) - 6 times.
- Row 9 (1 PR, 6 SC) - 6 times.
- Row 10 (1 PR, 7 SC) - 6 times.
- Rows 11-14 (54 STBN).
- Set the yarn to red.
- 15-24 rows (54 STBN).
- Row 25 (1 dec, 7 sc) — 6 times.
- Row 26 (1 dec, 6 sc) – 6 times.
- Row 27 (1 dec, 5 sc) — 6 times.
- Row 28 (1 dec, 4 sc) — 6 times.
- Row 29 (1 dec, 3 sc) – 6 times.
- Row 30 (1 dec, 2 sc) — 6 times.
- Row 31 (1 dec, 1 sc) — 6 times.
- Row 32 (6 DECREASE).
Knitting pattern for ears:
- Make 7 SC at the top of the head where the ear will be (leave a long end of the thread for tying).
- 2nd row (in the 2nd loop 4 SC, 1 dec).
- 3rd row (in the 2nd loop 2 SC, 1 dec)
- 4th row (in the 2nd loop 1 SC, 1 dec)
Next, you need to tie the ear along the contour with the thread that was previously left at its base.
The tail is knitted as follows:
- Make KA (6 STBN).
- 2nd row (6 SC).
- Row 3 (6 inc).
- Row 4 (1 PR, 1 SC) - 6 times.
- 5-7 rows (18 STBN).
- Row 8 (17 SC).
- Row 9 (16 SC).
- Row 10 (15 SC).
- Row 11 (14 SC).
- Row 12 (13 STBN).
- Rows 13-20 (12 STBN).
Next, you need to fill the tail with padding polyester and sew it to the body. The muzzle can be embroidered with red threads, then glue the eyes and nose.
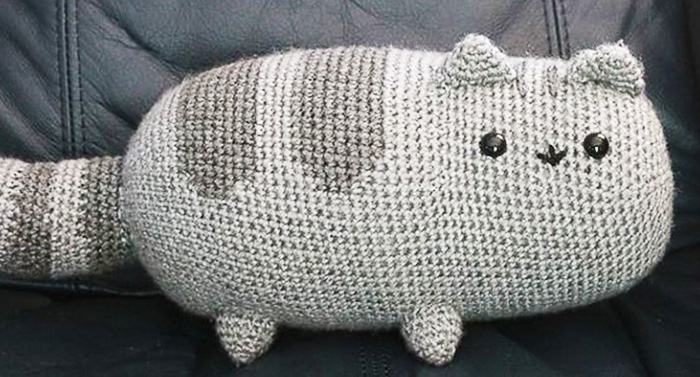
Pillow
The cat-pillow can be knitted from light-grey mohair yarn. You can use synthetic padding or fluff as a filler.
Knitting pattern for the body together with the head:
- Make KA (6 STBN).
- Row 2 (6 Inc).
- Row 3 (1 SC, 1 PR) - 6 times
- Row 4 (2 SC, 1 PR) - 6 times
- Row 5 (3 SC, 1 PR) - 6 times
- Row 6 (4 SC, 1 PR) - 6 times
- Row 7 (5 SC, 1 PR) - 6 times
- Row 8 (6 SC, 1 PR) - 6 times
- Row 9 (7 SC, 1 PR) - 6 times
- Row 10 (8 SC, 1 PR) - 6 times
- Row 11 (60 SC).
- Row 12 (9 SC, 1 PR) - 6 times
- Row 13 (66 STBN)
- Row 14 (10 SC, 1 PR) - 6 times
- Rows 15-17 (72 STBN).
- Rows 18-41 (72 STBN).
- Row 42 (10 SC, 1 DEC) – 6 times.
- Row 43 (9 SC, 1 dec) – 6 times.
- 44 - 59 rows (60 STBN).
- Row 60 (8 SC, 1 DEC) – 6 times.
- Row 61 (54 STBN).
- Row 62 (7 SC, 1 DEC) – 6 times.
- 63 row (48 STBN) - 6 times.
- Row 64 (6 SC, 1 DEC) – 6 times.
- Row 65 (5 SC, 1 DEC) – 6 times.
- Row 66 (4 SC, 1 DEC) – 6 times.
- Row 67 (3 SC, 1 DEC) – 6 times.
- Row 68 (2 SC, 1 DEC) – 6 times.
- Row 69 (1 SC, 1 DEC) – 6 times.
- Row 70 (6 DECREASE).
Next, you need to fill the body with synthetic padding and sew it up.
The paws are knitted according to the following pattern:
- Make KA (5 STBN).
- 2nd row (5 SC).
- Row 3 (5 inc).
- Row 4 (10 SC).
- Row 5 (1 SC, 1 PR) - 5 times.
- Row 6 (15 SC).
The ears are knitted like this:
- Make KA (6 STBN).
- 2nd row (6 SC).
- Row 3 (1 SC, 1 PR) - 6 times.
- Row 4 (12 SC).
- Row 5 (2 sc, 1 sc inc) - 6 times.
The tail is knitted like this:
- Make KA (6 STBN).
- Row 2 (1 SC, 1 PR) - 6 times.
- Row 3 (2 SC, 1 PR) - 6 times.
- Row 4 (18 SC).
- Row 5 (3 SC, 1 PR) - 6 times.
- 6-22 rows (24 STBN).
After all the parts are ready, you need to sew the paws, ears and tail to the body. Next, embroider the mouth and antennae, and then sew on the black eyes (you can use beads).
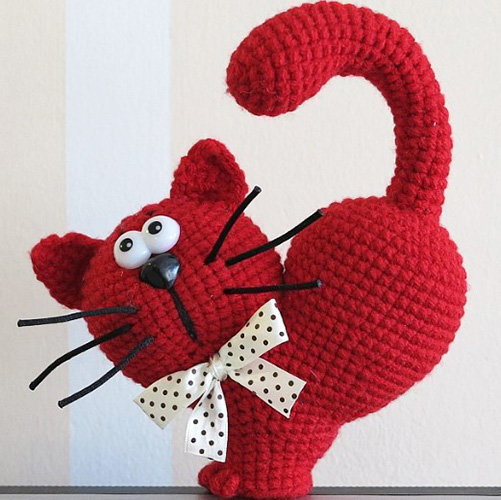
Heart-shaped cat
To create a heart-shaped cat you will need angora yarn, wire for the tail, ready-made plastic eyes and a nose.
Knitting pattern for the head:
- Make KA (6 STBN).
- Row 2 (6 Inc).
- Row 3 (1 SC, 1 PR) - 6 times.
- Row 4 (3 SC, 2 PR, 5 SC, 2 PR, 2 SC, 2 PR, 2 SC).
- Row 5 (4 SC, 2 PR, 6 SC, 2 PR, 6 SC, 2 PR, 2 SC).
- Row 6 (5 SC, 1 PR, 2 SC, 1 PR, 2 SC, 1 PR, 6 SC, PR, 2 SC, 1 PR, 2 SC, 1 PR, 5 SC).
- Row 7 (6 SC, 1 PR, 3 SC, 1 PR, 3 SC, PR, 6 SC, PR, 3 SC, 1 PR, 3 SC, 1 PR, 6 SC).
- 8-15 row (42 SC).
- Row 16 (5 SC, DECREASE) – 6 times.
Knitting pattern for the body:
- Make KA (6 STBN).
- Row 2 (6 Inc).
- Row 3 (1 sc, prib) - 6 times.
- 4 row (2 STBN, RIB) - 6 times.
- Row 5 (3 SC, PRB) - 6 times.
- Row 6 (4 STBN, RIB) - 6 times.
- Row 7 (5 STBN, RIB) - 6 times.
- Rows 8–14 (42 STBN).
- Row 15 (5 SC, DECREASE) – 6 times.
- Next, you need to connect the head to the body using 60 SC (along their last row).
- 16 - 18 rows (60 STBN).
- Row 19 (6 SC, 1 DEC) – 7 times.
- Row 20 (53 STBN).
- Row 21 (1 dec, 5 sc) - 7 times, then 4 sc.
- Row 22 (46 STBN).
- ROW 23 (8 SC, 1 dec, 1 SC, 1 dec, 11 SC, 1 dec, 5 SC, 1 dec, 5 SC, 1 dec, 6 SC).
- ROW 24 (8 SC, 1 dec, 1 SC, 1 dec, 10 SC, 1 dec, 5 SC, 1 dec, 5 SC, 1 dec, 2 SC).
- ROW 25 (6 SC, 1 dec, 1 SC, 2 dec, 10 SC, 1 dec, 5 SC, 1 dec, 4 SC).
- ROW 26 (5 SC, 1 dec, 1 SC, 1 dec, 11 SC, 1 dec, 8 SC).
- We fill the product with synthetic padding (we do not fill the head tightly so that we can tighten the muzzle).
- Row 27 (28 STBN).
- Row 28 (24 SC, 2 dec).
- 29 row (3 STBN, 3 decrease, 17 STBN).
- Row 30 (2 sc, 1 dec, 2 sc, 1 dec, 15 sc).
- Row 31 (3 sc, 1 dec, 1 sc, 1 dec, 1 sc).
- Row 32 (2 SC, 1 PR, 2 SC, 1 PR, 10 SC, 1 PR, 2 SC).
Next you need to knit the base of the cat:
- Make KA (6 STBN).
- Row 2 (6 Inc).
- Row 3 (1 SC, 1 PR) - 6 times.
Next, you need to sew this base to the lower opening of the body.
Tail diagram:
- Make KA (6 STBN).
- Row 2 (6 Inc).
- Row 3 (1 SC, 1 PR) - 6 times.
- 4-8 rows (18 STBN).
- Row 9 (4 SC, 1 DEC) – 3 times.
- 10-14 rows (15 STBN).
- Row 15 (3 SC, 1 DEC) – 3 times.
- Rows 16-18 (12 STBN).
- Row 19 (3 SC, 1 DEC) - 2 times.
- Row 20 (10 SC).
Ear diagram:
- Make 6 VP.
- Row 2 (1 sc in 2nd stitch, 4 sc).
- Row 3 (1 VP, 3 SC, 1 UBAV).
- Row 4 (1 VP, 2 SC, 1 UBAV).
- Row 5 (1 VP, 1 SC, 1 UBAV).
- Row 6 (1 VP, 1 DECREASE).
- Row 7 (knit the remaining loops together).
Next, you need to sew the ears and tail to the body. Then glue the eyes, nose and whiskers. You can tie a beautiful bow on the neck.
Phone case
It won't be difficult to crochet an unusual accessory for your phone in the form of a cat. You can use thin acrylic yarn to create this item.
Case diagram:
- Tie a chain of VP so that its length matches the width of your phone.
- Knit 3 rows of STBN along this chain (this will form the base of the case).
- Knit STBN around the base circle until the length of the case is equal to the length of your phone.
- Crochet the ears using double crochet stitches.
Then you can glue or sew on plastic eyes and embroider a mouth. If desired, you can embroider an inscription, hearts or flowers.
A crocheted cat can be sold at an exhibition or special fairs. Also, if you create your own model of a toy, its diagram and description can also be successfully sold as a master class on its production.
Video about crocheting a cat
Master class on crocheting a kitten: