To learn how to make a three-dimensional square out of paper or cardboard, you need to know how to calculate the dimensions and make a neat one. reamer for gluing.
Features of the figure, how many edges and angles does a volumetric square have
A volumetric square, or cube, is one of the simplest figures, a model of which can be assembled from paper or cardboard.
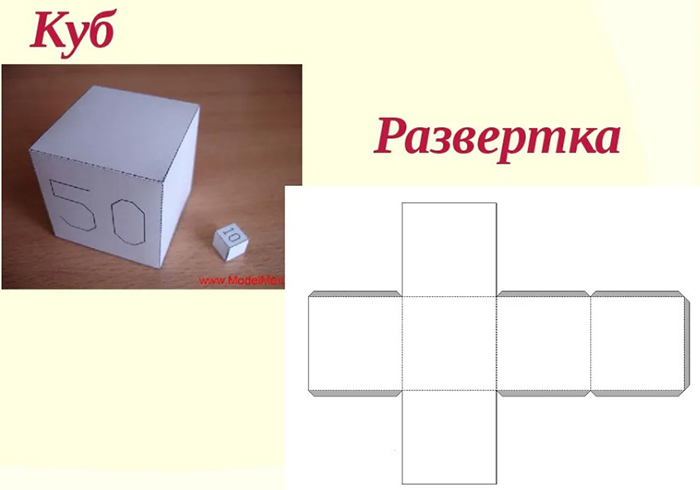
The cube has:
- 8 angles, all of them are right and equal to 90°.
- 12 sides. These are the spaces between the angles. In geometry, they are called edges.
- 6 faces. These are the flat sides of the figure. In a cube, they are square. All faces are the same height and width.
Due to the fact that all the edges and angles of the figure are equal, it will be very easy to draw and glue the three-dimensional figure.
What you need to make a cube with your own hands
The list of all materials and tools required for the work can be seen in the table:
| Simple pencil | Needed to create a drawing. You can use a tool with a rod of any degree of hardness. |
| Eraser | May be required to correct errors in the drawing. |
| Sharpener | Before work, the pencil should be sharpened well so that the lines are thin and neat. |
| Thick paper | To assemble the cube, you need sheets with a density of at least 200 g/m2. Then the figure will be strong and stable. You can use sheets for drawing or Whatman paper cut into A4 pieces. |
| Cardboard for children's creativity | Cardboard is needed to create a template that will help simplify the construction of the drawing. |
| Ruler | It is advisable to purchase a long wooden or iron ruler (at least 30 cm). |
| Stationery glue | Required for gluing the cube parts together. |
| Rigid corrugated cardboard of 2 layers | Useful for assembling a large and strong cube. |
| Moment glue | Allows you to securely and quickly fasten parts made of durable cardboard. |
| Scissors | Required for cutting out blanks from thin cardboard or paper. |
| Stationery knife | It will help you to carefully cut out a blank from thick cardboard. |
Before you start working, you need to take care of protecting the surface of your work table. To avoid getting glue on it, you can cover the tabletop with oilcloth. You need to cut paper and cardboard with a stationery knife on a cork board or a wide piece of foam.
How to make from A4 paper
A square (the pattern for gluing is presented later in the article), assembled from thick paper, can be used as a teaching aid for children. You can explain to the child in an accessible way what the faces, vertices and edges of a figure are.
You can also make an unusual photo frame out of a cube by gluing your favorite images onto the sides, or create a six-month calendar by selecting 1 side for a month. The cube can also be used for various games if you design its sides as a dice.
Size calculation
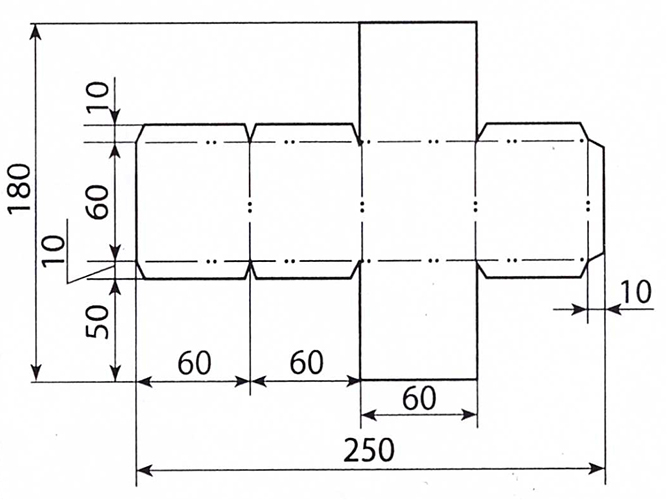
The maximum size of 1 face of the pattern that can be successfully placed on an A4 sheet is 6x6 cm. You can make a smaller model. The smaller the faces, the more difficult it will be to assemble the cube. It is also important to remember that special allowances are needed for gluing. Their minimum width is 5 mm.
Preparing a cardboard template
To avoid measuring and drawing each square with a ruler, you can prepare a simple template from thin cardboard. You will need to apply it to a sheet of paper and trace around it.
How to create a template:
- Using a ruler, measure 6 cm along the edge from any corner of the cardboard sheet.
- Mark the end of the segment with a point.
- Draw another line, on the other corner of the sheet. Also put a mark.
- From any of the points set, set aside another 6 cm. Put a barely noticeable point. You do not need to draw a line right away, you may have to adjust the position of the mark.
- From the other point, measure another 6 cm. The end of this segment should coincide with the point set in the previous point. If this does not happen, you need to change the location of the marks, applying a ruler.
- Check the length of all sides. There should be no errors.
- Draw the missing lines.
- Use scissors to carefully cut out the workpiece. Do not cut the cardboard in too small a "step". This will result in unevenness.
- Using a ruler, find the center points on each side of the figure and mark them.
At the end, you need to measure all sides of the square again.
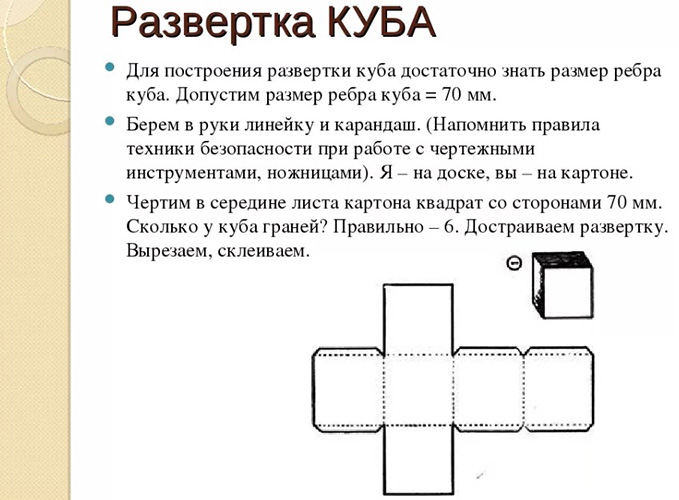
Construction of a development with allowances, drawings
A square (the pattern for gluing can be made in 2 versions) can be constructed according to the following scheme:
- Place the sheet of paper horizontally.
- Use a ruler to find the center of the sheet. First, find the middle of the side part on the left, then on the right. Put marks.
- Connect the dots with a very thin line.
- Place the cardboard template on the right side of the paper so that the edges of the sheet and the cardboard match. You also need to match the beginning of the center line and the marks on the side of the square.
- Trace the template along the outline.
- Move the cardboard to the left. Now the right edge should match the left side of the drawn square. Trace the template again.
- By analogy with the previous point, you need to draw 2 more squares, placing them in 1 horizontal line. It is important to ensure that the central strip drawn across the sheet coincides with the marks on the sides of the template.
- Find the 2nd square on the right. Place the template above it, connecting 1 of the cardboard sides to the top side of the drawn figure. Trace the cardboard.
- Now place the template under the 2nd square on the right. By analogy, trace the workpiece.
- Put the cardboard square aside. Use a ruler to check the accuracy of the drawing. Measure the sides of each face. If necessary, adjust the drawing. Make all the lines straighter and clearer.
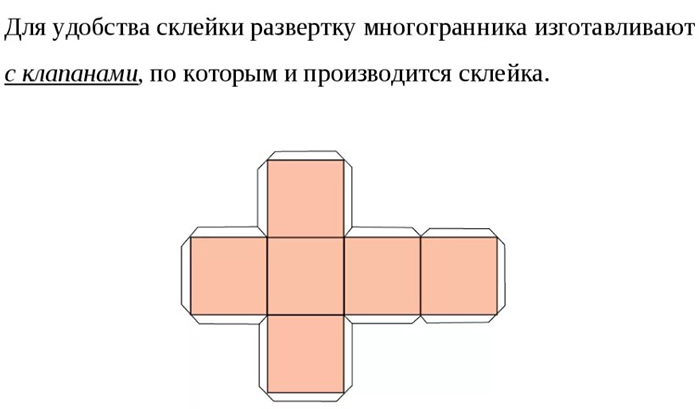
- On the first side, on the last square, draw a place for gluing. This should be a strip 5 mm thick. The corners of the strip should be beveled. Erase the extra lines with an eraser.
- The same gluing strips need to be drawn on 3 sides of the squares protruding from the top and bottom.
- Use an eraser to clean the background and remove all unnecessary lines.
Another variant of the development:
- Place the sheet of paper vertically.
- Mark the center with dots on the top and bottom sides.
- Connect the marks with a barely visible line.
- Place the cardboard blank on the bottom of the sheet. Connect the marks on the cardboard with the beginning and continuation of the central strip on the sheet.
- Move the cardboard so that the top side of the drawn square matches the bottom side of the cardboard. Trace the template again along the outline.
- By analogy, draw 2 more squares. Make sure that the marks on the template coincide with the central line of the sheet.
- Number the squares from bottom to top.
- From the 2nd square, on the right, draw another face of the cube, tracing the template.
- From the 3rd square, draw another edge on the left.
- Put the cardboard blank aside. Check the accuracy of the drawing. If necessary, align the lines. Correct any errors with an eraser.
- Draw a strip for gluing on the upper side of the 4th square. Its width should be 5 mm. Make the corners slightly beveled.
- On the protruding square on the left side, draw the same “ear” for gluing.
- On the square protruding on the right, draw another strip for gluing.
Use the eraser to clear the background and remove unnecessary lines. The numbers on the squares can also be removed.
Working with a finished form, gluing
The pattern for gluing the volumetric square should be cut out with scissors.
Next steps:
- Press down all the lines drawn with a pencil with the edge of a ruler. This will make it easier to fold them.
- Assemble the figure. Check if the sides are connected well. There should be no gaps or burrs.
- Expand the figure.
- Coat 1 of the gluing strips with glue.
- Raise the opposite side. Glue the "ear" by placing it on the inside of the cube (all strips should be located inside the cube).
- Press the glued area with your fingers and hold until the glue sets.
- Apply glue to the other "ears". Carefully glue the figure together.
- Leave the model until the glue is completely dry.
It is not recommended to dry the craft near radiators or in the sun. The glue should dry evenly, at room temperature.
Large cardboard cube
A square (the pattern for gluing is no different from those options from which you can assemble a paper cube), made of two-layer corrugated cardboard, can be used not only for teaching children or decorating a desktop.
Large cubes can be used as decoration for a child's room or a hall for a theme party. The cube can also be used as a money box for paper money.
Features of working with rigid cardboard
How to work with rigid cardboard:
- For work, you need to select a smooth material, without folds and torn edges. It is desirable that there are no paper clips or other elements in the cardboard. For large items, boxes from household appliances are suitable. Before starting work, they must be carefully unfolded. Remove tape and stickers.
- You need to cut the cardboard with a stationery knife. You won't be able to make even edges of the workpiece with scissors. In addition, using scissors will be inconvenient. You can rub calluses on your fingers, and even break the tool.
- Cut the cardboard slowly, placing it on a flat surface, facing you. Do not cut while it is hanging. The knife may slip and injure your hands.
- To ensure that the cutting edges are even, it is better to apply a ruler to the drawn lines.
- If the finished cube is pasted over with paper, then the edges can be connected using scotch tape. In other cases (especially if the figure is painted), the edges need to be fastened using Moment glue.

Stationery glue is not suitable for joining the cube faces. It takes too long to dry, and it is unlikely that such glue will securely fasten the structure.
Preparing and cutting out the template
For a cardboard cube, option 1 of the drawing is more suitable. It has more "ears" for gluing. Thanks to them, the figure will turn out neat, without gaps and gaps.
Procedure:
- Determine the size of the cube.
- Cut a sheet of cardboard to a suitable size.
- Step back 1-2 cm from the edge of the sheet.
- Draw 1 edge of the figure.
- Next, draw 3 more sides, placing them in 1 row. Check if the sides of all the squares are the same.
- Number the faces from bottom to top.
- From 3 squares, add one square on both sides.
- If there are any inaccuracies in the drawing, they need to be corrected. Remove extra lines with an eraser.
- On the upper side of square number 4, draw a strip for gluing. It should be quite wide. Not less than 5 cm. Remove the corners of the strip by drawing additional lines. Erase the excess with an eraser.
- On the squares protruding on the sides, draw the same stripes on 3 sides that are not adjacent to other edges. Design the corners of the "ears" for gluing.
- Carefully cut out the template with a stationery knife. Start from the top and move smoothly downwards. The main thing is not to rush. For convenience, you can use a ruler.
- Inspect the edges of the cut out workpiece. Trim off any burrs or uneven areas.
To make cutting the cardboard easier, you can trace the outline of the workpiece with a dark marker.
Connecting the edges
Before joining the edges, you need to press the fold lines well with a ruler. Avoid pressing on the corners of the ruler. They can break the cardboard layer. You can press the material by applying a ruler and using an unsharpened pencil.
The order of connecting the faces:
- First, you need to glue the "ear" that is located on the top square. To do this, apply a thin strip of glue to its surface.
- Press the strip to the inside of the opposite edge and press down well. Let the glue set. 10-25 seconds will be enough.
- Then, all 3 "ears" on the left side of the cube are lubricated with oil. They are carefully inserted inside the cube. Excess glue should be removed immediately.
- Lastly, glue the right part of the figure. For convenience, you can turn the cube so that the unglued part looks like a lid, i.e. is on top.
- Leave the model until the glue is completely dry.

The cube can be made dense. You can even sit on such a product. To do this, you will need to cut strips of cardboard, the width of which will be almost equal to the height of the edges. You should take into account the thickness of the cardboard. To do this, you need to measure 1 wall from the top and multiply this figure by 2. This is how much you need to cut off from the width of the strips.
Then the strips are tightly folded like an accordion and inserted inside the cube before gluing the last face. It is necessary to leave some free space around the edges so that the "ears" for gluing enter the inside of the figure without obstacles. The last face is well coated with glue from the back side and glued in the usual way.
It is not difficult to assemble a three-dimensional square from paper or cardboard. The main thing is to ensure that the pattern for gluing is constructed accurately, without errors.
Video about the craft
How to make a paper cube: