To knitting process openwork crochet napkin was simple and exciting, it is important not only to be able to knit, but also to understand at least a little about yarn. Knitting threads are divided into summer, winter and demi-season.
- Winter natural yarns are mainly merino, mohair, wool.
- Summer thread – viscose, nylon, cotton.
For an openwork napkin, it is recommended to choose cotton or viscose thread. These threads are easier to knit, even a beginner can make any pattern from them according to the diagram with the description.
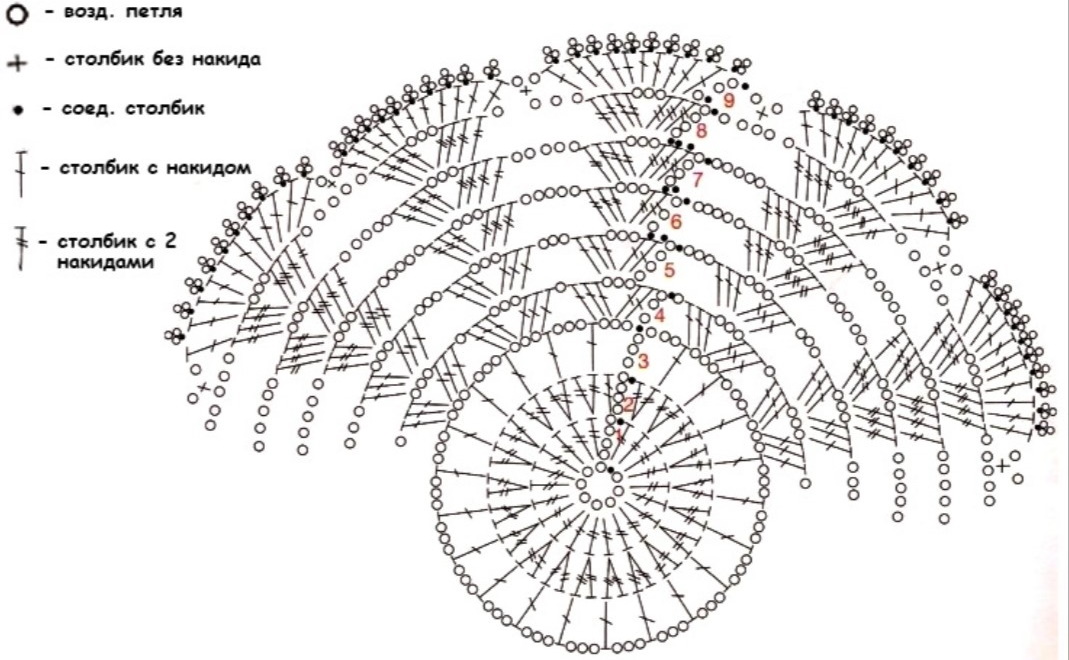
The symbols used in the diagrams are deciphered as follows:
- air loop – air loop;
- p.p. – lifting loop;
- st. b. n. – single crochet;
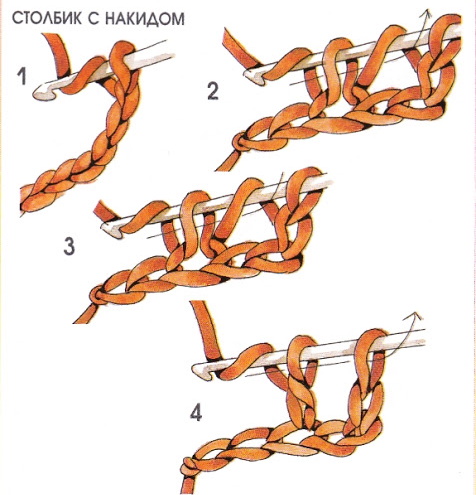
- st. with n. – double crochet;
- st. with dv. n. – column with double crochet;
- connecting st. – connecting post.
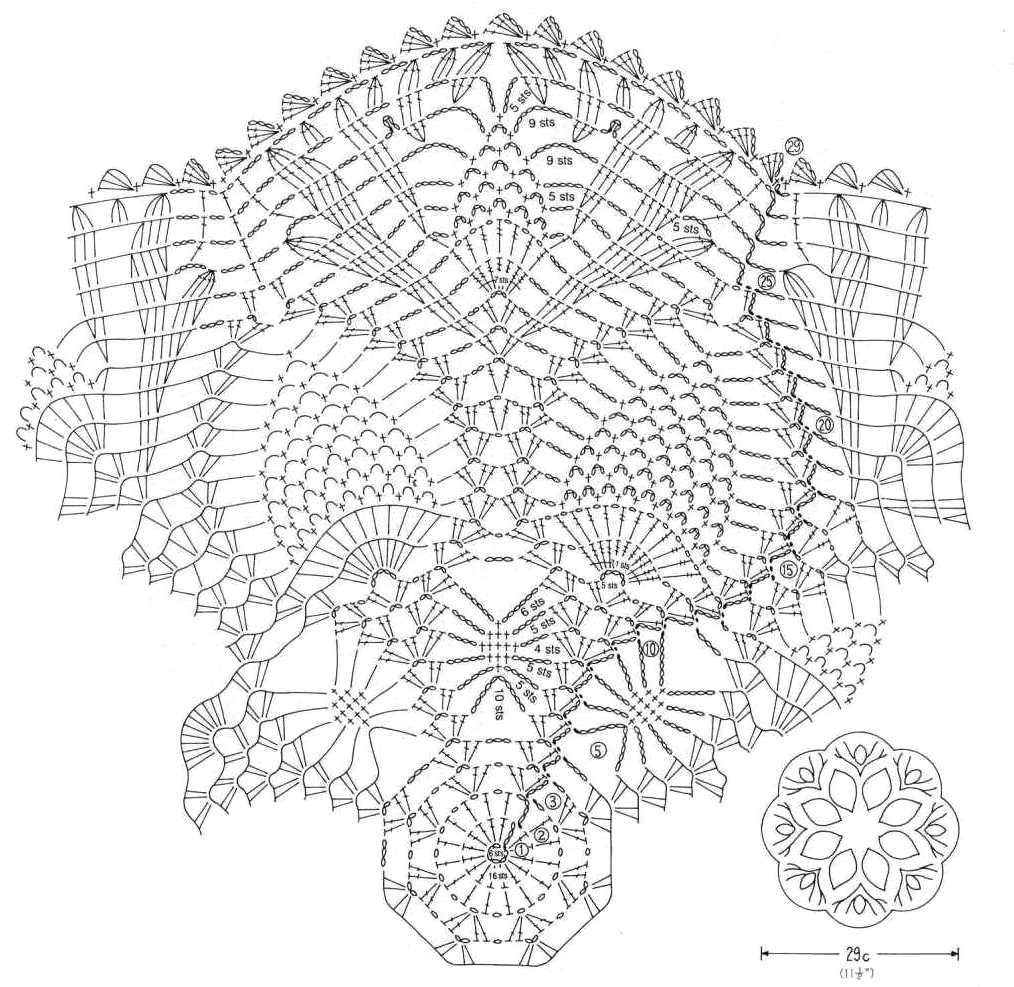
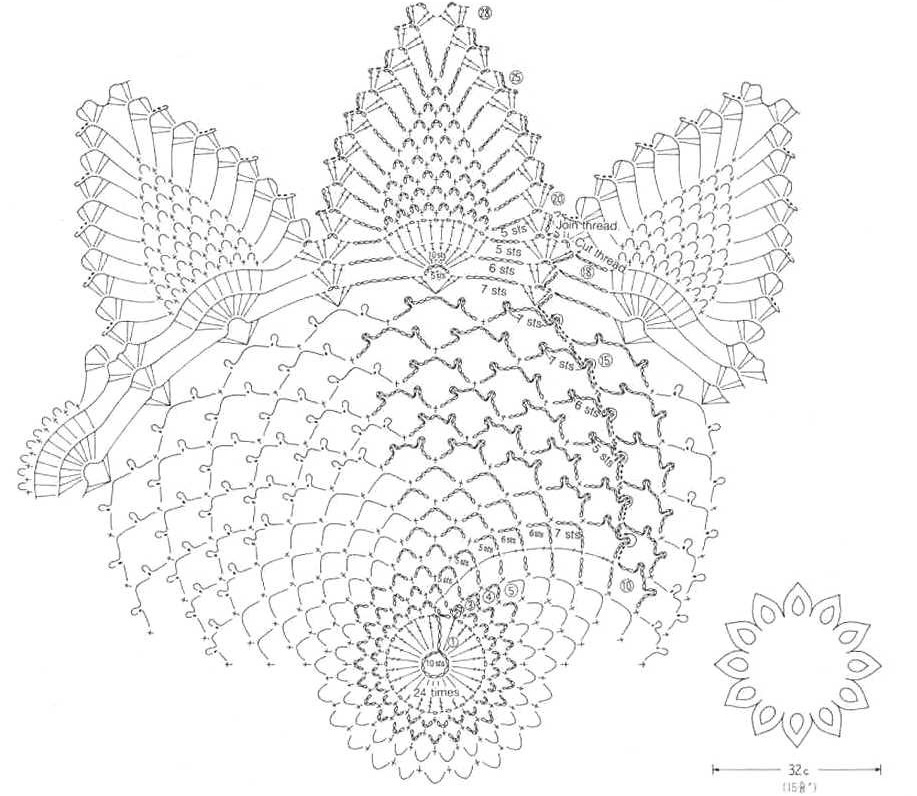
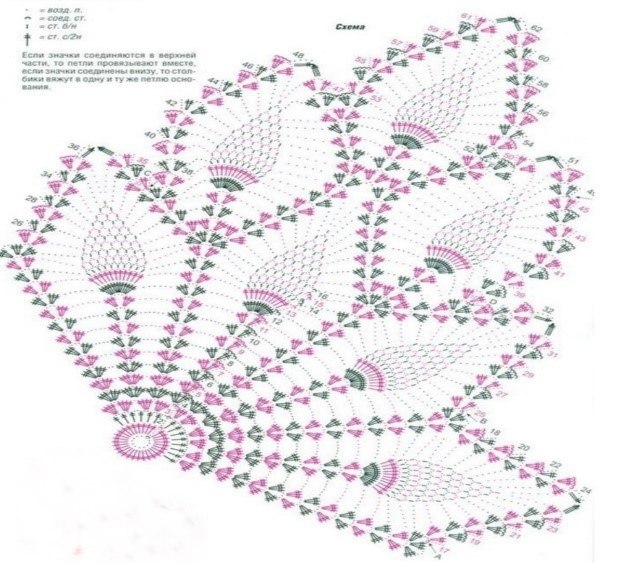
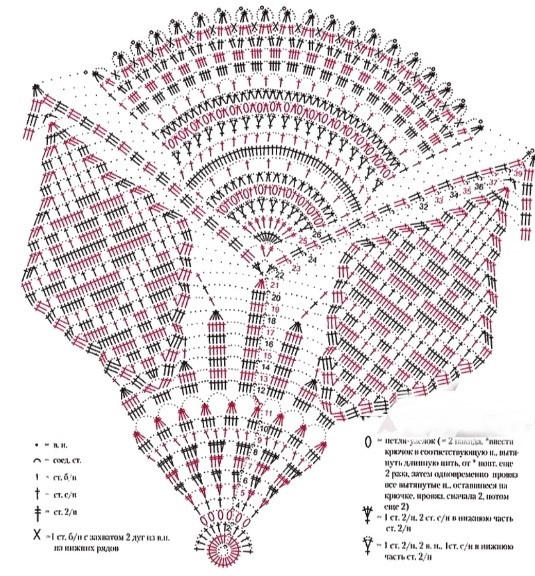
Openwork napkin with pineapple pattern
An openwork napkin with pineapple patterns can be crocheted. The patterns and description of knitting will help beginners and experienced craftswomen.
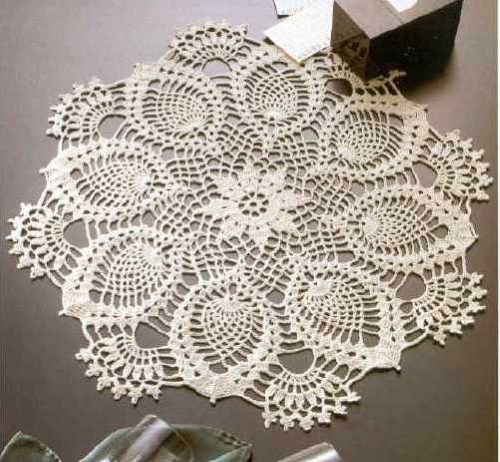
The product will have a diameter of 46 cm.
For knitting you will need:
- 70 grams of thread, preferably cotton, white.
- Thread thickness 325 m per 50 g.
- Hook No. 1-1.25.
The drawing is performed as follows:
- First, you need to knit eight air loops, knit with a connecting table-m in a circle. Air loops are those that are knitted, clinging to one another, regardless of the area of the product. They line up in the form of a knitted line.
- From it 3 air p., and then - 31 columns with a yarn over in a circle, until you reach the beginning. When you reach it, tie with a connecting table-m. Air loops and connecting columns are made everywhere where the beginning and end are connected, in a line through all the rows. A yarn over is a manipulation of placing a thread on a finger, and pulling the next loop through it. Without a yarn over - the thread is simply pulled through the elements of the craft, without manipulating the fingers.
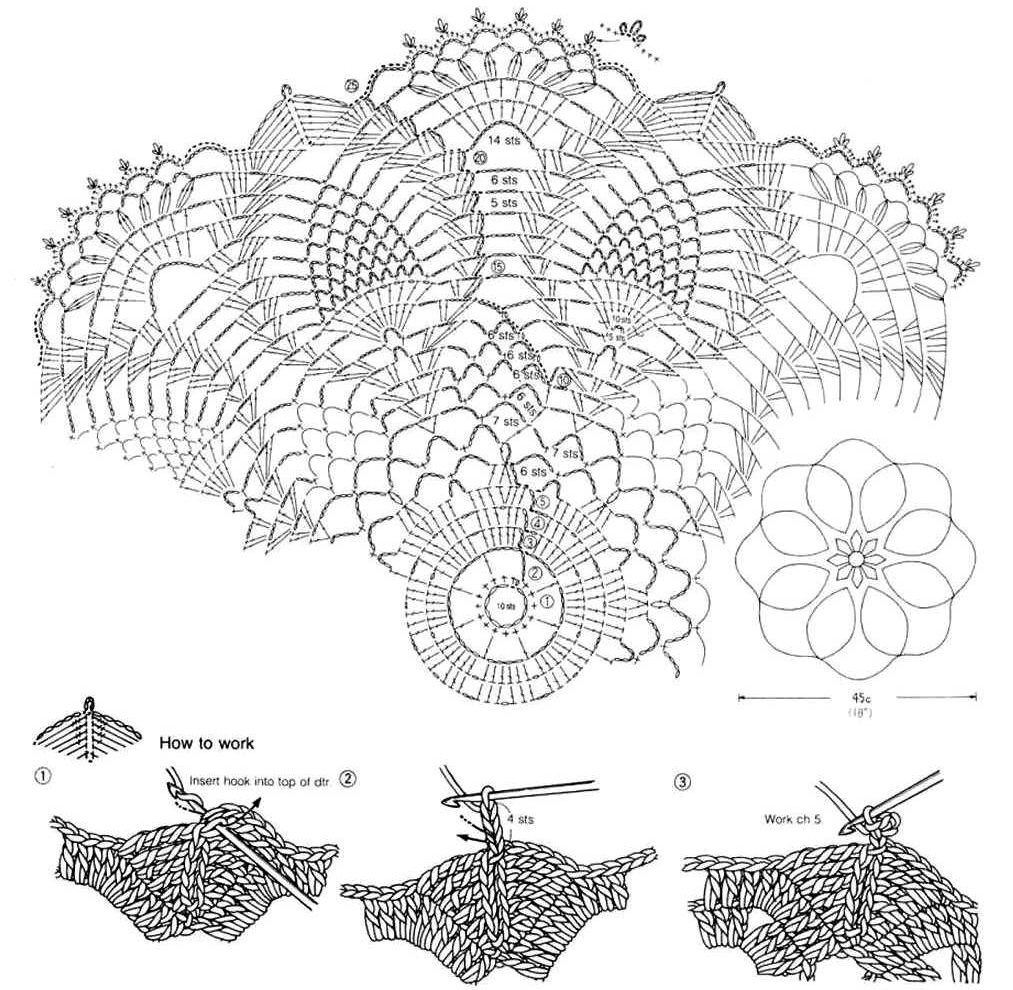
- The next row begins with sl sts with yarn overs that come out of each sl st of the previous row. The sl sts are connected in pairs with two air loops.
- From them come the same columns again. They are also connected in pairs, separating those that stand together on air loops. Pairs are connected with 3 air loops, from the middle one there will come a single crochet. The columns connected in a pair will be finished with the same elements during 8 rows.
- Between pairs, the elements will be connected as follows: where there were 3 loops and a single crochet. thread, from it - 6 air loops, three in one, and three in the other direction, are attached to the column. on the sides. From the second air loop, the middle one between the column in the pair and in the middle, one with a crochet comes out, which are tied together.
- From the top of the connection, knit 8 sts, four on each side. From there, knit a table without a thread thrown over it.
- From it and two adjacent air loops - 3 of the same elements (there should also be four loops in this row to the edges, where the tables are).
- From three columns, there should be the same number of air loops on the sides, 4 each.
- From 3 single crochet stitches, and from the adjacent loops from them, 5 of the same elements, their tops are connected on the sides with air stitches in the amount of 5 in each direction.
- The next row similarly increases to 7 columns and in the sides - 5 loops. Then they begin to decrease: only 5 pieces from seven, from the extreme columns the number of loops to the sides does not change. Then again to three columns we decrease, and to 1. From each row comes out the number of loops in five, from the extreme column (the highest) - 2 chains p-l. Because it is 1 naturally, on the sides - these are 2 chains from one top.
The table without the yarn over is shorter, so the pattern is stretched so that the air loops seem to stretch upwards, rather than going along the sides. - From the columns, which are connected 2 pieces 8 times in a row, then 2 of the same will come out, with a yarn over, outlining the petals. The loops are just attached to them, those that come from 5 columns without a yarn over. thread, those 5 pieces.
- The same situation is repeated, they knit with the table again, in pairs, closing the petal, the pairs are repeated 3 times, on the fourth - they are connected into 1 vertex.
- The outer edges of the petals form new ones - in the form of pineapples. Column. with a yarn over, which come out from 1 top and continue 2 further, are connected along the outer side of the petals with air loops. - 3 pcs.
- From the middle - a table without a thread thrown over it.
- From it - 3 loops to the sides. From the middle loops - again columns (2 between the petals).
Please note that the petals described are those that go in a circle, repeating. - Between two tables there are 5 p-l, on the sides – 3.
- Where there are 5, from the 3 middle ones - one column with yarn over. From those on the sides, from the middle loop - one column without yarn over. thread. From them - to the center - 4 loops, to the edges - 3.
- From the double crochets, knit the same, 2 from each. From the outer loops, which are 3, from the middle one comes out a column without a yarn over. It is connected to the top of the petal on one side, 4 loops, and 5 - to the other. On the other side - the same. And so on around the entire circle. Here the petals end and the outlines of the pineapple begin.
- From the tops of the petals come out st. without nak. From 6 columns in the center come out 2 more of the same. With those 12, from the top of the column, connect 5 p-l (the same thing in the other direction from the center of the pineapple).
- From the table that starts the wall of the pineapple - 2 columns with yarn overs. with threads from the 1st point. From the 12th column in the center - the same columns. They are connected with loops. They are connected to the edges with three loops, between the columns of the wall - 3 air loops.
- Between the columns in the center, where the loops are, the same columns come out, there will be 11 pieces. Then this center is knitted similarly, loops between the columns, from them - again columns, until the number decreases to 1.
- At this time, the wall of the pineapple continues as follows: where there are 3 loops, from the middle one knit 3 sts with the yarn overs, and continue from them with 3 of the same for 4 rows.
- The columns of the wall of the figured pineapple, which come out from 1 point, are connected by the top with air loops to the center, in the amount of 3 pieces. The next row of columns. - 3 pieces. Then 4, again 4, and five.
- The last three columns of the wall are divided, forming the tops of the pineapple, continuing its leaves. This is done like this: the middle column is continued by two of the same, the outer ones - by 1. You will get 4 of them. Two go in 1 direction, finishing this pineapple, 2 - the neighboring one.
- From two tables continue the same 7 rows, which are connected by air loops with the center: starting from what was divided from three, 2 out of four and 7 rows by 2, with the center are connected by five air loops.
- One column of the top continues crosswise with a table-m, which clings not to it, but to the p. on the sides of it.
- Three loops are added to its center from the sides. And two loops from each edge are added to the top of the cross. Cross table - without a yarn over.
- The top of the pineapple is 2 crossed columns, when the first 2 are attached to the place of the next two, and the next two to the place of the first two, you get a cross of two columns. From the cross, 2 st. go in 1 direction, 2 - in the other, forming the outlines of smaller pineapples - (the next elements of the product).
- Between the two middle columns, where four are crossed, - 5 sts. Between the forks of the columns (the corner where the two upper pineapples are connected) - 1 air st. Next row, the outer sides of the upper pineapples (between the pineapples and their tops there are other pineapples): 5 sts are connected. With the middle one - a single crochet.
- From it - to the sides - four sts. From the two middle sts along the table, the same. Between the columns and from them to the sides - 5 loops, a total of 15 in the pineapple row.
- From the central 3 p-l - 5 tables with nak., which are connected to the sides with 5 air loops.
- From these five, two more come out from each, 10 of the same tables, connected to the edges of the pineapple - 5 p-lyami.
- From these 10, one of the same table-u, between which are loops, to the edges of the pineapple from the central pattern, the same number of air loops in each row.

- The outlines of the upper pineapple from two crossed columns continue the rows of two columns with threads thrown over them, in the amount of 8 rows.
- The center of the pineapple is formed as follows: from the air loops that are between the columns with yarns, columns without yarns. threads, 10 pieces. Between them - three p.
- On the middle one, further on, there is again the same column.
- On the next row, there are 3 sts between the posts again, and so on until there is 1.
- The top of this pineapple ends by connecting the two outermost columns with a thread from the shell. Of the 4, only the two outermost ones continue with the same columns that are connected by 1 top.
- Between the crossed columns, where there were 5 loops, is the beginning of the last drawing, pineapple leaves. On the middle p-le - st. without nak.
- From it - 3 loops to the sides.
- On the middle ones - the same column. Between two columns - 5, and on the sides - 4 p-li.
- From the 3 middle rows - three columns with yarn overs, from the outer ones - on the second from the edge (the wall of the pineapple) - a single crochet.
- 3 column with a yarn over is the center, leaves. From the center to the st. without yarn over – 3 loops, from them – to the wall – 5.
- On the middle one there is the same column again.
- In the center, the second row is knitted from the columns. Between them - 1 st, from them to the column - 3, from it - to the edge - 5.
- Where there are 5, the story repeats itself again. The pattern, where 1 column without yarn over. thread in the center, stands on 5 loops in the middle, which to the center. 3 loops, and to the wall - five, continues to the end of the product, on both sides of the center, surrounding the center-leaves.
- From the column in the center the same elements continue, only 2 from the 1st, forming 6, between pairs by loop. Between two columns, which have one root, there is no p-ly.
- Further, these pairs continue with 2 such elements, but between them there is no longer one, but 3 loops.
- From the middle pair comes 6 sts, from the two outer ones – 2 each. Also, with yarns. The number of loops between them is the same as in the previous row.
- These six sts are continued by their brothers, with 2 loops between each.
- Two on the edges - duplicated to the end of the product. To them from the central ones - the same number of sts.
- Further from the st. in the center there are the same elements, but between them there are already 3 air loops. To the outer columns from the center there are also 3 loops.
- From the three loops, those between the columns, come out st. with two threads thrown over, reuniting into 1 vertex. From the outer columns of the center these vertices are connected by 5 p-lyami.
- Further from the st. cent. there will be three sts that will reach the st. without a yarn over that was between the center and the edge of the part of the drawing. There the edge has already ended, and 2 columns of adjacent drawings are connected with five sts, above the top of the pineapple.
- Between the points of joining the columns with two yarns. threads of 2 loops, on which a picot. These are elements that are knitted by twisting 3 air loops into a knot, tying the 2 outermost columns without a yarn.
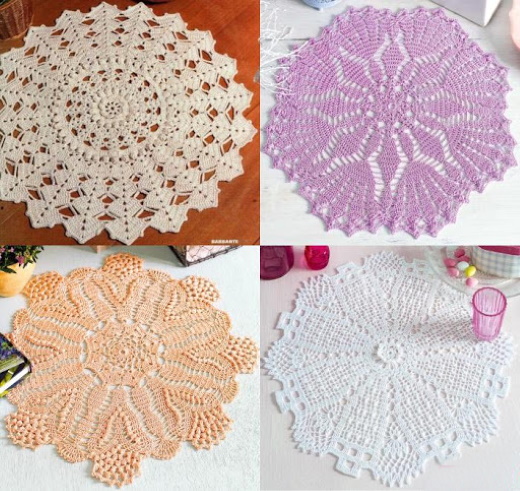
Other patterns for lacy napkins with pineapple pattern
Beautiful small openwork napkin, diameter 29 cm.
Scheme:
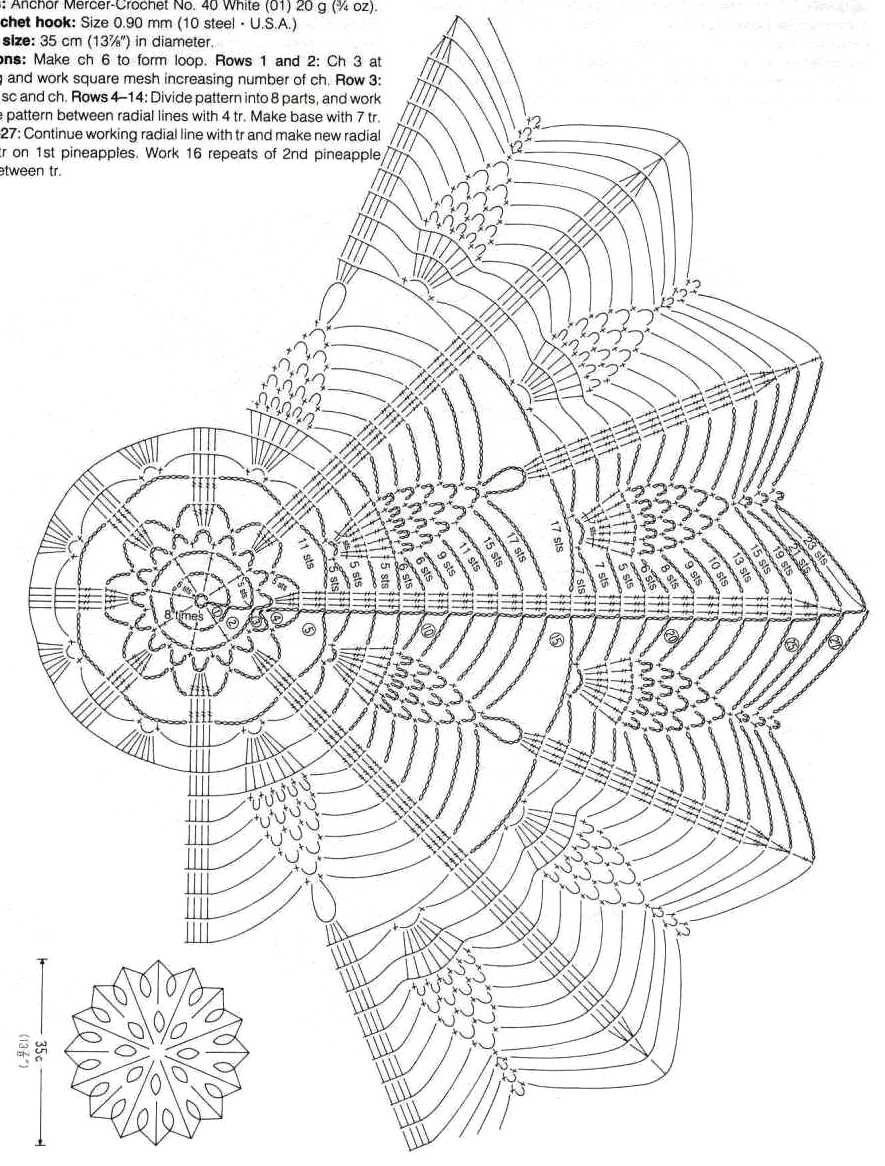
Another interesting openwork napkin with a diameter of 35 cm.
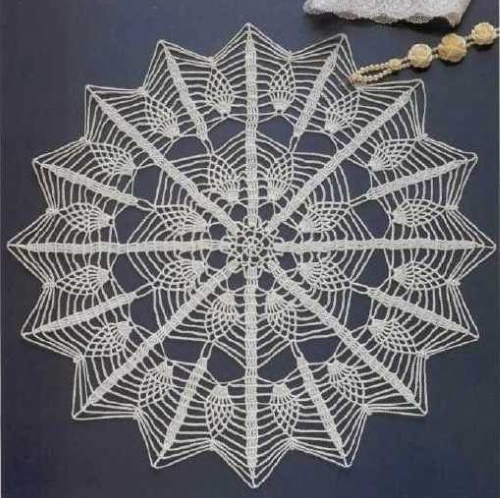
Scheme:
Another interesting crochet napkin with filigree edges, diameter 31-32 cm.
Scheme:
Crochet napkin made of thin yarn
An openwork napkin made of thin yarn can be not only part of the interior decoration, but also be used as an element of designer clothing.
Scheme
When choosing a napkin knitting pattern, you should follow a simple pattern.
To knit a napkin you will need 50 g of cotton threads of any color, hook number 1. This is a tutorial with a description of the initial level, suitable for beginners.
Step by step knitting instructions
Knitting begins with the zero row according to the instructions. On the diagram, the loops are indicated without a number. 5 air sts are collected and closed into a ring.
- The first and all subsequent rows begin with lifting loops, the number of which depends on the height of the row.
- After the loops in the ring are closed, 4 pp are knitted. Having finished the last lifting loop, 1 dc is knitted.
- Knit 4 air sts and conclude with a sc.
- The entire subsequent tier is knitted with 4 ch and 1 sc. You should get 6 rings.
- When the first tier is finished, you should move on to the second. In the second row, knit 2 pp. Then knit 4 dc, 3 ch.
- Next, 5 dc, and then 3 ch. You should get 6 identical segments.
- The third tier of the napkin begins with 2 pp, then 6 dc and 4 ch are knitted.
- The next step is to knit 7 dc and 4 ch. Continue knitting according to the pattern, and conclude the tier with a half-column.
- The fourth row begins with 2 pp, then knitting continues with 8 dc and 5 ch.
- The next steps are knitting 9 sts and 5 ch, ending the tier with a half-column.
- The final fifth tier consists of 2 ch, 10 dc and 6 air ch.
- Then knitting continues with 11 dc and 6 ch, finishing the row with a half-column.
The lace napkin is ready. It should be starched and, pulling the edges, ironed well.
Peculiarities
The final result of knitting depends on the tool used.
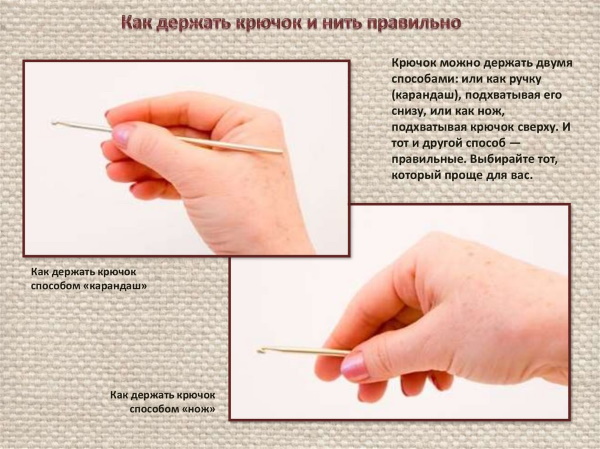
When choosing a hook, it is important to know some features:
- the head of the hook should not be too sharp;
- a good tool has a rounded shape;
- It is recommended to choose a hook made of one material, without handles;
- The thinner the yarn, the smaller the hook.
The knitting tool should fit comfortably in the palm of your hand so that it feels comfortable.
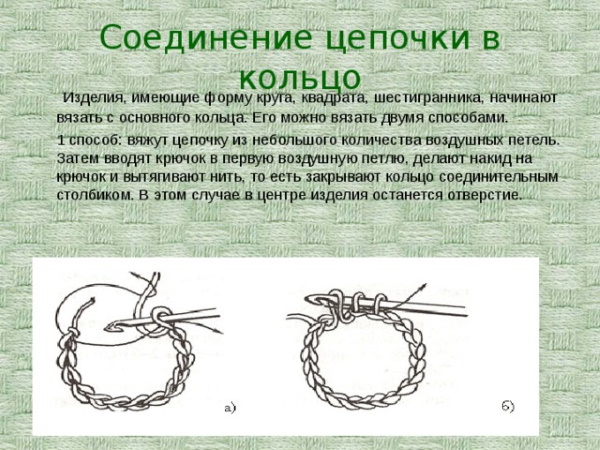
Openwork square crochet napkin
Napkins can be made in different shapes, not only from yarn, but also from fabric. Square napkins are tied on all sides. The fabric on them can be plain or patterned. If the napkin is made entirely of threads and is openwork, it is knitted in a circle. All the circles in the napkin are connected with a half-column.
Scheme
The scheme is simple and at the same time interesting. Also for a square napkin you will need a regular pencil.
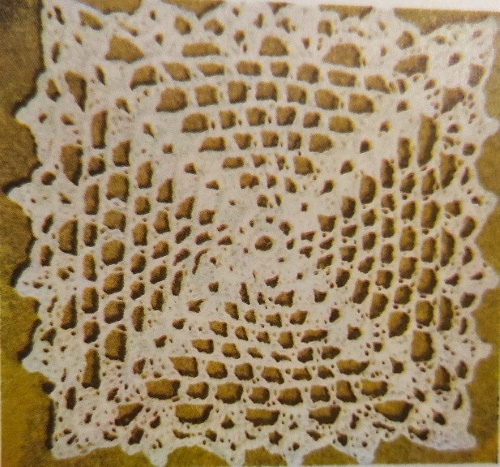
For a square napkin you will need 35 g of cotton thread and a hook number 1.5.
Knitting instructions
The technique of knitting a square napkin is slightly different from the usual one. Starting to knit in a circle, you need to make a square in the end.
If you follow the instructions, you can knit a square napkin quickly and easily:
- The pencil is wrapped 5 times with thread, this ring is removed and knitting continues with the same thread.
- 1 round: 16 sc are knitted under the ring.
- 2nd round: 3 pp, then skip the loop of the lower round, in the next one knit 1 dc, 1 ch.
- 3rd round: 2 ch, 2 air ch, 3 dc are knitted under the air loop of the lower circle, 2 air ch, 3 dc (corner of the square), 2 air ch. In the next loop, 1 dc is knitted, this is repeated 3 times.
- 4th round: 2 ch, 2 air loops, 3 dc are knitted under the middle of the corner of the lower circle, 2 air loops, 3 dc, 2 air loops. You get a corner. Knitting continues under the next loop of two air loops, 1 dc is knitted, 2 air loops, 1 dc is knitted under the loop. Repeat 3 rows.
- In each subsequent circle, 1 dc and 2 ch are added between the corners of the square. The number of circles depends on the desired size of the napkin.
- The napkin ends with teeth. 1 circle of teeth begins with 2 ch, 4 ch. under the middle of the corner of the lower circle are knitted 3 dc, 2 ch, 3 dc, 4 ch. Under the next loop of 2 loops are knitted 2 dc, 2 ch, 2 dc. Repeat through the loop to the next corner of the square.
- The 2nd circle of teeth consists of 2 p. p., 2 ch. p., under the loop of 4 loops 1 sc is knitted, 2 ch. In the middle of the corner, as well as under the middle of four double crochets of the lower circle 2 dc are knitted. A picot of 3 ch. loops is secured in the loop of the last double crochet, 2 dc.
The square napkin is ready. It needs to be starched and ironed, pulling the edges.
Using the diagram and description, you can knit an amazing product simply, quickly and with pleasure.
Oval napkin
An oval-shaped lace napkin is beautiful and original. It can have a variety of patterns. The oval shape is considered more complex, since all the elements need to be knitted harmoniously. It is better to choose thin and natural yarn for such products. In this case, the napkin looks airy and weightless.
Oval napkins sometimes have a square, rectangular or irregular shape. It all depends on what the master wants to do. There are many patterns to knit such a product. We will take the simplest one as a basis.
Scheme
For knitting you will need thin cotton yarn and a 1.5 mm hook.
By choosing an oval napkin, you can make a beautiful and interesting product.
Knitting instructions
Knitting an oval napkin begins in the same way as an openwork one. First comes the goal row. All rows on the diagram are marked with numbers.
- 11 air sts are cast on, they are joined into a ring, and 1 sl st is knitted. Then 4 sl sts are knitted. After the lifting loops, 28 dc are knitted. The first tier ends with a slip stitch or half-sl st.
- The 2nd tier begins with 4 ch, then double crochets and air loops are knitted in a circle. According to the scheme, 1 ch and 2 ch. The row ends with a slip stitch.
- The 3rd tier begins with 4 pp. In this row there will be 4 dc connected to each other. Such columns need to be knitted in the same loop, which is at the base.
- Knit 4 sts with dc joined at the base and 1 ch. Knitting continues in a circle. The row ends with 2 sl sts.
- The 4th tier begins with 4 sl sts and is knitted with 6 dc joined at the base. When 3 dc are knitted, 1 ch st is made and again 3 of the same dcs. The tier ends with 3 sl sts.
- The 5th tier is knitted in the same way as the 4th. Only between the double crochets 1 air p. is added. And in each subsequent row air loops and connecting posts are added.
- Knitting continues according to the pattern up to the 12th row with a decrease in double crochet stitches according to the pattern.
- Row 12 begins with 4 ch and 10 dc and one base. Next, 6 ch are knitted. After 3 dc, 3 ch and three dc again. The pattern continues in a circle according to the diagram. The tier ends with 2 sl st.
- Row 13 begins with 4 ch, 10 dc, a chain stitch is knitted between each column. Then follow 6 ch and 3 dc, connected at the base. Knitting continues with 3 ch and 3 dc. The pattern continues according to the diagram.
- Row 14 begins with 3 ch and a single crochet. Knit 3 ch and 1 sc. In total, at this stage there should be 9 sc and 3 ch between them. Then everything according to the pattern.
- When the 15th and 16th rows are finished, separate corners of the napkin are knitted. Knitting should be according to the pattern. The corners should start with the letters of the Latin alphabet, which are indicated on the pattern, and adhere to the numbering of the rows.
Peculiarities
If you follow the technology and knitting pattern, the napkin will turn out very attractive.
There are several nuances in this knitting pattern that are important to know:
- An oval napkin can be knitted from a round one, gradually adding synchronous elements to it on the sides.
- The markings on which the loops are connected are of two types.
- If there is a top join, the stitches are knitted together.
- Bottom connection, the posts are knitted into one base loop.
When the napkin is ready, it is recommended to starch it and iron it well.
Small lace napkin
Small napkins are often used as a decorative element in the kitchen. They also look interesting when used as a cup holder. Such openwork napkins are perfect for those who are just starting to master yarn and crochet. They are very convenient and quick to knit, especially when using a pattern.
Scheme with description
A simple pattern for a small openwork napkin.
You will need Narcissus yarn 100 g, hook 2.
Knitting instructions
Today you can choose different patterns and schemes for knitting openwork napkins crochet. Small products are best made of lace.
Following the pattern, you can make a beautiful napkin in this way:
- First, 8 ch. sts are collected, a ring is made, secured with a half-column. 4 ch. sts and 21 dc are knitted. 1 row ends with a slip stitch.
- Row 2 starts with 4 s.p., then 1 dc is knitted. All other columns are knitted with a double yarn over, but in one base. In total, there are 42 columns, the row ends with a sl st.
- Row 3 – 3 ch, 3 air ch, 1 dc. Then knit in a circle.
- Row 4 – 3 sl st, 2 dc, 3 ch, 3 dc, 1 ch. Then continue according to the pattern.
- Row 5 begins with 4 ch, 1 half double crochet, 1 dc, 1 half double crochet. Next 3 ch, 3 dc. Everything is knitted in a circle.
- Row 6 – 3 ch, 1 sl st, 1 dc, 1 sl st. Then knit 3 ch, 3 dc, 5 ch. Continue knitting in a circle.
- Row 7 should start with 4 ch, 1 dc, 1 sl st, 1 dc, 1 sl st, 1 dc, 1 sl st. Next step 3 ch, 4 dc, 5 ch. Everything is knitted in a circle according to the pattern.
- Row 8 – 4 sl st, 1 sl st, 3 dc, 3 ch, 4 dc, 4 ch. Then knit the same algorithm in a circle.
- The final 9th row begins with 3 sl st, 1 sl st and 3 ch, which are knitted from the base of the slip stitch. Next, 1 sl st, 1 sl st, 3 ch with one base.
The napkin ends up lacy. You can decorate it with beads.
Large openwork napkin
Large napkins made of thin yarn add coziness and an unusual atmosphere to the house. Such products can be used as decorations for a table or chest of drawers. Large napkins can also have a variety of patterns and designs. Themes, both floral and abstract, are very clearly visible on them.
Openwork crochet napkins, the patterns of which vary from simple to complex, can be crocheted with several threads at a time. The finished products attract attention and look beautiful.
Scheme with description
Knitting pattern for a large napkin with two colored threads.
You will need thin cotton yarn 25 g white and 25 g yellow. Hook number 1.
Knitting instructions
The product is knitted with two threads in turn. The middle is yellow, the edge is white. Knitting begins with the yellow thread.
- A chain of 12 air sts is collected. The chain is connected into a circle using a slip stitch.
- 1 row begins with 4 ch, then 35 dc are knitted.
- 2nd row – 7 ch, 1 dc, 3 ch. The row is knitted in a circle and ends with a slip stitch.
- Row 3 begins with 1 ch, 5 dc into the second 3 ch of the previous row. Next 5 ch, 5 dc into the same 3 ch. Then 1 dc into the second dc of the previous tier. Knit everything according to the pattern up to row 15.
- There are picots on the edges of the napkin. They are knitted very simply, 3 ch. p. end with a slip stitch in the first air loop.
- From row 16, the thread changes to white, and knitting continues according to the pattern.
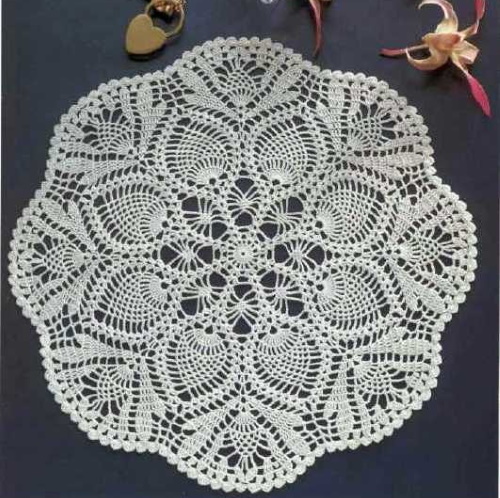
The napkin comes with a flower in the middle, which is beautifully tied with lace.
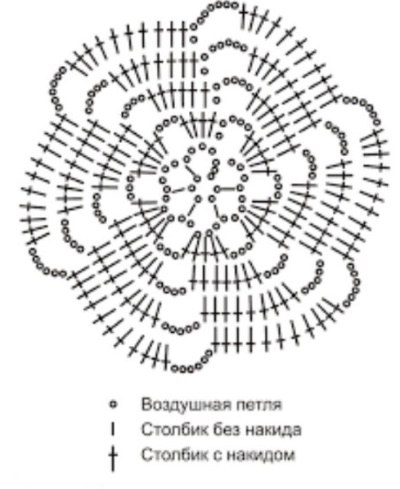
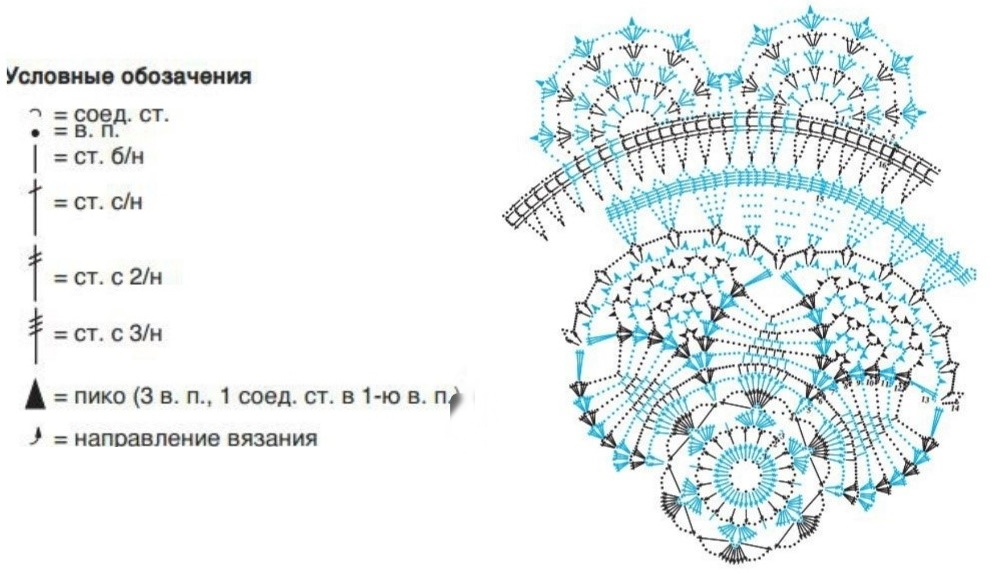
Beautiful openwork napkin with flowers
The lacy napkin with roses captivates with its unique appearance. It will decorate any interior where there are textile motifs.
Scheme with description
Pattern of an openwork napkin with roses.
You will need 90g Eikhor yarn and a number 1.25 hook. The color of the threads is optional.
Knitting instructions
A napkin with roses adds originality to the room. In turn, the craftswoman can show her talent and decorate her home with the product.
- A chain of 8 ch is collected and closed into a circle with a sl st. Then follow 3 ch and 23 dc. The circle ends with a sl st.
- 2nd round: 3 ch, 1 air ch, 1 dc, 1 air ch. Knitting continues in a circle.
- 3rd round: 3 ch, 2 air ch, 1 loop-knot. Knitting continues in a circle and ends with a slip stitch.
- 4th round: 3 ch, 2 air ch, 1 dc. Continue according to the pattern.
- 5th round: 4 ch, 1 dc, 2 ch, 2 dc in one base. Knitting continues according to the pattern. Each subsequent round begins with air loops and ends with a half-column.
The finished product must be starched, pressed and ironed.
Useful tips and ideas for crocheting napkins
- Napkins for a certain place on the table should be white, but you can take other colors. For example, to match the interior. Or create several beautiful multi-colored items for a colorful table decoration.
- You can come up with your own ideas, or you can knit according to the patterns. Different patterns have their own explanations. As a rule, in order not to make a mistake, the explanations that are known to the needlewoman are rewritten. For convenient knitting according to the article, it is recommended to draw a pattern, since you need to knit one by one, but it is written in a different sequence, for easy perception.
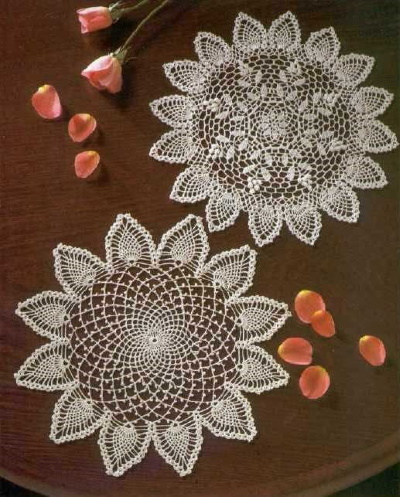
- There can be different napkins used not only on the table. Two products are knitted and placed one on top of the other. And at the same time they can be used separately.
- Napkins in the form of paths - oblong. The red craft on white fabric looks very harmonious, especially if it fits into the interior. On old Soviet cabinets and in sideboards, such products give their atmosphere and breathe traditions.
- Most napkins are knitted in a circle, counting the rows from the center of the product. Even square products are knitted from the center, in a circle. Over time, practicing on examples, you can come up with your own patterns for various products.
- There are such types as those connected with relief with different colors. For example, the product "Matilda" is presented in two shades of green, lighter inside, darker outside, on the edge of the colors there are knitted reliefs. As an option - a spiral product, where the petals are solidly knitted in the form of spirals, against the background of perforated openwork knitting.
- An interesting idea is to combine several circles into one flower-shaped product. The circles are inside a mesh base that is knitted between them. By combining the elements of the napkin into one, you can make a multifunctional single napkin, with elements in the form of coasters for various objects.
Examples of openwork crochet napkins. - Napkins can be complemented with relief figures, for example, knitted models of animals. Swans on a napkin, frogs. Made in such a way as if they were sitting on it.
Asymmetrical napkins, in the form of hearts, which are not knitted using identical elements, in the form of petals. This should be more difficult. Or, for example, a craft in the form of a Christmas tree. - You can attach a ligature to the napkin, by which you can hang it, and it is already on the wall, used as needed.
- Craftswomen give such ideas as how to knit a figure in the form of a plant (flower, stem, leaves) and connect the flowers together by the corners. Also make it in the form of candy, and fasten the same multi-colored crafts.
- If the shape is very simple and you can vary the size without losing the similarity of the crafts, you can make napkins of different sizes and a flower, laying them out on the surface.
- It looks very nice when ordinary fabric is complemented with knitting, mainly on the edges, but it can also be in the middle of the piece of fabric. It looks more modern than old-fashioned lace in sideboards, if someone likes it. Knitted elements can be decorated with small crocheted details. These details can be made and scattered near the napkin. It looks very interesting, original and more modern.
The variety of options, ideas and patterns of napkins that can be crocheted is very large today. Openwork napkins in different shapes and with patterns demonstrate the craftswoman's skill and talent to others. The needlewoman can choose ready-made patterns and yarn colors or combine them herself.
Video about openwork crochet napkins
Crochet napkin for beginners: