Regardless of the chosen drawing method, drawing a knight in armor requires drawing skills due to the large number of small details and asymmetrical lines. You can draw a warrior realistically or like a cartoon character, in black and white or color.
Simple step by step pencil drawing
Most knights had their own coat of arms or wore a coat of arms as a symbol of the noble person they serve. You can tell children in more detail about the meanings of the coat of arms or the lifestyle of knights and ask them to draw one of them to reinforce this new knowledge. Children can draw a fictional character with a made-up coat of arms.
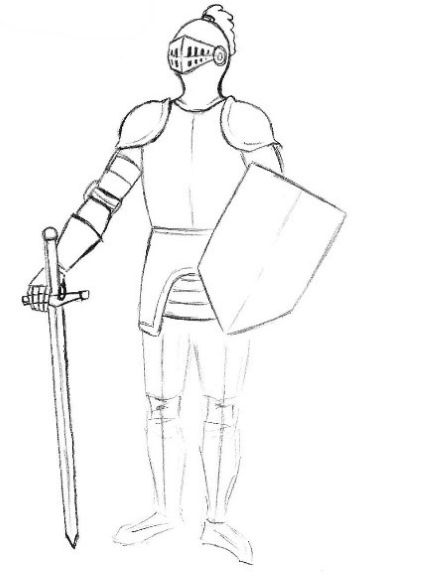
A drawing of a knight in armor can be depicted schematically, without drawing the face. For this purpose, a closed visor is depicted.
The following tools will be required for this process:
| Tool | For what |
| Paper | The density of the sheet is chosen depending on what the finished drawing is painted with. For painting with paints, thick paper is required. |
| Pencil | A hard or hard-soft pencil is recommended so that the sketch is light and invisible under the main outline. |
| Eraser | Remove unnecessary lines, correct the drawing. |
| Liner, pen or marker | Outline the finished contour, create a shadow. |
| Colored pencils or paints | Color the finished drawing |
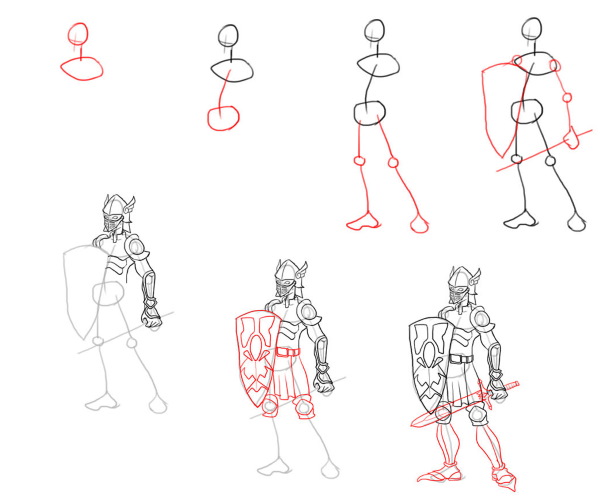
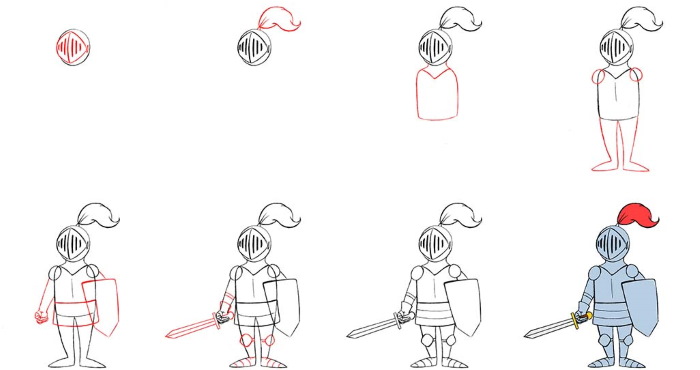
Draw a knight in armor using the following steps:
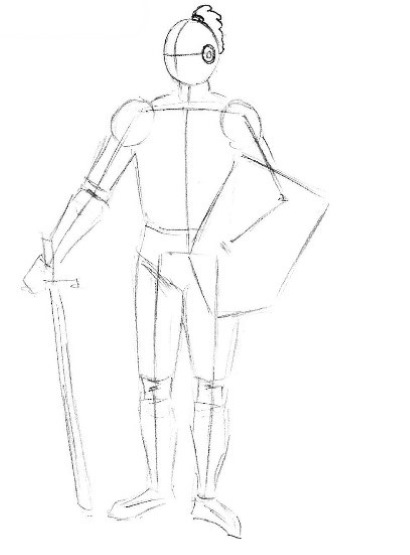
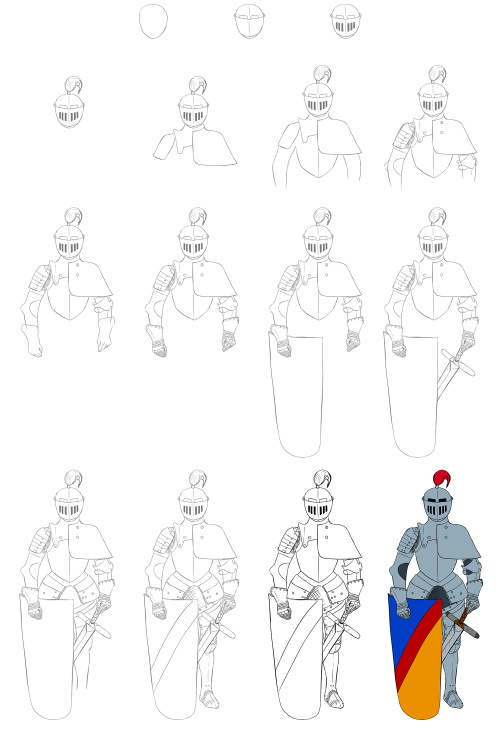
- They start with a schematic drawing of the knight's pose. Straight lines depict the arms, legs, torso and pelvic level. The head is depicted as a circle and a short line is drawn down - the neck. The left arm is slightly bent, it will hold the shield.
Maintain the correct proportions: the body is equal to the length of 2 heads, outstretched arms reach the middle of the thigh, the length of the legs is equal to the length of 3 heads.
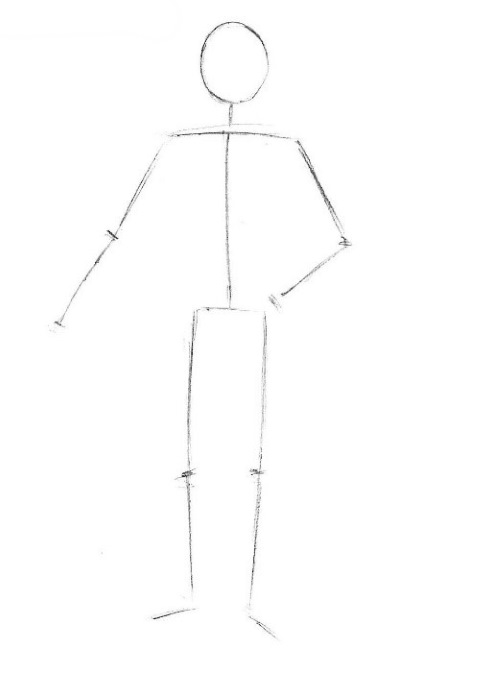
- The diagram depicts a shield in the left hand and a sword in the right.
- The head is drawn in detail. A vertical and horizontal line is drawn on the face for symmetry. The lines are slightly curved and crossed in the center on the left side to create the effect of a turned head.
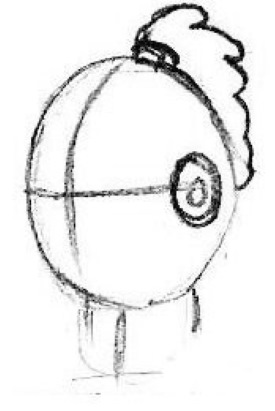
The right part of the visor is marked with a circle. A mane is depicted on the top of the head, and the neck is given thickness.
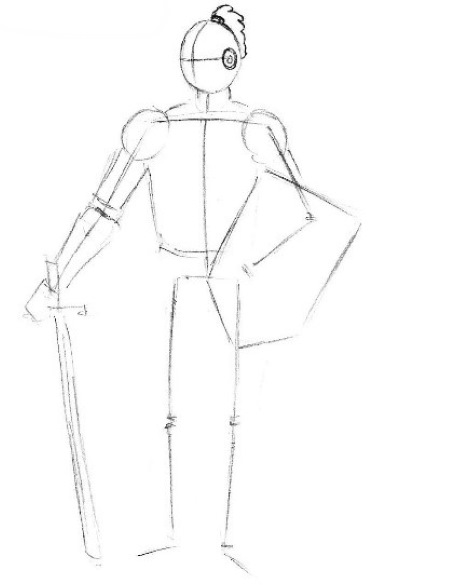
- The body is made voluminous: the armor on the shoulders is depicted as round, rectangular, and the body and arms are depicted with lines. Closer to the wrist, the lines are narrowed.
- Add volume to the lower body. The waist and groin are outlined with triangular shapes. The legs are outlined with rectangles. The legs are tapered closer to the knee and closer to the ankle.
- Add details to the drawing. Start with the head. Use a sketch for symmetry on the head and draw a visor with vertical slits on it. The visor is usually pointed towards the center, so it is depicted as wider at the nose.
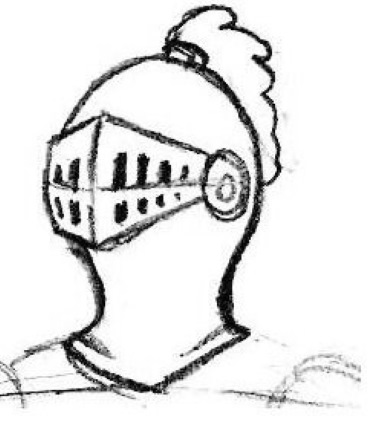
Erase the auxiliary lines and give a smooth overall outline to the helmet.
- The detail covering the shoulders is drawn with semicircular lines. The knight is in a half-turn, so the left shoulder wraps around the arm.
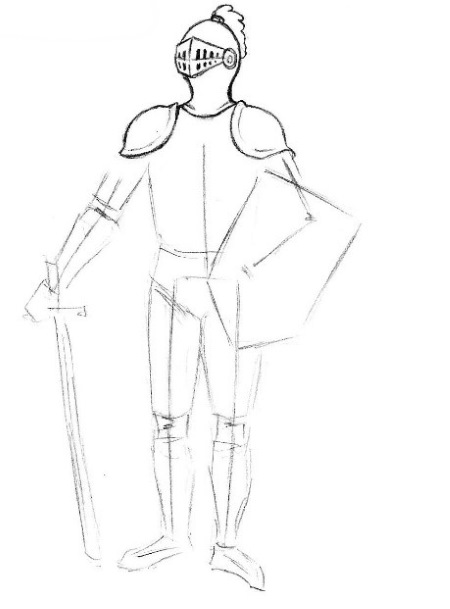
- Erase the auxiliary lines from the bib and draw a clear general outline. A curved vertical line runs through the center. Draw a protective skirt below the waist. It has a bend in the center and resembles an arc. Draw horizontal metal layers under this notch.
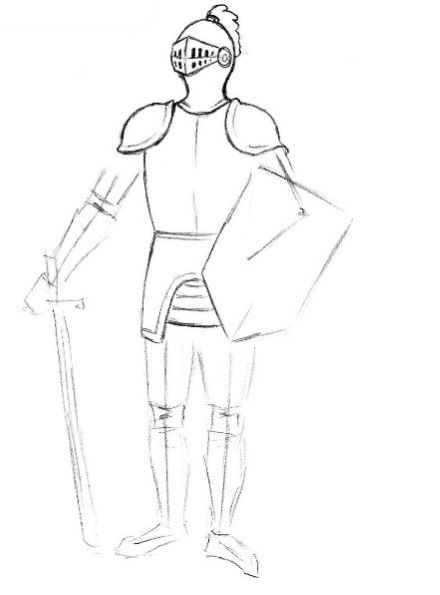
- A clear outline of the shield is drawn and auxiliary lines are removed. A vertical line is drawn in the middle of the shield to create the effect of a convex surface.
- The knight's right hand with a sword is drawn in detail. In the part of the elbow bend and slightly above the elbow, additional protection is drawn in the form of rectangular hoops.
The knight's hand is dressed in a glove that widens closer to the elbow. Each finger is drawn around the sword, placing them next to each other. The thumb should grasp the sword handle. The sword is outlined with straight and parallel lines: a long blade, a handle and its tip. A vertical line is drawn in the center of the blade to create a volume effect.
- The knee pads are depicted as a diamond-shaped fragment. A clearer outline of the leg is created above and below the knee. Horizontal stripes are added to the feet. Pointed spurs are drawn at the heels.
- Outline the entire contour with a liner. Erase the pencil outline. Add shading where the shadow falls.
- Colour the drawing with pencils or paints. If desired, it can be left black and white.
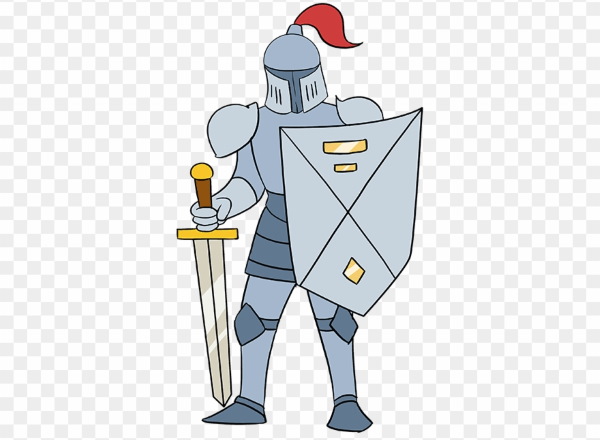
Knight with armor
A knight in armor (a drawing of this character in a simple version can be depicted using schematic figures and lines, which are then outlined in a clear outline and details are added) is suitable for children aged 10-12 who have drawing skills. In the process, you can repeat the specified elements or replace them with any others.
Step by step:
- Circles mark the head, shoulders and pelvis. A vertical line connects the figures together, depicting the line of the vertebra and neck. A cross-shaped mark marks the center of the face, from which the symmetrical features of the face and helmet will be drawn.
- The legs are depicted with schematic lines. The bends of the knees are marked with circles. The boundaries of the feet are drawn.
- Add a schematic image of the hands with a shield and sword. The bending points (shoulders, elbows and wrists) are depicted as circles.
- Add details to the drawing, starting from the top. Focusing on the center of the face, draw a pointed visor with slits for breathing. The helmet can completely cover the face or leave room for the eyes, as in the picture. Add an outline to the helmet and, if desired, add details in the ear area - circles, wings, wavy details.
- Round shoulder pads are framed with additional plates. The right shoulder is located further from the viewer and behind the shield, so it is almost invisible. The glove with a protective plate on the knight's left hand reaches the elbow. In the places of bending, additional details are drawn in the form of rounded plates.
- The details of the torso are depicted in the form of curved vertical lines that follow the lines of the muscles.
- They outline the clear outline of the shield and add the lines of the coat of arms.
- Draw a belt of rounded rectangles at the waist. Draw a protective skirt below the belt. If the skirt is not made of metal plates, its lines are softer.
- The knee pads are depicted as diamonds and protective rectangular plates are added at the top and bottom. A clear outline is added to the calves of the legs and shoes.
- The shading depicts the places where the shadow falls on the knight's figure.
- Outline the main outline with a liner or pen and erase the pencil sketch.
- Color the drawing with paints or colored pencils.
Rider on horseback
A knight in armor (a drawing of this historical character can be depicted on a horse) holds a coat of arms in his hands, the symbol of which children can come up with themselves or replace it with a sword. This version of the drawing is suitable for children of middle and high school or those who have drawing skills, since it is necessary to observe the proportions of the body of the knight and horse, as well as draw small details.
Step by step:
- Start with a schematic representation of the figure. Use a hard pencil for a light sketch. The horse's body under the blanket is depicted as a square with a rounded top. Above and to the right, the horse's head and neck are marked with a curved line. Above the horse's back, the body, head and shield of the rider are outlined with rounded figures.
- The rounded parts indicate the rider's right leg with the foot and knee. The location of the banner is shown schematically. The coat of arms or the design on the flag is depicted schematically.
- The ovals show the rider's right hand, which holds the banner. On the head, horizontal lines define the level of the helmet.
- The outline of the horse's head is completed, the eye and ears on the top of the head are marked. The bit and bridle are marked. Four legs are shown under the blanket, the hind legs are drawn at a higher level to show the distance of the figure.
- Using the finished scheme, draw a clear outline of the rider's torso, connecting the neck, arms and body. Additional metal parts are drawn at the folds. A turned face and a helmet with chain mail are drawn.
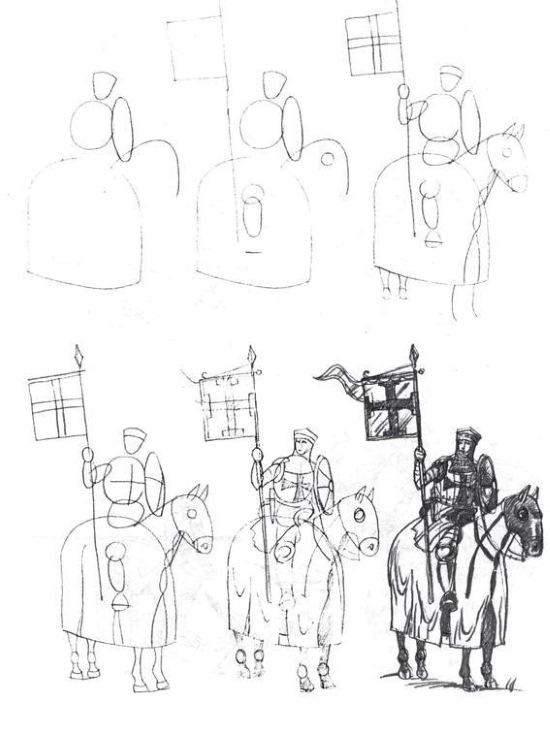
- The base of the banner is thickened and finished with a point from which a ribbon unfolds. The coat of arms is drawn in detail.
- The knight's right leg and arm are dressed in armor and are depicted with frequent horizontal lines, the direction of which depends on the position of the body part.
- The horse's blanket covers the head and the entire body, so the folds are drawn in, adding shading where the shadows fall.
- Add volume to the horse's legs and add shading as they are under the shadow of the blanket.
- Depict the ground level. Erase extra lines, outline the general contour and mark the shadow areas.
Realistic step-by-step drawing
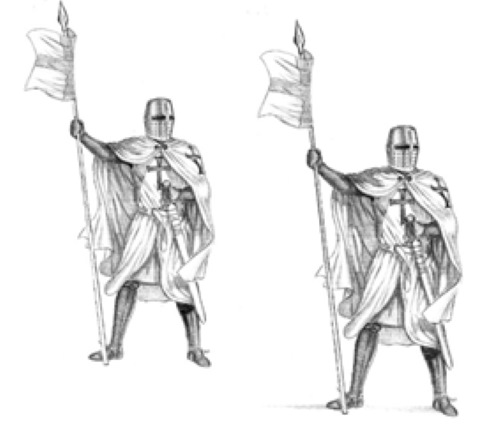
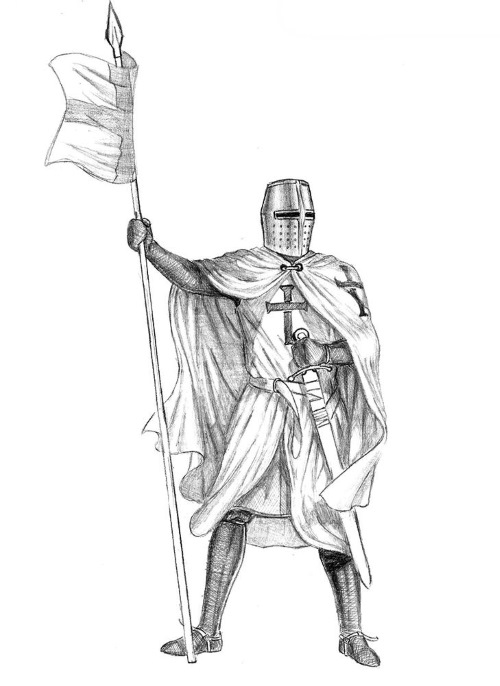
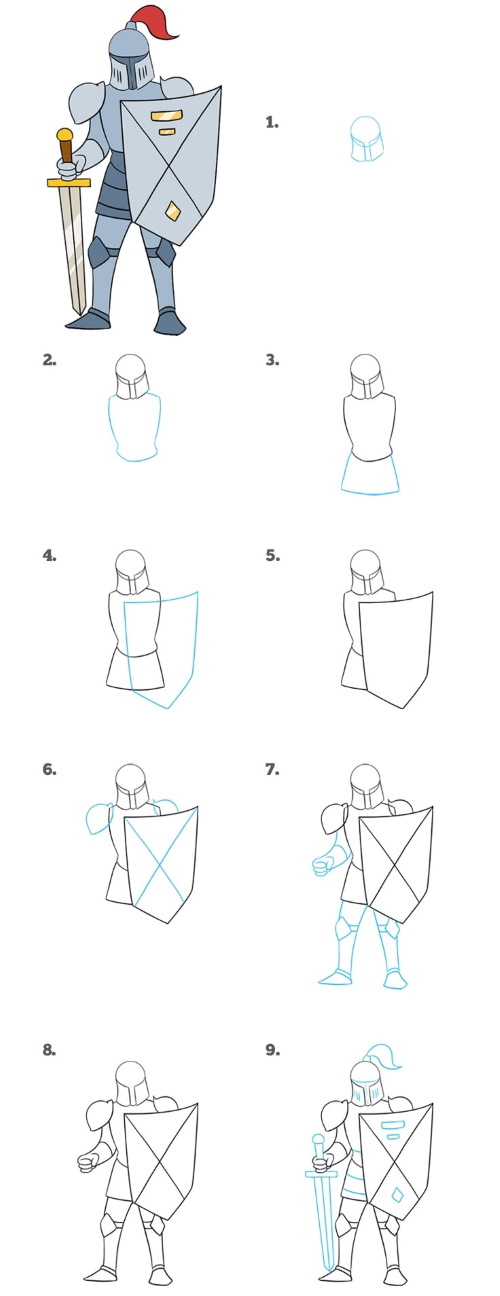
A knight in armor (a drawing of this character can be depicted standing with a banner and wearing a helmet) looks more realistic if you add a cloak that flutters in the wind.
The process will require:
- paper;
- medium hard pencil;
- eraser;
- ruler;
- liner or pen.
The drawing begins with the creation of a schematic image of a person from circles and lines that represent his figure.
Step by step:
- The lines show the axis of the body, neck, legs and arms. Instead of a head, a helmet is schematically depicted, turned to the side. A vertical line is drawn in the center, creating the effect of the helmet's volume. The warrior's legs are straight, his arms are bent so that it is convenient to hold the shield and banner.
- The knight's body and arms are outlined using schematic lines, giving them volume. All parts of the body are similar to cylinders, but the figures become narrower closer to the wrist and the waist. The lines are not too smooth, since the body is covered with hard metal armor.
- They add volume to the waist and legs, making them wider than the arms. The waist is outlined as a triangle, the legs as cylinders. The knees are marked with oval inserts.
- The drawing is supplemented with other elements of clothing. The robe is drawn in general terms, then folds are added with smooth lines. In the place of the raised hand, the robe covers the left hand. In the right hand, a sword is sketched, the hand is covered by a piece of fabric. The warrior's belt and part of the legs are covered by a piece of clothing resembling a skirt. Small folds are added.
- Detail the helmet: make a vertical shock of the helmet, outline the general contour, eye holes and paint them. At the bottom of the helmet draw repeating holes for breathing. These holes are located at the same distance and are of the same size.
- Detail the upper part of the body: erase auxiliary lines, depict a cord that pulls the mantle under the helmet, from it smooth lines of the mantle outline and folds are drawn. The outline of the mantle is taken behind the back. Make a general outline of the right hand and draw a pointed spear in it. For convenience, a ruler can be used.
Erase the auxiliary lines from the body and outline the general contour with a cross on the chest. This part of the body is dressed in a shirt over the armor, so the lines show the folds stretching towards the raised arm. Closer to the belt, make several vertical folds to show volume.
- Draw a thick belt on the warrior's hips and a scabbard with a sword attached to it. Around the sword's handle, draw a winding by drawing several lines superimposed on each other.
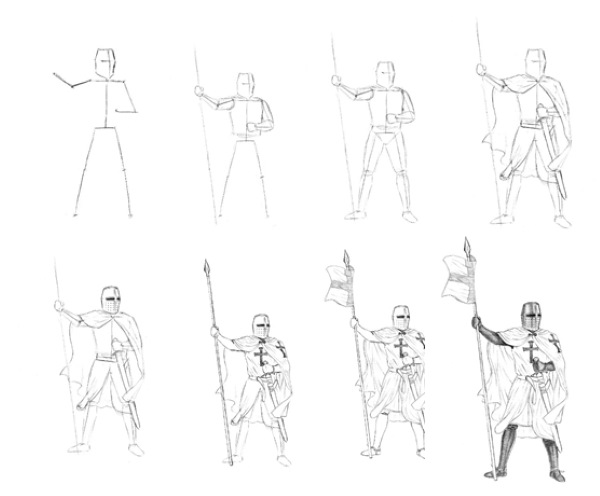
- Detail the lower part of the body: finish the lower level of the robe and add smooth, long, vertical folds, add folds on the clothes covering the belt. Here, smooth lines lead from the belt to the knees.
- Create a general outline of the legs, erasing previous sketches. On the knees, depict the connecting line of the armor with 2 lines, and draw spurs at the feet.
- On the top of the spear, a banner with a coat of arms is drawn. The flag flutters in the wind in the same direction as the mantle, so folds are added.
- Add shadows to give volume and realism to the drawing. Cover the edges of the helmet and the closest places to the vertical central line with vertical hatching. Go over the entire helmet with lighter hatching, creating a soft transition.
- The legs and arms are covered with soft, light cross-hatching. All lines are made across the limbs. The second layer of hatching is applied with light pressure, darkening the sides and places covered with fabric. They try to make the transition soft and gradual.
- The light source is determined and according to it, the shading is done on the mantle in the places of shadow. If the light falls on the figure from the left, then almost the entire left side of the knight should be shaded less. The folds and the forearm are indicated by lightly pressing the pencil. To make the shadow deeper, the area is shaded twice, making cross-shaped movements with the pencil lead.
- Add shadows to the flag, spear and the surface the warrior is standing on.
Tips and tricks
Drawing a knight in armor can be made simpler or more realistic at some stages if you follow simple tips:
- Preliminary canter. Place the sheet in the desired direction in advance and think over the composition of the drawing, in which there is only one character or several. All characters are designated by conventional figures.
- Schematic representation. First, create a sketch of the character with a pencil, then outline its contour and then trace it with a liner or pen. After the general contour is created, erase all auxiliary lines.
- Maintaining proportions. To make the character look believable, all body proportions are observed. To do this, make sure that the length of the entire body is equal to the length of 7 heads. The foot is approximately equal to the length of the head. The distance from the top of the head to the hips is equal to the length of 3 heads.
- When drawing a knight's head, it is made slightly larger than that of an ordinary person due to the additional volume from the helmet.
- The warrior's pose can be changed at your discretion, but it is worth noting that the knights carried the shield and sword in the same hands.
- The image of the coat of arms on the banner is drawn according to historical information or invented independently, depending on the purpose of the drawing.
- Volume. Light shading helps to add volume to the figure and create the effect of falling light and shadow.
Video about drawing
Knight in armor drawing: