You can learn how to make different shapes from balloons. Beginners should learn which balloons are suitable for twisting and how to twist them securely. You can look at several simple master classes and try to create a couple DIY crafts.
What can be made from balloons, which ones are suitable for twisting?
Twisting is the art of twisting long balloons into various shapes. This skill is especially popular among circus performers and magicians.
Professionals, with a deft movement of their hands, give a long balloon the shape of a dog, the sun, a flower, or make some other figure in 1 minute, which causes admiration among the spectators. Twisted balloons are used to decorate halls for weddings, birthdays, and other celebrations.
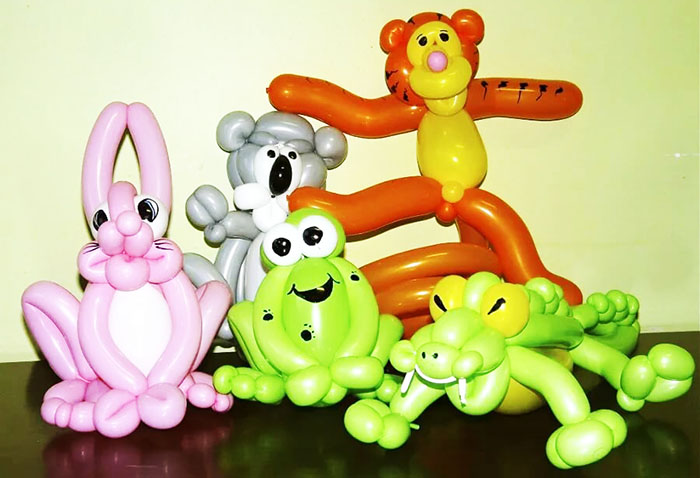
Twisting is also considered a useful activity for children. Twisting balls develops their imagination, fine motor skills and finger grip. Twisting also has a beneficial effect on the mental recovery process of those who have suffered a stroke or severe traumatic brain injury.
Modeling balls are abbreviated as SHDM. They differ from each other in color, length and diameter.
The table shows the sizes of balls that are most convenient to work with:
| Diameter | Length |
| 2.5 cm | 150 cm |
| 5 cm | 152 cm |
| 7.5 cm | 160 cm |
Beginners need to know that on the packaging of foreign manufacturers, the sizes of balls for twisting figures are indicated in inches by a three-digit number. For example, you can take size 260, where the first digit indicates the diameter of the ball when inflated - 2 inches, that is, 5 cm. The last 2 digits indicate the length. 60 inches is 152 cm.
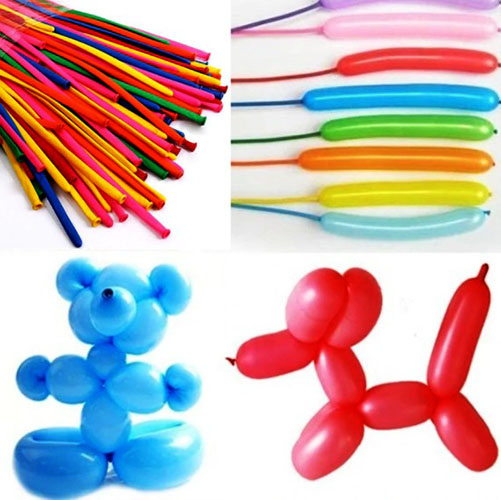
SHDM is made of soft latex. Before buying, you need to check the elasticity of the balls by slightly stretching them to the sides. The material should stretch without much effort, be dense and pleasant to the touch.
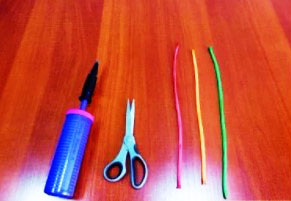
Tight balloons are harder to fill with air, and thin ones can't withstand multiple twists and burst. Even soft balloons can't be inflated by mouth, so you'll need a small hand pump.
Folding "lock"
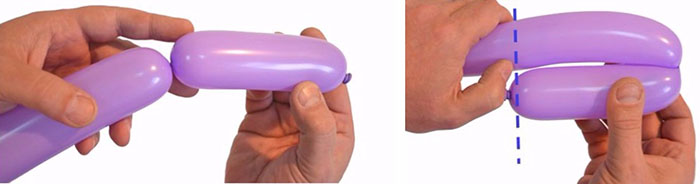
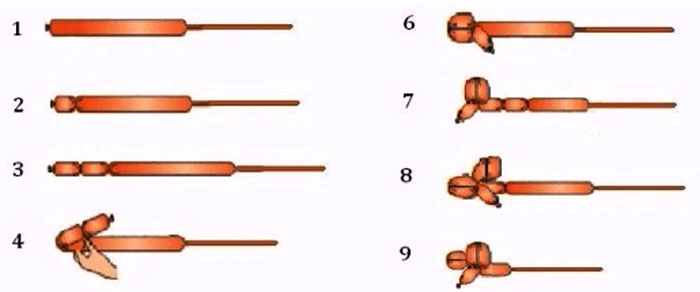
Balloon figures (it is important for beginners to practice several twisting techniques) can be twisted in different ways. One of the most reliable is called the "lock" twist. It is used to fasten 3 bubbles located one after another, as well as to fix any twists.
How to fold "lock":
- Inflate the balloon, leaving a 3 cm tip without air.
- Step back 5 cm from 1 edge and twist the ball 2 times clockwise. You will get a bubble.
- Make 2 more bubbles next.
- Holding the bubbles with your hands so that they do not unwind, fold 2 of them and bend the ball at the junction.
- Twist them clockwise 2-3 times.
This method is used to decorate the paws of animal-shaped figures, their ears or tails.
There are also other techniques for twisting balls:
- loop;
- ear;
- split;
- split loop;
- body;
- apple.
A more detailed description of these twisting methods can be found further in the article.
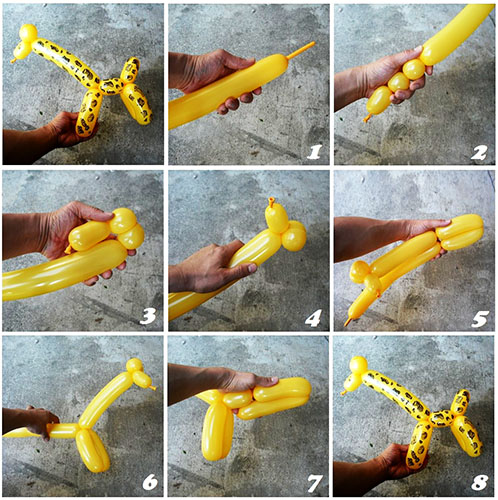
Balloon Sword
To make a sword, you will need a ball of any color, 5 cm in diameter, 152 cm long.
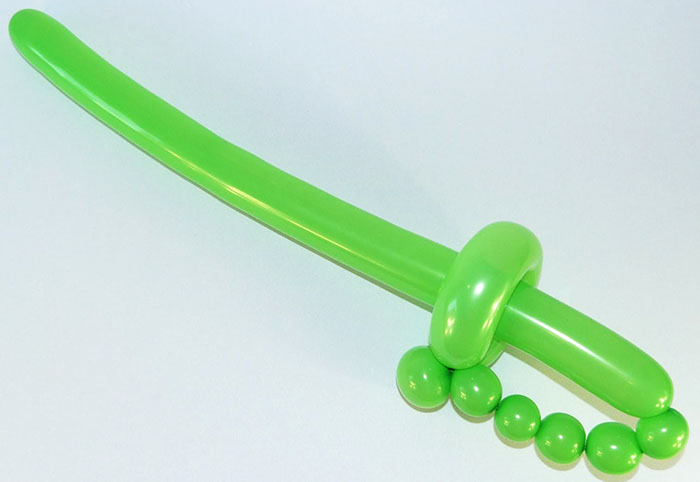
Step by step instructions:
- Inflate the balloon with a pump, leaving the tip 1 cm empty, without air.
- Move the ball to your left hand. Mark about 5 cm from the side where the string is tied.
- Use the thumb of your left hand to separate the bubble from the balloon, moving the air to the uninflated end.
- Twist the bubble 2-3 times clockwise. Hold the top of the balloon with the fingers of your left hand.
- The second bubble should be about 25 cm long. For convenience, you can bend the ball in your hand so that half of the 2nd bubble is on the bend.
- The place where you twist the previous bubble should be parallel to the place where you twist the next one. Twist the 2nd bubble.
- The remaining part of the balloon is considered the 3rd bubble.
- Now you need to connect the twists of bubbles 1 and 2 into a “lock”.
- The twisted bubbles form a loop into which you need to pull the 3rd bubble.
- You don't need to push it all the way through. The 3rd bubble should form an arc. Which will imitate the handle of the sword.
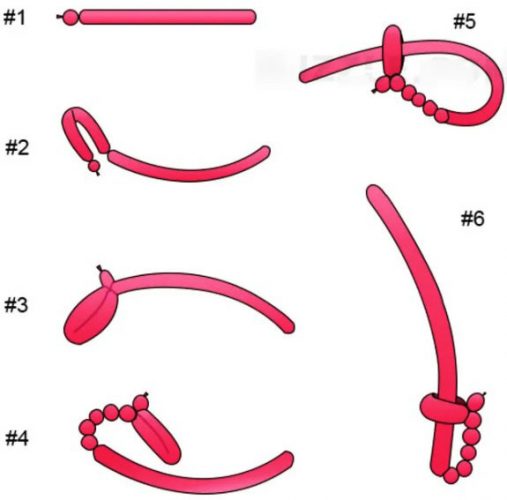
If the "blade" of the toy weapon is curved upwards, it should be carefully bent in the other direction and released. The sword from the long ball is ready.
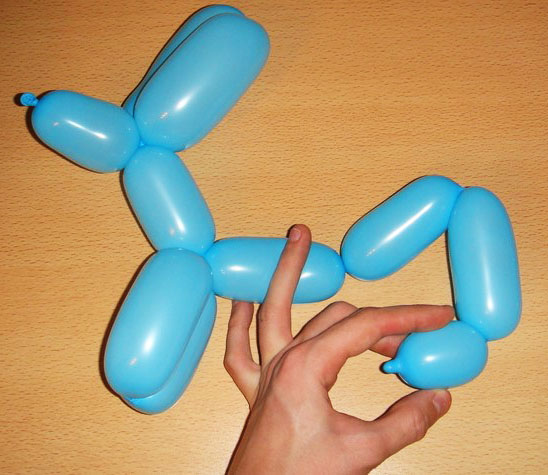
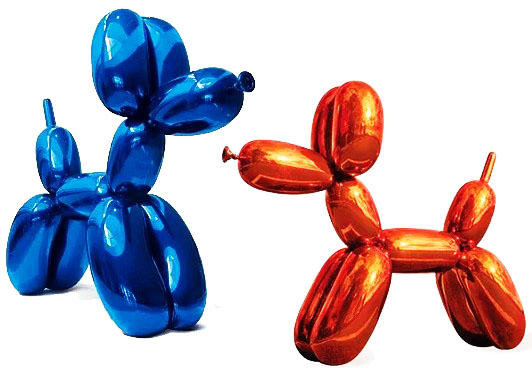
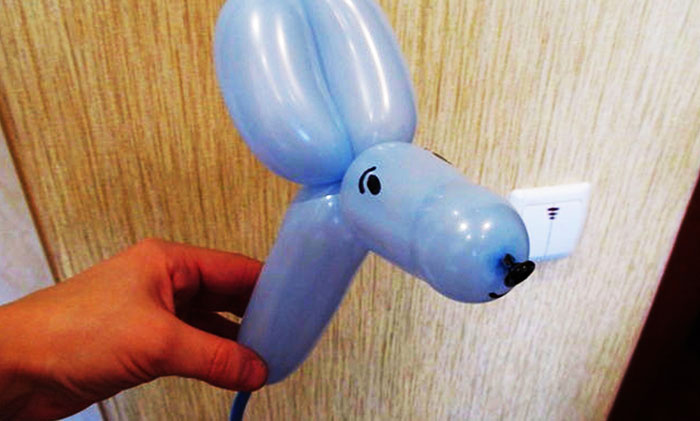
Balloon Dog
Balloon figures (for beginners, twisting a model from 1 ball is suitable) in the form of a dog can be of various shapes, imitating the silhouettes of animals of different breeds. Sometimes you can use several balls of all sorts of shades and sizes at once.
The most popular and easy to make figure is a poodle. It consists of 1 ball with a diameter of 5 cm and a length of 152 cm. The color of the material can be any.
Step by step instructions:
- Fill the balloon with air, leaving an empty end 15 cm long.
- Twist 1 bubble of about 5 cm in size. It will imitate the poodle's muzzle.
- The next bubble should be 2 cm in size.
- Roll another 1 cm long ball.
- Make another 2 cm bubble.
- Twist the 1st and 4th bubbles with a "lock". You will get a dog's head with ears and a muzzle. The puska imitates the nose.
- Now you need to twist a bubble for the neck. Its size is 2 cm.
- The next bubble should be 5 cm long.
- Twist a new 2 cm bubble.
- Make a bubble 5 cm long.
- Twist the 6th and 8th bubbles into a “lock” to make the poodle’s front legs.
- The dog's body will imitate an 8 cm bubble.
- To form the hind legs, repeat steps 8 through 11.
After twisting the back legs, there should be a bubble with an uninflated end left at the top. To turn it into a funny poodle tail with a pompom at the end, this bubble is inflated with your fingers so that some of the air goes up to the uninflated end.
Hare
To make a figure in the form of a hare you will need 1 ball with a diameter of 2.5 cm and a length of 150 cm.

Step by step instructions:
- Inflate the balloon, leaving a 4 cm empty tip.
- From the start, twist a bubble 8 cm long.
- The next 2 bubbles should be 16 cm each.
- Twisting the 2nd and 3rd bubbles needs to be fixed by twisting them into a "lock". This will make the rabbit's muzzle with ears.
- For the neck you need a 3 cm bubble.
- The next 2 bubbles are the same size, about 10 cm.
- Twist the 5th and 6th bubbles into a "lock". Now you have the rabbit's front paws.
- To imitate the body you need a bubble 8 cm long.
- At the other end of the ball you need to make a bubble 3 cm in size.
- Both ends of the body need to be twisted into a lock. This will make the hare's hind legs and tail.
You can use a marker to draw eyes and whiskers on the rabbit.
Swan
To create a swan-shaped figure, you will need a white ball with a diameter of 5 cm and a length of 152 cm.

Step by step instructions:
- Inflate the balloon, leaving a free end 8 cm long.
- From the end of the balloon, twist a 2 cm bubble.
- Secure the starter and twist into a “lock”.
- The next bubble should be 30 cm long.
- Twist the 2nd and 1st bubbles into a lock twist.
- Make a bubble 20 cm long. Twist the beginning and end into a “lock”.
- There should be 2 loops. The arc from the 3rd bubble should be pushed inside 2 loops.
- The rest of the ball will be the swan's neck. It will need to be slightly bent in the right direction.
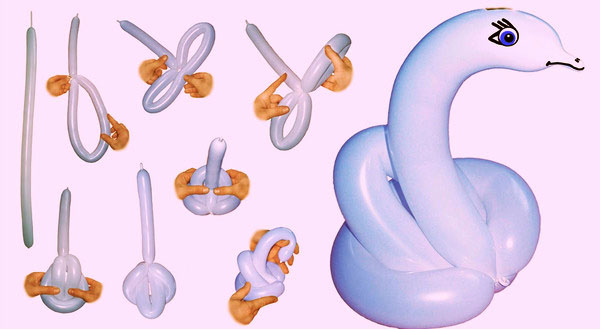
The remaining tip without air imitates the beak. It remains to draw the bird's eyes with a marker.
Birds
Balloon figures for beginners can be made from 2 balloons of different colors. The most popular bird in twisting is the parrot. Other bird shapes are more complex and require good preparation.
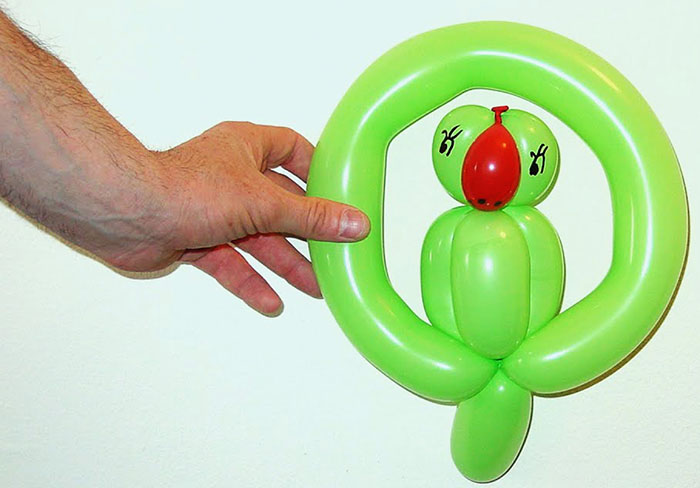
To model a parrot, you will need:
- Green ball, 5 cm in diameter, 152 cm in length.
- A 5 cm piece from a red ball with a diameter of 2.5 cm and a length of 150 cm.
- Black marker.
Step by step instructions:
- Fill the green balloon with air, leaving a 5 cm tip without air.
- From the start, twist 2 identical bubbles of 3 cm each.
- Fold the bubbles together and twist the starter with a twist of 2 bubbles. This will be the head of the parrot.
- Now you need to make the body. This method of twisting was mentioned earlier in the article. First, you need to twist 2 bubbles 8 cm long. Twists 3 and 4 bubbles together. The next bubble of 8 cm in size needs to be pushed between the 2 previous ones.
- Secure the connections with a lock.
- On the back of the balloon you need to twist a bubble measuring 8 cm.
- The initial and final twists of the longest part of the ball should be connected into a lock so that a loop is formed. It will imitate the swing of a parrot.
- Adjust the remaining end so that it points downwards. This will be the bird's tail.
- The red balloon trim will become the parrot's beak. The tip needs to be tied in a knot and the balloon inflated.
- The ends of the cut balloon need to be twisted between bubbles 1 and 2. The resulting red bubble is carefully inserted between the green bubbles.
Use a marker to draw the eyes and design the bird's beak.
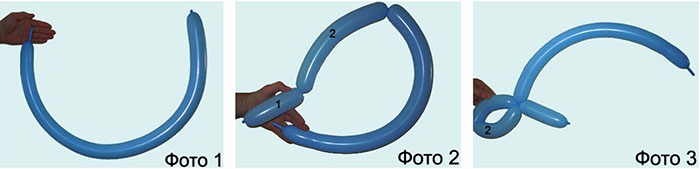
Bow
This bow option is simple and suitable for beginners. The figure has a ring in which you can insert a bouquet of balloons or put it on your hand as a bracelet.
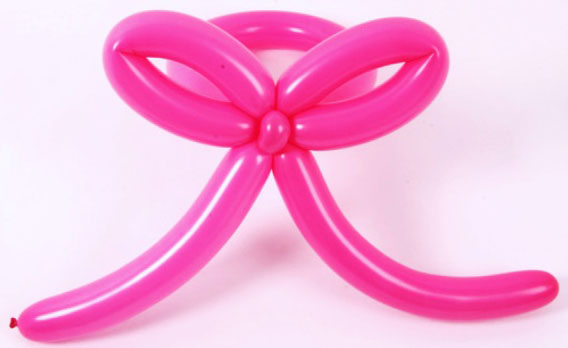
For work you will need a ball with a diameter of 2.5 cm, length of 15 cm. You can choose any color. Metallic shades look beautiful.
Step by step instructions:
- Inflate the balloon, leaving a 5 cm tip without air.
- From the end of the balloon, twist 1 bubble about 13 cm long.
- The next bubble should be 23 cm in size.
- Twist 2 bubbles into a "lock".
- To determine the approximate size of all the remaining bubbles, the remainder of the balloon must be folded in 3.
- Twist the ball along the fold line, forming the 3rd, 4th and 5th bubble.
- Twist the 3rd and 4th bubbles with a “lock”.
- Twist 2 bubbles of 2 cm each.
- Twist the 5th and 6th bubbles with a “lock”.
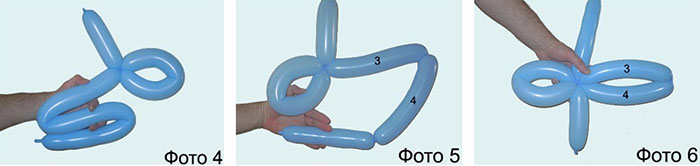
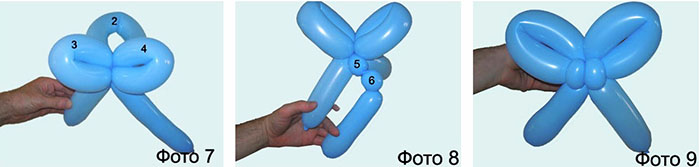
The message bubble (7) should be the same size as the first one. All that remains is to correct all the details and you can use the bow as a decoration for the inflatable bouquet.
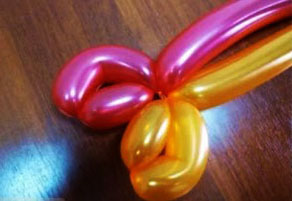
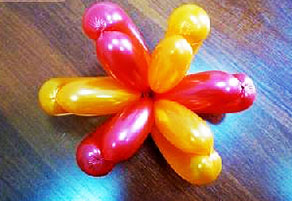
Chamomile
Balloon figures for beginners can be made from 1 or 2 balloons. This master class presents 2 options at once. To form a chamomile, you will need: a white ball with a diameter of 7.5 cm, a length of 160 cm, as well as a yellow or green ball with a diameter of 5 cm, a length of 152 cm.
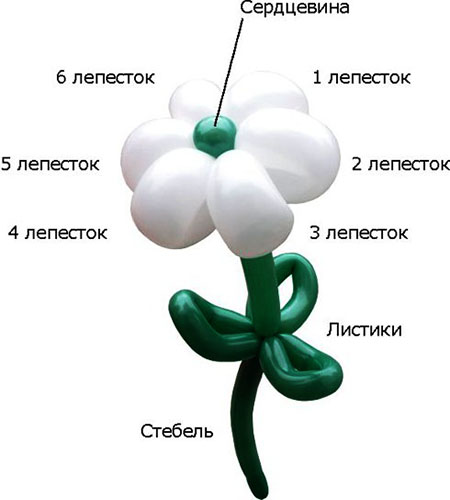
Step by step instructions:
- Inflate a white balloon, leaving a 10 cm empty tip.
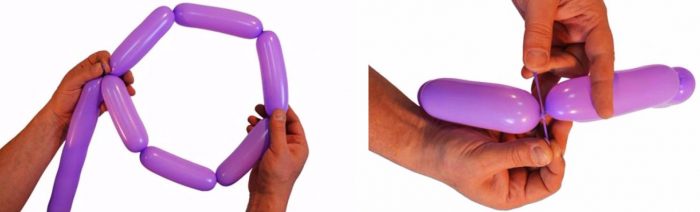
- From the start, twist 6 identical bubbles, each 12 cm long. Secure all the twists securely.
- Twist the 1st and 6th bubbles with a “lock” to form a ring.

- Fold the ring in half so that all the twists are parallel to each other.
- Twist all parallel connections into a “lock”.
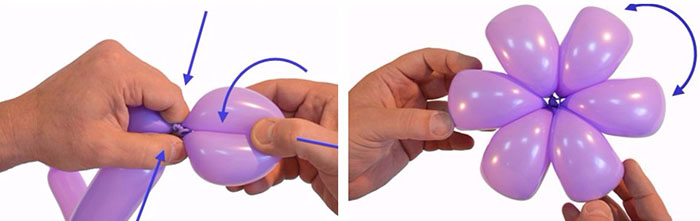
- Fold all the bubbles so that 3 are in your hand and the other 3 are on top.
- The connections that are in your hand need to be twisted together with a “lock”.
- The remainder of the ball can imitate the stem.
This is an option for beginners.
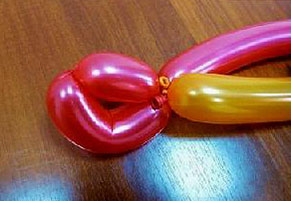
To assemble a daisy from balls of 2 colors, you need to continue the step-by-step actions:
- Cut off the rest of the balloon and tie the end with a strong knot.
- In a green or yellow balloon, inject enough air to form a 3 cm bubble. The rest should remain empty.
- Twist the start and end of the bubble into a “lock”.
- Pull the soft, flat end through the center of the white balloon flower.
- Roll the other end of the balloon into a ring and secure it with a “lock” between the top twist of the 1st and 2nd bubble of the white balloon.

Now this chamomile can be worn on your hand as a bracelet.
Tulip
To model a tulip you will need 1 green ball and 1 red ball with a diameter of 5 cm and a length of 152 cm.

Step by step instructions:
- Inflate both balloons, leaving 4 cm of the ends uninflated.
- Connect the balloon launches together.
- From the beginning of the red balloon, twist a 10 cm bubble, then another 2 cm bubble and again make a 10 cm bubble.
- Twist all connections into a “lock”.
- Repeat steps 3 and 4 to make 4 more tulip petals.
- Place all the resulting bubbles together, placing the lower twists parallel to each other.
- Fix 3 small upper bubbles and twist them together with a “lock”. The flower bud is ready.
- From the beginning of the green balloon, make a 10 cm bubble, fold it in half and twist the beginning and end into a “lock”.
- Repeat the previous step 2 times. The remainder of the ball is the stem of the flower.
For the buds, you can use yellow, pink or blue balls. Having collected a bouquet of 5-6 different tulips, you can decorate them with a bow.
Mouse
A mouse-shaped figure can be twisted from 1 ball of any color, 5 cm in diameter, 152 cm long.
Step by step instructions:
- Fill the balloon with air only halfway.
- From the end of the balloon, twist a bubble 25 cm long.
- Bend the ball at the twist point.
- Focusing on the middle of the small bubble, you need to twist both balls to get 2 small bubbles on top. They will imitate the ears.
- To prevent air from moving around the uninflated part, you need to tie a knot at the end of the bubble.
The lowered end imitates the tail of a mouse. Use a marker to draw eyes, whiskers and color the tail.
Horse
To model a horse you will need 2 balls of pink and blue color, 5 cm in diameter, 152 cm long.
Step by step instructions:
- Fill the pink balloon with air, leaving an 8cm empty tip.
- From the beginning of the ball, twist a bubble measuring 8 cm.
- Twist another 3 cm bubble. Twist the beginning and end of the bubble into a “lock”.
- For the neck you need a bubble 10 cm long.
- Make another 1-3 cm bubble. Twist the beginning and end of the bubble into a lock.
- Twist 2 identical bubbles of 12 cm each.
- Fold the bubbles together and connect them to the previous "lock". These are the front legs of the horse.
- For the body you need a 12 cm bubble.
- Repeat steps 5, 6 and 7. This will make the back legs. Twist them and the front legs into a spiral. The remaining part of the ball is the horse's tail.
- Fill the blue balloon with air to a depth of 25 cm.
- From the start, twist 2 balls of 2 cm each and secure with a “lock”.
- Using a “lock”, connect 2 bubbles of the blue balloon with a twist of 1 bubble of the pink balloon.
- Place the blue ball on the horse's neck and form a bubble parallel to the lower twist.
- Twist the blue ball "lock" around the pink one. You get a horse with a mane.
You can make a bridle from a piece of blue ball. To do this, you need to pass the ball between the neck and the mane and tie the free ring into a knot. Cut off the excess and pull the bridle onto the horse's muzzle.
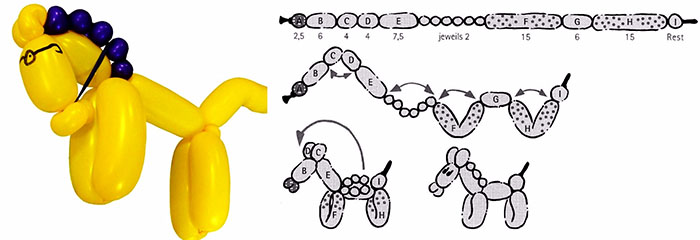
Giraffe
You can make a giraffe from a yellow or orange balloon 2.5 cm in diameter and 150 cm long.
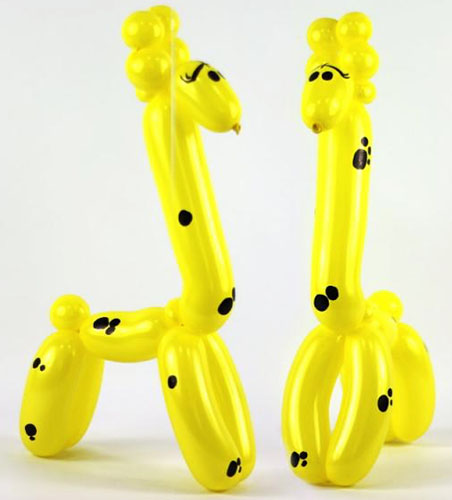
Step by step instructions:
- Inflate the balloon, leaving a 10 cm empty tip.
- From the end of the balloon, twist a 5 cm bubble.
- Make 2 identical bubbles of 5 cm each and twist them into a “lock”.
- The next bubble should be 25 cm long.
- Now you need to twist 4 bubbles to form the front legs. 1 bubble is 8 cm, the next 2 are 2 cm each and the last one is 8 cm.
- Twist the beginning and end of this chain into a “lock”.
- For the giraffe's body you need a bubble measuring 8 cm.
- To make the back legs, repeat steps 5 and 6.
- The rest of the balloon will imitate the giraffe's tail.
Use a marker to draw eyes, nose, mouth and spots.
Machine
To model the machine, you will need 1 ball of any color, 2.5 cm in diameter, 150 cm long.
Step by step instructions:
- Inflate the balloon leaving a 12 cm tip without air.
- From the start, twist a 12 cm bubble.
- Make a 3 cm bubble and twist its beginning and end into a “lock”.
- Twist another 12 cm bubble and secure both ends with a lock.
- The next bubble should be 10 cm in size.
- Twist 2 bubbles of 3 cm each and twist them together.
- Make a bubble 15 cm long.
- The next bubble should be 10 cm, and after that – 12 cm. The remainder should be 3 cm.
- Twists of the 7th, 8th and 9th bubbles need to be secured with a “lock” to form a loop.
All that remains is to fix all the bubbles by turning them downwards.
Crown
You will need 2 balls of yellow and red color, 2.5 cm in diameter, 120 cm long.
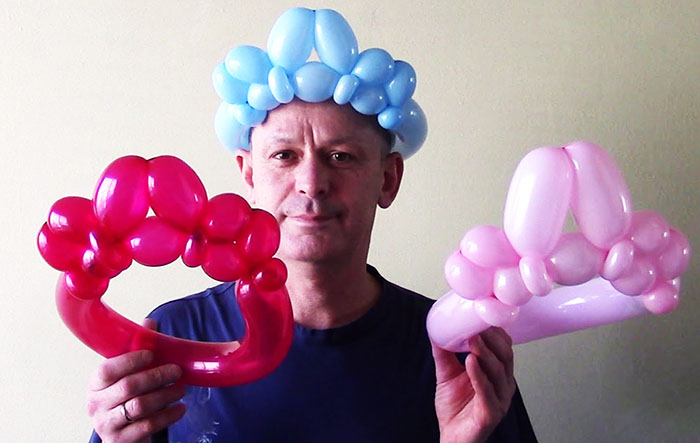
Step by step instructions:
- Inflate the red balloon, leaving an 8 cm tip without air.
- From the start make a 15 cm bubble.
- The next bubble is small – 2 cm. Its ends need to be secured in a “lock”.
- Twist a 12 cm bubble.
- Repeat steps 3 and 12 until the end of the ball. Close the chain into a ring.
- Inflate a yellow balloon, leaving a 10 cm long empty tip.
- Tie the yellow balloon to the twist of 2 red bubbles.
- Twist a 10 cm bubble from a yellow balloon.
- Twist a small bubble about 2 cm in size. Twist the ends into a “lock”.
- The next bubble should be 10 cm. Its end should be wrapped around the 4 red bubble.
- Repeat step 8 increasing the size of the bubble to 15 cm. Then repeat step 9 and twist another 15 cm bubble. Attach its end to the 6th red bubble.
- Repeat steps 8, 9 and 10.
- Secure the end of the 9th bubble with a “lock” on the twist of the 8th red balloon.
Adjust all the balls. Now you can put this crown on your head.
Heart
Heart-shaped figures can be used to beautifully decorate the hall where the wedding will take place. For work, you will need 1 red or pink balloon with a diameter of 5 cm and a length of 152 cm.
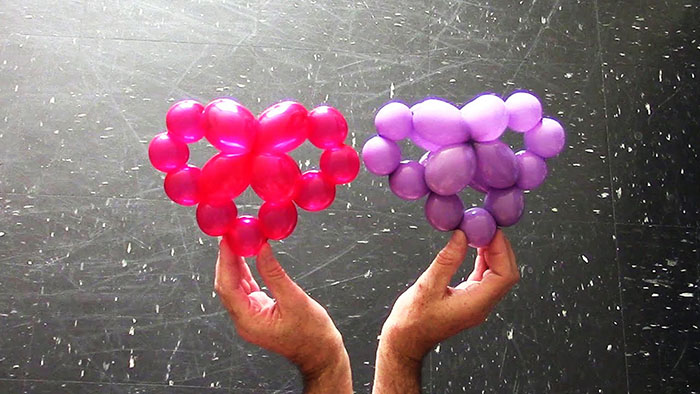
Step by step instructions:
- Fill the balloon with air, leaving 15 cm without air.
- Twist 5 identical bubbles of 5 cm each.
- Fold the chain in half and twist the ends into a “lock”.
- Twist 6 identical bubbles of 3 cm each.
- Pull the rest of the balloon through a loop of 4 bubbles of 5 cm each.
- Twist the end of the last bubble between the 2nd and 3rd bubbles.
- Twist 3 bubbles of 3 cm each.
- Then make 4 bubbles of 5 cm each and lock the ends of the chain.
- You need to pull 1, 4, 5, 6, 7 bubbles into the resulting loop.
- Carefully cut off the rest of the balloon and tie it into a knot.
Adjust all the bubbles so that they form a heart shape.
Letters
It is very easy to twist simple letters from balloons, so there is no need for step-by-step lessons here. Usually, balloons are filled with air, leaving the end of 5-10 cm uninflated. Mark the folds with a marker. For beauty, these places can be decorated with small 3 cm bubbles.
It is not difficult to make figures from balloons with your own hands. Beginners need to practice a little to master this skill. Then step-by-step instructions will not be needed, because experienced craftsmen rely only on their own imagination, inventing new all sorts of shapes.
Video about figures from balloons
Master class on making letters from balloons: