Dense walnut shells are a great material for creativity. You can make beautiful and original crafts from it to decorate your home, New Year's decor or in the form of cute animals. Even children make masterpieces from natural material.
Simple crafts for kindergarten
Children in kindergarten make crafts from walnut shells.
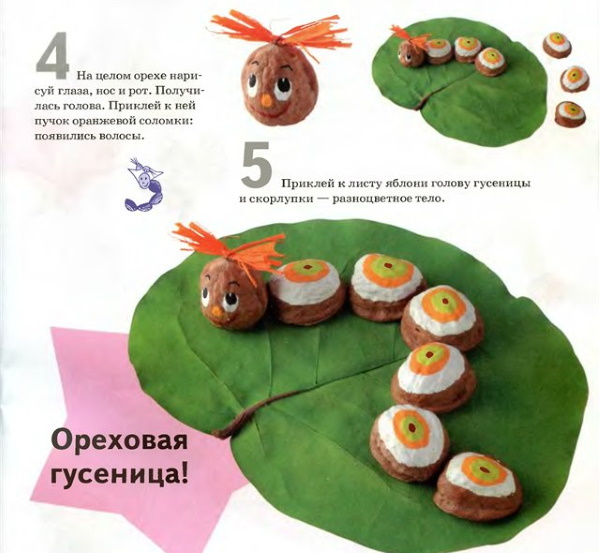
The order of production of the caterpillar:
- Use a green paper sheet as a base.
- Prepare 6 halves of walnut fruits and paint them white and orange.
- In the middle of each valve, draw a small spot of light green color.
- For the head, take a whole nut and draw facial features with a brush. Attach a bunch of bright yarn to the top.
- Glue the prepared blanks to the base sheet in the form of a caterpillar.
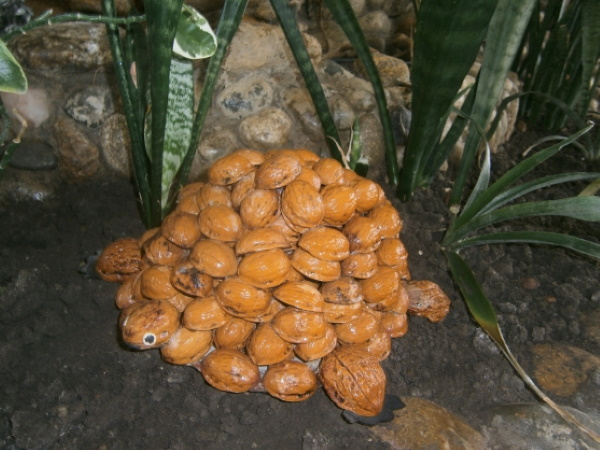
To decorate the turtle, you will need the following materials:
- cardboard;
- nut shell halves;
- adhesive "Dragon";
- plasticine.
Description of the creative process:
- Cut out an oval shape from cardboard.
- Next, glue walnut shells in layers onto the base in the shape of a turtle shell. The upper tiers must be gradually reduced.
- Finally, form the tail, paws and head from the hard halves.
- Mouth, eyes and nose are molded from plasticine.
Master class on creating strawberry applique:
- Cut a rectangle (A4 size) out of thick cardboard and paint the background green.
- In the center of the blank, depict a thin plant stem, sepals and a large leaf.
- At the top, paint open inflorescences with white watercolor. Use a thin brush to outline the drawing, giving it volume.
- Glue the shells onto the sheet near the stems, paint them red on top and make a pink border at the bottom.
- Wait until the paint dries and put small white dots on the berries.
- Glue 2 halves of nuts to the bottom of the sheet and paint them in the form of ladybugs. Draw the head in black and the wings in red. Then put dark dots and draw a stripe in the middle.
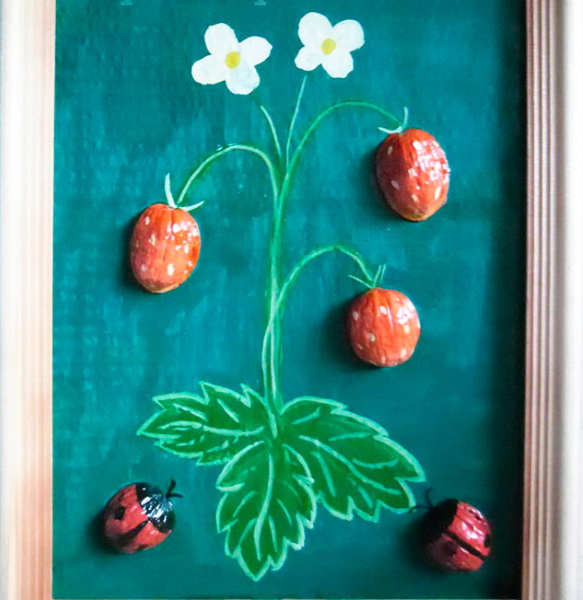
- Finally, place the craft in a frame.
Crafts for schoolchildren
Middle and high school age children can make a miniature box.
Materials required:
- 1 large walnut;
- satin ribbon;
- a piece of fabric (choose the structure and tone according to your taste);
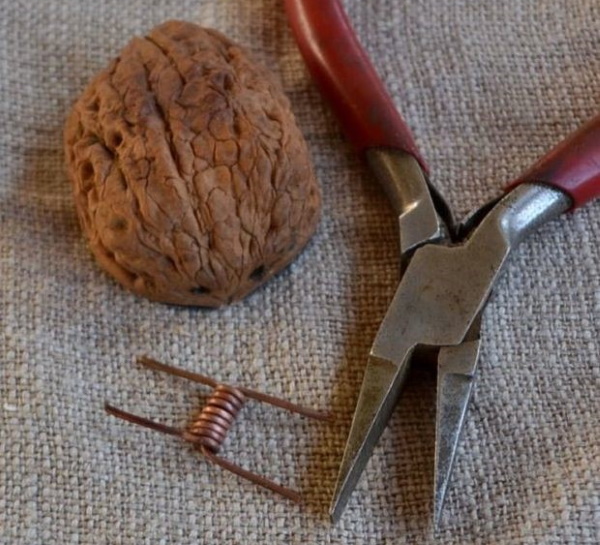
- round nose pliers;
- fine-pored sandpaper;
- soft copper wire;
- wood glue;
- knife;
- a screwdriver or a small drill and drill bits of 1.5-3 mm size;
- scissors.
Procedure:
- Carefully separate the nut into 2 parts with a knife or a hand jigsaw, then clean out the core and partitions, remove all roughness.
- Sand the edges of the shell, removing any shavings and rough edges.
- Next, take a drilling device, insert the drill and drill 2 holes in both halves “from behind” the fruit. The existing wire must pass through the holes made. Then, using a larger drill, make another hole in 2 flaps from the opposite edge to pull the tape through.

- Form a spring-shaped blank from the copper cord and leave 2 ends of 5 mm each. Then thread a straight wire through the spiral and bend it 900. Next, bend the ends of the spring and the wire passing through it another 900. You will get a hinge for closing.
- The next step involves inserting the bent loop elements into the back holes and bending them inward. As a result, the box should open and close.
- Next, cut 2 pieces of fabric and glue them inside the hard flaps. Trim the edges and fix them overlapping on the edges of the shell.
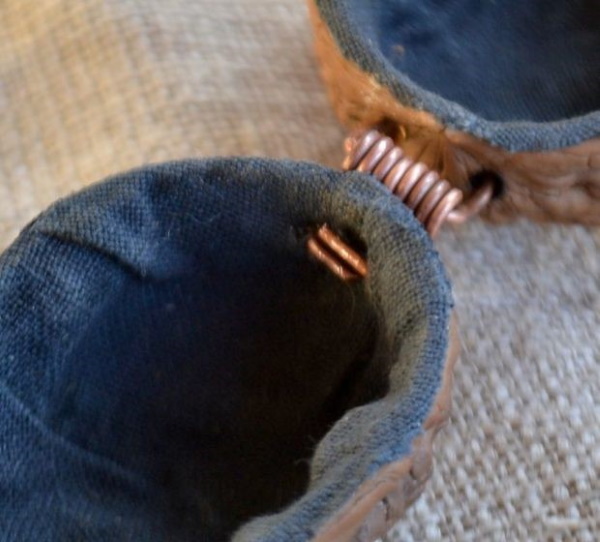
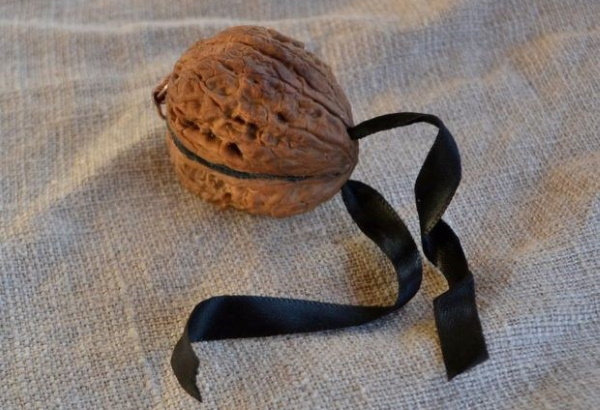
- Thread a ribbon through the large openings, place a miniature gift inside the craft, then close and tie the box.
- If desired, decorate the top of the product with glitter, rhinestones or cover with a layer of varnish.
To create an original vase you will need:
- peeled nut halves;
- furniture stapler;
- a large sheet of cardboard;
- pencil;
- ruler;
- scissors;
- polymer glue;
- black aerosol paint.
Master class on making:
- On a piece of cardboard, mark the parameters of one wall, then measure out 3 more pieces of the same size and the bottom.
- Cut out the drawn fragments. The width of the vase is 1.5 cm, and the height is 50 cm.
- Fasten the walls together with a stapler and glue the bottom.
- Next, the object is decorated with a shell. To do this, apply glue to the back of the flaps, then glue the halves to the cardboard vessel in lines.
- Cover all 4 walls with this method, filling their entire surface. Dry the vase.
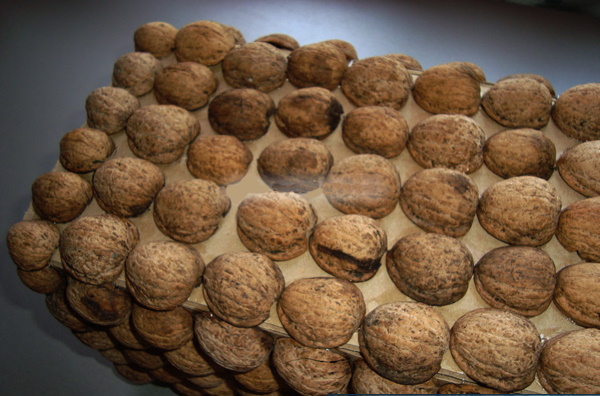
Crafts made from walnut shells can be made useful, for example by creating a vase. - After drying, it is advisable to go outside and spray the product with black paint from a can from a distance of 10 cm. It is recommended to apply 2-3 layers of aerosol. Dry the creation.
- Finally, the masterpiece can be treated with a golden hue and decorated with rhinestones.
Dried flowers are placed in the prepared vase or a glass vessel is placed into which water is poured and fresh flowers are placed.
Animal crafts
Crafts made from walnut shells are made in the form of various animals:
| Name | Design methodology |
| Little penguins | Whole walnuts are painted white and black, then paper paws and a beak are glued on. Eyes can be drawn or decorative ones can be attached. |
| Little mice | Paint the nut halves grey. Cut a long tail out of felt or twine, make mouse ears out of paper, or use small flat shells or pumpkin seeds. Attach the pieces to the right places. Use a black peppercorn for the nose and watermelon seeds for the eyes. |
| Turtle | Paint the hard shell green. Draw typical brown spots on the surface, then make a paper base with a muzzle and paws. Connect both blanks. |
| Little Hares | Cover the halves of the shells with white paint, attach large ears cut out of paper to the head, and attach a pompom tail at the back. Use a thin brush to draw a muzzle at the front. |
| Octopus | Paint the hard shell a pinkish shade. For the tentacles, cut 8 pieces of thin wire, cover them with pink fabric and attach to the body. |
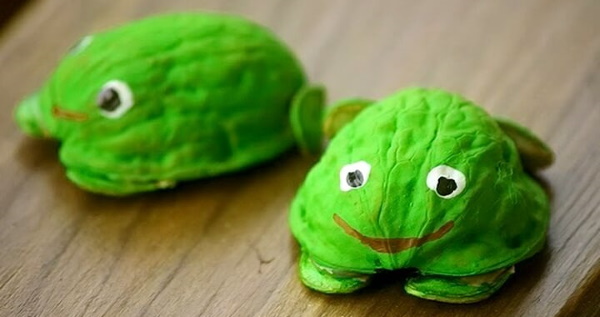
| Little frogs | Attach paws (made from pumpkin seeds) to the bottom of the nut halves, paint the sturdy base green, and draw funny faces on the front. |
| Whale | Cover the shell with blue color, create a tail and a water jet from paper. Attach the parts in the right place. |
| Bees | Paint the nut shells with yellow and black stripes, attach tendrils made from dark fluffy wire and twisted into a spiral on top. |
| Crayfish | Apply orange enamel to the nut shell. Form a base with drawn claws and a muzzle from paper. Glue the paper blank to the bottom. |
| Spiders | Paint the hard halves black, then attach the legs made from dark shaggy wire to the base at the bottom. |
| Birds | Paint whole nuts brown, leaving one side unpainted for the belly. Make the nose and eyes out of cardboard. Pumpkin seeds will do for the paws. Take a little fluff for the ears and glue it to the top on both sides. |
Interesting crafts
You can even make checkers from walnut shells, but you will need 24 halves, preferably of the same size. Paint 12 blanks black, and the remaining 12 white. Then dry the elements well. If desired, you can implement interesting ideas. For example, paint one part of the valves like Coralada beetles, and the other in the form of ladybugs.
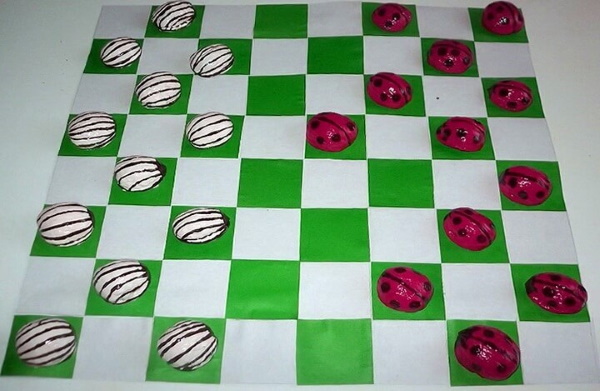
Next, the shell should be applied to the cardboard and traced. Cut out a cardboard circle and glue it as a bottom. The chessboard is depicted on cardboard or a real one is used.
To make a board game "memory", you need to clear an even number of nut halves (12-16) from partitions. The more elements, the more interesting the game. Then you need to take 2 blanks and paint them inside with acrylic paint of any shade. Then take 2 more parts and change the color in them. The number of pairs is supposed - so many colors will be.
An interesting idea is to make souvenirs-secrets or “wonderful wishes” from the original raw materials. Here you will need a large nut, which is cracked and cleaned out inside. Then a miniature gift or a message with a wish is put in the middle. Then the halves are glued together and the “whole” fruit is decorated to your taste. You can paint it, wrap it in lace or tie it with a bright ribbon.
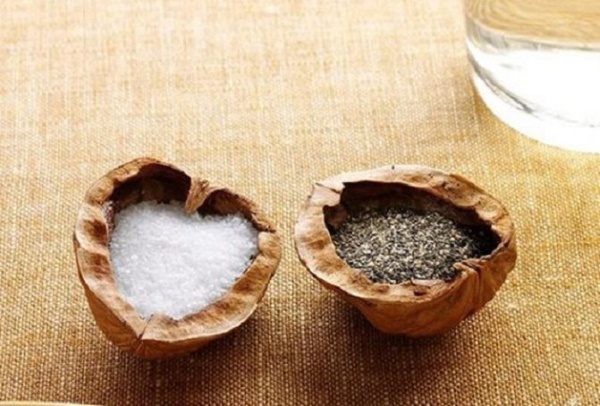
Hard shells can be used to decorate a festive table. To do this, split the nuts into 2 parts, carefully clean out the insides, removing the smallest particles. Then add salt to 1 segment, and sugar to the other, and place near each guest.
To make a miniature pincushion, you will need 1 shell. It is cleaned of partitions, and the top and edges are sanded with sandpaper. Cut a small round piece out of fabric, stuff it with cotton wool, sew it into a rounded cushion and place it inside the flap. Instead of a fabric element, you can crochet a small ball, also fill it with filler and place it in a nut shell.
To make a glowing composition in eco-style, you should put whole nuts in a glass container in 2 layers. Then melt the candle and pour wax into the half-shells. While the substance has not hardened, insert the wick there. Place the resulting blanks on top of the nut layers.
Home decorations
Crafts for the home are made from walnut shells.
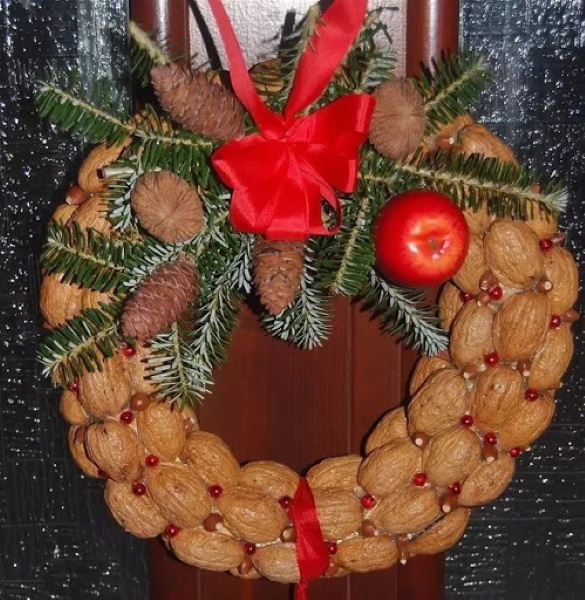
Step-by-step wreath design:
- At first it is advisable to empty 4-5 dozen nuts.
- Cut a circle out of cardboard, then remove the middle part to create a large hole. Wrap the blank in soft material or any fabric.
- Glue the half-pieces onto the cardboard piece using superglue.
- Decorate the craft with natural or artificial moss.
- If desired, the fruits can be painted in the desired shade.
- The masterpiece can be wrapped with red ribbon to create a Christmas wreath.
Step-by-step design of New Year's decoration:
- The process will require gold or silver colored paint.
- Pick up a bright ribbon, make a loop out of it and tie it with a knot.
- Place a knot in one shell, cover the edge with glue, and then press it with the second half.
- If desired, the creation can be decorated with a bead or tied with a bow.
The procedure for making a simple New Year's decoration:
- Prepare 1 shell.
- Glue a small amount of sisal inside the piece.
- Attach some miniature element (a large bead, a plasticine figure or a toy) to the top.
- Attach a lace loop at the top.
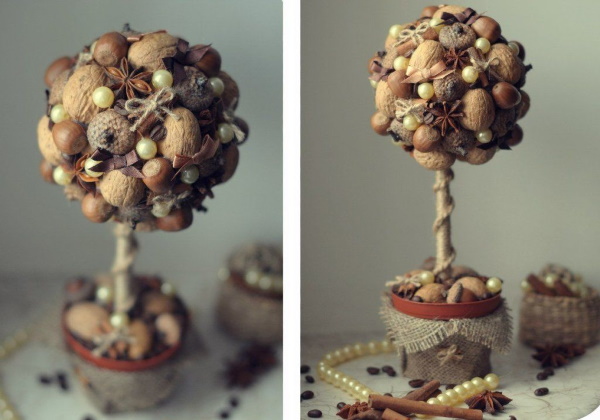
Topiary will decorate your home interior.
To prepare it you will need the following materials:
- white sisal;
- walnuts;
- a foam sphere with a diameter of 6-7 cm. They are sold ready-made in the craft departments. They also use New Year's foam balls or plastic balls for a children's dry pool;
- for the trunk 1 thick and 3-4 thin sticks;
- acrylic paint in gold and white shades;
- ceramic pot with glossy finish;
- natural moss;
- gypsum;
- organza ribbon;
- 2 thin stationery rubber bands;
- PVA glue;
- scissors;
- wooden skewer;
- sponge;
- glue gun.
Procedure:
- Connect the sticks - place the thin elements around the thick one and secure the resulting trunk at the top and bottom with rubber bands.
- Use scissors to cut a small indentation in the foam sphere, then add a drop of glue and insert the trunk.
- Using a glue gun, make the crown of the craft, gluing the walnut flaps close to each other. Start from the bottom zone.
- Paint the walnut circle white. To do this, take a little paint on the sponge and, having removed the excess, cover the dense shells with blotting actions.
- It is recommended to apply a small amount of gold dye over the light surface, then rub the crown with a piece of cloth to create an antique impression.
- Fill the gaps between the nuts with sisal, pushing it in with a skewer. It is not necessary to glue the material.
- Dilute the plaster with water to the consistency of liquid sour cream and pour the resulting mixture into the flowerpot. Before the solution hardens, insert the trunk of the topiary and hold it vertically for 2-3 minutes.
- After the plaster has hardened, pour a small amount of glue under the tree and, turning the container, distribute it evenly.
- Place moss on the sticky surface and allow the craft to dry.
- Tie an organza bow on the trunk and singe the ends with a match.
- Remove the elastic bands and, if desired, wrap them with sisal strands instead.
Figures and toys
Crafts made from walnut shells are hung on the New Year tree.
Method of making Christmas tree balls:
- Glue a cotton ball covered with fabric into half of the hard shell. The material used is of different shades. Burlap looks stylish and original.
- To make it, you need to take a little fluffy filler. Its quantity is measured so that the cotton wool fills the entire volume of the shell and protrudes slightly above it.
- Cut a round piece (5 cm in diameter) out of the fabric and stitch in a circle.
- Place the stuffing in the middle, then pull the thread and make 2-3 securing stitches.
- The front surface of the ball can be decorated with beads or sequins, if desired. You can use acrylic to depict snowflakes, Christmas trees or any New Year patterns.
- Form a loop from yarn or thin tape and glue it to the edge of the toy with a glue gun, then glue the fabric piece inside the shell.
- The walnut flaps can be pre-painted to match the fabric or the pattern on the ball.
The order of registration of sportsmen figures:
- Glue 3 whole nuts together one after the other using a glue gun.
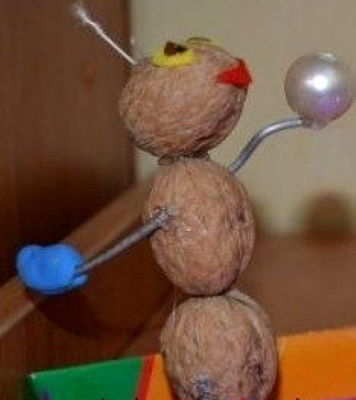
- Attach paper eyes and a mouth to the top of the product.
- For the mustache, knit a thin metallic thread, make 2 pieces of it and glue them to the top of the head.
- For the paws, take 4 strips of thick wire and fix with glue 2 pcs. on the sides of the middle nut, and the remaining 2 pcs. at the bottom of the craft. Then bend it slightly and insert sports equipment made from scrap materials into the resulting hands.
The boat
The nutshell craft in the shape of a boat is popular with boys.
Step by step description of the process:
- Carefully clean the solid sash from partitions, paint it and, if desired, write the name of the sailboat.
- For the mast, cut a strip of colored paper and attach it to a toothpick so that both ends of the paper blank are glued together.
- Use scissors to cut off excess paper, giving it the shape of a rectangular or triangular flag.
- The sail is made in a similar way. It is made from gift wrapping, nylon ribbon, organza or double-sided colored paper.
- Fill the inside of the shell with plasticine and decorate the top with cotton wool or other suitable material (glitter, beads).
- Next, pierce the sail with a toothpick in 2 places and stick it into the plasticine. It should hold tightly.
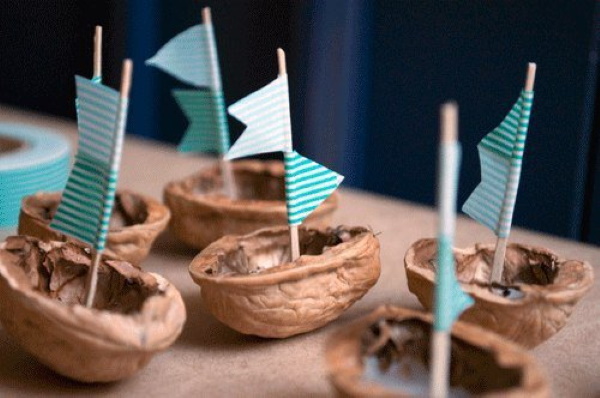
- If desired, a beautiful autumn leaf can be used as a sail.
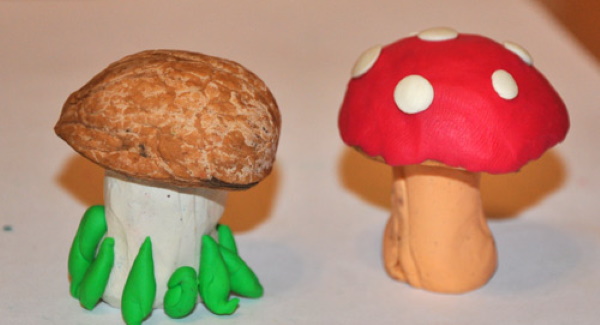
From shells and plasticine
Crafts made from walnut shells and plasticine are quite easy to make.
Step-by-step preparation of mushrooms:
- Roll a small sausage from a white plasticine ball.
- Attach the peeled walnut shell to the top of the elastic blank, rounded side up.
- The cap can be painted, then you will get more than just a porcini mushroom.
- For each type of craft, it is advisable to select a plasticine of a suitable shade for the stem. For example, for butter mushrooms - yellow, and for aspen mushrooms - gray material.
- To make the mushroom resistant, it is recommended to decorate it with green plasticine grass.
Methodology for decorating a turtle:
- Fill one nut shell with plasticine to make it stable, you will get a shell.
- From the brown plasticine substance, mold an elongated sausage and attach it to the body; this will be the head.
- For the paws and tail, make 5 thin, elongated blanks from the elastic mass and stick them to the shell.
- Pinch off small pieces of plasticine, roll into miniature balls and secure in the shape of eyes.
- Draw a nose and mouth on the head with a toothpick.
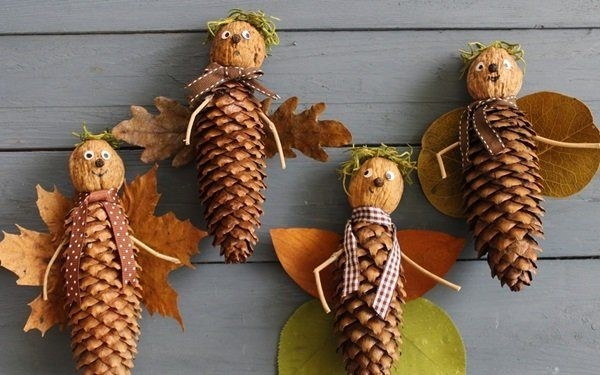
From shells and cones
To create forest men you need to find:
- elongated spruce cones;
- walnuts;
- dry multi-colored leaves;
- braid;
- yarn scraps;
- plasticine pieces.
Technique for decorating figures:
- Glue the nut to the bottom of the cone.
- Make the nose and eyes out of plasticine and use a felt-tip pen to draw a smiling mouth.
- Use colorful ribbons to create stylish scarves.
- Make hair from scraps of woolen threads and glue dry leaves to the back to form wings.
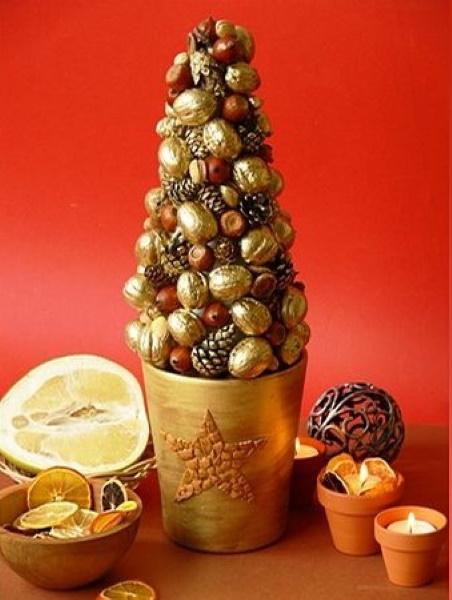
To make a Christmas tree you will need the following additional equipment:
- foam cone (diameter 12-15 cm);
- bronze powder paint;
- golden-hued flowerpot;
- gypsum;
- hot glue.
Procedure:
- Dilute the paint and paint the flowerpot with a brush. Make strokes in one direction. Apply one layer, let it dry and paint again.
- Round cones and nuts should be painted separately in bronze color. It is recommended to paint the shell entirely, and spruce fruits only on top, skipping the inner segments under the shells. Leave acorns in their natural form.
- Attach the prepared natural materials to the cone using hot glue.
- Draw a star on paper, then cut it out. Apply the finished template to the pot and trace it with a pencil. Crush the nut shells and stick them on the flowerpot, filling the space of the figure depicted.
- Next, dilute the plaster, throw stones into the container and insert 2 sharp thin blanks (you can use wire). Fill the pot with plaster mass. When the substance hardens, put the tree on sticks for stability.
Beautiful crafts made from walnut shells come in a variety of forms. They do not require much time or expensive materials to create. It is worth using your imagination, involving children in the work process, and as a result, the activity will bring a lot of positive emotions and pleasure.
Video about walnut shell crafts
Options for crafts made from walnut shells: