Knitting is one of those hobbies that suits both older people and young homebodies. The fashion of recent years has returned to exclusive things made by hand from high-quality materials. That is why learning different knitting techniques is not only a calming and interesting activity in the evenings, but also a way to follow trends.
For example, hand-knitted thick yarn blanket will become a wonderful element of home decor, and a voluminous hat will become an eye-catching accessory. Hand knitting, without the use of knitting needles or other tools, is especially popular now.
What yarn is better to buy?
Yarn for hand knitting is thick, soft, and quite pliable. You can find a variety of options for this material in various online stores and haberdasheries, but not all of them are suitable for different purposes.
In order to choose the right yarn, you need to pay attention to several criteria:
- what product is planned to be knitted;
- hypoallergenic material;
- how voluminous should the product be;
- product safety and availability of quality certificates.
Allergy sufferers should pay more attention to both synthetics and natural wool. You will have to choose the material that will definitely not cause problems. Another important factor is dust settling on bulky items. To reduce the risk of dust and pet hair accumulation, you can use an antistatic spray.
Knitting with thick yarn by hand is a fascinating process, but it is important that it is also safe. You should not trust materials from Chinese online stores, especially if they are much cheaper than those offered by well-known yarn manufacturers. In haberdashery and craft stores, you can always ask about product safety certificates (this is necessary if the product is to be knitted for a child).
Alize Puffy Yarn
Alize Puffy is a yarn with loops along its entire length. This distinctive feature allows you to use various hand weaving techniques and create unique patterns. This material is perfect for beginners to create voluminous knitted items.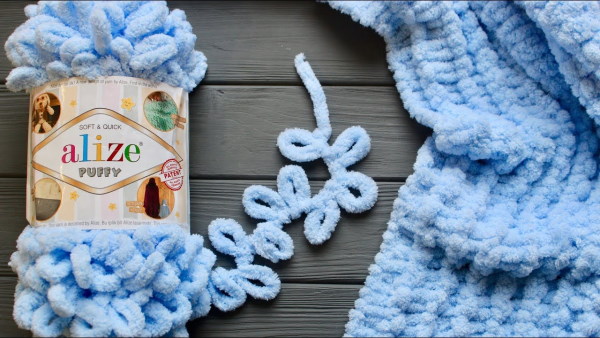
Alize yarn consists of micropolyester, withstands washing and drying well, does not cause allergic reactions in children. The material is sold in skeins of 100 g, each skein contains approximately 9 m of thread.
Merino wool
Fine-wool merino wool is one of the highest quality, softest and warmest materials for making clothes. Yarn made from it is more expensive than synthetic analogues, but the quality of the finished product will be better.
The barely twisted wool sliver is passed through a special device with a comb, which combs it out. The output is yarn called combed sliver.
Thick yarn from sheep wool in Russia is manufactured according to GOST - 17511-83. The composition of such yarn should contain no more than 1% of additional components.
Mixed type of yarn (semi-wool roving) consists of wool by at least 70%. A smaller part of the material is viscose or nitron fiber.
Pompom yarn
Micropolyester is most often found in the composition of such yarn. On one thread of yarn, pompons made of the same material are placed at equal intervals. When the threads are intertwined, a whole fabric of pompons is formed.
This yarn looks great in baby items, ponchos, blankets and hats. Different manufacturers offer different sizes and degrees of "fluffiness" of pompoms, which allows you to choose the material for any product or combine several different types of yarn in one weave.
Thick "plush" yarn
Knitting with thick yarn made of chenille is not only a useful activity, but also very pleasant to the touch. Due to the very short hairs sticking out in all directions on the main thread of such yarn, it is called "plush".
Products made from this material are very soft, warm and pleasant to the touch. It is best to choose acrylic chenille - it does not deform when washed, has beautiful iridescence on the pile.
Yarn in the form of a lace
Tightly interwoven threads with a hollow space in the center, forming a cord, are ideal for hand weaving.
Synthetic materials can be used to knit rugs or other interior decoration items, soft wool cords are suitable for creating clothing items.
Once you have decided on the main points, you can begin to choose a specific yarn size, color and material. You can find a wide variety of thick yarns from different manufacturers.
| Popular manufacturers of thick yarn in Russia | |
| Troitskaya worsted factory | Roving yarn "Zephyr" is a material consisting of 100% merino wool. It is produced in balls of 500 g, each skein contains about 50 m of yarn. A wide range of shades. |
| Kamtex LLC | The yarn of this company is distinguished by a slightly twisted structure and increased thickness of strands. Composition - sheep wool, release form - skeins of 500 gr. |
| Cloudy | The company produces two types of yarn - super-thick "Fittuccini" and giant "Optimal". It contains merino wool, many interesting shades are available. |
Knitting technique without knitting needles and hook
Knitting various items with your own hands from thick yarn is a great option for those who are just starting to do various handicrafts. The patterns for creating clothing items and decorative elements are very simple, and it takes very little time to make (from half an hour to 2 hours of continuous work).
Some knitting techniques involve placing the loops on the hand, while others use only the fingers. The choice of technique also depends on the size of the desired product and the thickness of the yarn.
Plaid
The most "Instragrammable" decorative item of recent years is a large-knit woolen blanket. This item has gained great popularity not only due to its beautiful appearance, warmth and coziness, but also due to the ability to knit a blanket of the perfect size yourself. The master class shows the process of knitting a blanket by hand, the size of the finished product is 1.1 x 1.6 m, weight 3.7 kg.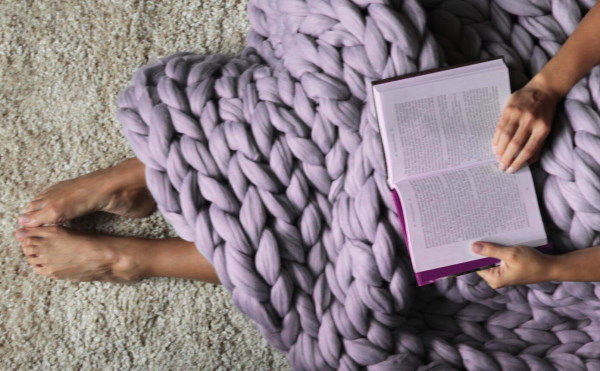
How to knit a blanket from large yarn with your own hands:
- For the specified size in width, you need to take 18 loops. The first loop is formed by ordinary twisting. The tip can be left as short as possible. The working thread is pulled through the loop, the knot is tightened.
- The working thread adjusts the size of the loop. The optimal length of the loop in this case is 9 cm.
- The working thread is threaded into the resulting loop, the required size of 9 cm is adjusted. The lower part of the loop is held by hand, the left side of the loops should always be on the side of the working thread. In this way, the required number of loops is collected, the row comes out similar to a braid.
- Next, the working thread is threaded through the loops of the resulting braid. The last free loop is not affected, it is considered an edge loop. Weaving - from right to left.
- By pulling the left side of the loop, you can adjust its size. By pulling the right side of the loop, you can adjust the density of the weave and the degree of elasticity of the future blanket (the right side of the loop closes the inner arches of the weave).
- Then weave in the opposite direction, from left to right, then in the opposite direction again. The resulting braids-columns should fit evenly next to each other. Do not forget to leave the edge loop free.
- The last row is closed as follows: the outer loop is placed on the adjacent one, and the working thread is threaded through them. A loop of the same size as all the previous ones is formed.
- The resulting loop is again placed on the next adjacent one. The actions are repeated until the end of the row.
- The remaining “tail” is completely pulled out, then hidden on the wrong side in the stitch loops.
The width and length of the product will also depend on the density of the weave. If the loops were formed manually, using a measuring tape or tape measure, and pulled tightly to each other, the size of the blanket may be smaller. When tying loops by hand, the density of the product will be less, which means it will stretch a little more.
Knitting the same loops with thick yarn:
- The first loop is put on the hand. The working thread is inserted into the next loop (it should not twist under any circumstances).
- The resulting loop is also put on the hand, and so on until the end of the row. The last loop is the edge loop, put on the other hand.
- Knitting continues in the opposite direction, without touching the outer loop.
It is also necessary to adjust the density depending on the purpose for which the product will be used. For covering during sitting on the sofa, it is better to choose a less dense weave so that the blanket turns out more mobile, stretchy, and breathable. Dense weave is suitable for creating a bedspread or decorative pillowcases.
Snood
A practical and very warm wardrobe item is a snood. Made from natural or mixed yarn, it will protect you in winter not only from the cold, but also from the wind. And a snood knitted with your own hands will also stand out among standard store models.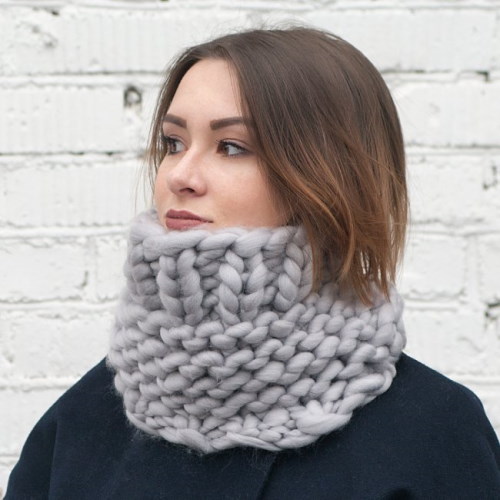
How to knit a snood scarf from Alize Puffy yarn with an unusual pattern:
- There are 12 loops counted along the width of the scarf. The first loop is pulled from the back to the front side. Weaving begins from right to left.
- Each subsequent loop is twisted before the next loop of the working thread is pulled through it. Only the first and last loops of the row are not twisted.
- The next row is knitted in the same way, but in the other direction. The first loop is knitted without turning, then 10 loops with turning, and the last one without it.
- At the end of the weaving, there remains a "tail", the same as at the very beginning of the snood. You need to adjust the rows so that both threads are at the same level.
- To connect the scarf into a single whole, you need to bring its two opposite sides to each other. On one side - free loops, on the other - the beginning of the weaving.
- Each free loop is pulled through the tied loop opposite.
- The last row is closed like this: each loop formed is threaded into the previous one until the row is finished. The last loop is closed with the remaining tail, then both weaving threads are tied together with a strong knot and cut off.
- All that remains is to turn the product inside out – the snood is ready.
The pattern of such a snood is obtained with a semblance of twisted strands. It looks original, as it differs from the standard braid weaving, and quite elegant if you choose a moderately thick yarn.
To knit a regular scarf, you need to act in the same way as in this master class with a snood. In this case, instead of the fifth step, the last row is closed in the usual way - each loop is threaded into the previous one.
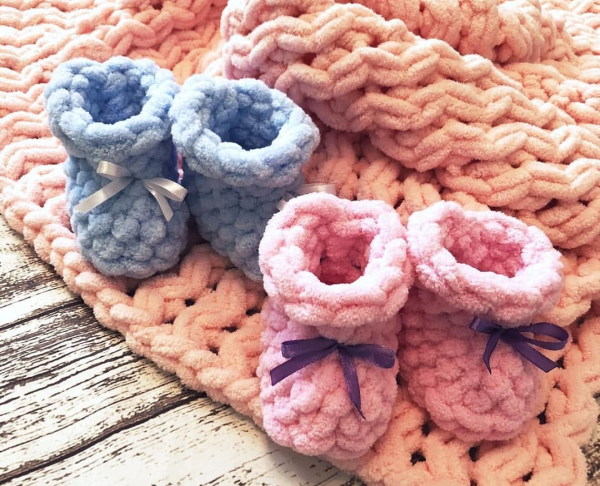
Things for children
Knitting baby clothes with thick yarn by hand often helps young mothers occupy their free time during maternity leave. In addition, the skill will also be useful for those whose friends or relatives are expecting a new addition to the family - warm booties or hand-knitted hats will be a great gift.
How to knit booties from Alize Puffy yarn by hand:
- For booties 10 cm long, you need to cast on 6 loops. This is done as follows: the second loop is threaded through the first, the third through the second, the fourth through the third, and so on until the end of the row of six loops. The last loop remains free. You should get something like a braid.
- The second stage involves tying 11 more free loops onto the braid loops. The first row of loops can be started in the opposite direction - a loop from the working thread is threaded into each loop of the braid.
- In this way, 6 loops are woven on one side of the “braid” and 5 loops on the other. In total, there are 12 loops (we must not forget one free loop left after the first step), located opposite each other in two rows.
- Starting from the last loop (the one free, left in the first step), the row is closed. You need to move from right to left, the last loop is put on the previous one, and so on until the end of the row.
- You can move straight from the first row to the second, as a result you should get 11 closed loops (columns). Another column needs to be knitted where the weaving of the first braid began (the main thing is not to confuse the initial loop). You will get 12 columns and 1 free loop.
- In the next step, the working thread is brought forward, along the product.
- The next row is knitted in the same way, moving from right to left. Each loop of the working thread is threaded into the already double loop of the previous row.
- This leaves 12 loops, which also need to be closed, as in step 4. You need to start closing the row from the loop that ended it. Here, too, there is 1 free loop at the end.
- Again we pass the working loop through the closed loop located next to it (still from right to left). We take the working thread back.
- Next, knit a row from the back side, each loop of the working thread is threaded into the loop of the braid of the previous row. There should be 11 such loops (one free one remained in the eighth step).
- At this stage, the row of loops is closed again. The "tail" left from the beginning of the weaving can be neatly sewn on immediately.
- Knit 11 loops of the next row. At this step, you need to start forming the bootie's toe.
- The first two loops (those on the fold of the oval) are skipped. The loop of the working thread is threaded into the third loop of the row (the reference point is the left side of the product).
- The working thread is pulled forward. A loop of the working thread remains in the fingers, and the third loop from the right side of the row is threaded into it.
- Next, the loop from the working thread is threaded into the second loop, then into the first. Ultimately, the loop of the working thread should be in the center of the bend of the oval, the working thread - in front under it.
- The next step is to close the remaining loops in the row. You should get 9 knitted columns.
- You need to find the very first closed loop next to the toe. The loop of the working thread is threaded through it (in the outward direction). From the next loop, a regular row is knitted, again 9 loops. This row is closed, starting from the same central loop from point 15.
- Next you need to knit 3 more rows of 9 stitches.
- This is where the knitting of the booties ends. The tail is cut off, threaded through the closed loop next to it, then through the remaining free loop. The tail should be pressed down on this loop, tying it among the columns of the last row.
The last step is to add some decor to the booties - two loops tied together form a bow, you can add elements of yarn of a different color or make a small pompom.
Tips for Beginners
The first thing that beginners in knitting need to pay attention to is the composition of the yarn. It can be synthetic fiber (acrylic, micropolyester) or natural (merino wool, roving). Synthetic yarn can be highly electrified, this material does not allow air and moisture to pass through well, and therefore is suitable for creating toys and decorative elements. Natural yarn has excellent heat-insulating properties, it is used to make soft and warm sweaters, scarves, blankets and even hats.
The combination of synthetics and wool in different proportions is a great option for knitting both home decor and clothing. Such products remain durable, while conducting moisture well and retaining heat, do not lose shape after washing and do not lose color saturation for a long time. The most successful combinations of materials in yarn are acrylic and cotton thread, wool and nylon.
The second important nuance is the correct calculation of the material. In order not to slow down the work on the product because the last skein suddenly runs out, it is better to immediately buy a sufficient amount of yarn.
Usually, consultants from specialized stores can help with this question, but you can do the calculations yourself:
- determine the approximate or exact dimensions of the finished product;
- knit a small sample from the available yarn, calculate its area;
- multiply the length of yarn in one skein by the resulting area of the sample, and then divide the result by the area of the entire product;
- the resulting value is the total length of yarn for the entire product.
Most often, skeins of yarn are sold by weight (from 100 to 500 g). Only suppliers or consultants can know what length of thread will be in such a skein. Therefore, for the first experience in knitting from thick yarn, you need to either choose a MK indicating the materials and sizes, or find out detailed information in the store.
Knitting is a fascinating process. Hand-made things and interior items can serve not only the master himself, but also become a great warm gift for relatives and close friends. Products made of thick yarn, in addition, look as if they were created specifically for stylish outfits and "Instagram" interiors - therefore they will suit people of any age.
Video about hand knitting
Plush blanket without knitting needles and crochet hook: