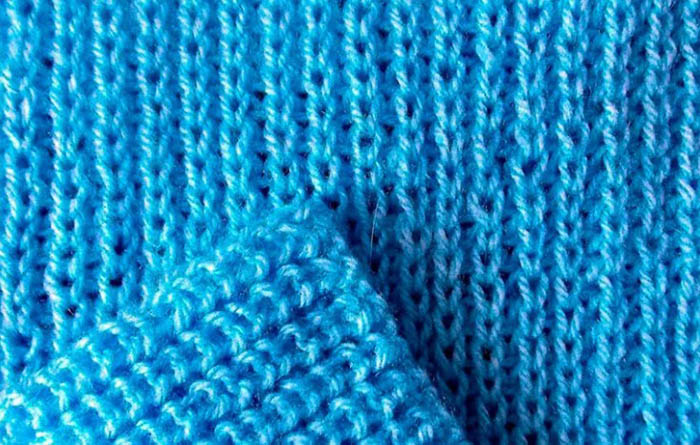
The origin of the patent rubber band is connected with the word patentis, which roughly translates as accessibility, openness. With such knitting pattern the pattern turns out lush and voluminous. As a result, the fabric acquires good elasticity with a pronounced relief.
The front and back sides of the product are characterized by identical appearance. Due to this, the patent method of elastic band design is in high demand among experienced and novice craftsmen.
What is a patent rubber band
Patent elastic knitting (the diagram with the description is given for informational purposes) is an elastic fabric segment that was decorated using knitting. This method of decorating a product is similar to ordinary needlework, because English knitting includes a large number of different methods.
When creating a fabric, the front and back elements are intertwined. However, the stitches must be cast on in an odd number.
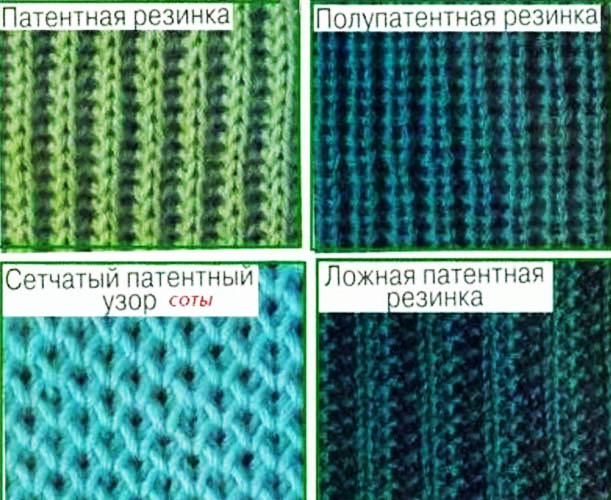
There is a semi-patent type of elastic band, which is somewhat reminiscent of the patent type. However, the difference is that in the first case, you need to dial an even number of elements.
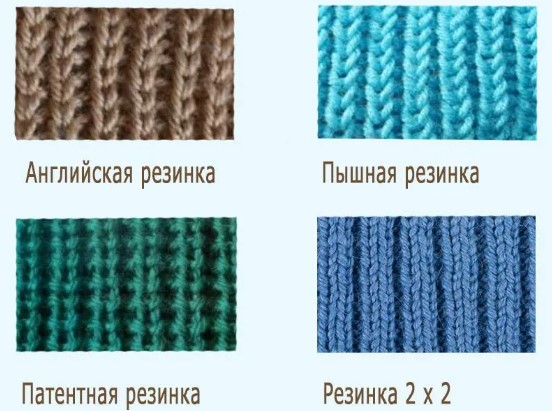
There are 2 types of patent rubber:
| Type | Peculiarities |
| Knitting with slipping stitches | This type of knitting can be designed using 2 different methods. For example, in the first case, the knitting should be designed as an English rib. In the second case, the front loops should be replaced with back loops. |
| From the elements of the previous line | In this case, you need to cast on an even number of elements on knitting needles. After the 2nd row, you need to make facial loops. As a result, the finished product will be smooth, without holes and bulges. |
Rules for knitting patent elastic
The patent elastic band must be knitted with knitting needles according to a pattern and certain rules so that the pattern is beautiful and lush:
- Most of the elastic bands will stretch in width, so before knitting you need to make a control sample, the size of which should be approximately 15x15 cm. This allows you to correctly calculate the number of loops to collect the edge, as well as understand how the ornament will behave further.
- To create an airy and voluminous elastic band, it is recommended to give preference to thick knitting needles and fluffy thread material. To create an attractive pattern, the loops should be loose, and there is no need to pull the yarn.
- Patent elastic is characterized by its decorative purpose, so it is not suitable for creating strips or the lower part of sleeves. The ornament stretches and will not hold its shape well.
- When knitting, you can't make mistakes, because they are almost impossible to correct. Otherwise, you will have to unravel the knitting to the area where the mistake was made. Then you will have to re-shape the fabric.
Knitting methods
Patent elastic knitting (the diagram with the description is easy to understand, so it is suitable for beginner knitters) can be designed not only in the classic way, but also in other ways. As a result, the finished product turns out beautiful and original.
The classic way
To make a classic elastic band, you need to cast on an even number of loops, and you also need to make 1 loop to join it into a ring. When working with circular tools, be sure to attach a marker to the right knitting needle before starting to create 1 line.
Step by step process:
- 1 row is made only once, without further repetitions, because this row is not included in the pattern rapport. To do this, remove 1 loop with a yarn over from the left knitting needle to the right one, without knitting. The 2nd element should be the front one. Do the same manipulations until the end of the row, removing with a yarn over and without knitting the loop and making the next element the front one.
- In 2 and all other even rows, make 1 loop as a front loop with a yarn over. Remove the 2 element onto the right knitting needle with a yarn over, but do not knit. The alternation should be until the end of the row.
- In 3 and other odd rows, remove the front loop with a throw on the right tool, without knitting. Make a new element purl with a throw. The alternation of loops should be until the end of the row.
Knitting with turning rows
Patent elastic knitting (the diagram will tell you how to correctly design the elastic with turning rows), designed with the help of turning rows, begins with the fact that you need to dial the required number of loops. In this case, any convenient method is suitable.

Next, you need to follow the scheme:
- Without knitting, remove the edge element. Make 1 loop as the front one.
- 2 purl element remove without knitting. At this point, grab the working yarn with a yarn over.
- Perform similar manipulations until the end of the line, knitting 1 element as a front one, and removing the new one without knitting with a yarn over.
- Make the outer edge element purl.
- In the 2nd and all other rows there should be knit elements, knitted together with the yarn over with knit loops. The purl elements are removed with the yarn over, but not knitted.
Simplified knitting method
Patent elastic knitting (the diagram will tell you how to knit the pattern in a simplified way) allows you to design a not very dense, but elastic product. In this case, when knitting, you do not need to do a throw. However, knitting needles should be 2 sizes larger than the thickness of the thread material.
Step-by-step description of the work:
- Cast on an even number of loops and join them into a ring. Make 1 row with a 1x1 elastic band. Knit this row only once at the beginning, without repeating.
- All even rows, starting with 2, should include 1 knitted from the bottom row. To do this, insert the right knitting tool into the loop that is located under the knitted element in the bottom row. When grabbing the working yarn, knit the knitted element and remove it onto the right knitting needle.
- The new loop should be purl. Alternate the elements until the line is finished.
- In odd rows, starting with 3, the front element should be the front one, and the back element should be the back one from the bottom row.
- In this case, place the working yarn in front of the fabric, place the right tool behind the knitting and insert it into the element that is placed under the purl loop.
- At the back of the fabric, turn the edge of the tool towards you, grab the working yarn and pull it through the element, removing it onto the right knitting needle. Continue alternating loops until the stitch is complete.
Semi-patent rubber band
This type of elastic is popular among knitters because it resembles the patent type, but at the same time requires a minimum consumption of thread material. At the same time, the knitting pattern allows you to create round wide facial loops.
Step-by-step description of the scheme:
- Knit an even number of loops, and also dial 1 connecting element to close the chain into a ring.
- 1 knit element knit behind the front wall. 1 loop slip with a yarn over on the right knitting needle, but do not knit. In the next row, this element will be purl. However, this loop can be slipped behind the front wall with a yarn over to create twisted elements or behind the back wall.
- If the English elastic is considered the front side, then the loop is removed behind the back wall. For the semi-patent front elastic, this is not significant.
- Repeat all manipulations until the end of the line. Knit in a similar way not only 1, but also all odd lines.
- For the 2nd and all even rows, knit 1 front element through the front wall, and knit 1 back loop together with the yarn over. Continue until the end of the row.
Patent elastic knitting patterns
Patent ornaments are characterized by elasticity and volume. When decorating clothes in this way, the products will have the same structure and pattern on both the front and back sides. In this regard, patent elastic is suitable for creating clothes where both sides of the fabric will be visible.

This is more related to:
- cardigans without buttons;
- blankets;
- hats with a turn-up;
- scarves and snoods.
However, when creating volumetric ornaments, you will have to spend a lot of thread material. In this case, the elastic will stretch after washing. To prevent such problems, you need to choose tools for knitting the product that are one size smaller than the yarn. Before measuring, the knitted fabric should be washed in advance.
Patent ornaments are universal, so they are suitable for decorating various knitwear. There are several common types of patterns that can be combined when creating a snood, hat, pullover. At the same time, experienced knitters are able to combine several ornaments on one piece of fabric.
The "Honeycomb" pattern is also called a lattice or mesh. The ornament is not very elastic, but voluminous and is suitable for creating warm clothing. As a result, the fabric is comfortable, practical and beautiful.
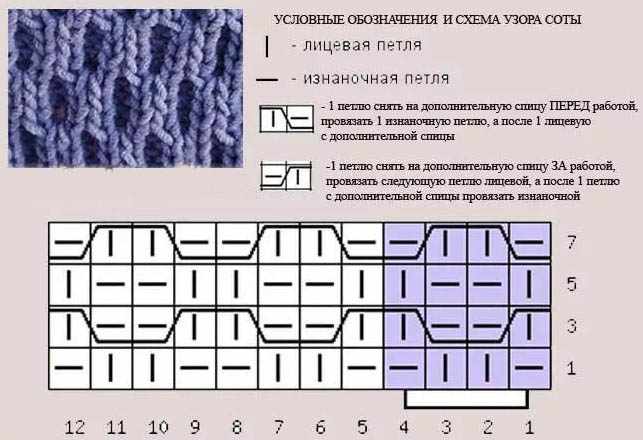
Step by step knitting method:
- Place yarn overs on the front side of the mesh-shaped ornament. Initially knit an odd number of loops.
- 1 row should consist of purl loops. To do this, make an edge element. Then knit a front loop, 1 element, as a purl, remove with a yarn over. Repeat the pattern to the end of the row. At the end of the row, knit 1 front and edge elements.
- The 2nd row consists of an edge and 1 front element. Then repeat the pattern to the end of the row: make the element before the yarn over as a front one, remove the yarn over as a purl, passing the yarn behind the yarn over, and knit 1 front loop. At the end of the row, make an edge element.
- In the 3rd row, first make an edge loop. Then knit 1 element as a purl and remove with a yarn over. Make the loop with a yarn over together with the front one. Repeat both steps to the end of the row. Then remove 1 element as a purl with a yarn over and knit an edge loop.
- In the 4th row, initially make an edge element. Then knit 1 front loop to the end of the row, remove the yarn as if it were purl and make 1 front element again. To complete the row, knit a front loop, yarn over, then remove the element as if it were purl and make an edge loop.
- In the 5th row after the edge element, knit the loop and yarn over together, remove 1 element with yarn over as if it were a purl. Continue knitting in the same way to the end of the row. At the end, knit the loop with yarn over together as a front one and knit the edge element.
- Knit the remaining rows from rows 2 to 5.
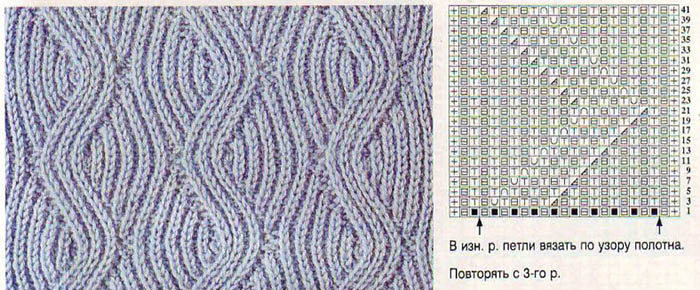
When creating the "Braid" pattern, the number of loops must be a multiple of 21. In this case, you need to additionally knit 2 elements so that the pattern is symmetrical.
Step by step description:
- From rows 1 to 7, repeat the pattern from the beginning to the end: 2 purl elements, 9 loops crossed with a right slope, 1 purl element and 9 loops crossed with a left slope. At the end of the row, knit 2 purl loops.
- Even rows, starting from the 2nd, are designed according to the pattern of the product.
- Rows 3 and 5 consist of 2 purl, 9 knit, 1 purl and 9 knit elements. At the end of the row, make 2 purl loops.
- In the 9th, 11th, 13th, 15th, 17th and 19th rows, repeat the pattern three times: 2 purl, 5 knit, 1 purl and 1 knit loop in the element of the previous row. Then knit 1 purl and 5 knit elements. Repeat knitting until the rows are finished. Then, at the end of the rows, make 2 purl elements.
- After that, decorate the ornament, starting from line 1.
To cross 9 elements with a right tilt, you need to throw 4 loops onto an additional knitting needle and leave them behind the fabric. Then you need to make 5 front elements and then knit the loops from the additional tool.
To cross the loops with a left tilt, you need to throw 5 elements onto an auxiliary tool and leave them in front of the fabric. Next, you should make 4 front loops and knit the elements with an additional knitting needle.
When creating a pattern, to prevent deformation of the lower strip of the fabric, it is recommended to start knitting from row 9. After that, you can design the pattern rapport in 20 rows.
The "Tulip" pattern can be made using 2 knitting needles. The ornament can also be made on circular knitting needles.

Step by step description:
- In the first row, make the main color from the beginning to the end with face loops, alternating with the element removed with a yarn over. For the additional color, initially remove 1 loop with a yarn over, then knit the purl element, and so on until the end of the row.
- In the 2nd row for the main color, remove 1 loop with a yarn over and knit the purl element. For the additional color, knit the front element and remove 1 loop with a yarn over. For each color, repeat knitting from the beginning to the end.
- In the 3rd row for the main color, from the beginning to the end, knit 7 from 1 element, then remove 1 loop with a yarn over, then knit together 3 elements with a left tilt, remove 1 loop with a yarn over, knit together 3 elements with a right tilt and again remove 1 loop with a yarn over. For an additional color, alternating from the beginning to the end, remove 1 loop with a yarn over and knit the purl element.
- 4th row is similar to 2nd row.
- In row 5 for the main color, from the beginning to the end, alternately knit the front element, remove 1 loop with a yarn over (repeat 4 times), knit 3 elements together with a right tilt and again remove 1 loop with a yarn over. For the additional color, alternate 1 removed loop with a yarn over and a purl element.
- Row 6 knit as 4.
- Row 7 is similar to row 1.
- Line 8 matches line 2.
- Row 9 is the same as row 1.
- Line 10 matches line 2.
- In the 11th row for the main color, knit 3 together elements with a left tilt, remove 1 loop with a yarn over, knit 3 together elements with a right tilt, remove with a yarn over again and knit 7 from 1 loop. Repeat from the beginning to the end. For an additional color, alternate a removed loop with a yarn over and a purl element.
- Rows 12, 14 and 16 match row 2.
- In row 13 for the main color, knit 3 elements together with a right tilt, remove with a yarn over, make a front loop and remove with a yarn over again (repeat 4 times). Alternate from the beginning to the end. For the additional color, remove 1 element with a yarn over and knit a purl loop, alternating with each other.
- Row 15 coincides with row 1.
Two-color patent elastic
When knitting a cardigan or scarf, it is permissible to create an ornament from 2 different shades. In this case, the pattern will have the same appearance both from the outside and from the inside.
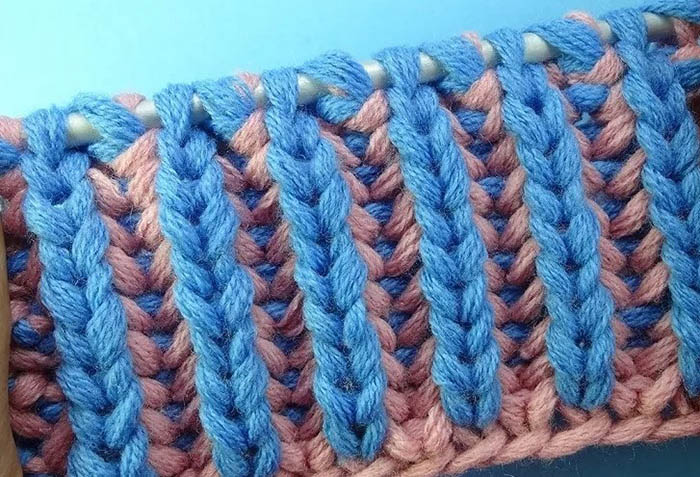
Step by step knitting process:
- For the pattern sample, cast on a knitting needle a number of elements that will be a multiple of 3. Additionally, knit 2 edge loops. Initially, work with one tone.
- Remove 1 edge stitch, knit 1 knit stitch and make 1 yarn over. Then remove the next stitch. Repeat to the end of the row.
- Turn the product and remove the edge element in the 2nd row, then perform a throw-over, and throw the loop of the previous row onto a knitting needle and knit the purl element. Repeat until the end of the row.
- To attach yarn of a different shade at the end of the 2nd row when knitting the edge element, use 2 threads at the same time.
- Turn the fabric and make a throw over. Remove the loop, then knit the element with 2 throws over. Repeat the ornament until the end of the fabric.
Knitting patterns for patent elastic bands are in great demand among beginner knitters because the patterns are beautiful, easy to create, versatile and elastic. It is permissible to knit not only individual fragments in the form of a collar, bottom or cuff, but also the entire thing. This method is mainly used to create scarves and sweaters.
Video about knitting