Decorative crafts made by paper tube weaving, look very attractive. For beginners, it seems surprising that tightly twisted paper in the finished product looks like vines, straw or other similar natural materials. Since the same patterns and types of weaving are used for paper tubes as for classic rods, you can get any objects - decorative napkins, vases, hanging design elements and so on.
Benefits of Paper Tube Weaving
The material for paper weaving can be prepared from any printed publications: color and black-and-white newspapers, glossy magazines, old books, brochures, booklets, office paper. Thick sheets hold the corners of square or rectangular items well.
Printed materials (especially newspapers) are very cheap consumables for handicrafts. Quite often, you can get them for free if you ask friends and acquaintances not to throw away old magazines and newspapers, but to pass them on for creative recycling.
This usually allows you to get a large batch, from which you can make tubes for weaving entire collections of crafts (since people often save media sources they read, and decide to get rid of them only when the stack of publications becomes very high and voluminous).
Weaving from paper parts is so popular not only because it is budget-friendly. When creating a craft, the length of the tubes can be increased indefinitely by connecting and gluing blanks of the same thickness. The numerous existing methods of interweaving parts help to obtain canvases and parts with unusual patterns.
In order for the finished product, regardless of the method and scheme used, to be strong and durable, it is necessary to properly process it from the outside. For this, various varnishes and dyes are used, and even drying oil for wood materials (woven paper surfaces painted with it become visually almost indistinguishable from wicker canvases).
Preparing for work
Before you start weaving crafts, you need to prepare a large number of paper tubes of the same shape and width. The recommended length of each of them is about 25 cm.
Materials
Weaving from paper tubes for beginners requires only 3 consumables:
- Newspaper, magazine or large book pages;
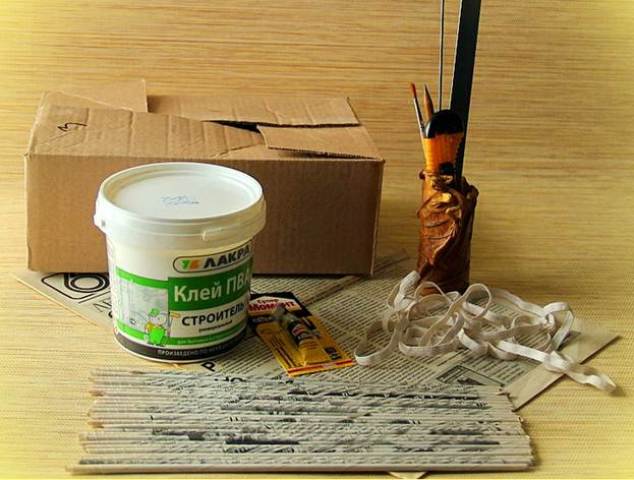
- white or transparent glue (PVA or any other stationery type);
- any type of paint in the chosen color (primer, acrylic, dye-sealant or other similar variety).
Tools
To do the job you will need tools (which many people always have at home, and if they don’t have them,x can be purchased at any hardware store at very low prices):
- wooden stick for mini kebabs or Asian food;
- large sheet painting;
- clamps or large paper clips;
- brushes of different thicknesses (thin for glue and thicker for applying paint).
Making tubes
Beginners can use paper tube weaving as a base material not only newspapers and magazines, but also wrapping paper and even cash receipts and ribbons. However, it is important to consider that all of these products differ in thickness, strength and elasticity.
For the first crafts, it is recommended to make tubes from newspapers, as they are flexible and quite elastic, easily intertwined with each other and hold a fixed shape without requiring significant effort.
Magazine pages (primarily glossy) are denser and thicker. Weaving tubes on their basis requires a certain skill and experience, and at the same time guarantees high strength of the final product. Cash receipts and tapes are very thin and soft, so they are easy to work with, but the results cannot be called strong and durable.
In addition to old unnecessary products, you can also use new materials to make tubes - primarily office paper (for printing) and colored craft paper.
Regardless of the paper source chosen to create the tubes, it is important to select paper with completely identical properties (thickness, density, texture). Paper strips must be rolled as tightly as possible to ensure their strength.
Cutting blanks
In order for the weaving material to be strong and high-quality, you need to cut the paper source taking into account the location of the fibers. To determine their direction, you should put a sheet of newspaper on a flat surface and soak it with moisture (but not soak it through). From the moisture, it will begin to bend slightly. Paper blanks for tubes must be cut in the direction of the resulting bends.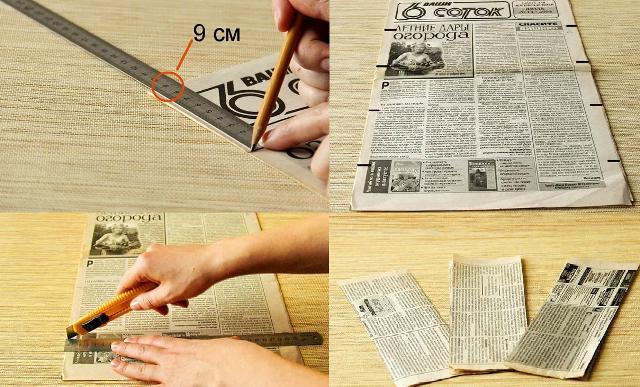
The process looks like this:
- A whole sheet of newspaper (standard format) needs to be folded in half lengthwise, then again in the same way.
- You will get a newspaper blank of 4 layers. It is necessary to cut it into 4 parts along the fold lines (you will get 16 sheets).
It is recommended to cut with a stationery or construction knife (with a thin, sharp blade). This will allow you to cut each strip in one quick motion (cut along a straight line), without nicks, unevenness and "frayed" edges, which would make the material look untidy. Standard tubes, suitable for making most crafts, are twisted from sheets of 7 cm or slightly more. Their length is determined by the width of the newspaper (usually about 25 cm).
Twisting
Paper tubes for weaving may seem very difficult to make for beginners. When first made, they often turn out to be different in thickness and shape. If the differences are small, this will not affect the final appearance of the craft.
A significant defect that should not be used in weaving is a low density of the workpiece, clearly visible visually. To avoid making low-quality tubes, you need to apply the same force when twisting each of them, and regulate their density with one knitting needle or chopstick.
The simplest method of rolling paper strips into tubes involves forming them with immediate and reliable fixation by adding glue over almost the entire inner surface of the material.
- Place the paper strip on the work surface, lengthwise away from you.
- Place a stick or knitting needle horizontally just below the middle of the paper (like a “bridge” across the width of the workpiece).
- Apply a thin layer of glue to the top half of the paper around the edges, starting from the stick.
- Fold the bottom of the newspaper strip to the top edge so that the sheet is folded in half and the stick is under the fold (between the two halves).
- Holding the stick tightly, roll the blank into a tight tube to the opposite edge and press it with your hands across the entire width several times - this will allow you to fasten all the layers of paper with the previously added glue.
- Once the tube looks solid and whole, carefully remove the stick.
- To create subsequent paper weaving pieces, you need to repeat the above steps, trying to perform all actions with absolute identity.
 There is another, faster method of twisting tubes for weaving. It is suitable when using newspapers, cash register tapes and other soft types of paper, which must first be cut into strips 9 cm wide (instead of 7 cm for the first method).
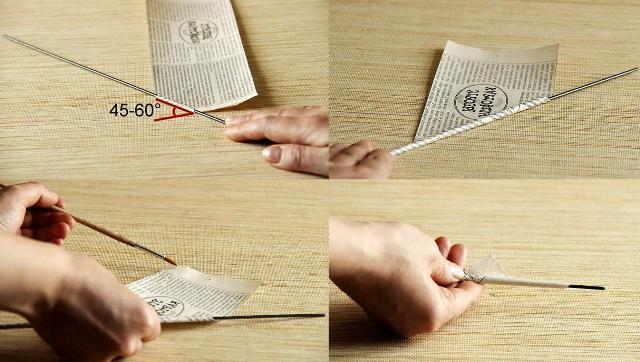
- Lay out the paper strip lengthwise away from you on a flat surface.
- Place a stick or pencil against its near edge at an angle of 45-60 degrees.
- Apply a drop of glue to the free corner of the paper near the stick.
- Turn the stick forward and make sure that the added glue has fixed the bend in a circular shape, then continue rolling the sheet onto the stick in the direction of the opposite end, without changing the angle if possible.
Compound
Correctly rolled and fastened tubes should differ in diameter at opposite ends. This is due to the fact that weaving crafts most often requires very long blanks, since most patterns and techniques are based on continuous repetition of twists and knots in a given sequence.
Since the length of 1 tube rarely exceeds 25-30 cm, the blanks should be fastened together with an extension effect:
- Add a drop of glue inside the larger diameter side of the tube.
- Insert the narrow edge of the second piece there.
- Slowly push the insert in, using circular motions at the same time, until the tube appears solid and strong.
Coloring
Weaving from paper tubes for beginners may raise questions about the possibility and necessity of coloring the original blanks (or finished crafts). If colored craft paper, colored newspapers and glossy magazine pages (or even standard ones in a color edition) are used as the base material, you can not use additional dyes at all.
Even if the tubes don't look too bright and expressive, their combination will create an interesting and original coloring in the finished product. It is recommended to paint black and white newspapers and other light types of paper in the color of straw or vines to imitate classic weaving from rods.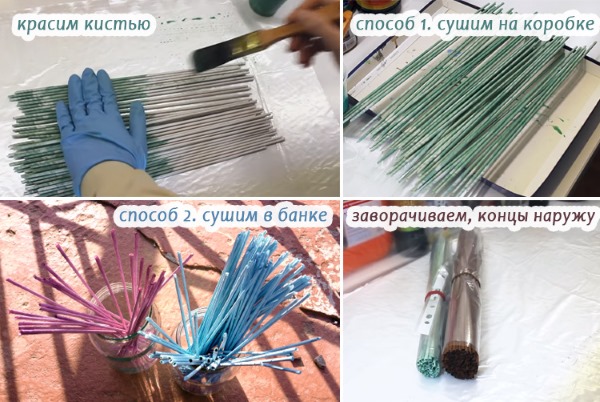
There are several options for coloring paper tubes and crafts made from them:
- before weaving;
- after completing the wickerwork;
- combined method (applying the base color before weaving and applying the design to the finished product).
All coloring methods can be suitable for almost any composition that is intended to be of a certain color or contain multi-colored elements or patterns.
Desirable and acceptable dyes
It is permissible to use many types of dyes for paper weaving, the choice of which is made depending on the desired shade, its brightness and intensity.
Some coloring compounds make the tubes rigid after they dry, others do not change the texture and properties of the paper, but in the finished product they fade or even become discolored after some time.
Dyes recommended for decorating paper tubes and crafts made from them can be made on a water or alcohol basis, or in powder form (for use, it is mixed with some liquid to obtain a creamy or liquid form).
The most common types of coloring agents are:
- gouache;
- watercolor;
- acrylic paints;
- car spray paint;
- iodine dyes;
- brilliant green (known to everyone as "Zelenka");
- potassium permanganate (potassium permanganate);
- aniline dyes for clothing;
- food colorings;
- ink for drawing;
- ink;
- hair dye (direct action pigments).
If you need to pre-color the tubes, you need to use a dye that interacts well with the paper and provides a beautiful, rich shade after drying. To increase the brightness, you can apply the dye in several layers, waiting for it to dry completely after each application.
If the woven paper product is intended to be used for storing food products, it is advisable to choose acrylic paints or gouache for its coloring. They are sold in sets, so they are suitable for creating complex patterns on the surface of a woven basket, box or vase. For an effective decoration, you can draw an ornament, floral motifs or any other drawing.
It is worth considering that when using any of the above dyes, you will need to fix it with varnish, and additionally make the product more durable and resistant to moisture. In this regard, it is recommended to paint the finished craft, since a layer of varnish will make the paper parts hard and not very convenient for weaving.
Dyes that are not recommended for use
Paper tube weaving for beginners often causes difficulties with the choice of dye for coloring and designing the craft. The list of recommended paints includes almost all popular and affordable ones, but some of them are not recommended by experts. The most famous example of such a contradiction is watercolor (this is due to the fact that after drying, the paint becomes very pale and dull).
It is not recommended to use natural dyes obtained from food products (onion peel, beetroot) - if on the surface of the eggshell they create a bright and uniform coating, then on paper the result of their use can be unpredictable (in terms of shade, its brightness and intensity and even uniformity). The same can happen when using permanent hair dye.
How to paint white paper tubes
To get a light craft and then apply a complex design to it using a stencil (for example, a floral pattern), it is recommended to make tubes from office or thin white paper or even cash register tape. 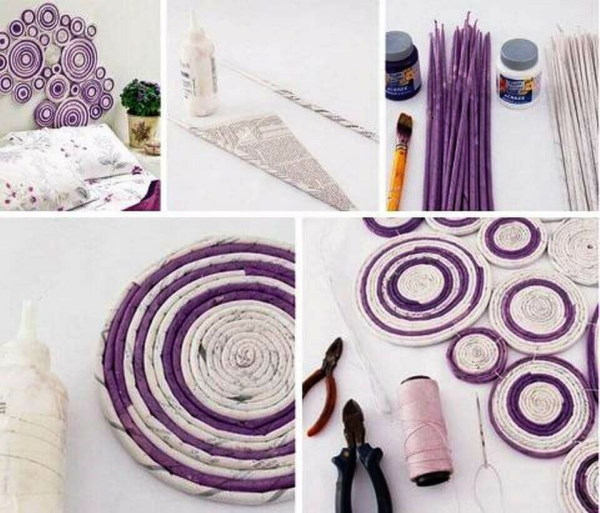 The most suitable dye for color design will be acrylic paint or primer, water emulsion and even gouache, if its consistency allows for the application of thick, voluminous layers.
How to paint straws before making a craft
To pre-paint the prepared tubes, you can use the following tools:
- wide brush;
- a small sponge or scoop;
- a tall container in which the blanks will be filled with liquid dye.
Using the first and second tools, the work is performed as follows:
- Prepare the dye of the desired intensity.
- Place the tubes in one layer on the film.
- Put on thin gloves and choose a comfortable brush.
- Dip your brush into the dye as needed and apply a thin layer over the top of each piece.
- Dry the painted side of the workpieces completely.
- Turn them over to the unpainted side and repeat the previous steps 3-4 times (until the entire surface of the tubes is evenly painted).
In addition, you can paint and dry all the blanks at the same time in a vertical position if you firmly fix them in place parallel to each other (for example, attach them with clothespins or paper clips to the inside wall of the container).
Then you should pour in the liquid dye solution, completely covering the blanks along the entire height. After some time, the dye will be absorbed into the paper and the liquid level in the container will decrease, so you will need to add it to the initial mark. As soon as the tubes are colored, you need to drain the solution and leave them fixed vertically until completely dry.
How to strengthen the craft
A product made of paper tubes will be durable only after strengthening with a primer. A liquid mixture of acrylic paint and PVA glue will be deeply absorbed into the paper and after drying will strengthen the structure from the inside. In addition, the primer facilitates the process of painting the finished product and makes the applied color more expressive.
To obtain a primer, you need to mix acrylic paint and PVA glue in equal proportions. It must be applied in several thin layers, each time waiting for the previous one to dry completely. It is recommended to distribute the mixture over the surface of the craft with a thick brush, and then process hard-to-reach areas with thinner and narrower brushes.
If you use white acrylic paint to make the primer, you can paint the product any color after strengthening. If desired, the strengthening composition can be prepared from a color dye of the desired shade. However, this will not be enough to finally paint the craft - you will need to apply at least one additional layer of acrylic paint of the same color.
Types of weaving
There are many types of weaving, with the help of which paper tubes are fastened together into a homogeneous craft. Beginners in handicrafts are recommended to master 2-3 basic methods in order to create unique products by combining them.
| Type of weaving | How it is done |
| Simple | An odd number of blanks are placed vertically on the base, and then the main working tube is intertwined with them horizontally, alternately from the front and back, rising in layers from the bottom up. |
| Layer by layer | Use 2 working tubes and intertwine them with each rack, alternately bending one of them from the front, the second from the back. |
| Rope | 2 working tubes are intertwined alternately with each rack and with each other. |
| Spiral | A simple weave done at an angle. |
| With a pigtail | In each row, 2-3 additional ones are added to the working tube and they are intertwined on the outside like a braid. |
| Openwork | A combination of several types of weaving that allows you to create an imitation of lace. |
| Circular | Several tubes are glued together and rolled into a circle, secured with glue and weaving continues in a circle using any of the simple techniques. |
Spiral Weaving: Master Class for Beginners
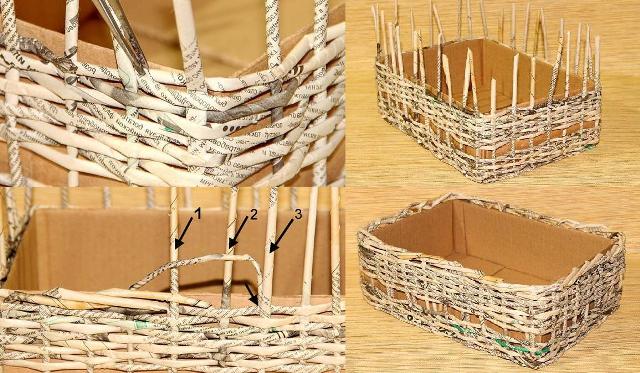
This is one of the easiest ways to create paper woven crafts. Its essence lies in fastening the working tube to the posts at an angle, as a result of which the rows of the canvas lie in a spiral. Usually, this technique is used to create decorative glasses or tall narrow vases.
The weaving process looks like this:
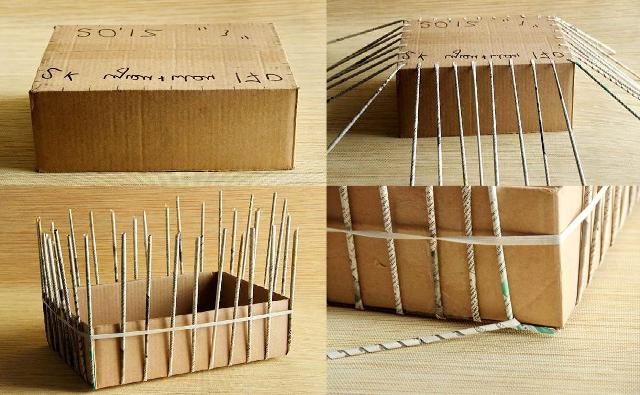
- First of all, prepare the bottom of the product of the selected diameter. The easiest way to do this is to cut the desired figure out of cardboard. If you plan to create a craft only from paper parts (without additional elements), you will need to fold several tubes to each other lengthwise and roll into a circle, fix it on all sides with glue.
- Several tubes need to be attached to the prepared bottom at one end at the same distance from each other - so that their free ends form vertical posts. Their number and distance between them can be arbitrary, and depends on the size of the desired craft (the more posts and the closer they are located - the denser the weaving will be).
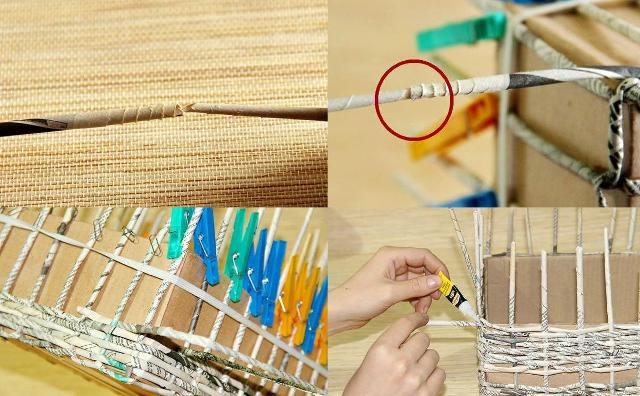
- Next, a working tube is intertwined with any of the posts and secured horizontally, snake-like around all the other posts one by one.
- Then move forward in horizontal layers, repeating the previous step and increasing the length of the working tube.
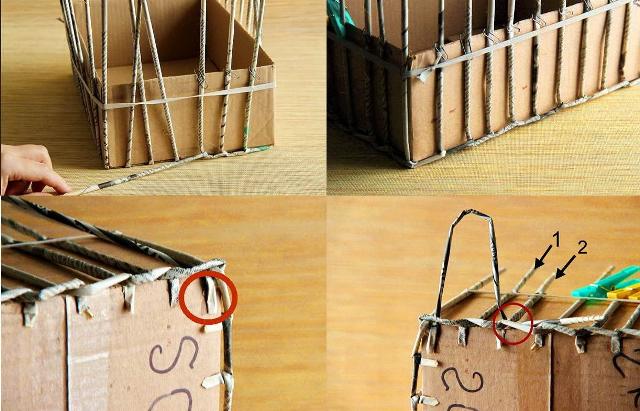
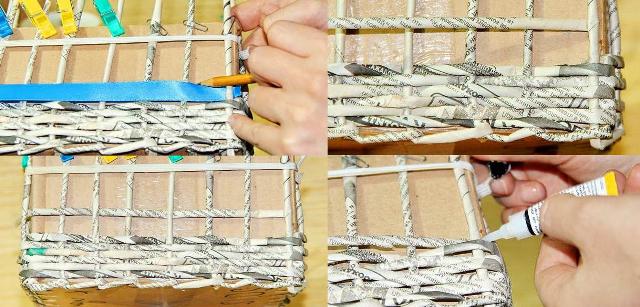
When the required height of the walls is obtained, it is necessary to correctly complete the weaving. It is permissible to simply cut off the remaining free parts of the racks, but this will lead to an untidy appearance of the product. In order for the craft to look complete and high-quality, it is necessary to use a special technique for forming a bend. These are types of weaving that allow you to harmoniously fit the ends of the racks into the finished canvas and create the appearance of a single whole.
There are many different ways to make a fold, including some used in the creation of certain products.
The easiest technique, suitable for beginners, looks like this:
- It is necessary to bend the free part of the rack towards the adjacent one, located on the left or right, measure approximately 1 cm from the intersection, and cut the remaining length at an acute angle.
- Bend the shortened end and press the cut against the adjacent post, inserting it into its upper loop.
- Repeat the previous steps with all the posts one by one, working in one direction around the perimeter.
- If desired, the cut ends of the tubes can be secured in the loops with glue.
Weaving a round panel
The panel is a very simple craft, suitable for beginners. Despite the extreme simplicity of assembly, with the right choice of color scheme, such a product will become an effective decoration of any interior.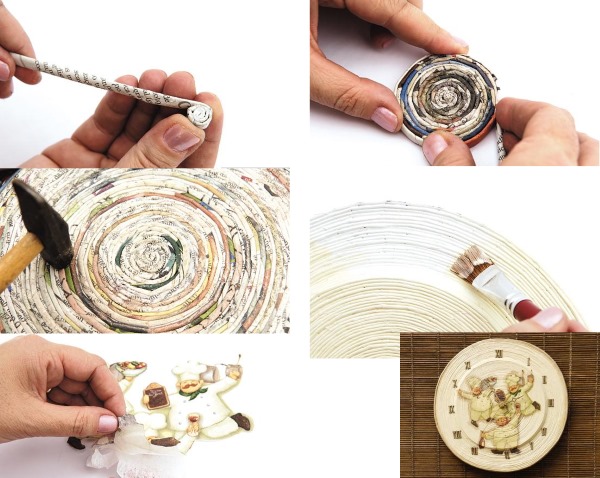
The creation process looks like this:
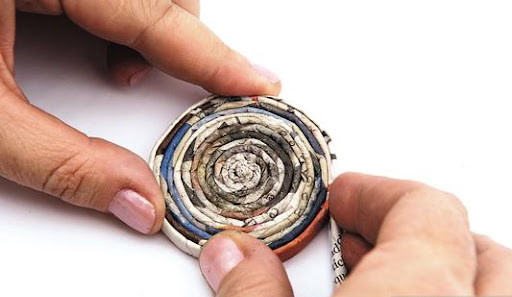
- It is necessary to first divide the paper tubes into several parts and paint them with different acrylic dyes (it is advisable to choose harmoniously matching colors).
- Place several identical tubes parallel to each other and roll them into a tight tape measure, securing the layers with PVA glue.
- Next, secure the circle with an elastic band and let it dry.
- Then attach a large number of multi-colored tubes to the edges of the base in random order.
- Straighten the attached blanks to the sides in the form of rays, attach the working tube to one of them and continue layer-by-layer weaving using any preferred technique or a combination of them.
- Make several wide rings by rolling several folded tubes and carefully gluing them in 2-3 layers.
- Fasten the prepared rings with the free edges of the rays along the entire circumference of the product with neat interlacing, wrap the free ends inside the loops and add a little glue for reliability.
Weaving from newspaper tubes allows you to create many interesting products, including original and unique ones. For beginners, it is recommended to choose simple-shaped crafts (coasters for hot dishes, lampshades, baskets and candy bowls, vases) and experiment with the pattern using a combination of different types of weaving.
As you gain experience, it will become possible to create more complex figures - dolls and other toys, flower bouquets and compositions, and other three-dimensional decorative elements.
Video about weaving from paper tubes
How and from what to roll tubes: