To develop and help children learn about the world around them, adults must create creative and playful conditions. Toys are an important point in this, and those made with your own hands from scrap materials will become especially beloved, inimitable and unique.
Materials for work
Children and adults can create toys with their own hands from scrap materials. Spending time together develops children's imaginative thinking, teaches them a love for creativity, helps them get acquainted with various materials and tactics for working with them. In addition, this has a beneficial effect on communication and expands their inner horizons.
The following items are used for foam plastic products:
- plastic containers;
- wire;
- metal mesh;
- hose;
- pieces of foam plastic;
- canisters.
To create crafts from tights, you will need children's knitted or thick nylon tights.
The following will also come in handy:
- synthetic padding;
- yarn;
- cotton fabric;
- chalk;
- scissors;
- threads;
- thick cardboard;
- wire.
When making toys from pom-poms, the most important component will be multi-colored yarn, which can be made from leftovers.
And auxiliary items:
- hook;
- skewers;
- beads;
- adhesive;
- plasticine;
- colored paper;
- felt.
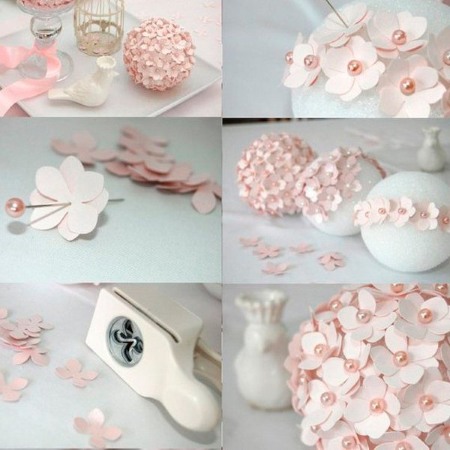
Paper toys are easy to make and require stationery supplies, namely:
- film;
- pencil;
- knife;
- glue;
- multi-colored paper or cardboard;
- pins;
- wand.
To make crafts from socks, first of all, you should look through these wardrobe items in your closet and select unnecessary or unpaired plain items for work.
You might also find these useful:
- hard fabric of different colors;
- threads, elastic bands;
- beads;
- scissors;
- ribbons;
- fabric glue.
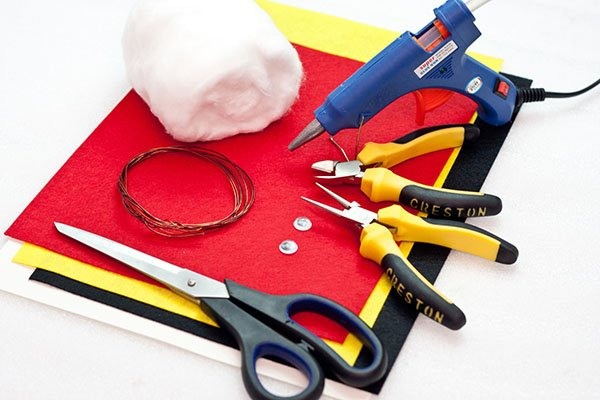
In felt products, different shades of this fabric will be used.
In addition, you will need:
- colorful fabric;
- floss;
- glue tool;
- scissors;
- felt-tip pen for fabric;
- filler;
- beads.
Soft Toys
To sew toys from soft materials, you will need a variety of fabrics:
- easy stretch knitwear;
- faux fur;
- silk is a must when sewing doll dresses;
- multi-colored cotton;
- wool;
- velour and velvet - necessary for creating soft toys;
- Felt - allows you to decorate crafts using the felting technique.
Methodology for manufacturing soft products:
- Select and prepare materials for work. The fabric must be washed and ironed.
- Cut out the marked parts.
- Sweep the pieces along the marked lines.
- Sew all elements along the basting line.
- Stuff the inside of the toy with stuffing.
- Collect all the components of the craft and sew them together.
- The final stage in decorating the general appearance of the product.
For patterns, craftsmen advise using thick cardboard.
Such templates are easier to trace on fabric and will serve as a basis for making other identical items.
Sewing a developmental pillow
The pillow must be ready-made or sewn. Put a pillowcase on top, to which the developing parts will be attached. It is better to sew the cover yourself from different easily washable fabrics, inserting various ribbons, cords, stripes, fittings in the process.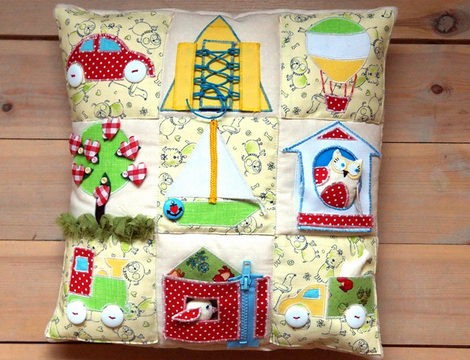
The most successful items for decorating a pillow:
- Iron-on sticker. Easy to design, it should be applied to the base and ironed with a heated iron through a cloth. The variety of labels in the form of animals, plants, geometric configurations will please any child. For example, a mouse is suitable for studying body parts (ears, nose, tail), and if you add a piece of "cheese", you will get a popular game of "lacing".
- Pocket. Attach an old mobile phone case and fill it with small toys. The child, pulling them out and putting them back, does finger exercises, develops curiosity and imagination.
- Velcro and zipper. It is not possible to open them right away, there is training for hand mobility and perseverance. It helps to learn how to handle items of footwear and clothing, the sounds produced make the baby happy.
- BeadsChildren enjoy playing with them. The tactile sensations are useful for learning about the environment.
- Buttons. By fiddling with them, they develop fine motor skills of their fingers. Various, colorful children's buttons promote basic counting skills and color discrimination.
It is important to secure all the elements well so that the child cannot put them in his mouth, bite them or swallow them.
Felt toys
To make felt crafts, semi-synthetic material is mainly used. Kids can make the simplest toys themselves. To decorate more complex items, patience and a little experience are required.
For example, to create a felt owl step by step you need to:
- Make a template out of cardboard, place it on felt and cut out the front and back parts and paws in 2 layers.
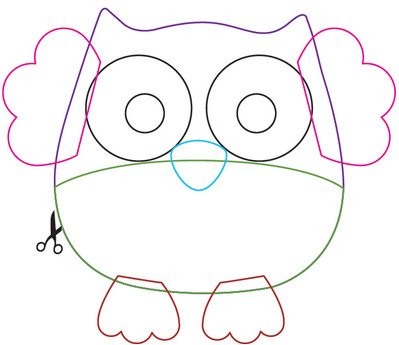
- The fabric will be needed for clothing.
- Decorate all the details and paint the owl's face (apply blush with a brush, glue on the eyes).
- Use a hot glue gun to attach the fabric to the original material.
- Decorate with a thin ribbon and beads.
- Sew the wings and fill with stuffing.
- Connect all the parts of the product by stitching along the edges with thread.
- Leave a small section unsewn and stuff it.
- Close the free area.
Toy "Harvest":
- Make a pattern of gifts of nature from thick paper.
- Place the template on the felt and cut out the figures in duplicate.
- Place 2 pieces together and sew them together, having filled them with cotton wool or synthetic padding beforehand.
- Attach Velcro on one side.
- Make a felt basket and attach all the elements to the base with the sticky side.
This craft will teach your child to distinguish vegetables and fruits and identify colors.
DIY Developmental Cube
Each side of the cube is made from different materials and complemented with elements of different textures.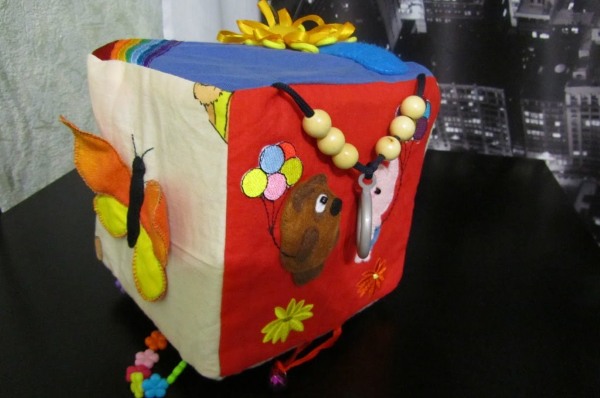
An example of an original developmental cube made of different materials with sides of 15x15 cm for children with description of the production of each side:
- Sew on a square any size, attach a toy inside on a string that can be pulled out and hidden back. For example, tie plastic rings of different diameters with threads for ease of grasping.
- Rustling butterfly. Make the wings in layers (fabric on both sides, 2 layers of bags in the middle). Sew from the inside, turn inside out, attach to the craft. Fill the body with cotton wool, and sew on the head-button.
- Lacing. Cut out 4 fabric squares with sides of 8 cm. Sew one to the other from the wrong side, two at a time, turn inside out and make 3 holes for the ribbon. Process the holes with threads, insert the rope and sew to the cube.
- Crispy Flower. Make petals similar to butterfly wings and sew them onto the square along the outline. Cut out a round part for the middle and glue it to the center of the inflorescence.
- Lightning. Make the blanks in the same way as for the lacing. Sew the zipper in the middle.
- Velcro. The technology is similar to making lacing. Decorate the square with applique, along the edge of which sew beads and buttons.
Sew everything except one side of the cube from the inside out, turn it right side out. Stuff the cube with filler and sew up the free edge.
Homemade toys from socks
Masters, I advise you not to use worn and frayed socks. You won't get a bright and beautiful thing from them.
Let's look at how to make a snowman from scrap materials:
- Fill a white sock ¾ full with dry beans and tie with a contrasting thread.
- Turn down the top empty part and roll up the edge to form a hat brim. Secure with hot glue.
- In the intended area of the neck, tie it with colored ribbons or threads in the form of a scarf.
- Glue on a pompom nose, embroider a thin strip for the mouth, and beady eyes.
- Decorate the body with bright buttons. Attach a colored woolen ball to the top of the hat.
Master class on creating a bunny from socks
Manufacturing technology:
- Fill the sock with cotton wool or cereal (rice, buckwheat).
- Use an elastic band to tie the section from the finger part to the area where the neck is planned.
- Cut the remaining free end of the sock in half lengthwise from the tying line to the edge.
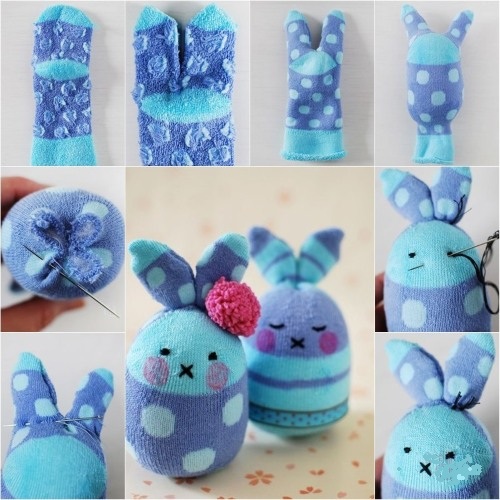
- Cut out 2 ears and shape them. Sew along the edge so that the fabric does not fray.
- For the tummy, cut out an oval or semi-oval piece. Glue it on.
- Sew on beaded eyes.
- Form a nose and teeth from thick fabric.
- Attach a pompom tail to the back.
- Decorate the neck or ears with a bow.
Original toys made from nylon tights
DIY toys made from scrap materials are made from nylon tights.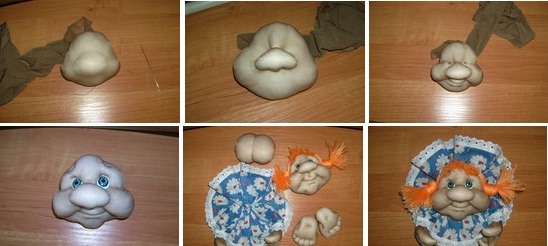
Frame technology for making a doll:
- Make a pattern. It is advisable to draw a mannequin so as not to have any difficulties during assembly.
- Make a wire frame for sitting and standing positions.
- Sew clothes that hide minor defects.
- The experts advise starting with the face. Cut off the bottom of the tights and stuff it with filler, forming the head.
- Place the nose in the center using cotton wool, stretching and giving it the desired shape, and secure with stitches.
- Use the above method to decorate the doll's cheeks.
- Design the eyes.
Nylon makes great materials for making various animals.
Step by step instructions: cat from a glove
Work order:
- Place the glove on the surface with the elastic band facing up. Cut off the middle finger, sew up the notch, and sew it in place of the previously cut little finger.
- In the area where the tail will be, make a small cut and sew the cut little finger there.
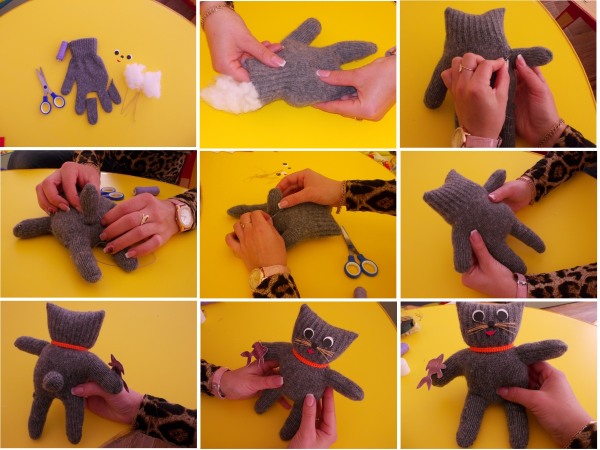
- Fill the craft loosely with synthetic padding, cotton wool or wool.
- Stuff up to the beginning of the elastic band, and at this point tighten with a thread. The animal's neck will be formed.
- To create the ears, sew the upper corners of the original material. Fill the remaining space with stuffing and sew the top of the glove.
- Embroider the mouth with thread, glue buttons for the nose and eyes, and attach the antennae from fishing line.
- Decorate by attaching a hair tie or ribbon bow to the neck. Make clothes from fabric scraps.
Paper toys
One of the most accessible materials for creating toys with your own hands is paper.
With its help they make:
- dolls;
- plants;
- animals;
- technique;
- volumetric and mobile configurations of different sizes;
- origami figures.
Even preschool children can make a paper pinwheel.
 Step-by-step method:
- Cut out a piece measuring 18 x 18 cm from double-sided colored cardboard.
- Draw two diagonals on the blank.
- Mark 1.5 cm from the middle.
- Use scissors to cut along the lines up to the marks.
- Glue the corners to the center one by one.
- Make a hole in the middle with a sharp object.
- To assemble: pin the pinwheel to the holder with a pushpin.
- Secure with a hammer.
- Leave a gap between the windmill and the stick.
- If you wrap it with a thin thread, the breeze moves faster.
- Checking the working condition.
Styrofoam toys
One of the materials at hand for creating toys with your own hands is polystyrene foam.
This substance is used to make crafts in the form of:
- Stork. The body is formed from canisters with cut off handles, then wrapped in mesh. Attach to a rod or wire, imitating the legs of a bird. Mount a hose in the neck. Attach feathers cut from a plastic bottle to the top of the structure. Cut the head out of foam.
- Airplane. Cut out a solid airplane from thick source material. If thin polystyrene is available, glue the craft from several parts.
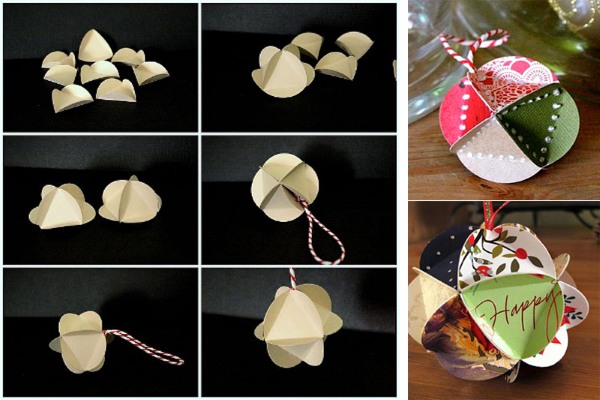
- Balls or cones for Christmas tree decorations. Such crafts can be easily decorated with ribbons, beads, glitter, tapes, transparent materials.
Toys made with your own hands from scrap materials can be done together with children. This promotes their development. - Exotic birds for your summer cottage. Take a straight piece of plastic, attach a template, draw a bird figure. Cut with a knife, putty on all edges. Let dry and apply a second layer of putty. After drying, process uneven edges with sandpaper. Paint with facade dye in the desired shade. The paint will serve as protection from the effects of varnish. The final stage is varnishing.
Pom Pom Toy Ideas
Scroll:
- Snowman. Using cardboard templates of different sizes, make three white pompoms. Make a hole in a plastic cork with a hot awl, insert the end of a narrow wooden rod into it and seal it with plasticine inside. Loosely place woolen balls on a skewer, starting with the largest. Crochet handles-hats and sew to the central ball. Attach a cap to the head with a skewer. Glue on beads - a mouth and a nose.
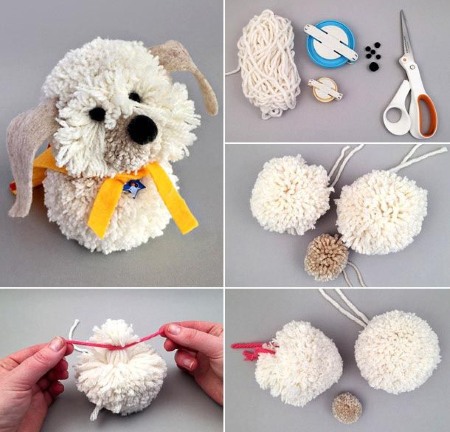
- Smeshariki. Make pompoms from yarn of the required colors. Glue on paper eyes and felt ears. Create a nose from threads of contrasting colors.
- Chickens. Make two yellow wool balls of different sizes. Join them together. The smaller of the two is the head, which should be decorated with a red paper beak and dark eyes. Glue two paper paws to the bottom of the body.
- Snake. Knit a row of pompoms, winding different colors onto the pattern evenly one after another. Form the last ball in one color. Then thread the fishing line through the bead and insert both ends into a needle with a large eye. Pass the thread through all the parts, starting from the end of the product. Fasten it to the head. Glue on the eyes and the elongated forked felt tongue.
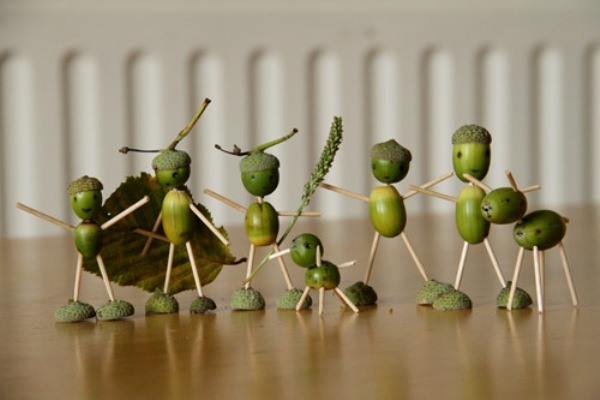
Crafts-toys from natural materials (pine cones, acorns, chestnuts)
Children will be happy to make toys with their own hands from available natural materials:
- To form a little man, you need to take two oak fruits. One round with a cap - for the head and the other oblong - for the body. Connect them together with a piece of a toothpick, having previously pierced the necessary places with an awl. Sculpt the eyes and mouth from plasticine. Create legs from pieces of toothpicks and glue inverted acorn caps at the bottom. Attach handles from sticks and add plasticine mittens. It is easy to create a deer or a duck from an acorn and its peculiar cap. The material is pierced with a sharp object. The legs and necks are formed from matches or sticks.
- You can make a hedgehog out of pine cones. Make the paws and muzzle out of plastic clay. Or a bear - glue together from old, open pine blossoms of different sizes, adding buttons as eyes. The same method is used to make a wood goblin.
- The simplest product made from chestnuts is a caterpillar. You need to take as many chestnuts as the insect will be long. Connect them together with plasticine plates or thin sticks, having punched holes in advance. Draw a muzzle and attach antennae from thin wire. To create snails, roll sausages from plasticine, in which one end is made thinner and the other edge is thicker - this will be the head. Chestnuts are houses, pierce small holes for eyes, and attach horns and a mouth from sticks.
What else can you make toys from with your own hands?
Toys are created with your own hands from the following materials at hand:
- Polyethylene bags. For example, to create a dog from them, you will also need a couple of unnecessary sweaters, a piece of artificial leather and plastic bottles.
- Straw. It is quite easy to make a human figure from this raw material. You need to bend a bunch of dry stalks and tie them in several places with a thick rope.
- Buttons serve not only as decorations, but can also turn into original crafts. If you assemble parts of certain sizes into a chain, you will get a New Year's toy in the form of a man or a pyramid.
- Foam sponges for washing dishes will serve as material for making colorful hedgehog bombs.
- You can create a robot from plastic caps;
- Wire is an excellent raw material for bending and forming figures of various birds, animals, and plants.
Making toys with your own hands from scrap materials can give you a lot of pleasure. To please a child with a hand-made craft, you don’t need to have a special education, sometimes all you need is skills in handling a thread, a needle and a flight of imagination.
Video: DIY toys from scrap materials
DIY toy for children from scrap materials, master class:
https://www.youtube.com/watch?v=psWwun1P-AM
DIY snowman toy, watch the video:
https://www.youtube.com/watch?v=BwVrsWXOIJ8