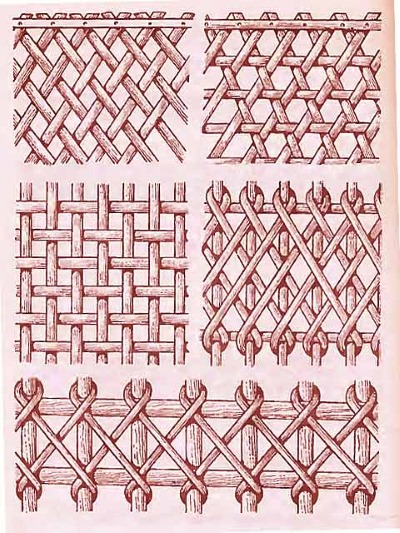
Weaving from newspaper tubes is a fascinating process of creating beautiful and practical products that will not only be useful in everyday life, but will also be a wonderful gift. The photo below shows options for crafts and patterns of various types of weaving for beginners.
Crafts made from newspaper tubes are so beautiful that this handicraft is becoming increasingly popular among people of all ages. The process and techniques of weaving are different, but it is important to prepare before work.
Preparatory work
Products made from newspaper tubes, photos and weaving techniques of which are presented below, are made using the simplest and most accessible materials and tools.
| Material/tool | Purpose |
| Newspapers or paper | to create paper vines - tubes from strips. |
| Knitting needles (diameter no more than 1.6 mm) or wooden sticks | for rolling strips into tubes. |
| A simple pencil or marker | for marking paper before cutting into strips. |
| Scissors or a stationery knife | for cutting marked sheets into strips, for trimming the ends of tubes of finished products. |
| Ruler | for convenient marking of paper before cutting into strips. |
| Glue | to fasten the edges of the formed tube. |
| Brush | for even distribution of glue. |
| Super glue | for fixing individual small details during weaving or decoration. |
| Varnish | to open a finished item. |
| Paints | to give paper vines or finished items the desired shade. |
| Wide brush or sponge | for even distribution of paint. |
| Boxes, buckets, volumetric figures | to give future products a certain shape during work. |
| Tweezers | to direct the tubes in the desired direction during work. |
| Rubber gloves | to keep your hands clean when painting or varnishing. |
| Tall or wide container with great depth | for painting a large batch of tubes. |
| A wide tray or baking sheet | for drying painted tubes. |
| Clothespins or paper clips | to fix the tubes while the glue dries. |
| Decorative elements | for the design of finished products. |
The main material for creativity is paper sheets of newspaper or writing materials.
The most accessible and inexpensive material, and most often free, are newspapers and paper advertising publications. An interesting effect can be achieved by making crafts from wrapping paper, glossy sheets of unnecessary magazines or advertising booklets.
Office paper for printing or writing is also suitable - it can be easily painted in the desired colors. The format of newspaper and paper sheets can be any: A2, A3, but not smaller than A4.
For fixing the edges of a twisted newspaper tube, the most practical option is PVA glue in a soft tube with a special tip. Jar glue (it can be any color and consistency) should be applied with a small brush.
If you only have a glue stick, you can use it, but only if it is of excellent quality. Otherwise, the tubes will come apart.
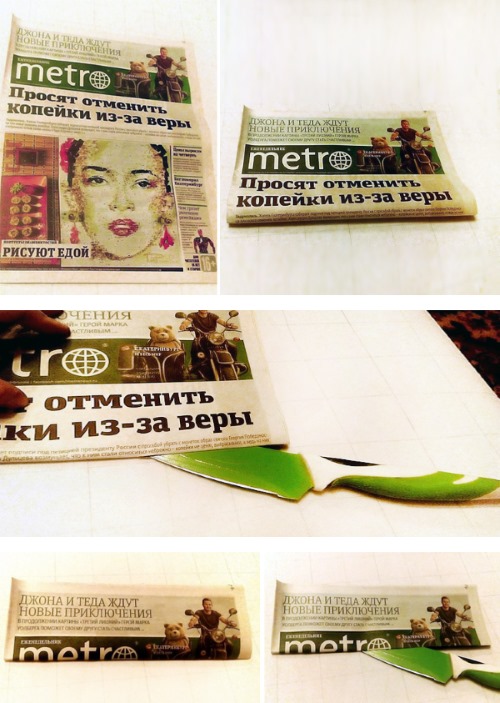
Cutting newspapers or paper is done with regular or tailor's scissors or a stationery knife - it is more convenient and faster to cut not one sheet at a time, but a whole stack. The thickness of the cutting tool depends on the size of the stack: the larger the stack, the thicker the blade should be.
Cutting is performed in one of the following ways:
- First, you need to cut the double pages of the A2 newspaper into 2 parts along the central fold line.
- The resulting 2 A3 sheets should be folded in half, unfolded again and cut into 2 more parts to get 4 A4 sheets.
- Next, you need to do the lining - this will make the cutting more accurate, but the lining process itself will take a lot of time. To save time, many craftswomen cut the sheets along the fold line, folding them in half each time until they get strips of the desired width.
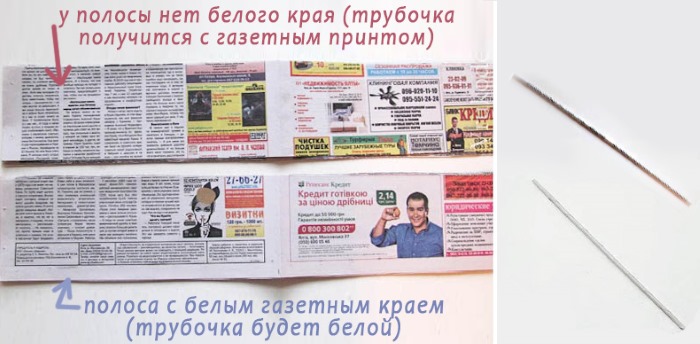
- After lining up, the sheets are cut into strips of the width required to make a specific craft. Thin straws twisted from strips measuring 5 by 30 cm are suitable for souvenirs and small-sized items. To obtain tubes of a wider diameter, it is necessary to cut strips 7-9 cm wide.
Processing newspaper
Before you start weaving, you need to process the newspaper strips - roll them into tubes.
This is done in a certain sequence of actions:
- You need to put a drop of glue on the edge of the newspaper strip, then place a knitting needle on it. It should form an acute angle with the lower long edge of the sheet. The diameter of the tube depends on the knitting needle size number: the thinner the knitting needle, the denser the tube will be.
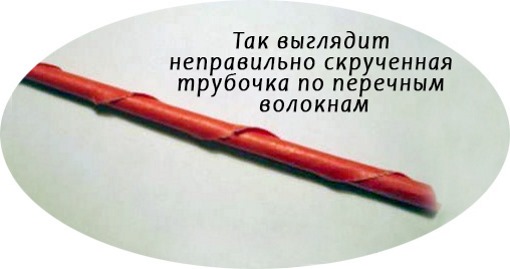
- Twisting should be done in circular motions, starting to rotate the knitting needle from the corner of the strip and maintaining a certain angle of inclination of the tool. The size of this angle determines the type of the resulting tube.
If the angle is less than 30 degrees, the tubes will be short and very dense - they are good for forming the frame of the product. If the angle is more than 90 degrees - the tubes will be long and fragile - it is extremely difficult to work with them. The optimal angle of the knitting needle is 45-60 degrees: you will get a standard length, and the density of the tube will be moderate.
- Rolling the strip into a tube, you need to hold it by the edge and after each turn around the spoke, carefully pull the paper. This way it will wind tightly, which will ensure good quality of the tube.
- Having formed a tube completely, you need to carefully pull out the knitting needle and drip some glue onto the corner of the strip, then press it with your fingers. One edge of the tube (from which the weaving began) should be narrow, and the opposite one should be a little wider.
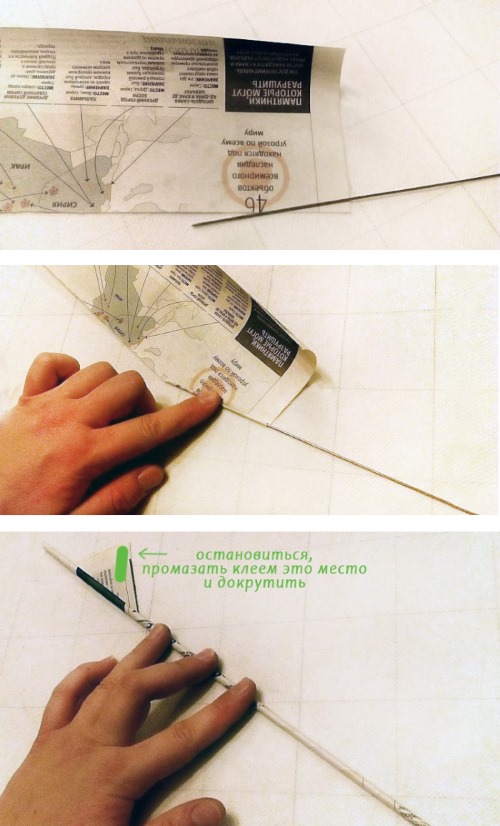
This is important so that during the work, if necessary, the length of the tube can be increased. This is done by inserting one tube with a narrow edge into the wide edge of another tube, after having dripped some glue.
There are such types of products as small panels, frames, decorative rugs and others, for the production of which flat tubes are needed, which must be prepared taking into account some nuances:
- When fixing the edge of the strip with glue before rolling, you need to make sure that it does not fit too tightly to the entire length of the strip. The opposite edges of the tube should be the same width.
- To twist, you need to use a knitting needle of the right size, not forgetting that the diameter and density of the tube depend on the thickness of the knitting needle. And the wider the original tube, the wider the flat tube formed from it will be.
- The required number of ready-made tubes should be laid out in one layer on the table, after which you need to roll over them with a rolling pin.
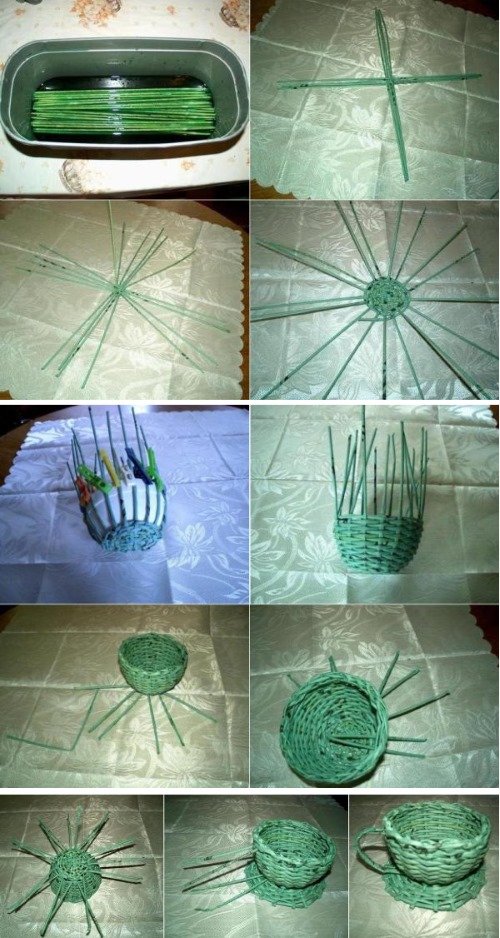
If desired, newspaper tubes can be painted in the desired color. Gouache or acrylic paint diluted with water are suitable for these purposes. Watercolor and wood stain can be used, but they do not paint over the letters of printed text well.
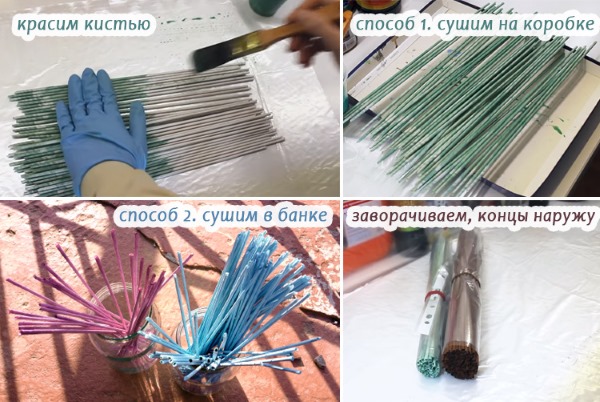
Painting each tube separately is a rather long and labor-intensive process, so you need to find a suitable container for the job:
- long tray;
- 5 liter bottle with the top cut off for long straws;
- 2 or 1.5 liter bottle for shorter straws;
- a small bucket.
Before painting, it is necessary to prepare a solution of the required shade and saturation and pour it into a container. After that, the tubes should be placed in the solution for as long as it takes to fully paint them.
If the dyeing is done in a 5-liter bottle or a bucket, a stack of tubes is dipped into the solution with opposite ends one after the other. If short tubes are dyed in a small bottle, then after placing them in the solution, the bottle should be shaken, then the tubes should be turned over with opposite ends to the bottom and shaken again.
Types and techniques of weaving
Products made from newspaper tubes (photos of possible options are presented below) are woven using different technologies, which depend on the shape, purpose and desired pattern.
Simple weaving
Simple (or straight) weaving is the most understandable and accessible technique for beginners. This type of weaving is suitable for creating basic elements of crafts that should be durable and hold their shape well. For example, simple baskets, flowerpots or trays.
The technique is performed as follows:
- You need to take one newspaper tube and, gradually increasing its length, weave it around the vertically located posts one by one, alternately from the front and back sides.
- The vertical posts are regular tubes fixed at the base of the product in an odd number. They are not working, but are called guides, as they perform an important function in the formation of the craft.
- Weaving begins from the wide side of the tube, which is fixed to the bottom or simply remains on the outside with a small part.
- Weaving of closed items (baskets, flowerpots, boxes) is done clockwise, the same applies to increasing the length of the tube - it is done in the same direction.
- Weaving of open flat items (fences, bottoms, trays) is also done with a single tube with a gradual increase in its length. However, having finished the current row, you need to encircle the last stand with a tube, and then continue working in the opposite direction.
Layered weaving
Layered weaving is used to make the same products as simple weaving, but it is continuous and without gaps, which makes the item more durable.
How to do layered weaving:
- To install the main posts, an odd number of rigid tubes are taken. They are placed at a distance of approximately 1.2 - 1.7 cm from each other.
- To the right of each vertical base, you need to insert additional tubes that will be actively used during the work. A beautiful pattern is obtained when the shade of the additional tubes differs from the shade of the main ones. An interesting effect can be achieved by alternating additional tubes of different shades.
- The first working tube should be drawn around the closest post, stretching the tube in front of it, then behind the second post.
- Next, you need to work with the second working tube: stretch it in front of the nearest stand and put it behind the second one.
- The entire row is woven in the same way: each subsequent working tube is pulled in front of the closest stand and placed behind the second stand from it.
- The end of the row is marked by the presence of 2 working tubes in one gap between the guides. You need to take the lower one, stretch it in front of the closest post and put it behind the second post. Then you need to check that there is one working tube in each space.
- The next row starts from any working tube and repeats the technique of the previous one.
- During the work, it will be necessary to increase the length of the tubes more than once, and upon completion of the process, their unbraided ends are cut off and secured by interlacing the contour with a pigtail or rope.
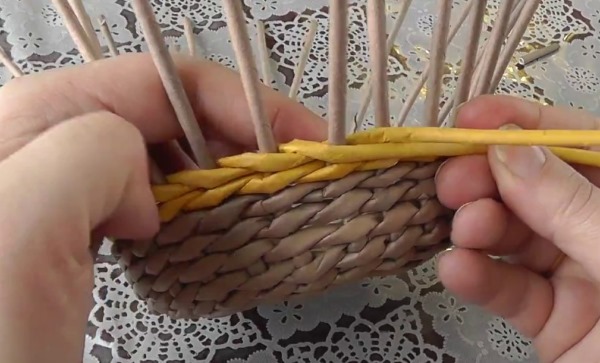
Row weaving
The technique of weaving in rows resembles the technique of simple weaving, but is performed not with a single tube, but with three in turn:
- Paper vine #1 must be placed with its wide end under the first stand and the following ones must be braided according to the rules of simple weaving. When its length ends, it is necessary to move on to the next vine.
- The wide end of the #2 vine also needs to be placed under the second post and woven in the same way as the first.
- The same actions should be done with vine #3, placing it under the third stand. The entire row is woven in this way.
- Having finished the current row, proceed to the next one until the required height of the product walls is achieved. A new row begins after building up another wicker on the braided vine by gluing their opposite ends.
- Rows can be formed by placing 2 or 3 tubes at a time under the same stand. Thus, one row can consist of three pairs or triplets of tubes.
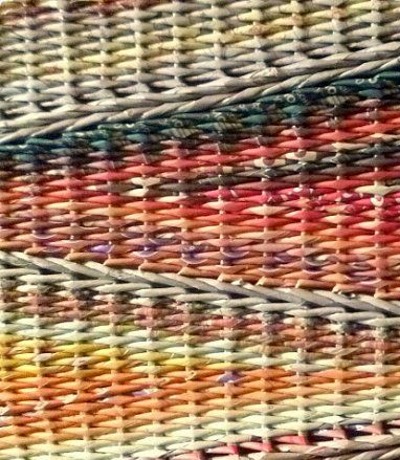
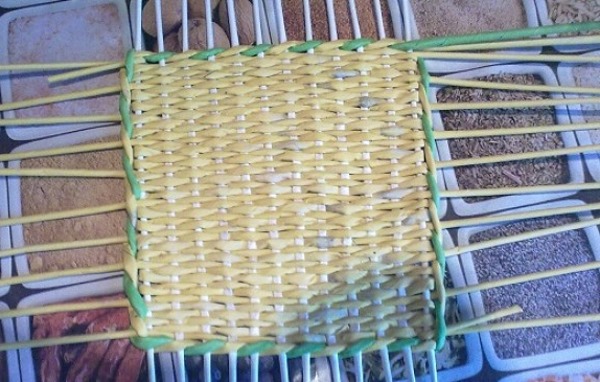
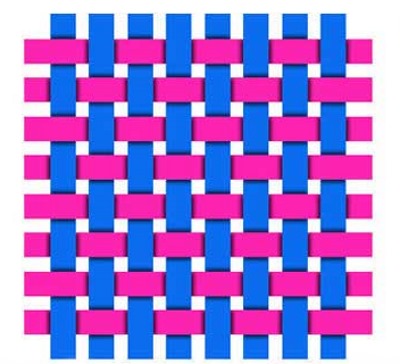
Square weaving from newspapers
Square weaving allows you to get a fabric with a checkered pattern, it is suitable for making products of any shape and type.
Square weaving is done as follows:
- You should start weaving with the wide end of the vine, passing it through each pair of guides, not bypassing the corner ones, in the direction from left to right.
- When the first vine is woven, you need to take the second one, but weave in the opposite direction: from right to left, and start not from the first, but from the second stand.
- In this way, the entire row is woven until its height becomes equal to the length of the gap between two adjacent posts.
- The second row is woven in the same way, but from the next stand. Thanks to this technique, a cellular pattern of square figures arranged in a checkerboard pattern is formed. In this row, the tubes are woven between two stands, starting not from the wide, but from the narrow ends.
- The number of rows depends on the required height of the product. Each odd row should be started from the first stand, repeating the pattern of the first row. Each even row is woven from the second stand, repeating the pattern of the second row.
- During the weaving process, you should pay attention to the corners: when going around the stand, the newspaper tube should fit tightly to its row, without creating gaps.
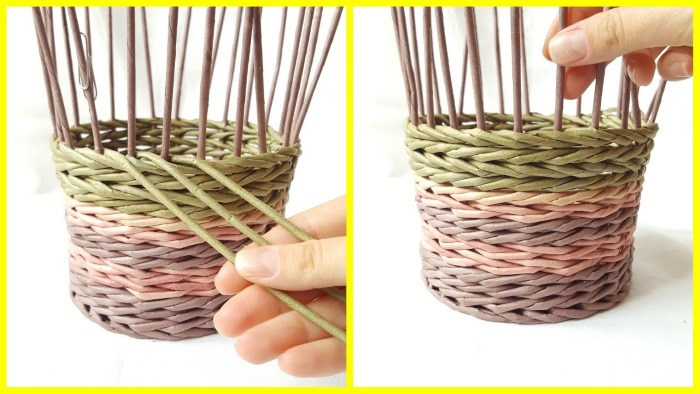
Rope weaving
This weaving technique is used to strengthen the upper and lower edges of the sides of the craft or the rack on which the bottom rests, as well as to connect individual elements when creating an openwork pattern.
The principle of rope weaving consists of braiding the stands with tubes and intertwining them. Thanks to this technique, the paper vines fit tightly around the stands, providing them with good stability.
Rope weaving in 2 tubes is done as follows:
- You will need 2 working tubes, which can be lengthened during the weaving process if necessary. Wicker #1 should be secured on the inside of the future product, wrapping it around the first stand and bringing it out in the next gap.
- Vine #2 also needs to be secured to the first post, and then pulled under the turn of the first tube in the space between the posts.
- The first vine should go around the next post and be brought out into the next gap.
- With the second vine, wrap it around the post from the other side and bring it out in the gap above the loop formed by the first vine.
- In this way, continue weaving to the end of the row, braiding the posts with vines and overlapping them with each other.
- The number of rows can be any. During the work it is necessary to move the rows closer to each other so that there are no gaps between them.
Rope weaving in 3 tubes has a slightly different principle:
- All 3 working tubes must be secured from the inside, wrapped around the first post.
- Using paper vine #1, you need to make a binding of 2 posts at once and bring it out to the next gap, tracing it around the next post.
- Willow #2 should be taken out from under the first one, in the space between the two uprights bent by the first willow. Then you need to make a weave of the next two uprights with it and encircle the third upright from them from behind, overlapping over the first willow.
- Vine #3 is brought out from under the second one, in the space between the two uprights bent by the second vine. Then you need to make a weave of the next two uprights with it and encircle the third upright from them from behind, overlapping over the second vine.
- In this way, the weaving of the entire row continues: each of the three working vines intertwines 2 posts, makes a turn around the next one and again intertwines 2 posts.
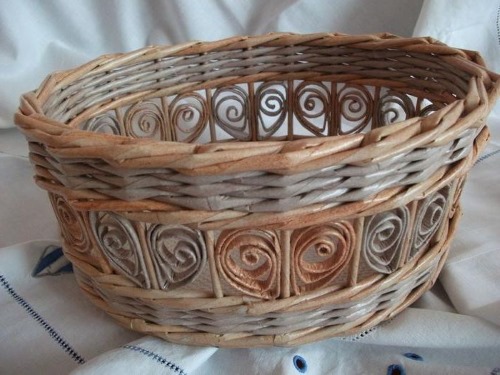
Openwork weaving
Products made from newspaper tubes, photos and diagrams of which are presented below, can be decorated with various finishes. For this, the technique of openwork weaving is used, of which there are many varieties.
Before proceeding to the design of the product with openwork, it is necessary to weave rows using one of the standard weaving options described above. Then it is necessary to specify the remaining length of the racks and choose a pattern, after which you can begin to implement the intended idea.
The most accessible type of openwork weaving for beginners is straight openwork in the form of stripes without weaving, which can be left as is, or decorated with a different pattern.
Technique of execution:
- It is necessary to weave the walls of the product to the required height, after which the weaving should be secured with a rope.
- Now you need to step back a distance equal to the width of the gap you want to make, and then weave 1 or more rows of rope weaving.
- You can leave the walls as they are, or you can continue weaving over the rope with the usual pattern that was used before creating the gap.
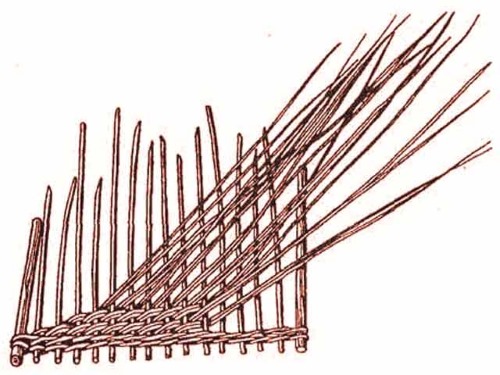
On the basis of straight openwork, linen is made:
- The working tubes should be laid out on the table and rolled over with a rolling pin so that they become flat.
- Each flat tube must be used to make interlacing of the posts through 1, using the simple weaving method, placing it horizontally.
- It is essential to maintain a distance between the horizontal tubes equal to the distance between the posts.
The pattern described above can be supplemented with a bias braid - you will get a linen openwork with a bias braid:
- The vertical posts need to be braided with working tubes diagonally, forming a loop over the second and then under the first crossbar of the linen pattern. You can do a diagonal weave of 2-4 posts at once or skip 2-4 crossbars.
- The first working tube should be secured under the lower crossbar, wrapped around the first post.
- Then, moving it diagonally upwards, you need to go around the next post above the upper crossbar.
- After this, you should move the working tube diagonally downwards and bend it around the next post under the lower crossbar.
- In this way, you need to continue weaving to the end of the row, increasing the length of the tube if necessary.
- The second working tube must be secured above the upper crossbar, wrapped around the first post.
- Weaving with the second tube is done in the same way as the first, only in the opposite direction: first you need to direct the working tube diagonally downwards, then upwards, and so on.
Crafts
Products made from newspaper tubes (photos and master classes can be found below) are not only souvenirs, but also interior and household items.
Basket
To make a basket you will need:
- newspaper tubes from strips 10 by 40 cm;
- 1 or 2 sheets of cardboard for the bottom (depending on the size of the basket);
- a box of the required size as a form for weaving;
- wide satin ribbon;
- scissors;
- clothespins or paper clips;
- PVA glue.
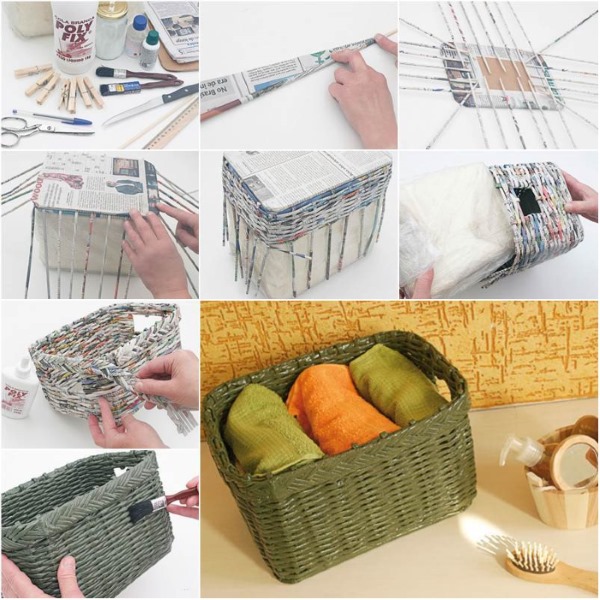
Manufacturing process:
- The cardboard rectangle must be coated with glue around the perimeter, after which the ends of the tubes must be glued to it, placing them at the same distance from each other.
- The second piece of cardboard should be coated with glue and placed on top of the first one, over the glued tubes, securing it with clothespins until the glue dries.
- Before weaving, the tubes need to be crossed in pairs and bent upwards. After that, they need to be secured with paper clips along the upper edge of the box-form, installed on the bottom of the future basket.
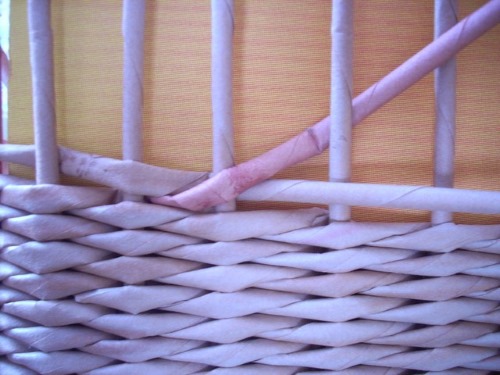
- The walls of the basket must be formed using the simple weaving technique, extending the tube as needed during the process.
- At the end, when the height of the walls is as planned at the beginning, you can braid the remaining part of the racks with rope.
- The end of each tube-stand should be bent into a semicircle towards the next stand and glued from the inside of the basket.
- A piece of ribbon must be threaded around the perimeter of the product through the resulting holes, then tied into a bow at one of the corners.
Fungus
To make a decorative mushroom you will need:
- newspaper tubes made from 12 x 40 cm strips of brown and white colors;
- semicircular shape;
- PVA glue;
- scissors.

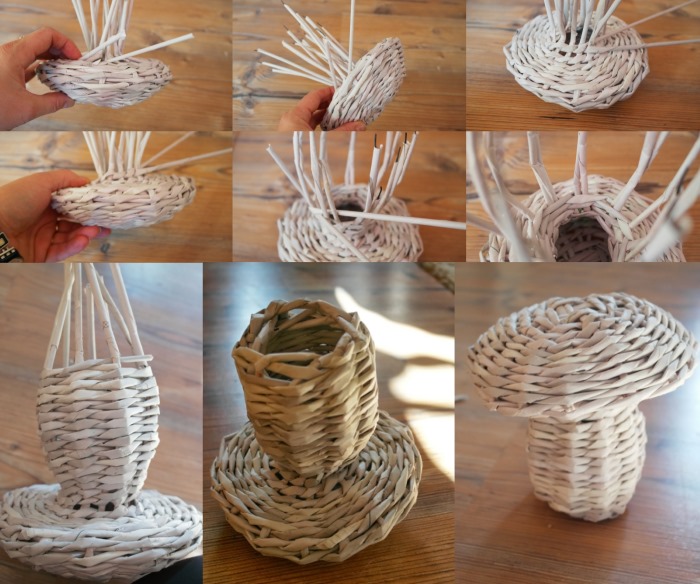
Manufacturing sequence:
- You need to take 8 brown tubes and put them in pairs in a checkerboard pattern so that they are intertwined in a cross. You get a frame for the future mushroom, consisting of 16 posts.
- The working brown tube should be folded, secured to the first stand, twisted into a loop. The stand should be exactly at the bend.
- Now you can start weaving the hat in a circle. Each stand must be passed between the two ends of the working tube, after which the ends should be crossed. Then again pass the next stand between the ends and cross the ends.
- After weaving 5 rows, you need to place a semicircular shape on the weave and weave it, making 10 rows.
- After this, the form should be removed and, bending the tubes inward, gather them into a bundle, pressing hard with your fingers. The bend resulting from the formation of the bundle will become the beginning of the mushroom stem.
- Next, you need to continue weaving the lower part of the hat using the same technology that was used to weave the upper part.
- When the weaving reaches the bend, you need to start weaving the mushroom stem with white tubes, without changing the technology. The base of the stem should be woven tightly, and from the 5th row the weaving should be loosened so that the stem thickens.
- The end of the stem must be woven in such a way that the mushroom can stand freely on a flat surface.
Panel
Materials and tools for creating a bright decorative panel:
- yellow newspaper tubes;
- hot melt glue;
- decorative elements (beads, buttons or others);
- scissors;
- clothespin or paper clip.
Progress of work:
- The newspaper tubes should be rolled into a spiral until a "snail" with a diameter of 7 cm is obtained, lengthening them as needed. To fix the structure during the extension process, a clothespin should be used.
- You need to twist 30 spirals, which you can decorate with decorative elements using hot glue.
- Decorated blanks must be glued together with hot glue. They must form a canvas, the shape of which can be any.
Bast shoes
Newspaper tubes are a material that allows you to create not only decorative items, photo attributes, household items, but also souvenirs and amulets, the magical power of which has been known since ancient times.
An example of such a talisman is bast shoes, for the manufacture of which you will need:
- newspaper tubes painted with stain;
- scissors;
- coarse brown rope (twine);
- hot melt glue.
How to make bast shoes:
- The newspaper tubes must be laid out in one layer on the table and flattened slightly with a rolling pin.
- Next, you need to take 3 tubes and lay them on the table in front of you, one under the other. Another one - the fourth tube - should be passed under the outer ones over the middle one exactly in the center so that it forms a right angle in relation to the three tubes.
- Next to the fourth, draw the fifth tube - it should be located parallel to the fourth and pass over the outer ones and under the middle one.
- As a result, you should get 10 working ends of the tubes, which must be intertwined one after the other using the simple circular weaving technique.
- When the required length of the sole is woven, you should move on to forming the head - the upper part of the bast shoe. To do this, bending the tubes alternately outward and inward, you need to intertwine them using the simple weaving technique.
- Before weaving the head, there should be 5 working ends of the tubes on each side of the bast shoe. Simple weaving should be done by directing the outer tubes towards each other.
- When the head is woven, it is necessary to make a border by bending each end of the working tube in turn inside the bast shoe and tucking it under the last row. The excess ends must be cut off, and for the strength of the border, fix the tucked ends with glue.
- A pair of bast shoes can be hung on the wall, tied with twine.
Frame
Materials and tools for creating an elegant photo frame:
- newspaper tubes made from strips 30 x 10 cm of any color;
- blank for a frame of any size;
- decorative elements for decorating crafts;
- transparent varnish;
- PVA glue.
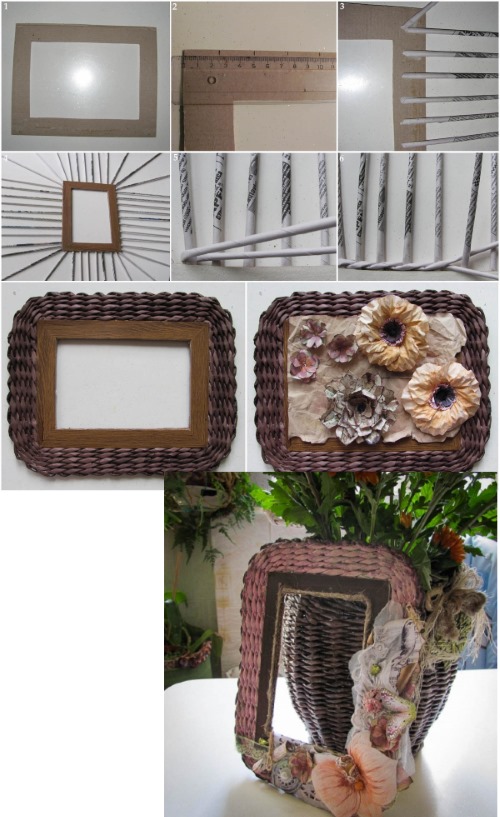
The process of creating a photo frame:
- Each tube must be rolled into a rectangle like a spiral, the ends fixed with glue. The height of the rectangles must correspond to the width of the cardboard blank strip.
- Once the required number of rectangles is ready, the cardboard frame blank must be coated with glue.
- Rectangles made from newspaper tubes should be glued to a cardboard blank, after which the photo frame should be placed under a press until the glue is completely dry.
- At the end, the frame must be varnished and decorated with decorative elements.
Tree
To make a tree you will need:
- 30 newspaper tubes;
- gouache;
- PVA glue;
- varnish;
- 2 brushes.

Manufacturing process:
- You need to fold 13-15 newspaper tubes into a bundle and fasten them with a strip of paper.
- Now you need to wrap the trunk with a newspaper tube in a spiral to the required height, increasing its length if necessary. During the work, it is necessary to constantly lubricate the working tube with glue.
- You should start winding not from the very bottom, leaving 2-3 cm, and continue not to the very top. The unbraided part remaining at the top is the branches of the tree, and the roots at the bottom.
- The trunk should be divided into 2 parts and each part should be wrapped with a newspaper tube for several cm. Then each of the two resulting branches should be divided into 2 more parts and continue wrapping for 0.5-1 cm.
- The division and winding must be done until there is 1 tube left in each branch.
- The branches need to be cut to the required length and twisted into curls in a chaotic manner.
- The lower ends of the tubes that are left unwrapped should be bent and wrapped with a tube in several layers in a spiral, giving the tree stability.
- Gouache must be mixed with PVA glue in the desired proportion, then the wood should be covered with this mixture using a brush. After that, using a clean brush, the product should be varnished.
- The finished tree can be decorated with small coins – then from a simple souvenir it will become a money tree.
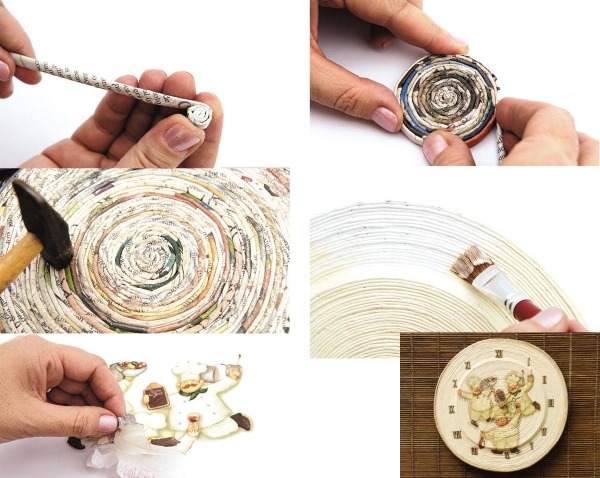
Cup
The cup and saucer are made using the following materials and tools:
- newspaper tubes made from strips of 30 x 10 cm, white;
- a cup without a handle and a saucer as molds;
- scissors.
Progress of work:
- First, you need to lay out 6 newspaper tubes in a checkerboard pattern, secure them together and place a cup on top of them.
- The working tubes should be braided around the cup in a circle using the chosen weaving method, and the excess ends should be cut off at the end of the work.
- To weave a saucer, you need to lay out 4 pairs of tubes in a checkerboard pattern and secure them together, then place the saucer on them.
- The working tube must be braided 3 rows, passing it through every 2 posts. Then you should braid 1 post to the end, and cut off the excess ends at the end of the work.
- If desired, the edges of the cup and saucer can be secured with rope weaving.
- To create a handle, you need to braid 3 tubes and glue them onto the cup.
Flowers
To make 1 flower you will need:
- newspaper tubes made from strips of 10 x 35 cm, green;
- newspaper tubes made from 5 x 12 cm strips of white color;
- yellow button;
- PVA glue;
- hot melt glue;
- scissors.
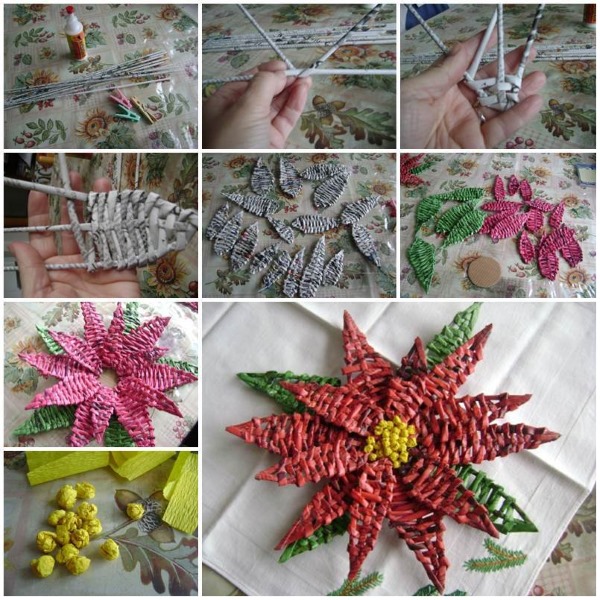
How to make a flower:
- You need to take 3 long green tubes and braid them.
- To create a petal, take 3 short white tubes, lay them out vertically and intertwine with a working tube of the same color. During the work, you need to ensure that the petal is narrow at the bottom and widens at the top - this requires controlling the density of the weaving.
- In the same way, you need to prepare 6 petals, which you will glue to the bottom of the button with hot glue.
- According to the petal pattern, you need to weave 2 leaves, only their shape should be similar to an even oval.
- The flower head and leaves should be glued to the braid-stem with hot glue.
Heart
Materials and tools:
- newspaper tubes made from strips measuring 10 x 22 cm, brown in color;
- colored beads;
- clothespins;
- rolling pin;
- scissors;
- PVA glue;
- rope for the loop.
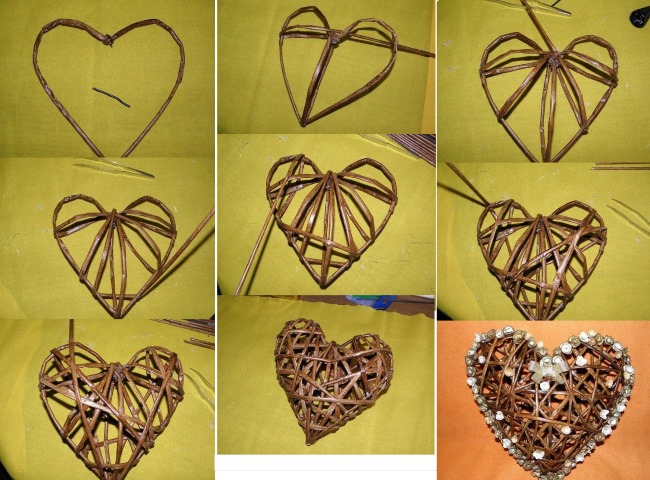
The production process is as follows:
- The newspaper tubes should be laid out on the table in one layer and flattened with a rolling pin.
- Next, you need to take 1 tube, fold it in half, drop some glue into the middle and secure it with a clothespin.
- The ends of the tube need to be bent into the shape of a heart, glued and also secured with a clothespin.
- The remaining tubes should be wound onto the base in a chaotic manner. In places where they touch the base, the tube should be lubricated with glue.
- When the three-dimensional figure is ready and the glue has dried, you need to glue beads around the heart along the outline and make a loop.
Christmas tree
To make a Christmas tree you will need:
- newspaper tubes made from strips of 10 x 40 cm, green;
- colored paper;
- decorative elements (beads, buttons, etc.);
- PVA glue;
- scissors;
- triangular or conical shape.
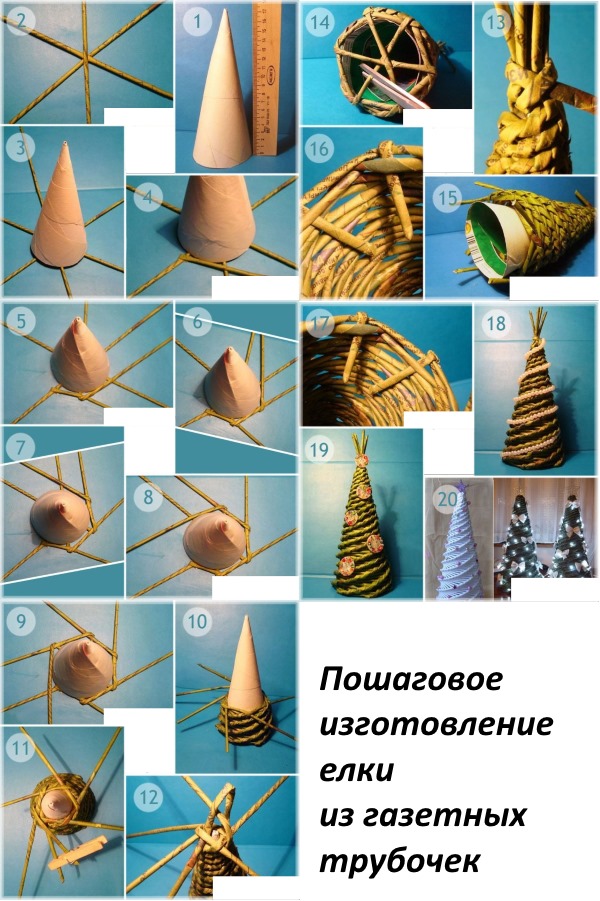
Manufacturing process:
- It is necessary to fix 4 tubes on the form, laying them out crosswise and securing them on top with tape.
- Next, you need to weave to the end of the shape using the technique of simple, layered weaving or in rows.
- After this, you should take out the form, bend the tubes and weave the base of the tree.
- You need to cut out stars from colored paper and glue them to the tree. You can also decorate the product with various decorative elements.
Having mastered the basic techniques of weaving from newspaper tubes, a novice craftsman can come up with his own patterns and designs for creating various products. Beautiful crafts can be given as gifts, as well as used to decorate an interior, used as attributes for photos or used for their intended purpose.
Author: A. Kostylina
Article formatting:Natalie Podolskaya
Video about products from newspaper tubes
Newspaper tube products - photos and videos:
I recently started trying to weave, it's a very exciting activity, the site is very useful, and I started trying to weave bast shoes right now, thank you very much!!!