In the autumn and summer periods, you can make a variety of crafts from maple leaves, which are not only suitable as children's work for school or kindergarten, but will also become a worthy decoration for the home.
The most common interior item of this type is roses from collected leaves. Their creation does not require special skills and takes only a few minutes of continuous painstaking work. Understanding the technique of forming such flowers will facilitate the process itself and bring its creator exclusively positive emotions.
How to preserve maple leaves for crafts?
Roses from maple leaves will be obtained only if the working material is completely preserved in its original form. In order for the leaves not to lose their original appearance, several methods of their "preservation" were identified in a practical way.
The most famous way to preserve maple leaves is to dry them. To do this, you need to:
- Collect the working material for the craft, choosing the brightest leaves with minimal damage.
- Carefully wash the leaves under a weak stream of running water. A strong stream can damage the integrity of the leaf, which will be impossible to restore for the craft later.
- Using a dry cloth made of natural fabric, remove excess moisture from the surface of the leaves after washing.
- Place dry leaves between the pages of a thick book (the number of pages in a paper edition should be at least 500). It is important to keep a large interval between the clamped leaves. Otherwise, they will dry unevenly, which may affect the final quality of the craft.
- Place an additional load on top of the book, for example, another book.
- Leave for several days until the maple leaves are completely dry.
When using this method of "preserving" maple leaves, it is important to remember that when drying, they in most cases change their color to a darker one. This feature should be taken into account when choosing the source material for the craft.
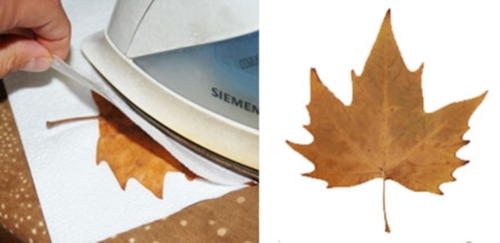
The second way to preserve maple leaves in their original form is to iron them.
To do this you need:
- Collect the leaves, wash them and remove excess moisture with a cloth.
- Take a piece of A4 paper. Place the maple leaf on it so that it fits completely on the paper surface.
- Place a sheet of paper on top that is the same size as the one used as the base.
- Place cardboard or other hard material on the ironing board.
- Place a maple leaf on the cardboard, sandwiched between the paper.
- Heat the iron to maximum temperature. Place it on the paper and leave it for 3-4 seconds.
- Turn the paper over, swapping the base with the “lid”. Repeat step 6.
- Remove the dried leaf for crafting.
The only drawback of this method of “preserving” maple leaves is the preservation of the specific smell of fallen leaves in the room after performing the above manipulations with the working material.
The 3rd method of preserving the original appearance of maple leaves involves the use of regular paraffin or wax:
- Wash the collected maple leaves and wipe them with a cloth, removing excess moisture from their surface.
- Melt paraffin or wax in a double boiler. Using a microwave or open fire to change the state of these materials is dangerous, as they are considered to be among the most flammable non-food products.
- When the wax or paraffin becomes liquid, pour it into a deep container. Let it cool to room temperature. If the temperature is chosen incorrectly, the maple leaf will change its color after dipping.
- Dip the maple leaf into the melted mixture and turn it over.
- Once you are sure that the liquid composition has completely covered the sheet, carefully remove it from the container, allowing the excess to drain off on its own.
- Place the maple leaf on a piece of paper or newspaper. Leave until completely dry.
The fourth method of “preserving” maple leaves is to use a glycerin solution:
- Mix liquid glycerin with water in a 1 to 2 ratio.
- Pour the solution over the pre-washed and dried maple leaves, making sure that it covers them completely.
- Leave the leaves for 3-5 days.
This method will not only preserve the original color of the maple leaves, but also give them a natural shine. A beautiful appearance will positively affect the final quality of the craft.
DIY Autumn Rose
Roses from maple leaves, in order to avoid damage to the collected natural material, are recommended to be made in accordance with the generally accepted algorithm. It involves the step-by-step creation of the rose itself, the stem of the flower and the final formation of the composition.
Formation of a rose
Roses made from maple leaves turn out beautiful if you use working material of different sizes. At the same time, the collected leaves should be approximately in the same color range. Otherwise, the appearance of the craft will be far from the natural appearance of flowers, which will cause conflicting feelings when visually assessing the final result of the work done.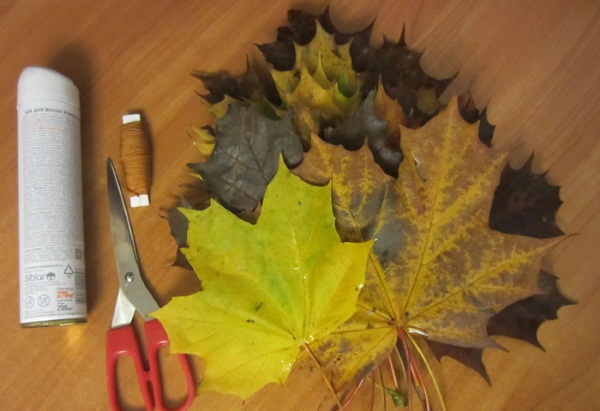
For one component of the composition you will need at least 7-8 maple leaves.
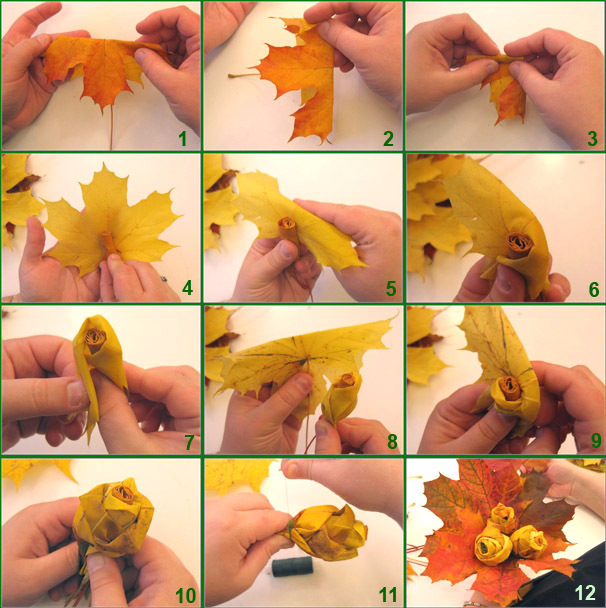
It is recommended to start with the smallest flower:
- Check the collected leaves for damage. Once you are sure that there is none, rinse the natural material under running water. Remove excess moisture with a cloth made of natural fabric.
- Fold the smallest maple leaf across. When deforming the leaf, make sure that no cracks form, which can later lead to a complete rupture of the piece of working material.
- Roll the used sheet into a tube. This will be the core of the autumn rose bud.
- Take a second sheet, slightly larger in size than the first.
- Fold the second sheet in half. Wrap it as carefully as possible around the first “tube” — the core.
- Fold the edges of the outer leaf outward, as if forming a rose petal.
- Repeat steps 4 – 6 7 – 8 times depending on the number of leaves prepared to create 1 bud. If all the leaves used are the same size, the order in which they are fixed in the bud does not matter.
- Tie the bottom part of the craft with a thread to secure the bud.
- Spread the petals and add volume to the rosebud. If the resulting flower is not lush enough, add 2-3 more maple leaves to the bud. It is not recommended to use more leaves, as it will be almost impossible to fix such a bud with a thread. Tying the bases with a denser material or a wide ribbon will significantly reduce the naturalness of the final composition.
If the integrity of one of the petals in the bud is damaged, it is not recommended to unfold the rest and redo the craft. The final result of the work done should be as close as possible in its naturalness to the appearance of a real rose. The vast majority of plants found in nature do not have ideal forms.
Despite this, if the resulting tears in the maple leaves are very noticeable and are in excessive quantities, it is better to make the bud again. Serious violations of the integrity of the petals can lead to the rose falling apart at the stage of bouquet formation.
Such unforeseen circumstances will force you to dismantle the composition, risking breaking other maple leaf roses.
Stem
Roses made from maple leaves will look unnatural without a properly made stem. It can be formed in 2 ways.
The 1st, simplest method, assumes that all (or the absolute majority) of the maple leaves used in the craft have stalks at the base.
In this case, creating a rose stem requires several steps:
- Using scissors or a stationery knife, achieve the same length for all the leaf stalks included in the composition. If the branches at the base are too short, it is recommended to cut them off completely, and then use another method of forming the rose stem.
- Cut a piece of transparent tape, at least 15-20 cm long. Narrow adhesive tape is best in this case. It will be less noticeable, increasing the naturalness of the final appearance of the resulting composition. If you don’t have tape, you can use foil and a stapler or glue gun.
- Wrap tape around the stems of the maple leaves. It is not recommended to overtighten the bases, as this may interfere with the fixation of the petals inside the bud.
- If there is not enough fixation, fasten the adhesive tape with staples in several places.
If the leaves used to create the craft do not have stalks, you can create a stem for the future rose separately, and then glue it to the base of the existing bud.
To do this you need:
- Take 2 or 3 sheets of A4 paper.
- Roll 1 sheet into a tube. Secure the joints with glue, a stapler or double-sided tape.
- Repeat step 2 with each piece of paper prepared for the craft.
- Slightly bend the top of the stem and attach it to the base of the bud using glue, a stapler or double-sided tape.
- If desired, the stem can be painted green (to create a natural look) or wrapped in foil (or colored paper) to disguise the original working materials.
When using the second method of creating a stem, it is recommended to cut the paper tube so that its total length is no more than 10-15 cm.
Otherwise, the bud will not be firmly fixed, which will lead to the fact that when it falls, the integrity of the maple leaves used in the craft may be damaged. As a result, the overall appearance of the rose will be spoiled, and it will be impossible to restore it without redoing the flower again.
Making and decorating a bouquet
Roses formed from maple leaves can be combined into one bouquet. To do this, you need to make several more flowers in a similar way to the one described above. The optimal number of roses for a single composition is considered to be 7 or 9. A larger number of "maple roses" will be difficult to fix in a bouquet due to the volume of the buds.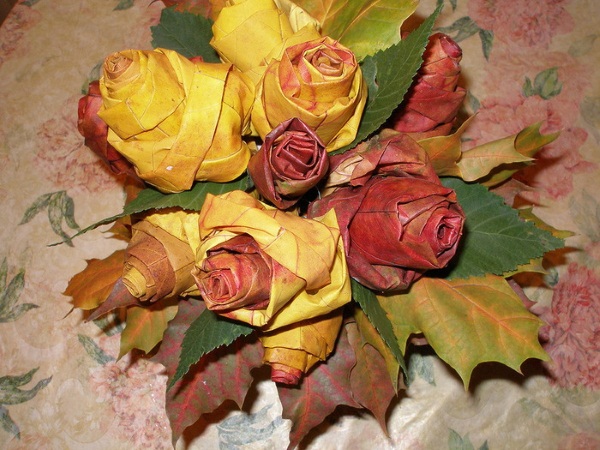
If they are tightly fixed to each other, the maple leaves may tear, which will provoke the need to redo the flower. If the number of artificial roses is less than 7, the final appearance of the craft will look unfinished.
If it is not possible to make more roses, you can supplement the bouquet with paper flowers of a similar type or form other plants using colored paper (cardboard can also be used as an alternative), glue or tape.
When the individual elements of the composition are ready, you can proceed to the final stage – forming the topiary:
- Place the maple roses next to each other without squeezing the outer "petals".
- Using scissors or a stationery knife, achieve the same length for the stems of all the plants that will make up the future bouquet.
- Tie a wide, dull-colored ribbon around the stems of the “maple roses,” wrapping it around all the cuttings at least 2-3 times.
- Assess the splendor of the bouquet. If necessary, at this stage it is allowed to increase the number of elements of the composition without the need to completely remake the craft. Additional plants are inserted into the bouquet, already fixed with a ribbon.
- Prepare 10-20 bright maple leaves without visible defects on the surface and cuts. Wash them under a weak stream of running water, then remove excess moisture with a rag. Let the leaves dry on their own until all drops of water disappear from their surface.
- Place the leaves one by one around the existing bouquet, wrapping the entire composition with them.
- Secure the outer maple leaves with staples, glue, hot glue gun or double-sided tape.
- If desired, you can decorate the composition with berries that have a similar color to the flowers, or natural plants. To add originality to the craft, it is recommended to glue a bright ribbon or a thin line of foil to the outside of the maple leaves in the edging. This will create a kind of visual accent, adding zest to the final appearance of the composition.
How to make other flowers from maple leaves step by step?
If a person is faced with the task of creating a “maple bouquet” consisting of various plants, he should use the simplest algorithms for creating artificial flowers given below.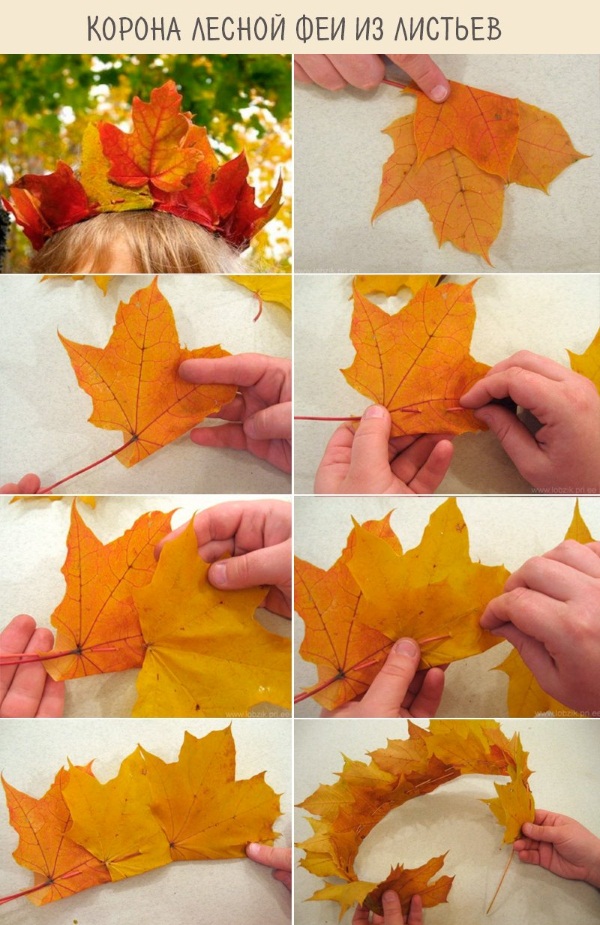
| Name of the artificial plant | The way it is created |
| Maple Asters | 1. Select 10-20 medium-sized maple leaves without visible damage to the upper surface. Prepare them for further work (wash, dry, trim dry cuttings). 2. Take the smallest sheet by size. Fold it in half and roll it into a tube. This will be the core of the future flower. 3. Take the second sheet, slightly smaller in size than the first. Wrap it around the core, slightly bending its edges to the outside. 4. Repeat step 3 with the next two leaves. 5. Take a small maple leaf and, without bending it, fix it at the base of the resulting bud. 6. Repeat step 5 with the remaining leaves. 7. Assess the splendor of the resulting flower and, if necessary, add outer petals. |
| Maple Wreath | 1. Weave a wreath of the desired size using slightly dried branches. Dry working material will be too brittle, which will minimize the chances of creating the main frame of the future flower craft with it.
2. Secure the branches with a thin thread in several places, wrapping it around the frame three times. 3. Tightly, leaving small branches free, wrap the wreath with gold or yellow thread. Alternatively, it is also acceptable to use a narrow ribbon of a similar color. 4. Glue the maple leaves to the branches. 5. To make the composition look more lush, you can decorate it with spruce branches, berries or maple roses made according to the above algorithm. |
| Maple Water Lily | 1. Inflate the balloon to the size you want your future flower to be.
2. Spread a thin layer of Vaseline over the surface of the ball, which is necessary to minimize the likelihood of damage to the integrity of the maple leaves due to gluing during the process of creating the craft. 3. Fix the ball in a stationary position. Glue medium and large maple leaves to its base, fixing them with glue to the ball itself and to each other's surfaces. 4. Having thus created the required thickness of the future water lily, leave the workpiece for 3-5 days until it is completely dry and the maple leaves are fixed. 5. Pop the balloon. Remove any remaining rubber from the inside of the water lily. 6. Form the core of the flower using the above algorithm (the inner part of the rosebud). 7. Secure the core inside the water lily using glue, a glue gun or double-sided tape. |
Any flowers, including roses, made from maple leaves, retain their original appearance for several months. If minor pigmentation occurs on the craft, but provided that the structure of the maple leaves is preserved, you can not redo the composition, but cover it with varnish or durable paint of any shade.
The simplicity of creating such crafts, as well as basic care, make this type of creativity a favorite not only among children, but also among adults, who thus get rid of accumulated emotional stress.
Article formatting: Vladimir the Great
Video about making a rose from maple leaves
Master class. Rose from maple leaves: