Before you start knitting a scarf for a child, you need to understand how to correctly select all the required materials and tools.
How to select tools and materials
All children's scarves are mainly used to warm the baby in the cold season, which means the thread from which the scarf will be knitted should be quite voluminous and warm. But do not forget that the baby's skin is very delicate, and the thread must be soft, non-prickly and hypoallergenic.
It is good that the wool content of such yarn does not exceed 40-50%, acrylic and bamboo should be present if possible. The length of the thread in a skein should not exceed 350 m per 100 g. The knitting needles on which the children's scarf will be knitted should be selected depending on the volume of the yarn: the knitting needles should be taken 2 times thicker than the thread. For example, for yarn 350 m long, the recommended knitting needle size is 2.5 - 4.
But if the knitting is too tight, you need to take larger knitting needles, and vice versa, if the knitting is too loose, the knitting needles will be smaller.
Usually the required knitting needle size is indicated on the yarn packaging. The size of the scarf will depend on the age and height of the child for whom the product will be knitted. To determine the number of stitches that will need to be cast on for the required size, it is advisable to knit a sample of a scarf measuring approximately 10x10 cm.
How to Knit a Simple Classic Scarf: Step-by-Step Instructions
Few beginners know how to knit a scarf for a child. There are two simple classic options that are within everyone's power, even beginner knitters: garter stitch and English rib. Both patterns allow you to get a double-sided fabric, that is, the front and back sides of the children's scarf will look the same.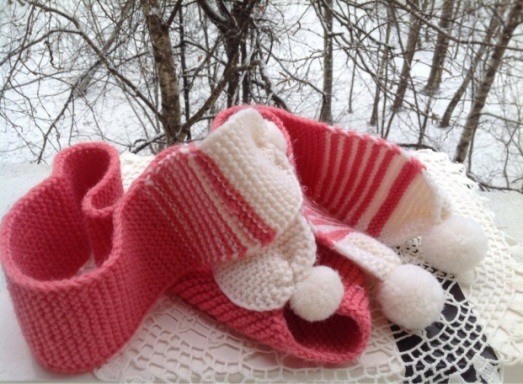
Garter stitch involves knitting with turning rows of face loops, circular: odd rows - face, even - purl. To prevent the fabric from stretching during the work with turning rows, the first loop is always removed without knitting, the last one is knitted purl. A scarf knitted with such a pattern will be quite voluminous, but not very soft.
You can add variety to the product with brightly colored yarn.
The technique of knitting with English elastic should be used after having mastered the basics of knitting with knitting needles, because when making such elastic, front and back loops will be used. The scarf will be voluminous and very soft.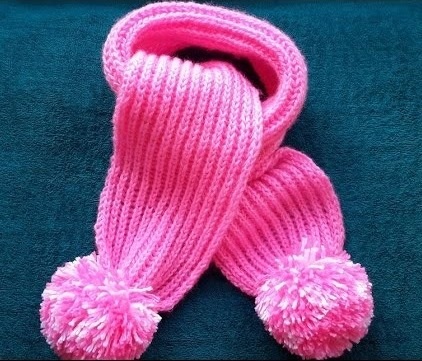
Step by step instructions:
- You need to cast on a number of loops on the knitting needles that is a multiple of 3 plus 2 edge loops.
- The first loop is removed, the last one is knitted.
- In the 1st row, the loop that follows the edge loop is knitted, a yarn over is made, and the next one is removed. This repeat must be done until the end of the row.
- In the 2nd row: the first one is removed, then the loop is knitted together with the yarn over, then the next loop is removed without being knitted. The alternation must be done until the end of the row.
- Repeat the first and second rows until the desired length of the scarf is reached. After knitting, close the loops, cut the thread and hide the remaining end with a crochet hook.
Original loop scarf for a boy
Many mothers are interested in how to knit a scarf for their beloved child so that it is warm and comfortable to use. Such an option as a loop scarf will help solve these problems; it will fit tightly around the boy’s neck, will not untie and will keep him warm in cold weather. For such a scarf, you will need a skein of bulky warm yarn (wool no more than 40%), knitting needles No. 4 and a knitting pin.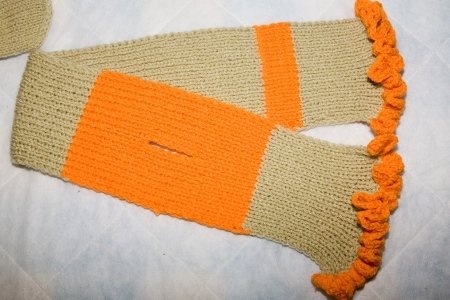
Step by step instructions:
- You need to cast on an even number of stitches on the knitting needles, which is a multiple of 4, in accordance with the chosen width of the scarf. Knit with a 2×2 elastic band, the first stitch is always removed, the last stitch is always knitted purlwise.
- In the 1st and all subsequent rows, starting from the second loop, alternate 2 front, 2 back loops until the end of the row. Knit to a height of 10-15 cm.
- Next, the product must be divided into 2 equal parts to make a loop: it is recommended to transfer the first half of the loops to a knitting needle, the second half to a pin. Knit the first part of the loops placed on the knitting needle. Continue knitting with a 2x2 elastic band. Having knitted to a height equal to the width of the scarf minus 2 cm, transfer the loops from the pin to a free knitting needle, the loops from the knitting needle to a pin. Using the free second end of the thread in the skein, knit the second half of the loops to a height equal to the number of knitted rows on the first half of the scarf, cut the thread.
- Remove all the loops to one free knitting needle in such a way that first the loops from the pin are transferred, and then the loops from the second knitting needle. Continue knitting to the required length of the scarf, which will be equal to the circumference of the child's neck, plus a few cm for the volume of the outerwear, plus a length equal to the length of the already knitted part.
- Close the loops, cut the thread, hide the end. You can decorate the scarf with pompoms or tassels.
Bow-shaped scarf collar for girls
A bow-shaped scarf collar for a girl is a more complicated version of a loop scarf.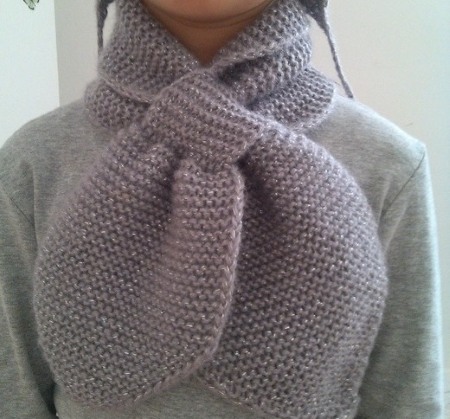
To knit such a scarf for a child you will need:
- description of how to knit a scarf;
- a skein of warm and voluminous yarn, consisting of 40% wool, 40% acrylic and 20% bamboo, thread length 350 m;
- a set of two straight knitting needles No. 3 and a set of two straight knitting needles No. 2;
- large knitting pin.
The length of the scarf will be equal to the child's neck circumference + 5-7 cm for the thickness of the clothes, if the scarf is put on over it. The scarf will be made using the "garter stitch" technique, loops are knitted behind the front wall, yarn overs are knitted behind the back wall.
Step by step instructions:
- Cast on 4 stitches using #3 knitting needles.
- In the 1st row, the 1st loop is removed, a yarn over is made, the next 2 loops are knitted, a yarn over is made and the last loop is knitted purlwise.
- In the 2nd row, the first loop is removed again, the second (yarn over) is knitted, the next 2 are knitted, then the yarn over is knitted as a knit loop and the last one is purl.
- Then, in each odd row, you need to make an increase similar to the first row: make a yarn over after and before the edge loop. Make the increase until the desired width of the ball.
- Each subsequent row is knitted in the same way as the second row, no increase is made.
- Then you need to do garter stitch without changes to a height of 7 - 10 cm.
- Next, move on to forming the loop itself. It is recommended to knit it on needles No. 2, so that it turns out more elastic. To make the loop, you will need to take needle No. 2 and a pin and remove the loops from needle No. 3 one by one (the first loop is removed to the needle), thus dividing them into two equal parts.
- Knit the first part of the loops from the knitting needle in garter stitch to a height of 5 cm. Then transfer the loops from the pin to the second knitting needle No. 2, and transfer the knitted loops from the first knitting needle No. 2 to the pin. Knit the loops removed from the pin to a height of 5 cm, using the second end of the thread in the skein for work. When the desired height is reached, cut the thread. Alternately removing the loops from knitting needle No. 2 and from the pin, transfer them all to knitting needle No. 3. Knit in garter stitch on knitting needles No. 3 to the desired length of the scarf.
- Start knitting the second loop similarly to the recommendations described above, that is, dividing the fabric into two equal parts, alternately removing the loops onto knitting needle No. 2 and a pin. Also knit the second loop to a height of 5 cm. Then connect the fabric together.
- Work garter stitch to a height of 7–10 cm (the number of rows is equal to the number knitted in step 6).
- Next comes the decrease of loops. In each front row, each 2nd and 3rd loop is knitted into one from the beginning and from the end of the row. The back row is knitted without decreasing with front loops.
- Finish knitting as soon as there are 4 loops on the needle. Cut the thread, hide the loose ends.
Universal scarf-shawl
Before you start making such a scarf-kerchief for a baby, it is recommended to decide on its size and color. The size of the scarf will depend entirely on the wishes of the craftswoman. To create it, you will need 2 skeins of yarn of different colors, which include 40% wool, 20% bamboo and 40% acrylic, the length of the thread is 350 m per 100 g), knitting needles No. 3.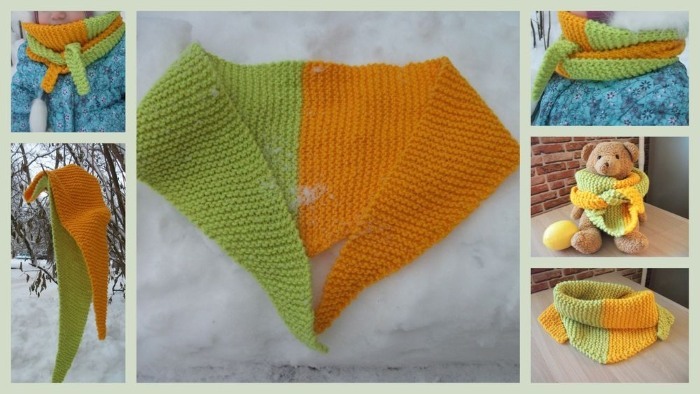
The easiest way to knit a scarf for a child is to use garter stitch (all loops are knitted).
Step by step instructions:
- Before starting work, it is recommended to make a small-sized test sample, wash and dry it, so as not to re-knit the finished product later.
- It is recommended to cast on 3 loops on the knitting needles, knit in turning rows with front loops, except for the edge loops: the first one is always removed, the last one is done with the purl side.
- The increase in loops will be carried out in every 4th row by 1 loop before the last edge loop: the first 3 rows are knitted without changes, in the fourth row 2 front loops are knitted in the third loop - one for the back wall, the other for the front. Then the next 3 rows are knitted without an increase, in the eighth row 2 front loops are again knitted in the penultimate loop - for the back and front wall of the loop of the previous row.
- The increase is carried out until the desired width of the scarf is reached. After the last decrease, it is necessary to knit 3 rows as well, in the second one, switch to a thread of a different color. Then follows the decrease.
- In a row, the first loop is removed, then the remaining loops are knitted except for the penultimate 2 loops. They are knitted in one front loop behind the front wall, then an edge purl loop.
- Repeat the decrease in every fourth row until there are 3 loops on the needle. Finish knitting, cut the thread, hide the end of the thread.
The scarf is ready. It can be additionally decorated with multi-colored pompoms or tassels.
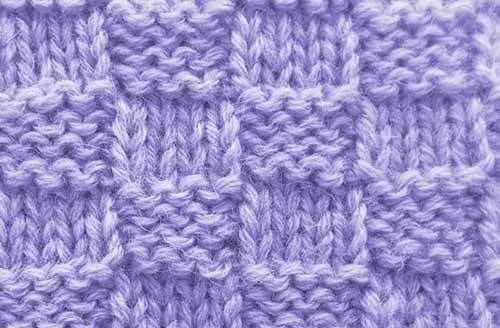
Scarf with checkerboard pattern
A scarf with a checkerboard pattern is very easy to knit, and it is double-sided, meaning that both the front and back sides look the same.
To create such a scarf you need:
- a skein of bright yarn 100 g/ 350 m, wool 40%;
- knitting needles No. 3;
- a crochet hook, not too thin and strong cardboard measuring 10x12 cm, will be needed to create tassels on the scarf.
Step by step instructions:
- Cast on 30 stitches + 4 edge stitches. Knit in turning rows.
- Edge: the first one is removed, the second one is always front behind the front wall, the second to last one is removed, while the thread passes in front of the work, the last one is back behind the front wall.
- Main drawing:
- 1st row – alternate 6 knit stitches behind the front wall, 6 purl stitches behind the back wall until the end of the row.
- 2nd, 4th, 6th row: 6 loops are made purlwise behind the front wall, 6 – knitwise behind the back wall to the end of the row.
- In the 3rd and 5th rows: alternate 6 front loops behind the back wall, 6 back loops behind the front wall until the end of the row.
- 7th row: it is necessary to change the arrangement of the squares, that is, over the front loops, purl loops are knitted behind the back wall, over the back loops, purl loops are knitted behind the front wall.
- Next, knit five more rows over the front ones, with the front ones behind the back wall, and over the back ones, with the back ones behind the front wall.
- Row 13 – change squares again. Knit to the required length of the scarf. Close the loops
- If desired, the scarf can be decorated with tassels:
- Wrap the thread from which the scarf was knitted around the narrow side of the cardboard 33 times. Cut the threads on the cardboard in half so that the result is 33 threads 20 cm long.
- Take the hook and pass it through the first cast-on stitch. Fold the thread in half and pull out a small loop with the hook. Pull the remaining end of the thread through the resulting loop. The tassel is ready. Repeat for the remaining 32 stitches. Use the hook to pull the end of the thread that remained during knitting when casting on stitches through the edge loop and secure. This will make tassel 34.
- Make tassels for the other edge of the scarf in the same way.
Scarf with voluminous braids
For beginner craftswomen who want to knit a scarf for their child, a scarf with voluminous braids is an option for how you can very quickly knit an interesting, warm and simple version of a children's scarf.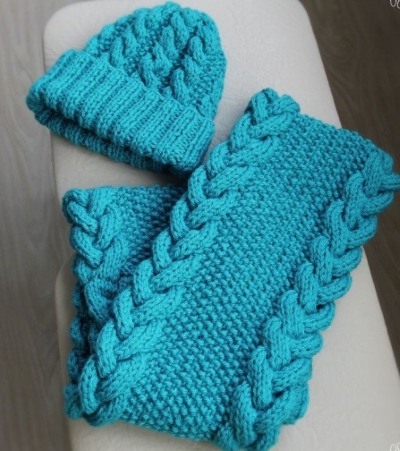
To knit such a scarf you will need a skein of bright yarn, which includes wool, preferably soft and non-prickly (the length of the thread in the skein is 350 m), straight knitting needles No. 3 and a knitting pin, which will be needed to form the braids.
Step by step instructions:
- The scarf with braids is knitted in turning rows. You will need to cast on 39 loops.
- First row: the first loop is removed, it is not knitted, then 12 front loops are made behind the back wall, then comes the pearl pattern, that is, over the course of 13 loops, 1 purl, 1 front loop alternate, the row ends with twelve front loops and 1 purl - edge loop.
- Second row and all subsequent even rows: remove the first loop, knit 12 purl loops, then a pearl pattern of 13 loops - alternating purl and front loops (start alternating in the same way as in the first row, with a purl loop), then 13 purl, including the last edge. The row is complete.
- In the third row, the formation of the braid begins: the first loop is removed, 4 front loops are knitted, the next 4 loops are transferred to a pin before knitting, 4 more front loops are knitted, then the loops from the pin are returned to the knitting needle and also knitted. Then comes the pearl pattern on 13 loops and another braid is formed: just like at the beginning of the row, 4 front loops are knitted, the next 4 are transferred to a pin in front of knitting, the remaining 5 loops, including the edge, are knitted, the loops from the pin are returned to the knitting needle and knitted - 3 front loops, and 1 last loop is front.
- The fourth and sixth rows are knitted similarly to the second; the fifth – similarly to the first.
- In the seventh row, 5 loops are transferred to the pin behind the work, the next 4 are knitted, then the loops from the pin are also knitted, 4 more knit loops are knitted, then follows a pearl pattern of 13 loops. Then 4 loops are removed to the pin, the next 4 are knitted, the next 4 loops are knitted from the pin, and the last 4 loops are knitted and 1 edge loop is purl. The row is complete.
- The eighth row is done similarly to the second. Then the rapport consisting of the first eight rows is repeated to the desired height.
- When the length of the work reaches the desired height, it is necessary to close the loops, cut the thread, hide its end. The scarf can be decorated with tassels.
Scarf with gathering
In the process of knitting such a scarf you will need 1 skein of bright, warm, voluminous and non-prickly yarn (the length of the thread in the skein is 350 m, composition: 40% wool, 40% acrylic and 20% bamboo), 2 sets of knitting needles: No. 2 and No. 5.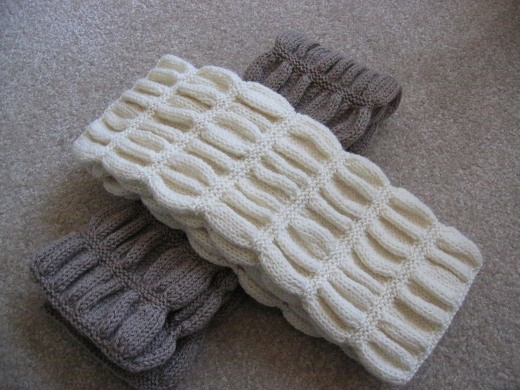
Step by step instructions:
- Cast on 22 stitches on knitting needles No. 2, including 2 edge stitches.
- From the 1st to the 4th row inclusive, knit with garter stitch (front and back rows are knitted exclusively with front loops behind the front wall).
- In the 5th row, switch to knitting needles No. 5. The first loop is knitted as a front loop. In the remaining loops, except for the last edge loop, 2 front loops are knitted: the first one is knitted as a front loop, the second one is knitted as a back loop, thus, the number of loops increases almost 2 times, there are 42 loops. The last loop is also knitted as a front loop.
- Rows 6 through 12 are knitted with the front surface on knitting needles No. 5, that is, the back rows are made with back loops, and the front rows are made with front loops.
- In the 13th row, you need to switch to knitting needles No. 2 and decrease the number of loops to the original: the first loop is a front loop, then every 2 loops are knitted into one front loop behind the back wall, the last one is a front loop.
- From the 14th to the 18th row inclusive, work in garter stitch.
- Repeat the rapport from the 5th to the 18th row until the desired length of the scarf. Then finish knitting - close the loops.
Warm snood collar
Seamless warm snood-collar with rice pattern is the simplest example of how you can quickly and beautifully knit a warm and cozy scarf for your child for the winter. To create it, you will need a skein of yarn 240 m long in 100 g (50% wool and 50% acrylic), circular needles No. 3, a knitting marker.
To determine the required size, you need to measure the circumference of the child's head: along the bottom of the chin, going around the face along the line of the crown.
Before starting work, knit a sample measuring 10x10 cm, wash, dry, count and cast on the required number of loops on the knitting needles, which will be a multiple of 2 and 1 additional loop to close the knitting in a circle. Close the knitting in a ring. Hang a marker between the beginning and the end of the row.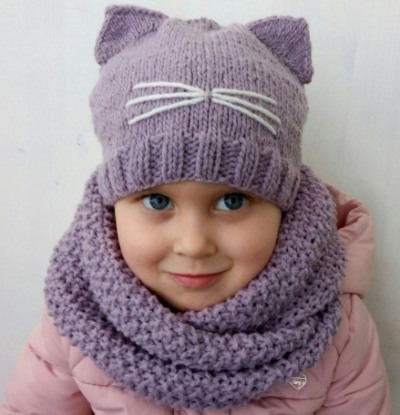
Step by step instructions:
- 1st row: alternate until the end of the row 1 front loop, 1 back loop. The row begins with a front loop, ends with a back loop.
- The 2nd row is knitted similarly to the first.
- 3rd row: alternate 1 purl and 1 knit. The row begins with a purl and ends with a knit.
- The 4th row is done similarly to the third.
Repeat from row 1 to row 4 to the desired snood height. Close the loops, hide the thread.
Scarf-hood
To knit a scarf-hood for a child aged 7-9 years, you will need 3 skeins of warm bulky yarn 100 m/100 g, containing 25% wool, circular knitting needles No. 5, a sewing needle, a marker for the beginning of a row, and a hook No. 5.5.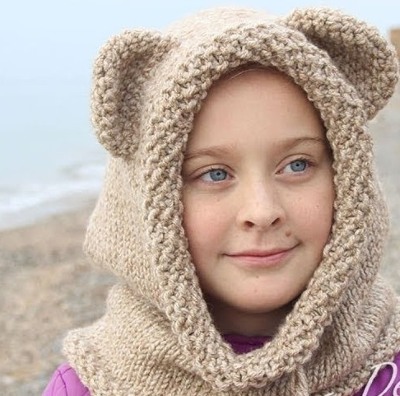
Step by step instructions:
- Cast on 80 stitches and one extra stitch to connect the knitting into a circle.
- Knitting begins with a pearl pattern: alternate one front and one back loop to the end of the row. The loops are knitted through the front wall. At the end of the row, so as not to get lost during subsequent knitting, hang a special marker.
- In the second row, the alternation of loops changes: a purl loop is knitted over the front loop of the previous row, and a front loop is knitted over the back loop.
- From the 3rd to the 6th row inclusive, the 1st and 2nd rows are repeated.
- From the 7th to the 22nd row, knit with the front surface (all loops are front only).
- Row 23: knit the first 37 loops through the front wall, then close 6 loops - for this, knit 38 and 39 loops, then remove loop 38 from the knitting needle through the knitted 39; knit the 40th loop, remove 39 from the knitting needle, and so on up to and including loop 43. Knit the next 37 loops to the end of the row.
- From the 24th row, the transition to knitting with turning rows is performed. It is necessary to knit a row up to the closed loops, the last loop before the closed one is knitted purlwise behind the front wall, the knitting is turned.
- Row 25: the first loop is removed without being knitted, then all loops to the end of the row (to the next closed loop) are knitted purlwise behind the front wall.
- In the 26th row, decrease two loops: knit the first and last 2nd and 3rd loops together.
- Then continue knitting with the front surface (that is, the front rows are knitted with front loops, the back rows are knitted with back loops, the first edge loops are always removed, the last ones are knitted with back loops) until the desired height of the hood.
- Once the required height of the product is reached, sew the two halves of the hood with a knitted seam.
- Proceed to knitting the lapel. To do this, cast on face loops, starting with the first closed loop in row 23, along the entire circumference of the resulting hood, their number should be odd to close the product into a circle. Knit all the cast on loops with a pearl pattern, repeating the actions from the 1st to the 2nd row of the beginning of knitting, to a height of 12 rows. Then sew on the resulting lapel, that is, sew the 1st and 12th row of the lapel together with a knitted seam.
- Start knitting the ears. To do this, crochet 6 single crochet stitches into the amigurumi ring. In the second row, make an increase of 1 single crochet stitch in each stitch of the previous row, i.e., you will end up with 12 stitches. In the 3rd row, make an increase in every second stitch, which will end up with 18 single crochet stitches. In the 4th row, make an increase in every third stitch, which will end up with 24 stitches. The 5th, 6th, and 7th rows are done without increases. The first ear is ready, cut the thread, leaving a long end for sewing it to the hood later. Knit the second ears in the same way. Fold each ear in half and sew it to the hood.
Double-sided scarf with pompoms
A double-sided scarf is a scarf that looks equally good on both the front and back sides. To knit a universal double-sided scarf for a child, you will need 3 skeins of yarn weighing 50 g (130 m), 25% wool, #2 knitting needles, 1 additional knitting needle for forming a braid, and #3 crochet hook. Abbreviations: knit stitch – front loop, purl stitch – back loop.

Step by step instructions:
- Cast on 40 stitches + 2 edge stitches. The front stitches are knitted behind the back wall, the back stitches are knitted behind the front wall. The scarf is knitted in turning rows. The first stitch is always removed without knitting, the last stitch is purl-knitted.
- Main drawing:
- in the 1st row, knit the first edge stitch (braid element: (2 knit stitches, 2 purl stitches) × 2 times; elastic band — 1×1 – 8 times) – perform twice. Complete the row 2 (2 knit stitches, 2 purl stitches) × 2 times and the last edge stitch.
- 2nd – 4th rows are done similarly to the 1st.
- in the 5th row, start forming the braid: edge loop (using an additional knitting needle, slip loops 5 through 8 inclusive to the front of the knitting and knit them first 2 knit stitches, 2 out of stitches; then repeat another 2 knit stitches, 2 out of stitches, make an elastic band of 8 loops 1 knit stitch, 1 out of stitch) – repeat 2 times. Finish the row by forming another 1st braid: slip the penultimate 4 loops on the knitting needle to the front of the knitting, knit them first: 2 knit stitches, 2 out of stitches, knit the remaining loops 2 knit stitches, 2 out of stitches and edge loop.
- Knit rows 6–8 in the same way as row 1.
- Repeat for the required length of the scarf from rows 1 to 8. Close the loops.
- Use a crochet hook to tie the edges of the scarf. Insert the hook into the middle of the resulting braid in the first row, knit 9 single crochet stitches into one loop, then 4 single crochet stitches into each 2nd front loop of the elastic. Repeat until the end of the row. Finish tying.
- Make pom-poms using the blank.
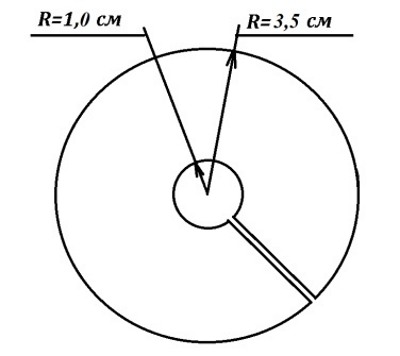
For a pompom with a diameter of 5 cm, cut 2 round blanks from cardboard: outer diameter 3 cm, inner 1 cm. Make a slit between them. Put them together, placing a thread between the blanks. Wind the thread through the slit onto these blanks so that the inner diameter decreases approximately 2 times.
Cut the wound thread along the outer diameter, pulling the thread between the blanks together. Remove the blanks. Trim the uneven edges of the pompoms. Make 2 more pompoms. Tie the resulting pompoms to the scarf in places where 9 single crochets are knitted. Decorate the other edge of the scarf in the same way.
Original cat scarf
To create such an original scarf for a child, you will need 2 skeins of yarn of different bright colors 500 g / 100 m, knitting needles No. 2, hook No. 3, a sewing needle with a large eye. Abbreviations: sc. - single crochet.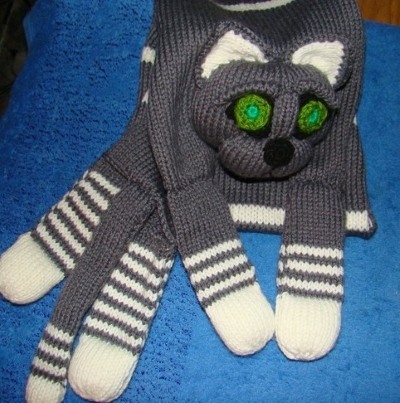
Step by step instructions:
- The scarf is knitted with the front surface, that is, the front side is made with front loops, the back side is made with back loops, turning rows.
- Cast on 40 stitches, including 2 edge stitches, the first of which is removed, the last one is always done purlwise. Knit to the required length of the scarf, periodically changing threads of different colors, thus making the future scarf striped. Close the stitches.
- For the paws, cast on 28 loops and knit to a height of 48 rows. To bevel the paw, decrease the loops. To do this, knit in the 49th front row in one loop the 1st and 2nd, 13th and 14th, 15th and 16th, knit the last two loops also in one, but purl loop. The 50th purl row is knitted without changes. In the 51st row, decrease again: knit in one loop the 1st and 2nd, 11th and 12th, 13th and 14th, and the last two in purl. The 52nd row - without changes. In the 54th - close the loops. Sew the paw along the long side. Knit all 4 paws according to this pattern.
- For the tail, cast on 14 loops and knit them to a height of 58 rows. Decrease the loops, forming a slope of the tail. In the 59th row, knit the 1st and 2nd, 6th and 7th, and the last two loops into 1 loop. Perform the 60th row without changes. In the 61st row, knit the 1st and 2nd, 5th and 6th, and the last two loops into one. In the 62nd row, do not decrease. In the 63rd row, close the remaining 8 loops.
- For the cat's head, cast on 24 stitches. Knit the first 2 rows in stockinette stitch. In the next 3rd, 5th, 7th, 9th, 11th and 13th rows, increase stitches in every 2nd stitch at the beginning and at the end of the row: knit two stitches from one stitch of the previous row. Then, without changes, knit from the 14th to the 34th row inclusive. From the 35th row and further in the 37th, 39th, 41st, 43rd and 45th rows, decrease stitches: knit every second and third stitch from the beginning and from the end of the row into one stitch. Knit the second piece from threads of a different color similarly to the first.
- For the muzzle, cast on 20 loops. For the bevel, in the 3rd, 5th and 7th rows, add one loop in every 2nd loop from each end of the row. In the 15th, 17th and 19th rows, decrease by knitting every second and third loop from each end of the product in 1 loop. In the 23rd, 25th and 27th rows, increase loops in every second loop from both edges of the fabric, in the 35th, 37th and 39th rows, decrease these loops. In the 41st row, close the knitting. Fold the piece in half and sew along the edge.
- The ear consists of two triangles of different colors, but the same size. For one part of the ear, cast on 16 loops. Knit them, performing in each odd row, starting from the third decrease in loops, knitting together each first and second loop from the beginning and from the end of the row. Until there is 1 loop left on the needle. Finish knitting. Knit two parts of one color and 2 of another. Place two parts of different colors together and crochet their edges with single crochets. The ears are ready.
- You can buy ready-made eyes, or you can knit them according to the following pattern. Each eye consists of 3 parts.
- The first part is made of white threads: cast on 12 stitches, starting from the 3rd row, knit together every 1st and 2nd stitch. In the 11th row, close the stitches.
- The second part is made of blue or green threads. Crochet. Cast on 6 sc in an amigurumi ring. 1st row: knit 2 sc in each loop. 2nd row: increase in every second sc. The result will be 18 sc. Finish knitting.
- Part three: cast on 6 sc in the amigurumi ring. In the first row, increase in each loop by knitting 2 sc. Finish knitting.
- Sew all the parts together. Repeat the steps for the second eye.
- For the nose, also knit 6 sc into the amigurumi ring. Increase in each sc. In the third row, decrease: sc, decrease to the end of the row. Pull the remaining 6 sc together.
- Sew all the parts together. Lightly stuff the head with padding polyester.
When making such an unusual knitted scarf for a child as a cat scarf, the cat's head can be "combed" with a slicker brush so that its head becomes fluffy.
Video: scarf with knitting needles with description, patterns for a child
Find out how to knit a children's scarf in the video:
Children's scarf knitted with knitting needles, pattern "Swedish elastic" in the video:
I knit all scarves only with a rib! The essence of the rib is in the combination of two types of loops (front and back) according to a certain pattern. Externally, they form vertical stripes of convex (front loops) and concave (back) lines. The structure of the loops allows you to significantly stretch the product and make it dimensionless.
Of course, I use several subtypes of elastic, which differ from each other in appearance, but have the same characteristics. The only thing you should think carefully about when knitting a scarf with a rib is the choice of material, since not every yarn stretches well.
Thank you for the descriptions and patterns of scarves for knitting. I knitted a scarf and warmed my child for the winter. Now I am looking for patterns for whole sets of winter knitted items: scarf + hat + gloves.
Recently I knitted a scarf with braids for my grandson. At first the braid caused considerable difficulties, but I wanted to use this option. The main action for creating such a pattern is moving the loops with additional knitting needles (they should be slightly thinner than the main knitting needles). But I don’t have them, so I made do with a simple safety pin.
In the first row, knit 2 purl stitches, then 8 front stitches, and repeat 2 purl stitches again. The second and fourth rows are knitted in exactly the same way - where the purl stitches are located in the first row, purl stitches are knitted in the row below. In the fifth row, you need to start re-slipping the stitches after two purl stitches - 4 stitches are removed and remain in front of the fabric. It is necessary to ensure that there is no large broach. After that, these same stitches are removed to the left knitting needle and knitted as front stitches. The stitches cross, creating a feeling of a leftward tilt.
Up to the twelfth row, knitting is done according to the required pattern and design, and after that, the actions are repeated, starting from the fifth row.
It turned out very beautiful!